CINXE.COM
Juan Cruz Martinez
<!DOCTYPE html><html lang="en"><head><link rel="shortcut icon mask-icon" type="image/svg+xml" href="https://cdn.auth0.com/website/website/favicons/auth0-favicon.svg"/><link rel="shortcut icon" type="image/svg+xml" href="https://cdn.auth0.com/website/website/favicons/auth0-favicon.svg"/><link rel="shortcut icon" type="image/png" href="https://cdn.auth0.com/website/website/favicons/auth0-favicon-48.png"/><link rel="icon" sizes="16x16" type="image/png" href="https://cdn.auth0.com/website/website/favicons/auth0-favicon-16.png"/><link rel="icon" sizes="32x32" type="image/png" href="https://cdn.auth0.com/website/website/favicons/auth0-favicon-32.png"/><link rel="icon" sizes="48x48" type="image/png" href="https://cdn.auth0.com/website/website/favicons/auth0-favicon-48.png"/><link rel="icon" sizes="96x96" type="image/png" href="https://cdn.auth0.com/website/website/favicons/auth0-favicon-96.png"/><link rel="icon" sizes="144x144" type="image/png" href="https://cdn.auth0.com/website/website/favicons/auth0-favicon-144.png"/><link rel="apple-touch-icon" sizes="180x180" href="https://cdn.auth0.com/website/website/favicons/auth0-favicon-180.png"/><link rel="stylesheet" href="https://cdn.auth0.com/styleguide/core/3.0.0/core.min.css"/><script class="optanon-category-4" type="text/plain">window.twttr=function(t,e,r){var n,i=t.getElementsByTagName(e)[0],w=window.twttr||{};return t.getElementById(r)?w:((n=t.createElement(e)).id=r,n.src="https://platform.twitter.com/widgets.js",i.parentNode.insertBefore(n,i),w._e=[],w.ready=function(t){w._e.push(t)},w)}(document,"script","twitter-wjs");</script><script class="optanon-category-4" type="text/plain">(function (h, o, t, j, a, r) {h.hj = h.hj || function () { (h.hj.q = h.hj.q || []).push(arguments) }; h._hjSettings = { hjid: 301495, hjsv: 5 }; a = o.getElementsByTagName('head')[0]; r = o.createElement('script'); r.async = 1; r.src = t + h._hjSettings.hjid + j + h._hjSettings.hjsv; a.appendChild(r);}(window, document, '//static.hotjar.com/c/hotjar-', '.js?sv='))</script><script class="optanon-category-4" type="text/plain"> window._6si = window._6si || []; window._6si.push(['enableEventTracking', true]); window._6si.push(['setToken', '17aa5119e1d44eeab301f44113230d69']); window._6si.push(['setEndpoint', 'b.6sc.co']); (function() { var gd = document.createElement('script'); gd.type = 'text/javascript'; gd.async = true; gd.src = '//j.6sc.co/6si.min.js'; var s = document.getElementsByTagName('script')[0]; s.parentNode.insertBefore(gd, s); })();</script><link rel="canonical" href="https://auth0.com/blog/authors/juan-cruz-martinez/"/><title>Juan Cruz Martinez</title><meta name="viewport" content="width=device-width, initial-scale=1.0, maximum-scale=5.0"/><meta charSet="utf-8"/><meta name="description" content="I stream, blog, and make youtube videos about tech stuff. I love coding, I love AI, and I love building stuff!"/><meta property="fb:app_id" content="534074790006350"/><meta property="og:type" content="website"/><meta property="og:title" content="Juan Cruz Martinez"/><meta property="og:site_name" content="Auth0 - Blog"/><meta property="og:description" content="I stream, blog, and make youtube videos about tech stuff. I love coding, I love AI, and I love building stuff!"/><meta property="og:image" content="https://cdn.auth0.com/blog/illustrations/auth0.png"/><meta property="og:url" content="https://auth0.com/blog/authors/juan-cruz-martinez/"/><meta name="twitter:site" content="@auth0"/><meta name="twitter:creator" content="@auth0"/><meta name="twitter:title" content="Juan Cruz Martinez"/><meta name="twitter:description" content="I stream, blog, and make youtube videos about tech stuff. I love coding, I love AI, and I love building stuff!"/><meta name="twitter:url" content="https://auth0.com/blog/authors/juan-cruz-martinez/"/><meta name="twitter:card" content="summary"/><meta name="twitter:image" content="https://cdn.auth0.com/blog/illustrations/auth0.png"/><meta name="twitter:image:height" content="512"/><meta name="twitter:image:width" content="1024"/><meta name="HandheldFriendly" content="True"/><meta name="MobileOptimized" content="320"/><link rel="manifest" href="https://auth0.com/blog/manifest.json"/><link type="application/atom+xml" rel="alternate" href="https://auth0.com/blog/rss.xml" title="Auth0 Blog"/><link type="application/opensearchdescription+xml" rel="search" href="https://auth0.com/blog/osd.xml"/><link rel="preload" href="https://gdpr-service.herokuapp.com/get-country-region" as="fetch" crossorigin="anonymous"/><meta name="next-head-count" content="31"/><noscript data-n-css=""></noscript><script defer="" nomodule="" src="/blog/_next/static/chunks/polyfills-5cd94c89d3acac5f.js"></script><script src="/blog/_next/static/chunks/webpack-1b139f7f105f29d0.js" defer=""></script><script src="/blog/_next/static/chunks/framework-7937d74165d2993d.js" defer=""></script><script src="/blog/_next/static/chunks/main-c16094a955a57664.js" defer=""></script><script src="/blog/_next/static/chunks/pages/_app-cfd46eba8f40512a.js" defer=""></script><script src="/blog/_next/static/chunks/9236dd9e-aed47daa82226578.js" defer=""></script><script src="/blog/_next/static/chunks/d81dd7c5-881fac382d625749.js" defer=""></script><script src="/blog/_next/static/chunks/1332-207222a61b837ea7.js" defer=""></script><script src="/blog/_next/static/chunks/1160-44dd30190751e9f9.js" defer=""></script><script src="/blog/_next/static/chunks/9418-4267d210fc322e4b.js" defer=""></script><script src="/blog/_next/static/chunks/6554-9e23ed423103e3ee.js" defer=""></script><script src="/blog/_next/static/chunks/1648-cc0938c5cbe906d2.js" defer=""></script><script src="/blog/_next/static/chunks/pages/blog/authors/%5Bauthor%5D-66ea312f9bba5096.js" defer=""></script><script src="/blog/_next/static/L-8E-oNj-NJipGRZqMH3N/_buildManifest.js" defer=""></script><script src="/blog/_next/static/L-8E-oNj-NJipGRZqMH3N/_ssgManifest.js" defer=""></script><script src="/blog/_next/static/L-8E-oNj-NJipGRZqMH3N/_middlewareManifest.js" defer=""></script><style data-styled="" data-styled-version="5.2.1">html{line-height:1.15;-webkit-text-size-adjust:100%;}/*!sc*/ body{margin:0;}/*!sc*/ main{display:block;}/*!sc*/ h1{font-size:2em;margin:0.67em 0;}/*!sc*/ hr{box-sizing:content-box;height:0;overflow:visible;}/*!sc*/ pre{font-family:monospace,monospace;font-size:1em;}/*!sc*/ a{background-color:transparent;}/*!sc*/ abbr[title]{border-bottom:none;-webkit-text-decoration:underline;text-decoration:underline;-webkit-text-decoration:underline dotted;text-decoration:underline dotted;}/*!sc*/ b,strong{font-weight:bolder;}/*!sc*/ code,kbd,samp{font-family:monospace,monospace;font-size:1em;}/*!sc*/ small{font-size:80%;}/*!sc*/ sub,sup{font-size:75%;line-height:0;position:relative;vertical-align:baseline;}/*!sc*/ sub{bottom:-0.25em;}/*!sc*/ sup{top:-0.5em;}/*!sc*/ img{border-style:none;}/*!sc*/ button,input,optgroup,select,textarea{font-family:inherit;font-size:100%;line-height:1.15;margin:0;}/*!sc*/ button,input{overflow:visible;}/*!sc*/ button,select{text-transform:none;}/*!sc*/ button,[type="button"],[type="reset"],[type="submit"]{-webkit-appearance:button;}/*!sc*/ button::-moz-focus-inner,[type="button"]::-moz-focus-inner,[type="reset"]::-moz-focus-inner,[type="submit"]::-moz-focus-inner{border-style:none;padding:0;}/*!sc*/ button:-moz-focusring,[type="button"]:-moz-focusring,[type="reset"]:-moz-focusring,[type="submit"]:-moz-focusring{outline:1px dotted ButtonText;}/*!sc*/ fieldset{padding:0.35em 0.75em 0.625em;}/*!sc*/ legend{box-sizing:border-box;color:inherit;display:table;max-width:100%;padding:0;white-space:normal;}/*!sc*/ progress{vertical-align:baseline;}/*!sc*/ textarea{overflow:auto;}/*!sc*/ [type="checkbox"],[type="radio"]{box-sizing:border-box;padding:0;}/*!sc*/ [type="number"]::-webkit-inner-spin-button,[type="number"]::-webkit-outer-spin-button{height:auto;}/*!sc*/ [type="search"]{-webkit-appearance:textfield;outline-offset:-2px;}/*!sc*/ [type="search"]::-webkit-search-decoration{-webkit-appearance:none;}/*!sc*/ ::-webkit-file-upload-button{-webkit-appearance:button;font:inherit;}/*!sc*/ details{display:block;}/*!sc*/ summary{display:list-item;}/*!sc*/ template{display:none;}/*!sc*/ [hidden]{display:none;}/*!sc*/ data-styled.g52[id="sc-global-ecVvVt1"]{content:"sc-global-ecVvVt1,"}/*!sc*/ @font-face{font-family:'Aeonik';font-style:normal;font-weight:400;font-display:swap;src:local('Aeonik-Regular'),url('https://cdn.auth0.com/website/cic-homepage/fonts/Aeonik-Regular.woff2') format('woff2');}/*!sc*/ @font-face{font-family:'Aeonik';font-style:normal;font-weight:500;font-display:swap;src:local('Aeonik-Medium'),url('https://cdn.auth0.com/website/cic-homepage/fonts/Aeonik-Medium.woff2') format('woff2');}/*!sc*/ @font-face{font-family:'Aeonik Mono';font-style:normal;font-weight:400;font-display:swap;src:local('AeonikMono-Regular'),url('https://cdn.auth0.com/website/okta-fonts/AeonikMono-Regular.woff2') format('woff2');}/*!sc*/ @font-face{font-family:'Aeonik Mono';font-style:normal;font-weight:500;font-display:swap;src:local('AeonikMono-Medium'),url('https://cdn.auth0.com/website/okta-fonts/AeonikMono-Medium.ttf') format('woff2');}/*!sc*/ @font-face{font-family:'Inter';font-style:normal;font-weight:400;font-display:swap;src:local('Inter-Regular'),url('https://cdn.auth0.com/website/fonts/Inter-Regular.woff2') format('woff2');}/*!sc*/ @font-face{font-family:'Inter';font-style:normal;font-weight:500;font-display:swap;src:local('Inter-Medium'),url('https://cdn.auth0.com/website/fonts/Inter-Medium.woff2') format('woff2');}/*!sc*/ @font-face{font-family:'Inter';font-style:normal;font-weight:700;font-display:swap;src:local('Inter-Bold'),url('https://cdn.auth0.com/website/fonts/Inter-Bold.woff2') format('woff2');}/*!sc*/ :root{--content-width:120rem;--font-main:'fakt-web',sans-serif;}/*!sc*/ .lightbox{width:100%;height:100%;position:fixed;top:0;left:0;background:rgba(0,0,0,0.85);z-index:9999999;line-height:0;cursor:pointer;}/*!sc*/ .lightbox-image{max-width:100%;cursor:pointer;margin:0 auto;display:block;}/*!sc*/ .lightbox img{position:relative;top:50%;left:50%;-ms-transform:translateX(-50%) translateY(-50%);-webkit-transform:translate(-50%,-50%);-webkit-transform:translate(-50%,-50%);-ms-transform:translate(-50%,-50%);transform:translate(-50%,-50%);max-width:100%;max-height:100%;}/*!sc*/ @media screen and (min-width:1200px){.lightbox img{max-width:1200px;}}/*!sc*/ @media screen and (min-height:1200px){.lightbox img{max-height:1200px;}}/*!sc*/ .lightbox span{display:block;position:fixed;bottom:13px;height:1.5em;line-height:1.4em;width:100%;text-align:center;color:white;text-shadow:-1px -1px 0 #000,1px -1px 0 #000,-1px 1px 0 #000,1px 1px 0 #000;font-family:'fakt-web','Helvetica Neue',Hevetica,sans-serif;font-size:18px;}/*!sc*/ .lightbox .videoWrapperContainer{position:relative;top:50%;left:50%;-ms-transform:translateX(-50%) translateY(-50%);-webkit-transform:translate(-50%,-50%);-webkit-transform:translate(-50%,-50%);-ms-transform:translate(-50%,-50%);transform:translate(-50%,-50%);max-width:900px;max-height:100%;}/*!sc*/ .lightbox .videoWrapperContainer .videoWrapper{height:0;line-height:0;margin:0;padding:0;position:relative;padding-bottom:56.333%;background:black;}/*!sc*/ .lightbox .videoWrapper iframe{position:absolute;top:0;left:0;width:100%;height:100%;border:0;display:block;}/*!sc*/ .lightbox #prev,.lightbox #next{height:50px;line-height:36px;display:none;margin-top:-25px;position:fixed;top:50%;padding:0 15px;cursor:pointer;-webkit-text-decoration:none;text-decoration:none;z-index:99;color:white;font-size:60px;font-family:'fakt-web','Helvetica Neue',Hevetica,sans-serif;}/*!sc*/ .lightbox.gallery #prev,.lightbox.gallery #next{display:block;}/*!sc*/ .lightbox #prev{left:0;}/*!sc*/ .lightbox #next{right:0;}/*!sc*/ .lightbox #close{height:50px;width:50px;position:fixed;cursor:pointer;-webkit-text-decoration:none;text-decoration:none;z-index:99;right:0;top:0;}/*!sc*/ .lightbox #close:after,.lightbox #close:before{position:absolute;margin-top:22px;margin-left:14px;content:'';height:3px;background:white;width:23px;-webkit-transform-origin:50% 50%;-ms-transform-origin:50% 50%;transform-origin:50% 50%;-webkit-transform:rotate(-45deg);-ms-transform:rotate(-45deg);transform:rotate(-45deg);}/*!sc*/ .lightbox #close:after{-webkit-transform:rotate(45deg);-ms-transform:rotate(45deg);transform:rotate(45deg);}/*!sc*/ .lightbox,.lightbox *{-webkit-user-select:none;-moz-user-select:none;-ms-user-select:none;user-select:none;}/*!sc*/ body{box-sizing:border-box;font-family:var(--font-main);font-size:2rem;line-height:3.2rem;}/*!sc*/ html{font-size:10px;}/*!sc*/ data-styled.g53[id="sc-global-guUULU1"]{content:"sc-global-guUULU1,"}/*!sc*/ html{font-size:62.5%;}/*!sc*/ body.modal-open{overflow:hidden;}/*!sc*/ data-styled.g54[id="sc-global-gUclnr1"]{content:"sc-global-gUclnr1,"}/*!sc*/ .etdOck{margin:0;-webkit-align-items:center;-webkit-box-align:center;-ms-flex-align:center;align-items:center;background:linear-gradient(0deg,rgba(255,255,255,0.40) 0%,rgba(255,255,255,0.40) 100%),radial-gradient(123.72% 71.29% at 7.15% 100%,#FFF 0%,rgba(255,255,255,0.00) 100%),radial-gradient(234.4% 144.94% at 84.62% 0%,#FFF 0%,rgba(255,255,255,0.00) 100%),linear-gradient(26deg,rgba(255,255,255,0.17) -32.04%,rgba(255,255,255,0.00) 133.43%);border-width:0;border-radius:0.6rem;border-style:solid;color:#000000;display:-webkit-box;display:-webkit-flex;display:-ms-flexbox;display:flex;font-size:1.6rem;line-height:2.4rem;-webkit-box-pack:center;-webkit-justify-content:center;-ms-flex-pack:center;justify-content:center;padding:1.2rem 3.2rem;width:100%;height:-webkit-fit-content;height:-moz-fit-content;height:fit-content;-webkit-text-decoration:none;text-decoration:none;-webkit-transition:all 0.4s ease-in-out;transition:all 0.4s ease-in-out;font-family:Aeonik,sans-serif;font-style:normal;font-weight:500;position:relative;overflow:hidden;box-shadow:0px -16px 24px 0px rgba(255,255,255,0.48) inset,0px 4px 4px 0px rgba(0,0,0,0.25);}/*!sc*/ @media screen and (min-width:900px){.etdOck{width:-webkit-fit-content;width:-moz-fit-content;width:fit-content;}}/*!sc*/ .etdOck:active{color:#191919;background:linear-gradient(0deg,rgba(0,0,0,0.20) 0%,rgba(0,0,0,0.20) 100%),linear-gradient(0deg,rgba(255,255,255,0.70) 0%,rgba(255,255,255,0.70) 100%),radial-gradient(120.32% 83.76% at 50% 100%,#FFF 0%,rgba(255,255,255,0.00) 100%),radial-gradient(47.47% 14.92% at 50% 0%,#FFF 0%,rgba(255,255,255,0.00) 100%),radial-gradient(67.49% 95.06% at 50% 15.5%,#FFF 0%,rgba(255,255,255,0.36) 100%),radial-gradient(33.16% 50% at 50% 0%,#FFF 0%,rgba(255,255,255,0.00) 100%);}/*!sc*/ .etdOck:hover{-webkit-transition:all 0.4s ease-in-out;transition:all 0.4s ease-in-out;color:#191919;background:linear-gradient(0deg,rgba(255,255,255,0.70) 0%,rgba(255,255,255,0.70) 100%),radial-gradient(120.32% 83.76% at 50% 100%,#FFF 0%,rgba(255,255,255,0.00) 100%),radial-gradient(47.47% 14.92% at 50% 0%,#FFF 0%,rgba(255,255,255,0.00) 100%),radial-gradient(67.49% 95.06% at 50% 15.5%,#FFF 0%,rgba(255,255,255,0.36) 100%),radial-gradient(33.16% 50% at 50% 0%,#FFF 0%,rgba(255,255,255,0.00) 100%);cursor:pointer;}/*!sc*/ .etdOck:hover{box-shadow:0px 8px 28px 0px rgba(255,255,255,0.08);}/*!sc*/ .etdOck:active{box-shadow:0px 8px 28px 0px rgba(255,255,255,0.08);}/*!sc*/ .etdOck:disabled{box-shadow:0px -16px 24px 0px rgba(255,255,255,0.48) inset,0px 4px 4px 0px rgba(0,0,0,0.25);}/*!sc*/ .etdOck span{z-index:3;}/*!sc*/ .etdOck:hover{background:linear-gradient(0deg,rgba(255,255,255,0.40) 0%,rgba(255,255,255,0.40) 100%),radial-gradient(123.72% 71.29% at 7.15% 100%,#FFF 0%,rgba(255,255,255,0.00) 100%),radial-gradient(234.4% 144.94% at 84.62% 0%,#FFF 0%,rgba(255,255,255,0.00) 100%),linear-gradient(26deg,rgba(255,255,255,0.17) -32.04%,rgba(255,255,255,0.00) 133.43%);}/*!sc*/ .etdOck::before{content:'';width:100%;height:100%;display:inline-block;background:linear-gradient(0deg,rgba(255,255,255,0.70) 0%,rgba(255,255,255,0.70) 100%),radial-gradient(120.32% 83.76% at 50% 100%,#FFF 0%,rgba(255,255,255,0.00) 100%),radial-gradient(47.47% 14.92% at 50% 0%,#FFF 0%,rgba(255,255,255,0.00) 100%),radial-gradient(67.49% 95.06% at 50% 15.5%,#FFF 0%,rgba(255,255,255,0.36) 100%),radial-gradient(33.16% 50% at 50% 0%,#FFF 0%,rgba(255,255,255,0.00) 100%);opacity:0;position:absolute;-webkit-transition:all 0.4s ease-in-out;transition:all 0.4s ease-in-out;}/*!sc*/ .etdOck:hover::before{opacity:1;}/*!sc*/ .cmgpvv{margin:0;-webkit-align-items:center;-webkit-box-align:center;-ms-flex-align:center;align-items:center;background:linear-gradient(26deg,rgba(255,255,255,0.15) -32.04%,rgba(255,255,255,0.00) 133.43%);border-width:1.5px;border-color:linear-gradient(29.98deg,rgba(255,254,250,0.7) 23.72%,rgba(255,254,250,0) 107.71%);border-radius:0.6rem;border-style:solid;color:#FFFEFA;display:-webkit-box;display:-webkit-flex;display:-ms-flexbox;display:flex;font-size:1.6rem;line-height:2.4rem;-webkit-box-pack:center;-webkit-justify-content:center;-ms-flex-pack:center;justify-content:center;padding:1.2rem 3.2rem;width:100%;height:-webkit-fit-content;height:-moz-fit-content;height:fit-content;-webkit-text-decoration:none;text-decoration:none;-webkit-transition:all 0.4s ease-in-out;transition:all 0.4s ease-in-out;font-family:Aeonik,sans-serif;font-style:normal;font-weight:500;position:relative;overflow:hidden;border:none;}/*!sc*/ @media screen and (min-width:900px){.cmgpvv{width:-webkit-fit-content;width:-moz-fit-content;width:fit-content;}}/*!sc*/ .cmgpvv:active{color:rgba(255,254,250,0.8);border-color:linear-gradient(29.98deg,rgba(255,254,250,0.8) 23.72%,rgba(255,254,250,0) 107.71%);background:linear-gradient(0deg,rgba(0,0,0,0.20) 0%,rgba(0,0,0,0.20) 100%),linear-gradient(26deg,rgba(255,255,255,0.08) -32.04%,rgba(255,255,255,0.00) 133.43%);}/*!sc*/ .cmgpvv:hover{-webkit-transition:all 0.4s ease-in-out;transition:all 0.4s ease-in-out;border-color:linear-gradient(29.98deg,rgba(255,254,250,0.8) 23.72%,rgba(255,254,250,0) 107.71%);color:#FFFEFA;background:radial-gradient(72.18% 56.98% at 50% 100%,rgba(255,255,255,0.20) 0%,rgba(255,255,255,0.00) 100%),radial-gradient(100.79% 100% at 50% 0%,rgba(255,255,255,0.40) 0%,rgba(255,255,255,0.00) 100%),linear-gradient(26deg,rgba(255,255,255,0.08) -32.04%,rgba(255,255,255,0.00) 133.43%);cursor:pointer;}/*!sc*/ .cmgpvv span{z-index:3;}/*!sc*/ .cmgpvv:hover{background:linear-gradient(26deg,rgba(255,255,255,0.15) -32.04%,rgba(255,255,255,0.00) 133.43%);}/*!sc*/ .cmgpvv::before{content:'';width:100%;height:100%;display:inline-block;background:radial-gradient(72.18% 56.98% at 50% 100%,rgba(255,255,255,0.20) 0%,rgba(255,255,255,0.00) 100%),radial-gradient(100.79% 100% at 50% 0%,rgba(255,255,255,0.40) 0%,rgba(255,255,255,0.00) 100%),linear-gradient(26deg,rgba(255,255,255,0.08) -32.04%,rgba(255,255,255,0.00) 133.43%);opacity:0;position:absolute;-webkit-transition:all 0.4s ease-in-out;transition:all 0.4s ease-in-out;}/*!sc*/ .cmgpvv:hover::before{opacity:1;}/*!sc*/ .cmgpvv span{z-index:10;}/*!sc*/ .cmgpvv::after{content:'';width:100%;height:100%;display:inline-block;position:absolute;border-radius:6px;padding:1.5px;z-index:999;background:linear-gradient(29.98deg,rgba(255,254,250,0.7) 23.72%,rgba(255,254,250,0) 107.71%);-webkit-mask:linear-gradient(#fff 0 0) content-box,linear-gradient(#fff 0 0);-webkit-mask-composite:xor;-webkit-mask-composite:exclude;mask-composite:exclude;-webkit-transition:all 0.4s ease-in-out;transition:all 0.4s ease-in-out;}/*!sc*/ .cmgpvv:active::after{background:linear-gradient(0deg,rgba(0,0,0,0.2),rgba(0,0,0,0.2)),linear-gradient(29.98deg,rgba(255,254,250,0.7) 23.72%,rgba(255,254,250,0) 107.71%);}/*!sc*/ .cmgpvv:hover::after{background:linear-gradient(29.98deg,rgba(255,254,250,0.8) 23.72%,rgba(255,254,250,0) 107.71%);}/*!sc*/ .cmgpvv:disabled::after{background:linear-gradient(29.98deg,rgba(255,254,250,0.7) 23.72%,rgba(255,254,250,0) 107.71%);}/*!sc*/ .dmEnyJ{margin:0;-webkit-align-items:center;-webkit-box-align:center;-ms-flex-align:center;align-items:center;background:radial-gradient(223% 105.53% at 6.05% 199.17%,rgba(255,255,255,0.14) 0%,rgba(255,255,255,0.00) 100%),radial-gradient(31.68% 130.91% at 100% 0%,rgba(255,255,255,0.20) 0%,rgba(255,255,255,0.00) 100%),radial-gradient(43.14% 139.47% at 0% 136.21%,rgba(227,235,255,0.30) 0%,rgba(255,255,255,0.00) 100%),linear-gradient(170deg,#4016A0 7.99%,#3F59E4 93.36%);border-width:0;border-color:radial-gradient(223% 105.53% at 6.05% 199.17%,rgba(255,255,255,0.14) 0%,rgba(255,255,255,0.00) 100%),radial-gradient(31.68% 130.91% at 100% 0%,rgba(255,255,255,0.20) 0%,rgba(255,255,255,0.00) 100%),radial-gradient(43.14% 139.47% at 0% 136.21%,rgba(227,235,255,0.30) 0%,rgba(255,255,255,0.00) 100%),linear-gradient(170deg,#4016A0 7.99%,#3F59E4 93.36%);border-radius:0.6rem;border-style:solid;color:#FFFEFA;display:-webkit-box;display:-webkit-flex;display:-ms-flexbox;display:flex;font-size:1.6rem;line-height:2.4rem;-webkit-box-pack:center;-webkit-justify-content:center;-ms-flex-pack:center;justify-content:center;padding:1.2rem 3.2rem;width:100%;height:-webkit-fit-content;height:-moz-fit-content;height:fit-content;-webkit-text-decoration:none;text-decoration:none;-webkit-transition:all 0.4s ease-in-out;transition:all 0.4s ease-in-out;font-family:Aeonik,sans-serif;font-style:normal;font-weight:500;position:relative;overflow:hidden;}/*!sc*/ @media screen and (min-width:900px){.dmEnyJ{width:-webkit-fit-content;width:-moz-fit-content;width:fit-content;}}/*!sc*/ .dmEnyJ:active{color:rgba(255,254,250,0.8);border-color:radial-gradient(1357.61% 111.93% at 58.53% 60.34%,rgba(255,255,255,0.40) 0%,rgba(180,155,252,0.00) 0.01%,rgba(182,202,255,0.40) 100%),radial-gradient(69% 81.35% at -8.65% 100%,rgba(255,255,255,0.20) 0%,rgba(255,255,255,0.00) 100%),radial-gradient(637.58% 79.63% at 96.25% -14.82%,rgba(255,255,255,0.20) 0%,rgba(255,255,255,0.00) 100%),radial-gradient(1373.34% 61.44% at -8.75% 153.45%,rgba(227,235,255,0.30) 0%,rgba(255,255,255,0.00) 100%),linear-gradient(170deg,#3F59E4 7.99%,#3F59E4 93.36%);background:linear-gradient(0deg,rgba(0,0,0,0.20) 0%,rgba(0,0,0,0.20) 100%),radial-gradient(1357.61% 111.93% at 58.53% 60.34%,rgba(255,255,255,0.40) 0%,rgba(180,155,252,0.00) 0.01%,rgba(182,202,255,0.40) 100%),radial-gradient(69% 81.35% at -8.65% 100%,rgba(255,255,255,0.20) 0%,rgba(255,255,255,0.00) 100%),radial-gradient(637.58% 79.63% at 96.25% -14.82%,rgba(255,255,255,0.20) 0%,rgba(255,255,255,0.00) 100%),radial-gradient(1373.34% 61.44% at -8.75% 153.45%,rgba(227,235,255,0.30) 0%,rgba(255,255,255,0.00) 100%),linear-gradient(170deg,#3F59E4 7.99%,#3F59E4 93.36%);-webkit-backdrop-filter:blur(34px);backdrop-filter:blur(34px);}/*!sc*/ .dmEnyJ:hover{-webkit-transition:all 0.4s ease-in-out;transition:all 0.4s ease-in-out;border-color:radial-gradient(1357.61% 111.93% at 58.53% 60.34%,rgba(255,255,255,0.40) 0%,rgba(180,155,252,0.00) 0.01%,rgba(182,202,255,0.40) 100%),radial-gradient(69% 81.35% at -8.65% 100%,rgba(255,255,255,0.20) 0%,rgba(255,255,255,0.00) 100%),radial-gradient(637.58% 79.63% at 96.25% -14.82%,rgba(255,255,255,0.20) 0%,rgba(255,255,255,0.00) 100%),radial-gradient(1373.34% 61.44% at -8.75% 153.45%,rgba(227,235,255,0.30) 0%,rgba(255,255,255,0.00) 100%),linear-gradient(170deg,#3F59E4 7.99%,#3F59E4 93.36%);color:#FFFEFA;background:radial-gradient(1357.61% 111.93% at 58.53% 60.34%,rgba(255,255,255,0.40) 0%,rgba(180,155,252,0.00) 0.01%,rgba(182,202,255,0.40) 100%),radial-gradient(69% 81.35% at -8.65% 100%,rgba(255,255,255,0.20) 0%,rgba(255,255,255,0.00) 100%),radial-gradient(637.58% 79.63% at 96.25% -14.82%,rgba(255,255,255,0.20) 0%,rgba(255,255,255,0.00) 100%),radial-gradient(1373.34% 61.44% at -8.75% 153.45%,rgba(227,235,255,0.30) 0%,rgba(255,255,255,0.00) 100%),linear-gradient(170deg,#3F59E4 7.99%,#3F59E4 93.36%);cursor:pointer;-webkit-backdrop-filter:blur(34px);backdrop-filter:blur(34px);}/*!sc*/ .dmEnyJ:hover{box-shadow:0px 8px 55px 0px rgba(182,202,255,0.24);}/*!sc*/ .dmEnyJ:active{box-shadow:0px 8px 55px 0px rgba(182,202,255,0.24);}/*!sc*/ .dmEnyJ span{z-index:3;}/*!sc*/ .dmEnyJ:hover{background:radial-gradient(223% 105.53% at 6.05% 199.17%,rgba(255,255,255,0.14) 0%,rgba(255,255,255,0.00) 100%),radial-gradient(31.68% 130.91% at 100% 0%,rgba(255,255,255,0.20) 0%,rgba(255,255,255,0.00) 100%),radial-gradient(43.14% 139.47% at 0% 136.21%,rgba(227,235,255,0.30) 0%,rgba(255,255,255,0.00) 100%),linear-gradient(170deg,#4016A0 7.99%,#3F59E4 93.36%);}/*!sc*/ .dmEnyJ::before{content:'';width:100%;height:100%;display:inline-block;background:radial-gradient(1357.61% 111.93% at 58.53% 60.34%,rgba(255,255,255,0.40) 0%,rgba(180,155,252,0.00) 0.01%,rgba(182,202,255,0.40) 100%),radial-gradient(69% 81.35% at -8.65% 100%,rgba(255,255,255,0.20) 0%,rgba(255,255,255,0.00) 100%),radial-gradient(637.58% 79.63% at 96.25% -14.82%,rgba(255,255,255,0.20) 0%,rgba(255,255,255,0.00) 100%),radial-gradient(1373.34% 61.44% at -8.75% 153.45%,rgba(227,235,255,0.30) 0%,rgba(255,255,255,0.00) 100%),linear-gradient(170deg,#3F59E4 7.99%,#3F59E4 93.36%);opacity:0;position:absolute;-webkit-transition:all 0.4s ease-in-out;transition:all 0.4s ease-in-out;}/*!sc*/ .dmEnyJ:hover::before{opacity:1;}/*!sc*/ data-styled.g229[id="styled__Button-sc-1hwml9q-0"]{content:"etdOck,cmgpvv,dmEnyJ,"}/*!sc*/ .FYDuM.FYDuM.FYDuM{color:#99A7F1;-webkit-text-decoration:underline;text-decoration:underline;}/*!sc*/ .bPWQw.bPWQw.bPWQw{width:100%;}/*!sc*/ .bKQnZO.bKQnZO.bKQnZO{margin-top:1.6rem;width:100%;}/*!sc*/ .iCUAvT.iCUAvT.iCUAvT{color:#ABABAB;font-weight:500;line-height:1.8rem;margin-bottom:2.1rem;}/*!sc*/ .eldvFb.eldvFb.eldvFb{-webkit-text-decoration:none;text-decoration:none;line-height:2.2rem;}/*!sc*/ .bdewcp.bdewcp.bdewcp{color:#8c929c;margin:0;}/*!sc*/ .eTNTBu.eTNTBu.eTNTBu{font-family:Aeonik,sans-serif;color:#FFFFFF;margin:0.4rem 0 0;font-weight:500;font-size:1.6rem;line-height:2rem;}/*!sc*/ .czoLEI.czoLEI.czoLEI{display:block;-webkit-text-decoration:underline;text-decoration:underline;}/*!sc*/ .jrcqSi.jrcqSi.jrcqSi{display:-webkit-box;display:-webkit-flex;display:-ms-flexbox;display:flex;-webkit-text-decoration:none;text-decoration:none;}/*!sc*/ .kXdnOe.kXdnOe.kXdnOe{font-family:Aeonik,sans-serif;color:#e5e5e5;font-size:1.4rem;-webkit-letter-spacing:0.015rem;-moz-letter-spacing:0.015rem;-ms-letter-spacing:0.015rem;letter-spacing:0.015rem;line-height:2rem;}/*!sc*/ .dKTRwW.dKTRwW.dKTRwW{color:#8c929c;}/*!sc*/ .crZFdA.crZFdA.crZFdA{-webkit-text-decoration:none;text-decoration:none;display:block;}/*!sc*/ .iyreho.iyreho.iyreho{margin-right:1.6rem;-webkit-letter-spacing:0.032rem;-moz-letter-spacing:0.032rem;-ms-letter-spacing:0.032rem;letter-spacing:0.032rem;white-space:nowrap;}/*!sc*/ @media screen and (min-width:1200px){.iyreho.iyreho.iyreho{padding:0.8rem 2.4rem;}}/*!sc*/ .dTOMa-D.dTOMa-D.dTOMa-D{-webkit-letter-spacing:0.032rem;-moz-letter-spacing:0.032rem;-ms-letter-spacing:0.032rem;letter-spacing:0.032rem;white-space:nowrap;}/*!sc*/ @media screen and (min-width:1200px){.dTOMa-D.dTOMa-D.dTOMa-D{padding:0.8rem 2.2rem;}}/*!sc*/ .cvLfHs.cvLfHs.cvLfHs{color:#FFFEFA;}/*!sc*/ .lmzreS.lmzreS.lmzreS{padding:1.6rem;color:#8E8E8E;}/*!sc*/ .hZxSJK.hZxSJK.hZxSJK{display:inline-block;color:#FFFEFA;}/*!sc*/ .gCRKXL.gCRKXL.gCRKXL{display:inline-block;color:#8E8E8E;}/*!sc*/ .dzhwtc.dzhwtc.dzhwtc{grid-area:job;color:#808080;}/*!sc*/ .keBOjr.keBOjr.keBOjr{color:#FFFEFA;opacity:0.5;}/*!sc*/ .hvtcVw.hvtcVw.hvtcVw{color:#E5E5E5;}/*!sc*/ .bBeyP.bBeyP.bBeyP{color:#E5E5E5;font-weight:400;}/*!sc*/ .hbRhns.hbRhns.hbRhns{text-transform:capitalize;color:#4CB7A3;border:1px solid #4CB7A354;background:rgba(0,0,0,0.33);width:-webkit-fit-content;width:-moz-fit-content;width:fit-content;padding:0.2rem 0.6rem;border-radius:.6rem;white-space:nowrap;}/*!sc*/ @media screen and (min-width:900px){.gbKHFx.gbKHFx.gbKHFx{font-size:1.3rem;}}/*!sc*/ @media screen and (min-width:900px){.gbKHFx.gbKHFx.gbKHFx{-webkit-letter-spacing:0.05rem;-moz-letter-spacing:0.05rem;-ms-letter-spacing:0.05rem;letter-spacing:0.05rem;}}/*!sc*/ @media screen and (min-width:1200px){.glCwmv.glCwmv.glCwmv{font-size:2.8rem;}}/*!sc*/ @media screen and (min-width:1200px){.glCwmv.glCwmv.glCwmv{line-height:3.6rem;}}/*!sc*/ .hDAMWg.hDAMWg.hDAMWg{text-transform:capitalize;color:#B49BFC;border:1px solid #B49BFC54;background:rgba(0,0,0,0.33);width:-webkit-fit-content;width:-moz-fit-content;width:fit-content;padding:0.2rem 0.6rem;border-radius:.6rem;white-space:nowrap;}/*!sc*/ .gINUVb.gINUVb.gINUVb{display:-webkit-box;display:-webkit-flex;display:-ms-flexbox;display:flex;-webkit-align-items:center;-webkit-box-align:center;-ms-flex-align:center;align-items:center;}/*!sc*/ .fMkBdy.fMkBdy.fMkBdy{padding:4.8rem 0;background-size:cover;max-width:100%;}/*!sc*/ @media screen and (min-width:900px){.fMkBdy.fMkBdy.fMkBdy{padding:6.4rem 0;}}/*!sc*/ @media screen and (min-width:1200px){.fMkBdy.fMkBdy.fMkBdy{padding:8rem 0 14rem;}}/*!sc*/ .jbTxDN.jbTxDN.jbTxDN{z-index:1;}/*!sc*/ @media screen and (min-width:900px){.jbTxDN.jbTxDN.jbTxDN{grid-column:1 / 13;}}/*!sc*/ @media screen and (min-width:1200px){.jbTxDN.jbTxDN.jbTxDN{grid-column:1 / 7;}}/*!sc*/ .hlbQwp.hlbQwp.hlbQwp{font-weight:500;}/*!sc*/ .dViOmG.dViOmG.dViOmG{display:-webkit-inline-box;display:-webkit-inline-flex;display:-ms-inline-flexbox;display:inline-flex;-webkit-align-items:center;-webkit-box-align:center;-ms-flex-align:center;align-items:center;-webkit-text-decoration:none;text-decoration:none;}/*!sc*/ .dVQvBz.dVQvBz.dVQvBz{color:#80868F;margin:0;}/*!sc*/ .bqMfzV.bqMfzV.bqMfzV{border-top:0.1rem solid #5a5f66;padding:2.4rem 1.6rem;color:#80868F;margin:0;}/*!sc*/ data-styled.g230[id="utils-sc-11hlfw-0"]{content:"FYDuM,bPWQw,bKQnZO,iCUAvT,eldvFb,bdewcp,eTNTBu,czoLEI,jrcqSi,kXdnOe,dKTRwW,crZFdA,iyreho,dTOMa-D,cvLfHs,lmzreS,lbFYLj,hZxSJK,gCRKXL,dzhwtc,keBOjr,hvtcVw,bBeyP,hbRhns,gbKHFx,glCwmv,hDAMWg,gINUVb,fMkBdy,jbTxDN,hlbQwp,dViOmG,dVQvBz,bqMfzV,"}/*!sc*/ .jOKDAt{margin:0 0 1.6rem 0;color:#ABABAB;font-family:'Aeonik Mono',monospace;font-style:NORMAL;font-weight:500;font-size:1.4rem;-webkit-letter-spacing:0.1rem;-moz-letter-spacing:0.1rem;-ms-letter-spacing:0.1rem;letter-spacing:0.1rem;line-height:2rem;text-transform:uppercase;padding:0;}/*!sc*/ @media screen and (min-width:900px){.jOKDAt{color:#ABABAB;font-family:'Aeonik Mono',monospace;font-style:NORMAL;font-weight:500;font-size:1.4rem;-webkit-letter-spacing:0.1rem;-moz-letter-spacing:0.1rem;-ms-letter-spacing:0.1rem;letter-spacing:0.1rem;line-height:2rem;}}/*!sc*/ @media screen and (min-width:1200px){.jOKDAt{color:#ABABAB;font-family:'Aeonik Mono',monospace;font-style:NORMAL;font-weight:500;font-size:1.4rem;-webkit-letter-spacing:0.1rem;-moz-letter-spacing:0.1rem;-ms-letter-spacing:0.1rem;letter-spacing:0.1rem;line-height:2rem;}}/*!sc*/ .calwMa{margin:0;color:#ABABAB;font-family:'Aeonik Mono',monospace;font-style:NORMAL;font-weight:500;font-size:1.4rem;-webkit-letter-spacing:0.1rem;-moz-letter-spacing:0.1rem;-ms-letter-spacing:0.1rem;letter-spacing:0.1rem;line-height:2rem;text-transform:uppercase;padding:0;}/*!sc*/ @media screen and (min-width:900px){.calwMa{color:#ABABAB;font-family:'Aeonik Mono',monospace;font-style:NORMAL;font-weight:500;font-size:1.4rem;-webkit-letter-spacing:0.1rem;-moz-letter-spacing:0.1rem;-ms-letter-spacing:0.1rem;letter-spacing:0.1rem;line-height:2rem;}}/*!sc*/ @media screen and (min-width:1200px){.calwMa{color:#ABABAB;font-family:'Aeonik Mono',monospace;font-style:NORMAL;font-weight:500;font-size:1.4rem;-webkit-letter-spacing:0.1rem;-moz-letter-spacing:0.1rem;-ms-letter-spacing:0.1rem;letter-spacing:0.1rem;line-height:2rem;}}/*!sc*/ .bvimfW{margin:0 0 0.8rem;color:#ABABAB;font-family:'Aeonik Mono',monospace;font-style:NORMAL;font-weight:500;font-size:1.4rem;-webkit-letter-spacing:0.1rem;-moz-letter-spacing:0.1rem;-ms-letter-spacing:0.1rem;letter-spacing:0.1rem;line-height:2rem;text-transform:uppercase;padding:0;}/*!sc*/ @media screen and (min-width:900px){.bvimfW{color:#ABABAB;font-family:'Aeonik Mono',monospace;font-style:NORMAL;font-weight:500;font-size:1.4rem;-webkit-letter-spacing:0.1rem;-moz-letter-spacing:0.1rem;-ms-letter-spacing:0.1rem;letter-spacing:0.1rem;line-height:2rem;}}/*!sc*/ @media screen and (min-width:1200px){.bvimfW{color:#ABABAB;font-family:'Aeonik Mono',monospace;font-style:NORMAL;font-weight:500;font-size:1.4rem;-webkit-letter-spacing:0.1rem;-moz-letter-spacing:0.1rem;-ms-letter-spacing:0.1rem;letter-spacing:0.1rem;line-height:2rem;}}/*!sc*/ .jPTHXi{margin:0.8rem 0 1.6rem;color:#ABABAB;font-family:'Aeonik Mono',monospace;font-style:NORMAL;font-weight:500;font-size:1.4rem;-webkit-letter-spacing:0.1rem;-moz-letter-spacing:0.1rem;-ms-letter-spacing:0.1rem;letter-spacing:0.1rem;line-height:2rem;text-transform:uppercase;padding:0;}/*!sc*/ @media screen and (min-width:1200px){.jPTHXi{margin:0;}}/*!sc*/ @media screen and (min-width:900px){.jPTHXi{color:#ABABAB;font-family:'Aeonik Mono',monospace;font-style:NORMAL;font-weight:500;font-size:1.4rem;-webkit-letter-spacing:0.1rem;-moz-letter-spacing:0.1rem;-ms-letter-spacing:0.1rem;letter-spacing:0.1rem;line-height:2rem;}}/*!sc*/ @media screen and (min-width:1200px){.jPTHXi{color:#ABABAB;font-family:'Aeonik Mono',monospace;font-style:NORMAL;font-weight:500;font-size:1.4rem;-webkit-letter-spacing:0.1rem;-moz-letter-spacing:0.1rem;-ms-letter-spacing:0.1rem;letter-spacing:0.1rem;line-height:2rem;}}/*!sc*/ .gHcESW{margin:0.4rem 0 2rem;color:#ABABAB;font-family:'Aeonik Mono',monospace;font-style:NORMAL;font-weight:500;font-size:1.4rem;-webkit-letter-spacing:0.1rem;-moz-letter-spacing:0.1rem;-ms-letter-spacing:0.1rem;letter-spacing:0.1rem;line-height:2rem;text-transform:uppercase;padding:0;}/*!sc*/ @media screen and (min-width:900px){.gHcESW{color:#ABABAB;font-family:'Aeonik Mono',monospace;font-style:NORMAL;font-weight:500;font-size:1.4rem;-webkit-letter-spacing:0.1rem;-moz-letter-spacing:0.1rem;-ms-letter-spacing:0.1rem;letter-spacing:0.1rem;line-height:2rem;}}/*!sc*/ @media screen and (min-width:1200px){.gHcESW{color:#ABABAB;font-family:'Aeonik Mono',monospace;font-style:NORMAL;font-weight:500;font-size:1.4rem;-webkit-letter-spacing:0.1rem;-moz-letter-spacing:0.1rem;-ms-letter-spacing:0.1rem;letter-spacing:0.1rem;line-height:2rem;}}/*!sc*/ .VzOyt{margin:0 0 1.6rem 0;color:#8B929B;font-family:SpaceGrotesk,monospace;font-style:NORMAL;font-weight:600;font-size:1.2rem;-webkit-letter-spacing:0.12rem;-moz-letter-spacing:0.12rem;-ms-letter-spacing:0.12rem;letter-spacing:0.12rem;line-height:1.8rem;text-transform:uppercase;padding:0;}/*!sc*/ @media screen and (min-width:900px){.VzOyt{color:#8B929B;font-family:SpaceGrotesk,monospace;font-style:NORMAL;font-weight:600;font-size:1.4rem;-webkit-letter-spacing:0.15rem;-moz-letter-spacing:0.15rem;-ms-letter-spacing:0.15rem;letter-spacing:0.15rem;line-height:2rem;}}/*!sc*/ @media screen and (min-width:1200px){.VzOyt{color:#8B929B;font-family:SpaceGrotesk,monospace;font-style:NORMAL;font-weight:600;font-size:1.4rem;-webkit-letter-spacing:0.15rem;-moz-letter-spacing:0.15rem;-ms-letter-spacing:0.15rem;letter-spacing:0.15rem;line-height:2rem;}}/*!sc*/ data-styled.g234[id="styled__Overline-sc-165cfko-0"]{content:"jOKDAt,calwMa,bvimfW,jPTHXi,gHcESW,VzOyt,"}/*!sc*/ .bkTDvW{margin:0 0 1.6rem 0;color:#E5E5E5;font-family:Aeonik,sans-serif;font-style:NORMAL;font-weight:400;font-size:1.8rem;-webkit-letter-spacing:0.0125rem;-moz-letter-spacing:0.0125rem;-ms-letter-spacing:0.0125rem;letter-spacing:0.0125rem;line-height:2.5rem;color:#FFFEFA;padding:0;}/*!sc*/ @media screen and (min-width:900px){.bkTDvW{color:#E5E5E5;font-family:Aeonik,sans-serif;font-style:NORMAL;font-weight:400;font-size:1.8rem;-webkit-letter-spacing:0.0125rem;-moz-letter-spacing:0.0125rem;-ms-letter-spacing:0.0125rem;letter-spacing:0.0125rem;line-height:2.5rem;color:#FFFEFA;}}/*!sc*/ @media screen and (min-width:1200px){.bkTDvW{color:#E5E5E5;font-family:Aeonik,sans-serif;font-style:NORMAL;font-weight:400;font-size:1.8rem;-webkit-letter-spacing:0.0125rem;-moz-letter-spacing:0.0125rem;-ms-letter-spacing:0.0125rem;letter-spacing:0.0125rem;line-height:2.5rem;color:#FFFEFA;}}/*!sc*/ .fXa-dFL{margin:0 0 1.6rem 0;color:#E5E5E5;font-family:Aeonik,sans-serif;font-style:NORMAL;font-weight:400;font-size:1.4rem;-webkit-letter-spacing:0.015rem;-moz-letter-spacing:0.015rem;-ms-letter-spacing:0.015rem;letter-spacing:0.015rem;line-height:2rem;color:#FFFEFA;padding:0;}/*!sc*/ @media screen and (min-width:900px){.fXa-dFL{color:#E5E5E5;font-family:Aeonik,sans-serif;font-style:NORMAL;font-weight:400;font-size:1.4rem;-webkit-letter-spacing:0.015rem;-moz-letter-spacing:0.015rem;-ms-letter-spacing:0.015rem;letter-spacing:0.015rem;line-height:2rem;color:#FFFEFA;}}/*!sc*/ @media screen and (min-width:1200px){.fXa-dFL{color:#E5E5E5;font-family:Aeonik,sans-serif;font-style:NORMAL;font-weight:400;font-size:1.4rem;-webkit-letter-spacing:0.015rem;-moz-letter-spacing:0.015rem;-ms-letter-spacing:0.015rem;letter-spacing:0.015rem;line-height:2rem;color:#FFFEFA;}}/*!sc*/ .kVgWkQ{margin:0 .8rem 0 0;color:#E5E5E5;font-family:Aeonik,sans-serif;font-style:NORMAL;font-weight:400;font-size:1.6rem;-webkit-letter-spacing:0.0125rem;-moz-letter-spacing:0.0125rem;-ms-letter-spacing:0.0125rem;letter-spacing:0.0125rem;line-height:2.2rem;color:#FFFEFA;padding:0;}/*!sc*/ @media screen and (min-width:900px){.kVgWkQ{color:#E5E5E5;font-family:Aeonik,sans-serif;font-style:NORMAL;font-weight:400;font-size:1.6rem;-webkit-letter-spacing:0.0125rem;-moz-letter-spacing:0.0125rem;-ms-letter-spacing:0.0125rem;letter-spacing:0.0125rem;line-height:2.2rem;color:#FFFEFA;}}/*!sc*/ @media screen and (min-width:1200px){.kVgWkQ{color:#E5E5E5;font-family:Aeonik,sans-serif;font-style:NORMAL;font-weight:400;font-size:1.6rem;-webkit-letter-spacing:0.0125rem;-moz-letter-spacing:0.0125rem;-ms-letter-spacing:0.0125rem;letter-spacing:0.0125rem;line-height:2.2rem;color:#FFFEFA;}}/*!sc*/ .gXwSZc{margin:0;color:#E5E5E5;font-family:Aeonik,sans-serif;font-style:NORMAL;font-weight:400;font-size:1.6rem;-webkit-letter-spacing:0.0125rem;-moz-letter-spacing:0.0125rem;-ms-letter-spacing:0.0125rem;letter-spacing:0.0125rem;line-height:2.2rem;color:#FFFEFA;padding:0;}/*!sc*/ @media screen and (min-width:900px){.gXwSZc{color:#E5E5E5;font-family:Aeonik,sans-serif;font-style:NORMAL;font-weight:400;font-size:1.6rem;-webkit-letter-spacing:0.0125rem;-moz-letter-spacing:0.0125rem;-ms-letter-spacing:0.0125rem;letter-spacing:0.0125rem;line-height:2.2rem;color:#FFFEFA;}}/*!sc*/ @media screen and (min-width:1200px){.gXwSZc{color:#E5E5E5;font-family:Aeonik,sans-serif;font-style:NORMAL;font-weight:400;font-size:1.6rem;-webkit-letter-spacing:0.0125rem;-moz-letter-spacing:0.0125rem;-ms-letter-spacing:0.0125rem;letter-spacing:0.0125rem;line-height:2.2rem;color:#FFFEFA;}}/*!sc*/ .gWBdwk{margin:0;color:#E5E5E5;font-family:Aeonik,sans-serif;font-style:NORMAL;font-weight:400;font-size:1.4rem;-webkit-letter-spacing:0.015rem;-moz-letter-spacing:0.015rem;-ms-letter-spacing:0.015rem;letter-spacing:0.015rem;line-height:2rem;color:#FFFEFA;padding:0;}/*!sc*/ @media screen and (min-width:900px){.gWBdwk{color:#E5E5E5;font-family:Aeonik,sans-serif;font-style:NORMAL;font-weight:400;font-size:1.4rem;-webkit-letter-spacing:0.015rem;-moz-letter-spacing:0.015rem;-ms-letter-spacing:0.015rem;letter-spacing:0.015rem;line-height:2rem;color:#FFFEFA;}}/*!sc*/ @media screen and (min-width:1200px){.gWBdwk{color:#E5E5E5;font-family:Aeonik,sans-serif;font-style:NORMAL;font-weight:400;font-size:1.4rem;-webkit-letter-spacing:0.015rem;-moz-letter-spacing:0.015rem;-ms-letter-spacing:0.015rem;letter-spacing:0.015rem;line-height:2rem;color:#FFFEFA;}}/*!sc*/ .hZdkzi{margin:0;color:#E5E5E5;font-family:Aeonik,sans-serif;font-style:NORMAL;font-weight:400;font-size:2rem;-webkit-letter-spacing:0.005rem;-moz-letter-spacing:0.005rem;-ms-letter-spacing:0.005rem;letter-spacing:0.005rem;line-height:2.8rem;color:#FFFEFA;padding:0;}/*!sc*/ @media screen and (min-width:900px){.hZdkzi{color:#E5E5E5;font-family:Aeonik,sans-serif;font-style:NORMAL;font-weight:400;font-size:2.4rem;-webkit-letter-spacing:0;-moz-letter-spacing:0;-ms-letter-spacing:0;letter-spacing:0;line-height:3.2rem;color:#FFFEFA;}}/*!sc*/ @media screen and (min-width:1200px){.hZdkzi{color:#E5E5E5;font-family:Aeonik,sans-serif;font-style:NORMAL;font-weight:400;font-size:2.4rem;-webkit-letter-spacing:0;-moz-letter-spacing:0;-ms-letter-spacing:0;letter-spacing:0;line-height:3.2rem;color:#FFFEFA;}}/*!sc*/ .jpqCEe{margin:0;color:#E5E5E5;font-family:Aeonik,sans-serif;font-style:NORMAL;font-weight:400;font-size:2rem;-webkit-letter-spacing:0.005rem;-moz-letter-spacing:0.005rem;-ms-letter-spacing:0.005rem;letter-spacing:0.005rem;line-height:2.8rem;color:#FFFEFA;padding:0;}/*!sc*/ @media screen and (min-width:900px){.jpqCEe{color:#E5E5E5;font-family:Aeonik,sans-serif;font-style:NORMAL;font-weight:400;font-size:2rem;-webkit-letter-spacing:0.005rem;-moz-letter-spacing:0.005rem;-ms-letter-spacing:0.005rem;letter-spacing:0.005rem;line-height:2.8rem;color:#FFFEFA;}}/*!sc*/ @media screen and (min-width:1200px){.jpqCEe{color:#E5E5E5;font-family:Aeonik,sans-serif;font-style:NORMAL;font-weight:400;font-size:2rem;-webkit-letter-spacing:0.005rem;-moz-letter-spacing:0.005rem;-ms-letter-spacing:0.005rem;letter-spacing:0.005rem;line-height:2.8rem;color:#FFFEFA;}}/*!sc*/ .CBuMa{margin:1.6rem 0 3.2rem;color:#E5E5E5;font-family:Aeonik,sans-serif;font-style:NORMAL;font-weight:400;font-size:1.6rem;-webkit-letter-spacing:0.0125rem;-moz-letter-spacing:0.0125rem;-ms-letter-spacing:0.0125rem;letter-spacing:0.0125rem;line-height:2.2rem;color:#FFFEFA;padding:0;}/*!sc*/ @media screen and (min-width:900px){.CBuMa{color:#E5E5E5;font-family:Aeonik,sans-serif;font-style:NORMAL;font-weight:400;font-size:1.6rem;-webkit-letter-spacing:0.0125rem;-moz-letter-spacing:0.0125rem;-ms-letter-spacing:0.0125rem;letter-spacing:0.0125rem;line-height:2.2rem;color:#FFFEFA;}}/*!sc*/ @media screen and (min-width:1200px){.CBuMa{color:#E5E5E5;font-family:Aeonik,sans-serif;font-style:NORMAL;font-weight:400;font-size:1.6rem;-webkit-letter-spacing:0.0125rem;-moz-letter-spacing:0.0125rem;-ms-letter-spacing:0.0125rem;letter-spacing:0.0125rem;line-height:2.2rem;color:#FFFEFA;}}/*!sc*/ .eoMTCq{margin:0 0 0.8rem;color:#E5E5E5;font-family:Aeonik,sans-serif;font-style:NORMAL;font-weight:400;font-size:2rem;-webkit-letter-spacing:0.005rem;-moz-letter-spacing:0.005rem;-ms-letter-spacing:0.005rem;letter-spacing:0.005rem;line-height:2.8rem;color:#FFFEFA;padding:0;}/*!sc*/ @media screen and (min-width:900px){.eoMTCq{color:#E5E5E5;font-family:Aeonik,sans-serif;font-style:NORMAL;font-weight:400;font-size:2rem;-webkit-letter-spacing:0.005rem;-moz-letter-spacing:0.005rem;-ms-letter-spacing:0.005rem;letter-spacing:0.005rem;line-height:2.8rem;color:#FFFEFA;}}/*!sc*/ @media screen and (min-width:1200px){.eoMTCq{color:#E5E5E5;font-family:Aeonik,sans-serif;font-style:NORMAL;font-weight:400;font-size:2rem;-webkit-letter-spacing:0.005rem;-moz-letter-spacing:0.005rem;-ms-letter-spacing:0.005rem;letter-spacing:0.005rem;line-height:2.8rem;color:#FFFEFA;}}/*!sc*/ .jXSJzE{margin:0 0 4rem;color:#E5E5E5;font-family:Aeonik,sans-serif;font-style:NORMAL;font-weight:400;font-size:2rem;-webkit-letter-spacing:0.005rem;-moz-letter-spacing:0.005rem;-ms-letter-spacing:0.005rem;letter-spacing:0.005rem;line-height:2.8rem;color:#FFFEFA;padding:0;}/*!sc*/ @media screen and (min-width:900px){.jXSJzE{color:#E5E5E5;font-family:Aeonik,sans-serif;font-style:NORMAL;font-weight:400;font-size:2.4rem;-webkit-letter-spacing:0;-moz-letter-spacing:0;-ms-letter-spacing:0;letter-spacing:0;line-height:3.2rem;color:#FFFEFA;}}/*!sc*/ @media screen and (min-width:1200px){.jXSJzE{color:#E5E5E5;font-family:Aeonik,sans-serif;font-style:NORMAL;font-weight:400;font-size:2.4rem;-webkit-letter-spacing:0;-moz-letter-spacing:0;-ms-letter-spacing:0;letter-spacing:0;line-height:3.2rem;color:#FFFEFA;}}/*!sc*/ .hYaXSW{margin:0;color:#41454C;font-family:Inter,sans-serif;font-style:NORMAL;font-weight:400;font-size:1.4rem;-webkit-letter-spacing:0rem;-moz-letter-spacing:0rem;-ms-letter-spacing:0rem;letter-spacing:0rem;line-height:2.2rem;color:#FFFFFF;padding:0;}/*!sc*/ @media screen and (min-width:900px){.hYaXSW{color:#41454C;font-family:Inter,sans-serif;font-style:NORMAL;font-weight:400;font-size:1.4rem;-webkit-letter-spacing:0rem;-moz-letter-spacing:0rem;-ms-letter-spacing:0rem;letter-spacing:0rem;line-height:2.2rem;color:#FFFFFF;}}/*!sc*/ @media screen and (min-width:1200px){.hYaXSW{color:#41454C;font-family:Inter,sans-serif;font-style:NORMAL;font-weight:400;font-size:1.4rem;-webkit-letter-spacing:0rem;-moz-letter-spacing:0rem;-ms-letter-spacing:0rem;letter-spacing:0rem;line-height:2.2rem;color:#FFFFFF;}}/*!sc*/ .kgFLyt{margin:0 0 1.6rem 0;color:#41454C;font-family:Inter,sans-serif;font-style:NORMAL;font-weight:400;font-size:1.4rem;-webkit-letter-spacing:0rem;-moz-letter-spacing:0rem;-ms-letter-spacing:0rem;letter-spacing:0rem;line-height:2.2rem;color:#FFFFFF;padding:0;}/*!sc*/ @media screen and (min-width:900px){.kgFLyt{color:#41454C;font-family:Inter,sans-serif;font-style:NORMAL;font-weight:400;font-size:1.4rem;-webkit-letter-spacing:0rem;-moz-letter-spacing:0rem;-ms-letter-spacing:0rem;letter-spacing:0rem;line-height:2.2rem;color:#FFFFFF;}}/*!sc*/ @media screen and (min-width:1200px){.kgFLyt{color:#41454C;font-family:Inter,sans-serif;font-style:NORMAL;font-weight:400;font-size:1.4rem;-webkit-letter-spacing:0rem;-moz-letter-spacing:0rem;-ms-letter-spacing:0rem;letter-spacing:0rem;line-height:2.2rem;color:#FFFFFF;}}/*!sc*/ data-styled.g235[id="styled__Paragraph-sc-165cfko-1"]{content:"bkTDvW,fXa-dFL,kVgWkQ,gXwSZc,gWBdwk,hZdkzi,jpqCEe,CBuMa,eoMTCq,jXSJzE,hYaXSW,kgFLyt,"}/*!sc*/ .fqVxFN{margin:0;color:#FFFEFA;font-family:Aeonik,sans-serif;font-style:NORMAL;font-weight:400;font-size:3.2rem;-webkit-letter-spacing:-0.01rem;-moz-letter-spacing:-0.01rem;-ms-letter-spacing:-0.01rem;letter-spacing:-0.01rem;line-height:4.4rem;color:#FFFEFA;padding:0;}/*!sc*/ @media screen and (min-width:900px){.fqVxFN{color:#FFFEFA;font-family:Aeonik,sans-serif;font-style:NORMAL;font-weight:400;font-size:4rem;-webkit-letter-spacing:-0.02rem;-moz-letter-spacing:-0.02rem;-ms-letter-spacing:-0.02rem;letter-spacing:-0.02rem;line-height:4.8rem;color:#FFFEFA;}}/*!sc*/ @media screen and (min-width:1200px){.fqVxFN{color:#FFFEFA;font-family:Aeonik,sans-serif;font-style:NORMAL;font-weight:400;font-size:4rem;-webkit-letter-spacing:-0.02rem;-moz-letter-spacing:-0.02rem;-ms-letter-spacing:-0.02rem;letter-spacing:-0.02rem;line-height:4.8rem;color:#FFFEFA;}}/*!sc*/ .OWQrv{margin:0 0 1.6rem 0;color:#FFFEFA;font-family:Aeonik,sans-serif;font-style:NORMAL;font-weight:400;font-size:3.2rem;-webkit-letter-spacing:-0.01rem;-moz-letter-spacing:-0.01rem;-ms-letter-spacing:-0.01rem;letter-spacing:-0.01rem;line-height:4.4rem;color:#FFFEFA;padding:0;}/*!sc*/ @media screen and (min-width:900px){.OWQrv{color:#FFFEFA;font-family:Aeonik,sans-serif;font-style:NORMAL;font-weight:400;font-size:4rem;-webkit-letter-spacing:-0.02rem;-moz-letter-spacing:-0.02rem;-ms-letter-spacing:-0.02rem;letter-spacing:-0.02rem;line-height:4.8rem;color:#FFFEFA;}}/*!sc*/ @media screen and (min-width:1200px){.OWQrv{color:#FFFEFA;font-family:Aeonik,sans-serif;font-style:NORMAL;font-weight:400;font-size:4.8rem;-webkit-letter-spacing:-0.02rem;-moz-letter-spacing:-0.02rem;-ms-letter-spacing:-0.02rem;letter-spacing:-0.02rem;line-height:5.6rem;color:#FFFEFA;}}/*!sc*/ data-styled.g236[id="styled__Heading-sc-165cfko-2"]{content:"fqVxFN,OWQrv,"}/*!sc*/ .butiik{margin:0;padding:0;font-family:Aeonik,sans-serif !important;color:#635DFF;font-family:Inter;font-style:NORMAL;font-weight:500;font-size:1.8rem;-webkit-letter-spacing:-0.005rem;-moz-letter-spacing:-0.005rem;-ms-letter-spacing:-0.005rem;letter-spacing:-0.005rem;line-height:2.8rem;color:#99A7F1;-webkit-text-decoration:underline;text-decoration:underline;text-underline-offset:0.3rem;cursor:pointer;width:-webkit-fit-content;width:-moz-fit-content;width:fit-content;}/*!sc*/ @media screen and (min-width:900px){.butiik{color:#635DFF;font-family:Inter;font-style:NORMAL;font-weight:500;font-size:1.8rem;-webkit-letter-spacing:-0.005rem;-moz-letter-spacing:-0.005rem;-ms-letter-spacing:-0.005rem;letter-spacing:-0.005rem;line-height:2.8rem;color:#99A7F1;}}/*!sc*/ @media screen and (min-width:1200px){.butiik{color:#635DFF;font-family:Inter;font-style:NORMAL;font-weight:500;font-size:1.8rem;-webkit-letter-spacing:-0.005rem;-moz-letter-spacing:-0.005rem;-ms-letter-spacing:-0.005rem;letter-spacing:-0.005rem;line-height:2.8rem;color:#99A7F1;}}/*!sc*/ .butiik:hover{color:#B6CAFF;cursor:pointer;-webkit-text-decoration:underline;text-decoration:underline;}/*!sc*/ .butiik:active{color:#3F59E4;}/*!sc*/ .butiik:focus-visible{outline:0.2rem solid #99A7F1;border-radius:0.4rem;color:#99A7F1;}/*!sc*/ .butiik:after{content:'→';padding-left:0.8rem;display:inline-block;}/*!sc*/ .bhxyxO{margin:0;padding:0;font-family:Aeonik,sans-serif !important;color:#635DFF;font-family:Inter;font-style:NORMAL;font-weight:500;font-size:1.4rem;-webkit-letter-spacing:0rem;-moz-letter-spacing:0rem;-ms-letter-spacing:0rem;letter-spacing:0rem;line-height:2.2rem;color:#99A7F1;-webkit-text-decoration:underline;text-decoration:underline;text-underline-offset:0.3rem;cursor:pointer;width:-webkit-fit-content;width:-moz-fit-content;width:fit-content;}/*!sc*/ @media screen and (min-width:900px){.bhxyxO{color:#635DFF;font-family:Inter;font-style:NORMAL;font-weight:500;font-size:1.6rem;-webkit-letter-spacing:-0.001rem;-moz-letter-spacing:-0.001rem;-ms-letter-spacing:-0.001rem;letter-spacing:-0.001rem;line-height:2.4rem;color:#99A7F1;}}/*!sc*/ @media screen and (min-width:1200px){.bhxyxO{color:#635DFF;font-family:Inter;font-style:NORMAL;font-weight:500;font-size:1.6rem;-webkit-letter-spacing:-0.001rem;-moz-letter-spacing:-0.001rem;-ms-letter-spacing:-0.001rem;letter-spacing:-0.001rem;line-height:2.4rem;color:#99A7F1;}}/*!sc*/ .bhxyxO:hover{color:#B6CAFF;cursor:pointer;-webkit-text-decoration:underline;text-decoration:underline;}/*!sc*/ .bhxyxO:active{color:#3F59E4;}/*!sc*/ .bhxyxO:focus-visible{outline:0.2rem solid #99A7F1;border-radius:0.4rem;color:#99A7F1;}/*!sc*/ .jSunBo{margin:0;padding:0;font-family:Aeonik,sans-serif !important;color:#635DFF;font-family:Inter;font-style:NORMAL;font-weight:500;font-size:1.4rem;-webkit-letter-spacing:0rem;-moz-letter-spacing:0rem;-ms-letter-spacing:0rem;letter-spacing:0rem;line-height:2.2rem;color:#99A7F1;-webkit-text-decoration:underline;text-decoration:underline;text-underline-offset:0.3rem;cursor:pointer;width:-webkit-fit-content;width:-moz-fit-content;width:fit-content;}/*!sc*/ @media screen and (min-width:900px){.jSunBo{color:#635DFF;font-family:Inter;font-style:NORMAL;font-weight:500;font-size:1.4rem;-webkit-letter-spacing:0rem;-moz-letter-spacing:0rem;-ms-letter-spacing:0rem;letter-spacing:0rem;line-height:2.2rem;color:#99A7F1;}}/*!sc*/ @media screen and (min-width:1200px){.jSunBo{color:#635DFF;font-family:Inter;font-style:NORMAL;font-weight:500;font-size:1.4rem;-webkit-letter-spacing:0rem;-moz-letter-spacing:0rem;-ms-letter-spacing:0rem;letter-spacing:0rem;line-height:2.2rem;color:#99A7F1;}}/*!sc*/ .jSunBo:hover{color:#B6CAFF;cursor:pointer;-webkit-text-decoration:underline;text-decoration:underline;}/*!sc*/ .jSunBo:active{color:#3F59E4;}/*!sc*/ .jSunBo:focus-visible{outline:0.2rem solid #99A7F1;border-radius:0.4rem;color:#99A7F1;}/*!sc*/ .jSunBo:after{content:'→';padding-left:0.8rem;display:inline-block;}/*!sc*/ .hfCwZi{margin:0;padding:0;font-family:Aeonik,sans-serif !important;color:#635DFF;font-family:Inter;font-style:NORMAL;font-weight:500;font-size:1.8rem;-webkit-letter-spacing:-0.005rem;-moz-letter-spacing:-0.005rem;-ms-letter-spacing:-0.005rem;letter-spacing:-0.005rem;line-height:2.8rem;color:#99A7F1;-webkit-text-decoration:underline;text-decoration:underline;text-underline-offset:0.3rem;cursor:pointer;width:-webkit-fit-content;width:-moz-fit-content;width:fit-content;}/*!sc*/ @media screen and (min-width:900px){.hfCwZi{color:#635DFF;font-family:Inter;font-style:NORMAL;font-weight:500;font-size:1.8rem;-webkit-letter-spacing:-0.005rem;-moz-letter-spacing:-0.005rem;-ms-letter-spacing:-0.005rem;letter-spacing:-0.005rem;line-height:2.8rem;color:#99A7F1;}}/*!sc*/ @media screen and (min-width:1200px){.hfCwZi{color:#635DFF;font-family:Inter;font-style:NORMAL;font-weight:500;font-size:1.8rem;-webkit-letter-spacing:-0.005rem;-moz-letter-spacing:-0.005rem;-ms-letter-spacing:-0.005rem;letter-spacing:-0.005rem;line-height:2.8rem;color:#99A7F1;}}/*!sc*/ .hfCwZi:hover{color:#B6CAFF;cursor:pointer;-webkit-text-decoration:underline;text-decoration:underline;}/*!sc*/ .hfCwZi:active{color:#3F59E4;}/*!sc*/ .hfCwZi:focus-visible{outline:0.2rem solid #99A7F1;border-radius:0.4rem;color:#99A7F1;}/*!sc*/ .gnISOU{margin:0;padding:0;font-family:Aeonik,sans-serif !important;color:#635DFF;font-family:Inter;font-style:NORMAL;font-weight:500;font-size:1.8rem;-webkit-letter-spacing:-0.005rem;-moz-letter-spacing:-0.005rem;-ms-letter-spacing:-0.005rem;letter-spacing:-0.005rem;line-height:2.8rem;color:#99A7F1;-webkit-text-decoration:underline;text-decoration:underline;text-underline-offset:0.3rem;cursor:pointer;width:-webkit-fit-content;width:-moz-fit-content;width:fit-content;}/*!sc*/ @media screen and (min-width:900px){.gnISOU{color:#635DFF;font-family:Inter;font-style:NORMAL;font-weight:500;font-size:1.8rem;-webkit-letter-spacing:-0.005rem;-moz-letter-spacing:-0.005rem;-ms-letter-spacing:-0.005rem;letter-spacing:-0.005rem;line-height:2.8rem;color:#99A7F1;}}/*!sc*/ @media screen and (min-width:1200px){.gnISOU{color:#635DFF;font-family:Inter;font-style:NORMAL;font-weight:500;font-size:2rem;-webkit-letter-spacing:-0.01rem;-moz-letter-spacing:-0.01rem;-ms-letter-spacing:-0.01rem;letter-spacing:-0.01rem;line-height:3.2rem;color:#99A7F1;}}/*!sc*/ .gnISOU:hover{color:#B6CAFF;cursor:pointer;-webkit-text-decoration:underline;text-decoration:underline;}/*!sc*/ .gnISOU:active{color:#3F59E4;}/*!sc*/ .gnISOU:focus-visible{outline:0.2rem solid #99A7F1;border-radius:0.4rem;color:#99A7F1;}/*!sc*/ .dpsQkm{margin:0;padding:0;font-family:Aeonik,sans-serif !important;color:#635DFF;font-family:Inter;font-style:NORMAL;font-weight:500;font-size:1.4rem;-webkit-letter-spacing:0rem;-moz-letter-spacing:0rem;-ms-letter-spacing:0rem;letter-spacing:0rem;line-height:2.2rem;color:#99A7F1;-webkit-text-decoration:underline;text-decoration:underline;text-underline-offset:0.3rem;cursor:pointer;width:-webkit-fit-content;width:-moz-fit-content;width:fit-content;}/*!sc*/ @media screen and (min-width:900px){.dpsQkm{color:#635DFF;font-family:Inter;font-style:NORMAL;font-weight:500;font-size:1.4rem;-webkit-letter-spacing:0rem;-moz-letter-spacing:0rem;-ms-letter-spacing:0rem;letter-spacing:0rem;line-height:2.2rem;color:#99A7F1;}}/*!sc*/ @media screen and (min-width:1200px){.dpsQkm{color:#635DFF;font-family:Inter;font-style:NORMAL;font-weight:500;font-size:1.4rem;-webkit-letter-spacing:0rem;-moz-letter-spacing:0rem;-ms-letter-spacing:0rem;letter-spacing:0rem;line-height:2.2rem;color:#99A7F1;}}/*!sc*/ .dpsQkm:hover{color:#B6CAFF;cursor:pointer;-webkit-text-decoration:underline;text-decoration:underline;}/*!sc*/ .dpsQkm:active{color:#3F59E4;}/*!sc*/ .dpsQkm:focus-visible{outline:0.2rem solid #99A7F1;border-radius:0.4rem;color:#99A7F1;}/*!sc*/ .hwiOrq{margin:0;padding:0;font-family:Inter,sans-serif !important;color:#635DFF;font-family:Inter;font-style:NORMAL;font-weight:500;font-size:1.4rem;-webkit-letter-spacing:0rem;-moz-letter-spacing:0rem;-ms-letter-spacing:0rem;letter-spacing:0rem;line-height:2.2rem;color:#BCBAFF;-webkit-text-decoration:none;text-decoration:none;text-underline-offset:0.3rem;cursor:pointer;width:-webkit-fit-content;width:-moz-fit-content;width:fit-content;}/*!sc*/ @media screen and (min-width:900px){.hwiOrq{color:#635DFF;font-family:Inter;font-style:NORMAL;font-weight:500;font-size:1.4rem;-webkit-letter-spacing:0rem;-moz-letter-spacing:0rem;-ms-letter-spacing:0rem;letter-spacing:0rem;line-height:2.2rem;color:#BCBAFF;}}/*!sc*/ @media screen and (min-width:1200px){.hwiOrq{color:#635DFF;font-family:Inter;font-style:NORMAL;font-weight:500;font-size:1.4rem;-webkit-letter-spacing:0rem;-moz-letter-spacing:0rem;-ms-letter-spacing:0rem;letter-spacing:0rem;line-height:2.2rem;color:#BCBAFF;}}/*!sc*/ .hwiOrq:hover{color:#E9E8FF;cursor:pointer;-webkit-text-decoration:underline;text-decoration:underline;}/*!sc*/ .hwiOrq:active{color:#908BFF;}/*!sc*/ .hwiOrq:focus-visible{outline:0.4rem solid #635DFFCC;border-radius:0.4rem;color:#BCBAFF;}/*!sc*/ data-styled.g238[id="styled__Link-sc-bubr9x-0"]{content:"butiik,bhxyxO,jSunBo,hfCwZi,gnISOU,dpsQkm,hwiOrq,"}/*!sc*/ .bLVyXv{font-family:Aeonik,sans-serif;width:100%;min-width:17.3rem;display:-webkit-box;display:-webkit-flex;display:-ms-flexbox;display:flex;font-size:1.6rem;height:100%;line-height:2.4rem;-webkit-letter-spacing:0.015rem;-moz-letter-spacing:0.015rem;-ms-letter-spacing:0.015rem;letter-spacing:0.015rem;padding:0 0 0 4rem;border-radius:0.6rem;box-sizing:border-box;color:#FFFEFA;background:#111111;outline:none;border:0.1rem solid #555555;}/*!sc*/ .bLVyXv::-webkit-input-placeholder{color:#808080;}/*!sc*/ .bLVyXv::-moz-placeholder{color:#808080;}/*!sc*/ .bLVyXv:-ms-input-placeholder{color:#808080;}/*!sc*/ .bLVyXv::placeholder{color:#808080;}/*!sc*/ .bLVyXv:disabled{background-color:#383838;border:0.1rem solid #555555;color:#555555;}/*!sc*/ .bLVyXv:hover{border:0.1rem solid #808080;}/*!sc*/ data-styled.g240[id="styled__TextInput-sc-zjpc1c-1"]{content:"bLVyXv,"}/*!sc*/ .lrdPx{display:-webkit-box;display:-webkit-flex;display:-ms-flexbox;display:flex;-webkit-align-items:center;-webkit-box-align:center;-ms-flex-align:center;align-items:center;width:100%;min-width:17.3rem;border-radius:0.8rem;padding:0;height:4.8rem;box-sizing:border-box;margin-inline-start:0;margin-inline-end:0;padding-block-start:0;padding-inline-start:0;padding-inline-end:0;padding-block-end:0;border:none;}/*!sc*/ data-styled.g241[id="styled__InputWrapper-sc-zjpc1c-2"]{content:"lrdPx,"}/*!sc*/ .dNHNJo{position:absolute;margin:0 0 0 1.6rem;}/*!sc*/ data-styled.g242[id="styled__SearchIcon-sc-zjpc1c-3"]{content:"dNHNJo,"}/*!sc*/ .gfVdta{background:url(https://cdn.auth0.com/website/components/cta-module/fullwidth/Background.png) right center,no-repeat;color:#fffefa;}/*!sc*/ @media screen and (min-width:1200px){.gfVdta{max-width:153.6rem;margin:0 auto;border-radius:0;}}/*!sc*/ data-styled.g297[id="styled__Grid-sc-vosx1t-0"]{content:"gfVdta,"}/*!sc*/ .cvYPGz{display:grid;grid-template-columns:repeat(6,1fr);-webkit-column-gap:1.6rem;column-gap:1.6rem;margin:0 auto;width:calc(100% - (1.6rem * 2));}/*!sc*/ @media screen and (min-width:900px){.cvYPGz{grid-template-columns:repeat(12,1fr);width:calc(100% - (6.4rem * 2));}}/*!sc*/ @media screen and (min-width:1200px){.cvYPGz{max-width:1312px;-webkit-column-gap:3.2rem;column-gap:3.2rem;}}/*!sc*/ data-styled.g298[id="styled__Content-sc-vosx1t-1"]{content:"cvYPGz,"}/*!sc*/ .hmZChk{grid-column:span 6;}/*!sc*/ @media screen and (min-width:900px){.hmZChk{grid-column:span 7;}}/*!sc*/ data-styled.g299[id="styled__GridItem-sc-vosx1t-2"]{content:"hmZChk,"}/*!sc*/ .iWCUjn{display:-webkit-box;display:-webkit-flex;display:-ms-flexbox;display:flex;-webkit-flex-direction:column;-ms-flex-direction:column;flex-direction:column;gap:1.6rem;width:100%;}/*!sc*/ @media screen and (min-width:900px){.iWCUjn > a{width:100%;}}/*!sc*/ @media screen and (min-width:1200px){.iWCUjn{-webkit-flex-direction:row;-ms-flex-direction:row;flex-direction:row;-webkit-align-items:center;-webkit-box-align:center;-ms-flex-align:center;align-items:center;}.iWCUjn > a{width:-webkit-fit-content;width:-moz-fit-content;width:fit-content;}}/*!sc*/ data-styled.g330[id="styled__ButtonWrapper-sc-2ky66j-2"]{content:"iWCUjn,"}/*!sc*/ .guGDRs{position:relative;max-width:17.6rem;border-radius:0.8rem;border:0.1rem solid #555555;display:-webkit-box;display:-webkit-flex;display:-ms-flexbox;display:flex;padding:0;cursor:pointer;}/*!sc*/ data-styled.g403[id="sc-8t61xl-0"]{content:"guGDRs,"}/*!sc*/ .huAclX{width:100%;position:absolute;bottom:0;top:0;cursor:pointer;-webkit-appearance:none;-moz-appearance:none;appearance:none;}/*!sc*/ data-styled.g404[id="sc-8t61xl-1"]{content:"huAclX,"}/*!sc*/ .loMVLS{-webkit-flex:1;-ms-flex:1;flex:1;color:white;text-align:center;border-radius:0.8rem 0 0 0.8rem;background:none;-webkit-appearance:none;-moz-appearance:none;appearance:none;border:0.1rem solid transparent;padding:0.25rem 0;z-index:1;background:#2A2A2A;border-color:#2A2A2A;outline:0.1rem solid #808080;border-radius:0.7rem 0 0 0.7rem;}/*!sc*/ .loMVLS:last-of-type{border-radius:0 0.8rem 0.8rem 0;}/*!sc*/ .loMVLS svg{opacity:0.55;}/*!sc*/ .loMVLS svg{opacity:1;}/*!sc*/ .loMVLS:last-of-type{border-radius:0 0.7rem 0.7rem 0;}/*!sc*/ .loMVLS:hover{background:#2A2A2A;border-color:#2A2A2A;outline:0.1rem solid #555555;}/*!sc*/ .loMVLS:hover svg{opacity:1;}/*!sc*/ .loMVLS:focus{border-color:#555555;outline:0.2rem solid #B6CAFF;}/*!sc*/ .bWbXhw{-webkit-flex:1;-ms-flex:1;flex:1;color:white;text-align:center;border-radius:0.8rem 0 0 0.8rem;background:none;-webkit-appearance:none;-moz-appearance:none;appearance:none;border:0.1rem solid transparent;padding:0.25rem 0;z-index:1;}/*!sc*/ .bWbXhw:last-of-type{border-radius:0 0.8rem 0.8rem 0;border-left-color:#555555;}/*!sc*/ .bWbXhw svg{opacity:0.55;}/*!sc*/ .bWbXhw:hover{background:#2A2A2A;border-color:#2A2A2A;outline:0.1rem solid #555555;}/*!sc*/ .bWbXhw:hover svg{opacity:1;}/*!sc*/ .bWbXhw:focus{border-color:#555555;outline:0.2rem solid #B6CAFF;}/*!sc*/ data-styled.g405[id="sc-8t61xl-2"]{content:"loMVLS,bWbXhw,"}/*!sc*/ .dDTyLk{-webkit-align-items:center;-webkit-box-align:center;-ms-flex-align:center;align-items:center;background:none;border:none;display:-webkit-box;display:-webkit-flex;display:-ms-flexbox;display:flex;gap:0.4rem;-webkit-transition:all 0.2s ease-in-out;transition:all 0.2s ease-in-out;}/*!sc*/ .dDTyLk p{-webkit-transition:all 0.2s ease-in-out;transition:all 0.2s ease-in-out;}/*!sc*/ .dDTyLk:hover p{-webkit-text-decoration:underline;text-decoration:underline;text-underline-position:from-font;}/*!sc*/ data-styled.g406[id="sc-1xszjru-0"]{content:"dDTyLk,"}/*!sc*/ .ePAqkg{border-bottom:0.1rem solid #555555;width:100%;}/*!sc*/ .ePAqkg span{display:block;}/*!sc*/ @media screen and (min-width:1200px){.ePAqkg span{display:inline;}.ePAqkg span:first-child{margin-right:0.8rem;}}/*!sc*/ data-styled.g407[id="dh4ait-0"]{content:"ePAqkg,"}/*!sc*/ .egvjS{margin-bottom:5.6rem;}/*!sc*/ data-styled.g408[id="wiotl7-0"]{content:"egvjS,"}/*!sc*/ .keAMQj{display:-webkit-box;display:-webkit-flex;display:-ms-flexbox;display:flex;-webkit-flex-wrap:wrap;-ms-flex-wrap:wrap;flex-wrap:wrap;gap:1.2rem;padding:1.6rem 0;-webkit-transition:all 0.2s ease;transition:all 0.2s ease;}/*!sc*/ .keAMQj > button{padding:0;}/*!sc*/ data-styled.g409[id="wiotl7-1"]{content:"keAMQj,"}/*!sc*/ .jbIORl{-webkit-transition:all 0.2s ease;transition:all 0.2s ease;}/*!sc*/ .jbIORl path{fill:#99A7F1;}/*!sc*/ .jbIORl:hover path{fill:#B6CAFF;}/*!sc*/ data-styled.g410[id="wiotl7-2"]{content:"jbIORl,"}/*!sc*/ .gpkRVN{-webkit-align-items:center;-webkit-box-align:center;-ms-flex-align:center;align-items:center;background:none;border:none;color:#99A7F1;display:-webkit-box;display:-webkit-flex;display:-ms-flexbox;display:flex;font-size:1.4rem;font-weight:500;gap:0.4rem;line-height:2rem;-webkit-letter-spacing:0.021rem;-moz-letter-spacing:0.021rem;-ms-letter-spacing:0.021rem;letter-spacing:0.021rem;outline:none;padding:0;-webkit-transition:all 0.2s ease;transition:all 0.2s ease;}/*!sc*/ .gpkRVN:hover{color:#B6CAFF;}/*!sc*/ .gpkRVN:active{color:#3F59E4;}/*!sc*/ .gpkRVN:focus{border-radius:0.8rem;border:0.2rem solid #B6CAFF;}/*!sc*/ .gpkRVN >:first-child{-webkit-text-decoration:underline;text-decoration:underline;text-underline-offset:0.3rem;}/*!sc*/ data-styled.g411[id="wiotl7-3"]{content:"gpkRVN,"}/*!sc*/ .hdiybx{background:#111;display:none;position:fixed;z-index:100;top:10.4rem;bottom:0;left:0;right:0;width:100%;overflow:auto;}/*!sc*/ data-styled.g421[id="styled__Wrapper-sc-85iotp-0"]{content:"hdiybx,"}/*!sc*/ .iZzMFn{margin-bottom:15rem;padding-left:0;}/*!sc*/ data-styled.g422[id="styled__ContentWrapper-sc-85iotp-1"]{content:"iZzMFn,"}/*!sc*/ .fbKXcX{list-style:none;width:100%;border-bottom:0.1rem solid #2A2A2A;}/*!sc*/ .fbKXcX:first-of-type{border-top:0.1rem solid #2A2A2A;}/*!sc*/ data-styled.g423[id="styled__NavItemContainer-sc-85iotp-2"]{content:"fbKXcX,"}/*!sc*/ .bUCOoz{padding:2.4rem 2rem 2.4rem 1.6rem;display:-webkit-box;display:-webkit-flex;display:-ms-flexbox;display:flex;-webkit-box-pack:justify;-webkit-justify-content:space-between;-ms-flex-pack:justify;justify-content:space-between;}/*!sc*/ @media screen and (min-width:900px){.bUCOoz{padding-left:6.4rem;padding-right:6.4rem;}}/*!sc*/ data-styled.g424[id="styled__NavLinkContainer-sc-85iotp-3"]{content:"bUCOoz,"}/*!sc*/ .dETrsJ{font-family:Aeonik,sans-serif;font-weight:500;font-size:2rem;line-height:2.8rem;-webkit-letter-spacing:-0.01rem;-moz-letter-spacing:-0.01rem;-ms-letter-spacing:-0.01rem;letter-spacing:-0.01rem;color:#FFFEFA;display:inline-block;width:100%;}/*!sc*/ .dETrsJ:hover{color:#BCBAFF;}/*!sc*/ data-styled.g425[id="styled__NavLink-sc-85iotp-4"]{content:"dETrsJ,"}/*!sc*/ .jJmhNW{font-family:Aeonik,sans-serif;font-weight:500;font-size:2rem;line-height:2.8rem;-webkit-letter-spacing:0.01rem;-moz-letter-spacing:0.01rem;-ms-letter-spacing:0.01rem;letter-spacing:0.01rem;color:#FFFEFA;margin:0;padding:2.4rem 0 2.4rem 1.6rem;position:relative;-webkit-transition:color 0.2s;transition:color 0.2s;}/*!sc*/ .jJmhNW::before{border-style:solid;border-width:0.1em 0.1em 0 0;content:'';display:inline-block;height:1.4rem;right:3rem;top:calc(50% - 0.83rem);position:absolute;vertical-align:top;width:1.4rem;-webkit-transform:rotate(135deg);-ms-transform:rotate(135deg);transform:rotate(135deg);-webkit-transition:-webkit-transform 0.4s ease;-webkit-transition:transform 0.4s ease;transition:transform 0.4s ease;}/*!sc*/ @media screen and (min-width:900px){.jJmhNW{padding-left:6.4rem;}.jJmhNW:before{right:7rem;}}/*!sc*/ data-styled.g426[id="styled__NavItemTitle-sc-85iotp-5"]{content:"jJmhNW,"}/*!sc*/ .dAmhCz{overflow:hidden;height:auto;-webkit-transition:max-height 0.3s ease-out;transition:max-height 0.3s ease-out;padding-left:1.6rem;background:#191919;height:0;max-height:0;}/*!sc*/ @media screen and (min-width:900px){.dAmhCz{padding-left:6.4rem;}}/*!sc*/ data-styled.g427[id="styled__NavItem-sc-85iotp-6"]{content:"dAmhCz,"}/*!sc*/ .QEhDV:not(:last-of-type){margin-bottom:3.2rem;}/*!sc*/ .QEhDV:last-of-type{padding-bottom:1.6rem;}/*!sc*/ data-styled.g428[id="styled__ColumnContainer-sc-85iotp-7"]{content:"QEhDV,"}/*!sc*/ .dhdvtD{font-family:Aeonik Mono,monospace;font-size:1.4rem;line-height:2rem;font-weight:500;-webkit-letter-spacing:0.14rem;-moz-letter-spacing:0.14rem;-ms-letter-spacing:0.14rem;letter-spacing:0.14rem;text-transform:uppercase;color:#8c929c;margin:0 0 2rem;padding-top:3.2rem;}/*!sc*/ data-styled.g429[id="styled__ColumnItemTitle-sc-85iotp-8"]{content:"dhdvtD,"}/*!sc*/ .lbxxTt{list-style:none;padding:0;margin:0;}/*!sc*/ data-styled.g431[id="styled__ColumnList-sc-85iotp-10"]{content:"lbxxTt,"}/*!sc*/ .ihpWnt{font-family:Aeonik,sans-serif;font-size:2rem;line-height:2.8rem;-webkit-letter-spacing:0.01rem;-moz-letter-spacing:0.01rem;-ms-letter-spacing:0.01rem;letter-spacing:0.01rem;margin-bottom:2rem;}/*!sc*/ .ihpWnt a{color:#FFFEFA;display:inline-block;width:100%;}/*!sc*/ .ihpWnt a:hover{color:#BCBAFF;}/*!sc*/ data-styled.g432[id="styled__ColumnListItem-sc-85iotp-11"]{content:"ihpWnt,"}/*!sc*/ .hiEELR{-webkit-box-pack:center;-webkit-justify-content:center;-ms-flex-pack:center;justify-content:center;width:100%;padding:1.6rem;margin:0 auto;border-top:0.1rem solid #2A2A2A;position:fixed;bottom:0;left:0;right:0;text-align:center;background:#111;display:-webkit-box;display:-webkit-flex;display:-ms-flexbox;display:flex;-webkit-flex-direction:column;-ms-flex-direction:column;flex-direction:column;}/*!sc*/ @media screen and (min-width:900px){.hiEELR{padding:3.2rem 6.4rem;}}/*!sc*/ data-styled.g436[id="styled__ButtonContainer-sc-85iotp-15"]{content:"hiEELR,"}/*!sc*/ .epRiIO{width:100%;display:-webkit-box;display:-webkit-flex;display:-ms-flexbox;display:flex;gap:1.6rem;}/*!sc*/ data-styled.g439[id="styled__SecondaryButtonContainer-sc-85iotp-18"]{content:"epRiIO,"}/*!sc*/ .kXBJzn{background:#242424;color:#FFFFFF;width:100%;margin:auto;font-size:1.4rem;line-height:2rem;text-align:left;font-family:Aeonik,sans-serif;border-bottom:0.1rem solid #41454C;border-bottom:0.2rem solid;border-image-slice:1;border-image-source:linear-gradient( 135deg,#4cb7a3 0%,#3f59e4 50%,#4016a0 100% );}/*!sc*/ @media screen and (min-width:900px){.kXBJzn{text-align:left;}}/*!sc*/ data-styled.g441[id="styled__Wrapper-q607n8-0"]{content:"kXBJzn,"}/*!sc*/ .bTcOHV{width:100%;max-width:144rem;min-height:4rem;margin:auto;display:-webkit-box;display:-webkit-flex;display:-ms-flexbox;display:flex;-webkit-align-items:center;-webkit-box-align:center;-ms-flex-align:center;align-items:center;padding:1rem 1.6rem;}/*!sc*/ @media screen and (min-width:900px){.bTcOHV{padding:1rem 6.4rem;}}/*!sc*/ @media screen and (min-width:1200px){.bTcOHV{padding:0 6.4rem;}}/*!sc*/ data-styled.g442[id="styled__Container-q607n8-1"]{content:"bTcOHV,"}/*!sc*/ .iXBkOf{-webkit-flex:1;-ms-flex:1;flex:1;padding:0;cursor:pointer;}/*!sc*/ @media screen and (min-width:900px){.iXBkOf{padding:0;}}/*!sc*/ @media screen and (min-width:1200px){.iXBkOf{padding:0.9rem 0;margin-right:2.4rem;}}/*!sc*/ .iXBkOf:hover .styled__CTA-q607n8-4{color:#B6CAFF;}/*!sc*/ data-styled.g446[id="styled__Message-q607n8-5"]{content:"iXBkOf,"}/*!sc*/ .gncCYg{display:none;}/*!sc*/ @media screen and (min-width:1200px){.gncCYg{display:-webkit-inline-box;display:-webkit-inline-flex;display:-ms-inline-flexbox;display:inline-flex;-webkit-align-items:center;-webkit-box-align:center;-ms-flex-align:center;align-items:center;}}/*!sc*/ data-styled.g447[id="styled__Buttons-q607n8-6"]{content:"gncCYg,"}/*!sc*/ .gGyWpQ{color:#FFFFFF;cursor:pointer;font-weight:500;display:-webkit-inline-box;display:-webkit-inline-flex;display:-ms-inline-flexbox;display:inline-flex;-webkit-align-items:center;-webkit-box-align:center;-ms-flex-align:center;align-items:center;}/*!sc*/ .gGyWpQ:focus{outline:none;}/*!sc*/ .gGyWpQ:hover,.gGyWpQ:focus{color:#B6CAFF;}/*!sc*/ data-styled.g448[id="styled__Login-q607n8-7"]{content:"gGyWpQ,"}/*!sc*/ .dHTtIj{height:10.4rem;width:100%;margin:0 auto;}/*!sc*/ @media screen and (min-width:1200px){.dHTtIj{display:none;}}/*!sc*/ data-styled.g456[id="styled__HeaderBackMobile-sc-1755fzv-1"]{content:"dHTtIj,"}/*!sc*/ .TGnyL{height:0.1rem;position:absolute;visibility:hidden;top:0;}/*!sc*/ data-styled.g457[id="styled__ObservedPixel-sc-1755fzv-2"]{content:"TGnyL,"}/*!sc*/ .kwaEt{position:fixed;top:0;left:0;width:100%;z-index:1000;color:#FFFEFA;}/*!sc*/ data-styled.g458[id="styled__Header-sc-1755fzv-3"]{content:"kwaEt,"}/*!sc*/ .hfWran{display:-webkit-box;display:-webkit-flex;display:-ms-flexbox;display:flex;-webkit-align-items:center;-webkit-box-align:center;-ms-flex-align:center;align-items:center;}/*!sc*/ data-styled.g459[id="styled__LogoWrapper-sc-1755fzv-4"]{content:"hfWran,"}/*!sc*/ .cUYhhG{display:-webkit-box;display:-webkit-flex;display:-ms-flexbox;display:flex;-webkit-align-items:center;-webkit-box-align:center;-ms-flex-align:center;align-items:center;-webkit-flex:1;-ms-flex:1;flex:1;}/*!sc*/ data-styled.g460[id="styled__LogoWrapperMobile-sc-1755fzv-5"]{content:"cUYhhG,"}/*!sc*/ .fblBoo{-webkit-transition:background-color 0.2s ease,border-radius 0.2s ease;transition:background-color 0.2s ease,border-radius 0.2s ease;position:relative;display:none;width:100%;max-width:100%;margin:auto;padding:0 6.4rem;background-color:#111;}/*!sc*/ @media screen and (min-width:1200px){.fblBoo{display:-webkit-box;display:-webkit-flex;display:-ms-flexbox;display:flex;-webkit-box-pack:justify;-webkit-justify-content:space-between;-ms-flex-pack:justify;justify-content:space-between;}}/*!sc*/ .fblBoo:hover{background-color:#111;border-radius:0 0 1.6rem 1.6rem;}/*!sc*/ data-styled.g461[id="styled__NavDesktop-sc-1755fzv-6"]{content:"fblBoo,"}/*!sc*/ .bCnrpr{max-width:131.2rem;width:100%;margin:auto;-webkit-transition:background-color 0.2s ease,border-radius 0.2s ease;transition:background-color 0.2s ease,border-radius 0.2s ease;position:relative;padding:0 6.4rem;background-color:#111;}/*!sc*/ @media screen and (min-width:1200px){.bCnrpr{display:-webkit-box;display:-webkit-flex;display:-ms-flexbox;display:flex;-webkit-box-pack:justify;-webkit-justify-content:space-between;-ms-flex-pack:justify;justify-content:space-between;padding:0;}}/*!sc*/ .bCnrpr:hover{background-color:#111;border-radius:0 0 1.6rem 1.6rem;}/*!sc*/ data-styled.g462[id="styled__NavDesktopContainer-sc-1755fzv-7"]{content:"bCnrpr,"}/*!sc*/ .hLHYiD{display:-webkit-box;display:-webkit-flex;display:-ms-flexbox;display:flex;-webkit-align-items:center;-webkit-box-align:center;-ms-flex-align:center;align-items:center;}/*!sc*/ data-styled.g463[id="styled__ButtonList-sc-1755fzv-8"]{content:"hLHYiD,"}/*!sc*/ .gZnwIf{max-width:144rem;width:100%;margin:auto;padding:1.2rem 1.6rem;display:-webkit-box;display:-webkit-flex;display:-ms-flexbox;display:flex;background-color:#111;height:6.4rem;box-shadow:inset 0 -0.1rem 0 #2A2A2A;position:relative;-webkit-align-items:center;-webkit-box-align:center;-ms-flex-align:center;align-items:center;}/*!sc*/ @media screen and (min-width:900px){.gZnwIf{padding:1.6rem 6.4rem;}}/*!sc*/ @media screen and (min-width:1200px){.gZnwIf{display:none;}}/*!sc*/ data-styled.g464[id="styled__NavMobile-sc-1755fzv-9"]{content:"gZnwIf,"}/*!sc*/ .UKpEE{justify-self:flex-end;padding:2rem 0;}/*!sc*/ data-styled.g465[id="styled__RightColumnMobile-sc-1755fzv-10"]{content:"UKpEE,"}/*!sc*/ .iHuLVG{-webkit-appearance:none;-moz-appearance:none;appearance:none;border:0;background:transparent;height:2.4rem;margin:0;padding:0;position:relative;display:-webkit-box;display:-webkit-flex;display:-ms-flexbox;display:flex;-webkit-box-pack:center;-webkit-justify-content:center;-ms-flex-pack:center;justify-content:center;cursor:pointer;-webkit-transition:all 0.5s ease-in-out;transition:all 0.5s ease-in-out;}/*!sc*/ data-styled.g466[id="styled__BurgerIconWrapper-sc-1755fzv-11"]{content:"iHuLVG,"}/*!sc*/ .dGpEKR{width:2.2rem;display:-webkit-box;display:-webkit-flex;display:-ms-flexbox;display:flex;height:0.25rem;background:#FFFFFF;-webkit-transition:all 0.2s ease-in-out;transition:all 0.2s ease-in-out;margin-top:1.2rem;}/*!sc*/ .dGpEKR::before,.dGpEKR::after{content:'';position:absolute;width:2.2rem;height:0.25rem;background:#FFFFFF;-webkit-transition:all 0.2s ease-in-out;transition:all 0.2s ease-in-out;}/*!sc*/ .dGpEKR::before{-webkit-transform:translateY(-0.7rem);-ms-transform:translateY(-0.7rem);transform:translateY(-0.7rem);}/*!sc*/ .dGpEKR::after{-webkit-transform:translateY(0.7rem);-ms-transform:translateY(0.7rem);transform:translateY(0.7rem);}/*!sc*/ data-styled.g467[id="styled__BurgerIcon-sc-1755fzv-12"]{content:"dGpEKR,"}/*!sc*/ .gJozFS{display:-webkit-box;display:-webkit-flex;display:-ms-flexbox;display:flex;-webkit-align-items:center;-webkit-box-align:center;-ms-flex-align:center;align-items:center;padding:0;list-style:none;margin:0;line-height:2.4rem;}/*!sc*/ data-styled.g468[id="styled__NavList-sc-1755fzv-13"]{content:"gJozFS,"}/*!sc*/ .iyaTlV{color:#FFFEFA;cursor:initial;padding-top:0.9rem;width:104.4rem;position:absolute;left:0;right:0;margin:-0.1rem auto 0;top:6.4rem;display:inline-block;visibility:hidden;opacity:0;-webkit-transform:translateX(-1.6rem);-ms-transform:translateX(-1.6rem);transform:translateX(-1.6rem);-webkit-transition:visibility 0s,opacity 0.2s linear,-webkit-transform 0.2s linear;-webkit-transition:visibility 0s,opacity 0.2s linear,transform 0.2s linear;transition:visibility 0s,opacity 0.2s linear,transform 0.2s linear;}/*!sc*/ data-styled.g469[id="styled__NavElementContentWrapper-sc-1755fzv-14"]{content:"iyaTlV,"}/*!sc*/ .goPIno{position:relative;-webkit-transition:color 0.2s ease;transition:color 0.2s ease;color:#FFFEFA;display:-webkit-box;display:-webkit-flex;display:-ms-flexbox;display:flex;-webkit-align-items:center;-webkit-box-align:center;-ms-flex-align:center;align-items:center;-webkit-box-pack:center;-webkit-justify-content:center;-ms-flex-pack:center;justify-content:center;}/*!sc*/ .goPIno::after{content:'';-webkit-transition:border-color 0.2s ease,-webkit-transform 0.2s ease;-webkit-transition:border-color 0.2s ease,transform 0.2s ease;transition:border-color 0.2s ease,transform 0.2s ease;width:100%;height:0.2rem;border-bottom:0.2rem solid transparent;display:block;bottom:-1.6rem;position:absolute;left:0;-webkit-transform:scale(0,1);-ms-transform:scale(0,1);transform:scale(0,1);}/*!sc*/ data-styled.g470[id="styled__NavElementButton-sc-1755fzv-15"]{content:"goPIno,"}/*!sc*/ .dnWatv{font-family:Aeonik,sans-serif;padding:1.6rem 1.8rem;cursor:pointer;font-size:1.6rem;font-weight:500;line-height:3.2rem;-webkit-letter-spacing:0.02rem;-moz-letter-spacing:0.02rem;-ms-letter-spacing:0.02rem;letter-spacing:0.02rem;}/*!sc*/ .dnWatv .styled__NavElementButton-sc-1755fzv-15 > svg{stroke:#FFFEFA;-webkit-transition:stroke 0.2s ease;transition:stroke 0.2s ease;padding-left:0.4rem;}/*!sc*/ .dnWatv:hover{color:#BCBAFF;}/*!sc*/ .dnWatv:hover .styled__NavElementContentWrapper-sc-1755fzv-14{visibility:visible;opacity:1;-webkit-transform:translateX(0);-ms-transform:translateX(0);transform:translateX(0);}/*!sc*/ .dnWatv:hover .styled__NavElementButton-sc-1755fzv-15{color:#BCBAFF;}/*!sc*/ .dnWatv:hover .styled__NavElementButton-sc-1755fzv-15::after{border-bottom-color:#BCBAFF;-webkit-transform:scale(1,1);-ms-transform:scale(1,1);transform:scale(1,1);}/*!sc*/ .dnWatv:hover .styled__NavElementButton-sc-1755fzv-15 > svg{stroke:#BCBAFF;}/*!sc*/ .dnWatv:focus-visible{color:#BCBAFF;}/*!sc*/ .dnWatv:focus-visible .styled__NavElementContentWrapper-sc-1755fzv-14{visibility:visible;opacity:1;-webkit-transform:translateX(0);-ms-transform:translateX(0);transform:translateX(0);}/*!sc*/ .dnWatv:focus-visible .styled__NavElementButton-sc-1755fzv-15{color:#BCBAFF;}/*!sc*/ .dnWatv:focus-visible .styled__NavElementButton-sc-1755fzv-15::after{border-bottom-color:#BCBAFF;-webkit-transform:scale(1,1);-ms-transform:scale(1,1);transform:scale(1,1);}/*!sc*/ .dnWatv:focus-visible .styled__NavElementButton-sc-1755fzv-15 > svg{stroke:#BCBAFF;}/*!sc*/ .dnWatv:focus-within{color:#BCBAFF;}/*!sc*/ .dnWatv:focus-within .styled__NavElementContentWrapper-sc-1755fzv-14{visibility:visible;opacity:1;-webkit-transform:translateX(0);-ms-transform:translateX(0);transform:translateX(0);}/*!sc*/ .dnWatv:focus-within .styled__NavElementButton-sc-1755fzv-15{color:#BCBAFF;}/*!sc*/ .dnWatv:focus-within .styled__NavElementButton-sc-1755fzv-15::after{border-bottom-color:#BCBAFF;-webkit-transform:scale(1,1);-ms-transform:scale(1,1);transform:scale(1,1);}/*!sc*/ .dnWatv:focus-within .styled__NavElementButton-sc-1755fzv-15 > svg{stroke:#BCBAFF;}/*!sc*/ data-styled.g471[id="styled__NavListEl-sc-1755fzv-16"]{content:"dnWatv,"}/*!sc*/ .jtpgRu{background:rgba(23,23,23,0.96);-webkit-backdrop-filter:blur(14px);backdrop-filter:blur(14px);border:0.1rem solid #2A2A2A;border-radius:1rem;display:-webkit-box;display:-webkit-flex;display:-ms-flexbox;display:flex;}/*!sc*/ data-styled.g472[id="styled__NavElementContent-sc-1755fzv-17"]{content:"jtpgRu,"}/*!sc*/ .xvieK{min-width:31.1rem;width:31.1rem;padding:3.2rem;display:-webkit-box;display:-webkit-flex;display:-ms-flexbox;display:flex;-webkit-flex-direction:column;-ms-flex-direction:column;flex-direction:column;}/*!sc*/ data-styled.g477[id="styled__Column-sc-1ff7bch-0"]{content:"xvieK,"}/*!sc*/ .ksvdhq{border-right:0.1rem solid #2A2A2A;-webkit-flex:1;-ms-flex:1;flex:1;width:100%;min-width:33%;}/*!sc*/ .kIFVcf{border-right:0.1rem solid #2A2A2A;}/*!sc*/ data-styled.g478[id="styled__FirstColumn-sc-1ff7bch-1"]{content:"ksvdhq,kIFVcf,"}/*!sc*/ .bpIsaL{border-right:0.1rem solid #2A2A2A;-webkit-flex:1;-ms-flex:1;flex:1;width:100%;min-width:33%;}/*!sc*/ .fbRjZO{border-right:0.1rem solid #2A2A2A;}/*!sc*/ data-styled.g479[id="styled__SecondColumn-sc-1ff7bch-2"]{content:"bpIsaL,fbRjZO,"}/*!sc*/ .cUYhhd{width:auto;-webkit-flex:1;-ms-flex:1;flex:1;padding:3.2rem;width:100%;min-width:33%;}/*!sc*/ .dDttGJ{width:auto;-webkit-flex:1;-ms-flex:1;flex:1;padding:3.2rem 0;}/*!sc*/ .gMGasY{width:auto;-webkit-flex:1;-ms-flex:1;flex:1;padding:0;width:100%;min-width:33%;}/*!sc*/ data-styled.g480[id="styled__ThirdColumn-sc-1ff7bch-3"]{content:"cUYhhd,dDttGJ,gMGasY,"}/*!sc*/ .guYaGV{list-style:none;padding:0;height:100%;}/*!sc*/ data-styled.g482[id="styled__List-sc-1p6pq9n-1"]{content:"guYaGV,"}/*!sc*/ .jSbSuj{margin:0;display:-webkit-box;display:-webkit-flex;display:-ms-flexbox;display:flex;-webkit-align-items:center;-webkit-box-align:center;-ms-flex-align:center;align-items:center;font-family:Aeonik,sans-serif;font-weight:500;font-size:1.4rem;line-height:2.4rem;color:#FFFFFF;}/*!sc*/ .jSbSuj + li{margin-top:1.6rem;}/*!sc*/ .jSbSuj svg{margin-right:1.4rem;min-width:2.4rem;}/*!sc*/ .jSbSuj a{display:-webkit-box;display:-webkit-flex;display:-ms-flexbox;display:flex;-webkit-align-items:center;-webkit-box-align:center;-ms-flex-align:center;align-items:center;color:#FFFFFF;-webkit-transition:color 0.2s ease;transition:color 0.2s ease;width:100%;}/*!sc*/ .jSbSuj a:hover{color:#BCBAFF;}/*!sc*/ .jSbSuj:last-of-type{margin-bottom:3.2rem;}/*!sc*/ data-styled.g483[id="styled__Element-sc-1p6pq9n-2"]{content:"jSbSuj,"}/*!sc*/ .eDzJqf{border-top:0.1rem solid #2A2A2A;padding-top:2.4rem;}/*!sc*/ data-styled.g485[id="styled__BottomLinkWrapper-sc-1p6pq9n-4"]{content:"eDzJqf,"}/*!sc*/ .dURBhZ{list-style:none;padding:0;display:grid;grid-template-columns:1fr;-webkit-align-items:center;-webkit-box-align:center;-ms-flex-align:center;align-items:center;height:100%;}/*!sc*/ data-styled.g486[id="styled__List-sc-12vkkep-0"]{content:"dURBhZ,"}/*!sc*/ .cetBpD{margin:0;padding:3.2rem;height:14.47rem;display:-webkit-box;display:-webkit-flex;display:-ms-flexbox;display:flex;-webkit-align-items:center;-webkit-box-align:center;-ms-flex-align:center;align-items:center;}/*!sc*/ .cetBpD + li{border-top:0.1rem solid #2A2A2A;}/*!sc*/ .cetBpD div{display:-webkit-box;display:-webkit-flex;display:-ms-flexbox;display:flex;-webkit-flex-direction:column;-ms-flex-direction:column;flex-direction:column;-webkit-box-pack:center;-webkit-justify-content:center;-ms-flex-pack:center;justify-content:center;}/*!sc*/ .cetBpD a{color:#BDC4CF;width:100%;}/*!sc*/ .cetBpD a svg{margin-right:1.4rem;}/*!sc*/ .cetBpD a p{margin:0;}/*!sc*/ .cetBpD a p:first-child{font-weight:500;color:#FFFFFF;-webkit-transition:color 0.2s ease;transition:color 0.2s ease;}/*!sc*/ .cetBpD a:hover p{color:#BDC4CF;}/*!sc*/ .cetBpD a:hover p:first-child{color:#BCBAFF;}/*!sc*/ data-styled.g487[id="styled__Element-sc-12vkkep-1"]{content:"cetBpD,"}/*!sc*/ .gXQAAw a{display:block;color:#FFFFFF;}/*!sc*/ .gXQAAw a:hover{color:#BCBAFF;}/*!sc*/ .gXQAAw a span{font-weight:500;}/*!sc*/ .gXQAAw a + a{margin-top:2.4rem;}/*!sc*/ .gXQAAw a + p{margin-top:3.6rem;}/*!sc*/ data-styled.g488[id="styled__Wrapper-mvo3b8-0"]{content:"gXQAAw,"}/*!sc*/ .dNLwir{padding:0 3.2rem;display:block;}/*!sc*/ .dNLwir:hover p:last-of-type{color:#BCBAFF;}/*!sc*/ .dNLwir:first-child{margin-bottom:2.4rem;}/*!sc*/ data-styled.g492[id="styled__Link-k7d9qa-0"]{content:"dNLwir,"}/*!sc*/ .dXPgwV{display:-webkit-box;display:-webkit-flex;display:-ms-flexbox;display:flex;-webkit-align-items:center;-webkit-box-align:center;-ms-flex-align:center;align-items:center;}/*!sc*/ data-styled.g493[id="styled__Container-k7d9qa-1"]{content:"dXPgwV,"}/*!sc*/ .iACfSx{border-radius:0.8rem;width:100%;max-width:13rem;height:9rem;margin-right:1.9rem;object-fit:cover;}/*!sc*/ data-styled.g495[id="styled__Image-k7d9qa-3"]{content:"iACfSx,"}/*!sc*/ .iJOdtI{border-top:0.1rem solid #2A2A2A;}/*!sc*/ data-styled.g496[id="styled__Divider-sc-25clja-0"]{content:"iJOdtI,"}/*!sc*/ .gYCAsK{padding:3.2rem 3.2rem 0 3.2rem;}/*!sc*/ data-styled.g497[id="styled__ItemsListContainer-sc-25clja-1"]{content:"gYCAsK,"}/*!sc*/ .gCBQiB{position:relative;padding-left:0.8rem;z-index:100;}/*!sc*/ .gCBQiB:after{content:'';position:absolute;left:0;top:50%;-webkit-transform:translateY(-50%);-ms-transform:translateY(-50%);transform:translateY(-50%);display:inline-block;width:0.1rem;background:#242424;height:2.6rem;}/*!sc*/ data-styled.g498[id="sc-8aqj4j-0"]{content:"gCBQiB,"}/*!sc*/ .fjEeoE{padding:0.6rem 0.55rem;display:-webkit-box;display:-webkit-flex;display:-ms-flexbox;display:flex;-webkit-align-items:center;-webkit-box-align:center;-ms-flex-align:center;align-items:center;-webkit-box-pack:center;-webkit-justify-content:center;-ms-flex-pack:center;justify-content:center;background:#1E1E1E;-webkit-appearance:none;-moz-appearance:none;appearance:none;border-radius:0.4rem;-webkit-transition:all 0.2s ease-in-out;transition:all 0.2s ease-in-out;outline:0.4rem solid transparent;border:0.2rem solid #1E1E1E;outline-offset:0;}/*!sc*/ .fjEeoE:hover{background:#2A2A2A;}/*!sc*/ .fjEeoE:focus{outline-color:#6B665FCC;border-color:#B6CAFF;}/*!sc*/ data-styled.g499[id="sc-8aqj4j-1"]{content:"fjEeoE,"}/*!sc*/ .gdIxpa{display:none;-webkit-transition:all 0.2s ease-in-out;transition:all 0.2s ease-in-out;}/*!sc*/ data-styled.g500[id="sc-8aqj4j-2"]{content:"gdIxpa,"}/*!sc*/ .iaowVa{list-style:none;}/*!sc*/ data-styled.g501[id="sc-8aqj4j-3"]{content:"iaowVa,"}/*!sc*/ .kTELOh{background:none;width:100%;text-align:left;display:-webkit-box;display:-webkit-flex;display:-ms-flexbox;display:flex;-webkit-align-items:center;-webkit-box-align:center;-ms-flex-align:center;align-items:center;gap:0.8rem;padding:0.6rem 1.4rem;-webkit-transition:all 0.2s ease-in-out;transition:all 0.2s ease-in-out;border-radius:0.6rem;outline:0.4rem solid transparent;border:0.2rem solid transparent;}/*!sc*/ .kTELOh:hover{background:#2A2A2A;}/*!sc*/ .kTELOh:disabled:hover{background:none;}/*!sc*/ .kTELOh:disabled span{color:#383838;}/*!sc*/ .kTELOh:disabled svg path{stroke:#383838;}/*!sc*/ .kTELOh span{color:#B6CAFF;}/*!sc*/ .kTELOh svg path{stroke:#B6CAFF;}/*!sc*/ .kTELOh:focus{outline-color:#6B665FCC;border-color:#B6CAFF;}/*!sc*/ .jmjPHc{background:none;width:100%;text-align:left;display:-webkit-box;display:-webkit-flex;display:-ms-flexbox;display:flex;-webkit-align-items:center;-webkit-box-align:center;-ms-flex-align:center;align-items:center;gap:0.8rem;padding:0.6rem 1.4rem;-webkit-transition:all 0.2s ease-in-out;transition:all 0.2s ease-in-out;border-radius:0.6rem;outline:0.4rem solid transparent;border:0.2rem solid transparent;}/*!sc*/ .jmjPHc:hover{background:#2A2A2A;}/*!sc*/ .jmjPHc:disabled:hover{background:none;}/*!sc*/ .jmjPHc:disabled span{color:#383838;}/*!sc*/ .jmjPHc:disabled svg path{fill:#383838;}/*!sc*/ .jmjPHc:focus{outline-color:#6B665FCC;border-color:#B6CAFF;}/*!sc*/ data-styled.g502[id="sc-8aqj4j-4"]{content:"kTELOh,jmjPHc,"}/*!sc*/ .iyxCTh{position:fixed;z-index:999;display:none;}/*!sc*/ @media screen and (min-width:1200px){.iyxCTh{display:block;background:#171717;border-top:0.1rem solid #555555;width:100%;margin-top:10.6rem;top:0;}}/*!sc*/ data-styled.g503[id="sc-19z8ym3-0"]{content:"iyxCTh,"}/*!sc*/ @media screen and (min-width:1200px){.fAWgzp{height:6.4rem;width:100%;background:#111;position:absolute;top:-6.4rem;}}/*!sc*/ data-styled.g504[id="sc-19z8ym3-1"]{content:"fAWgzp,"}/*!sc*/ .ePjeMY{max-width:144rem;padding:0 6.4rem;margin:0 auto;display:-webkit-box;display:-webkit-flex;display:-ms-flexbox;display:flex;gap:5.2rem;-webkit-align-items:center;-webkit-box-align:center;-ms-flex-align:center;align-items:center;-webkit-box-pack:justify;-webkit-justify-content:space-between;-ms-flex-pack:justify;justify-content:space-between;}/*!sc*/ .ePjeMY a:hover,.ePjeMY a:focus{color:#FFFEFA;}/*!sc*/ .ePjeMY a{outline:0.4rem solid transparent;border:0.2rem solid transparent;}/*!sc*/ @media screen and (min-width:1200px) and (max-width:1300px){.ePjeMY{gap:3.2rem;}}/*!sc*/ data-styled.g505[id="sc-19z8ym3-2"]{content:"ePjeMY,"}/*!sc*/ .jdjutH{margin:0;padding:0;display:-webkit-box;display:-webkit-flex;display:-ms-flexbox;display:flex;gap:2.8rem;}/*!sc*/ @media screen and (min-width:1200px) and (max-width:1300px){.jdjutH{gap:2rem;}.jdjutH a{font-size:1.4rem;line-height:1.8rem;}}/*!sc*/ data-styled.g506[id="sc-19z8ym3-3"]{content:"jdjutH,"}/*!sc*/ .kKvPZn{list-style:none;}/*!sc*/ .kKvPZn a{display:block;padding:2rem 0 1.8rem;}/*!sc*/ .kKvPZn:after{display:block;content:'';border-bottom:0.2rem solid #4CB7A3;-webkit-transform:scaleX(0);-ms-transform:scaleX(0);transform:scaleX(0);-webkit-transition:-webkit-transform 0.4s ease-in-out;-webkit-transition:transform 0.4s ease-in-out;transition:transform 0.4s ease-in-out;}/*!sc*/ .kKvPZn:hover{color:inherit;}/*!sc*/ .kKvPZn:hover:after{-webkit-transform:scaleX(1);-ms-transform:scaleX(1);transform:scaleX(1);}/*!sc*/ .kKvPZn:hover a{color:#FFFEFA;}/*!sc*/ .iVeAMP{list-style:none;}/*!sc*/ .iVeAMP a{display:block;padding:2rem 0 1.8rem;}/*!sc*/ .iVeAMP:after{display:block;content:'';border-bottom:0.2rem solid #B49BFC;-webkit-transform:scaleX(0);-ms-transform:scaleX(0);transform:scaleX(0);-webkit-transition:-webkit-transform 0.4s ease-in-out;-webkit-transition:transform 0.4s ease-in-out;transition:transform 0.4s ease-in-out;}/*!sc*/ .iVeAMP:hover{color:inherit;}/*!sc*/ .iVeAMP:hover:after{-webkit-transform:scaleX(1);-ms-transform:scaleX(1);transform:scaleX(1);}/*!sc*/ .iVeAMP:hover a{color:#FFFEFA;}/*!sc*/ .fJixJm{list-style:none;}/*!sc*/ .fJixJm a{display:block;padding:2rem 0 1.8rem;}/*!sc*/ .fJixJm:after{display:block;content:'';border-bottom:0.2rem solid #E27133;-webkit-transform:scaleX(0);-ms-transform:scaleX(0);transform:scaleX(0);-webkit-transition:-webkit-transform 0.4s ease-in-out;-webkit-transition:transform 0.4s ease-in-out;transition:transform 0.4s ease-in-out;}/*!sc*/ .fJixJm:hover{color:inherit;}/*!sc*/ .fJixJm:hover:after{-webkit-transform:scaleX(1);-ms-transform:scaleX(1);transform:scaleX(1);}/*!sc*/ .fJixJm:hover a{color:#FFFEFA;}/*!sc*/ .gbVuTJ{list-style:none;}/*!sc*/ .gbVuTJ a{display:block;padding:2rem 0 1.8rem;}/*!sc*/ .gbVuTJ:after{display:block;content:'';border-bottom:0.2rem solid #F4D594;-webkit-transform:scaleX(0);-ms-transform:scaleX(0);transform:scaleX(0);-webkit-transition:-webkit-transform 0.4s ease-in-out;-webkit-transition:transform 0.4s ease-in-out;transition:transform 0.4s ease-in-out;}/*!sc*/ .gbVuTJ:hover{color:inherit;}/*!sc*/ .gbVuTJ:hover:after{-webkit-transform:scaleX(1);-ms-transform:scaleX(1);transform:scaleX(1);}/*!sc*/ .gbVuTJ:hover a{color:#FFFEFA;}/*!sc*/ .cIIkJD{list-style:none;}/*!sc*/ .cIIkJD a{display:block;padding:2rem 0 1.8rem;}/*!sc*/ .cIIkJD:after{display:block;content:'';border-bottom:0.2rem solid #62C0EB;-webkit-transform:scaleX(0);-ms-transform:scaleX(0);transform:scaleX(0);-webkit-transition:-webkit-transform 0.4s ease-in-out;-webkit-transition:transform 0.4s ease-in-out;transition:transform 0.4s ease-in-out;}/*!sc*/ .cIIkJD:hover{color:inherit;}/*!sc*/ .cIIkJD:hover:after{-webkit-transform:scaleX(1);-ms-transform:scaleX(1);transform:scaleX(1);}/*!sc*/ .cIIkJD:hover a{color:#FFFEFA;}/*!sc*/ .hFAXQk{list-style:none;}/*!sc*/ .hFAXQk a{display:block;padding:2rem 0 1.8rem;}/*!sc*/ .hFAXQk:after{display:block;content:'';border-bottom:0.2rem solid #7192EC;-webkit-transform:scaleX(0);-ms-transform:scaleX(0);transform:scaleX(0);-webkit-transition:-webkit-transform 0.4s ease-in-out;-webkit-transition:transform 0.4s ease-in-out;transition:transform 0.4s ease-in-out;}/*!sc*/ .hFAXQk:hover{color:inherit;}/*!sc*/ .hFAXQk:hover:after{-webkit-transform:scaleX(1);-ms-transform:scaleX(1);transform:scaleX(1);}/*!sc*/ .hFAXQk:hover a{color:#FFFEFA;}/*!sc*/ .fInsdZ{list-style:none;}/*!sc*/ .fInsdZ a{display:block;padding:2rem 0 1.8rem;}/*!sc*/ .fInsdZ:after{display:block;content:'';border-bottom:0.2rem solid #E991B0;-webkit-transform:scaleX(0);-ms-transform:scaleX(0);transform:scaleX(0);-webkit-transition:-webkit-transform 0.4s ease-in-out;-webkit-transition:transform 0.4s ease-in-out;transition:transform 0.4s ease-in-out;}/*!sc*/ .fInsdZ:hover{color:inherit;}/*!sc*/ .fInsdZ:hover:after{-webkit-transform:scaleX(1);-ms-transform:scaleX(1);transform:scaleX(1);}/*!sc*/ .fInsdZ:hover a{color:#FFFEFA;}/*!sc*/ data-styled.g507[id="sc-19z8ym3-4"]{content:"kKvPZn,iVeAMP,fJixJm,gbVuTJ,cIIkJD,hFAXQk,fInsdZ,"}/*!sc*/ .hkZJsJ{display:-webkit-box;display:-webkit-flex;display:-ms-flexbox;display:flex;-webkit-align-items:center;-webkit-box-align:center;-ms-flex-align:center;align-items:center;width:100%;-webkit-flex:1;-ms-flex:1;flex:1;-webkit-box-pack:end;-webkit-justify-content:flex-end;-ms-flex-pack:end;justify-content:flex-end;}/*!sc*/ data-styled.g508[id="sc-19z8ym3-5"]{content:"hkZJsJ,"}/*!sc*/ .bHAfBe{width:100vw;display:none;position:fixed;left:0;top:16rem;}/*!sc*/ .bHAfBe br{display:none;}/*!sc*/ .bHAfBe fieldset,.bHAfBe input{min-width:12.5rem;}/*!sc*/ .bHAfBe input{width:100%;}/*!sc*/ .bHAfBe input:focus{border-width:0.1rem;}/*!sc*/ @media screen and (min-width:900px){.bHAfBe{padding:0 6.4rem;}}/*!sc*/ @media screen and (max-width:1200px){.bHAfBe input{border-radius:0;border-width:0.1rem 0;}.bHAfBe input:hover{border-width:0.1rem 0;}}/*!sc*/ @media screen and (min-width:1200px) and (max-width:1300px){.bHAfBe{padding:0;padding-right:0.8rem;}}/*!sc*/ @media screen and (min-width:1200px){.bHAfBe{display:block;max-width:29rem;width:100%;position:relative;top:0;padding-right:1.6rem;}.bHAfBe input{max-height:4rem;max-width:29rem;width:100%;}.bHAfBe input:focus{border-width:0.1rem;}}/*!sc*/ data-styled.g511[id="sc-8jxe5n-1"]{content:"bHAfBe,"}/*!sc*/ .exdfoO{-webkit-appearance:none;-moz-appearance:none;appearance:none;background:none;border:0;margin:0;padding:0;}/*!sc*/ @media screen and (min-width:1200px){.exdfoO{display:none;}}/*!sc*/ data-styled.g513[id="sc-8jxe5n-3"]{content:"exdfoO,"}/*!sc*/ .iPbnr{position:relative;}/*!sc*/ data-styled.g515[id="sc-1q6s0ef-0"]{content:"iPbnr,"}/*!sc*/ .cmMjKH{display:block;background:#171717;border-top:0.1rem solid #555555;width:100%;z-index:200;position:fixed;}/*!sc*/ @media screen and (min-width:1200px){.cmMjKH{display:none;}}/*!sc*/ data-styled.g540[id="sc-1gkkh2j-0"]{content:"cmMjKH,"}/*!sc*/ .hfnTjw{max-width:144rem;padding:1.2rem 1.6rem;margin:0 auto;display:-webkit-box;display:-webkit-flex;display:-ms-flexbox;display:flex;-webkit-align-items:center;-webkit-box-align:center;-ms-flex-align:center;align-items:center;-webkit-box-pack:justify;-webkit-justify-content:space-between;-ms-flex-pack:justify;justify-content:space-between;}/*!sc*/ @media screen and (min-width:900px){.hfnTjw{padding:1.2rem 6.4rem;}}/*!sc*/ data-styled.g541[id="sc-1gkkh2j-1"]{content:"hfnTjw,"}/*!sc*/ .djkNR{visibility:hidden;z-index:8;position:absolute;background:#171717;width:100%;height:100vh;-webkit-transform:translateY(-1rem);-ms-transform:translateY(-1rem);transform:translateY(-1rem);-webkit-transition:-webkit-transform 0.5s ease,visibility 0.4s ease;-webkit-transition:transform 0.5s ease,visibility 0.4s ease;transition:transform 0.5s ease,visibility 0.4s ease;display:block;overflow-y:scroll;overflow-x:hidden;top:5.6rem;left:0;right:0;}/*!sc*/ data-styled.g542[id="sc-1gkkh2j-2"]{content:"djkNR,"}/*!sc*/ .jqUhwM{padding:0;margin:0;border:none;background:none;height:2.4rem;width:2.4rem;-webkit-transition:-webkit-transform 0.5s ease-in-out;-webkit-transition:transform 0.5s ease-in-out;transition:transform 0.5s ease-in-out;-webkit-transform:rotate(0deg);-ms-transform:rotate(0deg);transform:rotate(0deg);}/*!sc*/ data-styled.g544[id="sc-1gkkh2j-4"]{content:"jqUhwM,"}/*!sc*/ .ktqmki{display:-webkit-box;display:-webkit-flex;display:-ms-flexbox;display:flex;-webkit-align-items:center;-webkit-box-align:center;-ms-flex-align:center;align-items:center;}/*!sc*/ data-styled.g545[id="sc-1gkkh2j-5"]{content:"ktqmki,"}/*!sc*/ .drcxHp{margin:0;padding:0;display:-webkit-box;display:-webkit-flex;display:-ms-flexbox;display:flex;list-style:none;-webkit-flex-direction:column;-ms-flex-direction:column;flex-direction:column;-webkit-align-items:flex-start;-webkit-box-align:flex-start;-ms-flex-align:flex-start;align-items:flex-start;}/*!sc*/ data-styled.g546[id="sc-1gkkh2j-6"]{content:"drcxHp,"}/*!sc*/ .eAKUYk{width:100%;display:-webkit-box;display:-webkit-flex;display:-ms-flexbox;display:flex;-webkit-box-pack:justify;-webkit-justify-content:space-between;-ms-flex-pack:justify;justify-content:space-between;-webkit-align-items:center;-webkit-box-align:center;-ms-flex-align:center;align-items:center;padding:2.4rem 1.6rem;}/*!sc*/ data-styled.g547[id="sc-1gkkh2j-7"]{content:"eAKUYk,"}/*!sc*/ .jZeTEE{list-style:none;border-bottom:0.1rem solid rgba(128,128,128,0.6);width:100%;background:linear-gradient(90deg,rgba(17,17,17,0.00) 0%,rgba(9,98,86,0.12) 100%);}/*!sc*/ .eMQqDZ{list-style:none;border-bottom:0.1rem solid rgba(128,128,128,0.6);width:100%;background:linear-gradient(90deg,rgba(17,17,17,0.00) 0%,rgba(117,73,242,0.12) 100%);}/*!sc*/ .fiENtL{list-style:none;border-bottom:0.1rem solid rgba(128,128,128,0.6);width:100%;background:linear-gradient(90deg,rgba(17,17,17,0.00) 0%,rgba(226,113,51,0.12) 100%);}/*!sc*/ .dPGYxJ{list-style:none;border-bottom:0.1rem solid rgba(128,128,128,0.6);width:100%;background:linear-gradient(90deg,rgba(17,17,17,0.00) 0%,rgba(244,213,148,0.12) 100%);}/*!sc*/ .bUbYVZ{list-style:none;border-bottom:0.1rem solid rgba(128,128,128,0.6);width:100%;background:linear-gradient(90deg,rgba(17,17,17,0.00) 0%,rgba(98,192,235,0.12) 100%);}/*!sc*/ .jtthK{list-style:none;border-bottom:0.1rem solid rgba(128,128,128,0.6);width:100%;background:linear-gradient(90deg,rgba(17,17,17,0.00) 0%,rgba(153,167,241,0.12) 100%);}/*!sc*/ .kvjbE{list-style:none;border-bottom:0.1rem solid rgba(128,128,128,0.6);width:100%;background:linear-gradient(90deg,rgba(17,17,17,0.00) 0%,rgba(233,145,176,0.12) 100%);}/*!sc*/ data-styled.g548[id="sc-1gkkh2j-8"]{content:"jZeTEE,eMQqDZ,fiENtL,dPGYxJ,bUbYVZ,jtthK,kvjbE,"}/*!sc*/ .hAGWZa{display:-webkit-box;display:-webkit-flex;display:-ms-flexbox;display:flex;-webkit-align-items:center;-webkit-box-align:center;-ms-flex-align:center;align-items:center;}/*!sc*/ data-styled.g549[id="sc-1gkkh2j-9"]{content:"hAGWZa,"}/*!sc*/ .kpLfjt{border-bottom:0.1rem solid #808080;}/*!sc*/ data-styled.g551[id="sc-1gkkh2j-11"]{content:"kpLfjt,"}/*!sc*/ .dOVPCc{margin-right:1.6rem;display:-webkit-box;display:-webkit-flex;display:-ms-flexbox;display:flex;}/*!sc*/ data-styled.g556[id="sc-1gkkh2j-16"]{content:"dOVPCc,"}/*!sc*/ .hirdXK{display:none;background:#E8DCC7;min-height:14rem;height:14rem;-webkit-transition:all 0.2s ease;transition:all 0.2s ease;width:100%;z-index:1;}/*!sc*/ @media screen and (min-width:1200px){.hirdXK{display:block;min-height:19.2rem;height:19.2rem;}}/*!sc*/ data-styled.g563[id="sc-1akycv5-0"]{content:"hirdXK,"}/*!sc*/ .jfOuiK{background-image:url(https://images.ctfassets.net/23aumh6u8s0i/26C3LpFeTjPcRa8J0dUW8D/ae8fb9148b63d11479440074e2be960d/langchain-blog-hero.jpg);background-size:cover;background-position:center;height:100%;}/*!sc*/ .nrvze{background-image:url(https://images.ctfassets.net/23aumh6u8s0i/6zbsbi997n49Aod4Q6aHW8/ef0e630ca01255470dbee2ebdc5b41c1/FGA_V01_X4.jpg);background-size:cover;background-position:center;height:100%;}/*!sc*/ .cgJtWC{background-image:url(https://images.ctfassets.net/23aumh6u8s0i/6CM1el9wfXtLVF8JICe5xG/9b227b08347bae71033f760f26c163a0/Introducing_Auth0_Actions02B.png);background-size:cover;background-position:center;height:100%;}/*!sc*/ .gLGwaz{background-image:url(https://images.ctfassets.net/23aumh6u8s0i/gADLmc9RdVnmfSaHOGRAA/76aa9da7043a15afee799d776a633b9d/value-passion);background-size:cover;background-position:center;height:100%;}/*!sc*/ .cVhJLF{background-image:url(https://images.ctfassets.net/23aumh6u8s0i/sM737xO0lMZYEXuWf3qVQ/c001ded9b56cbd991c6e045ceb6d2e18/break_up_letter_hero.jpeg);background-size:cover;background-position:center;height:100%;}/*!sc*/ .ggmvVw{background-image:url(https://images.ctfassets.net/23aumh6u8s0i/lpo0yom5xDZonfNzlOkHc/c55bd864b5d7360bf8a2c307f99c8e40/Security_and_Identity_4x.jpg);background-size:cover;background-position:center;height:100%;}/*!sc*/ .gjWrIj{background-image:url(https://images.ctfassets.net/23aumh6u8s0i/6pjUKboBuFLvCKkE3esaFA/5f2101d6d2add5c615db5e98a553fc44/nextjs.jpeg);background-size:cover;background-position:center;height:100%;}/*!sc*/ .lmPuun{background-image:url(https://images.ctfassets.net/23aumh6u8s0i/6uBzrqHNLlSAoER6HtgDN0/accd8f871b1de37f472b94da4346afa2/python-hero);background-size:cover;background-position:center;height:100%;}/*!sc*/ data-styled.g564[id="sc-1akycv5-1"]{content:"jfOuiK,nrvze,cgJtWC,gLGwaz,cVhJLF,ggmvVw,gjWrIj,lmPuun,"}/*!sc*/ .kZamtW{background:#1E1E1E;border-radius:1.6rem;cursor:pointer;display:-webkit-box;display:-webkit-flex;display:-ms-flexbox;display:flex;-webkit-flex-direction:column;-ms-flex-direction:column;flex-direction:column;-webkit-transition:all 0.2s ease-in;transition:all 0.2s ease-in;overflow:hidden;position:relative;-webkit-transform:translateY(100px);-ms-transform:translateY(100px);transform:translateY(100px);border-bottom:0.1rem solid #2A2A2A;-webkit-transform:translateY(14.4rem);-ms-transform:translateY(14.4rem);transform:translateY(14.4rem);opacity:0;-webkit-animation:DPLcZ 500ms ease-out;animation:DPLcZ 500ms ease-out;-webkit-animation-delay:150ms;animation-delay:150ms;-webkit-animation-fill-mode:forwards;animation-fill-mode:forwards;}/*!sc*/ .kZamtW:before{position:absolute;content:'';inset:0;background:radial-gradient(70.73% 156.97% at 50% -67.43%,#4352A4 0%,#1E1E1E 100%);z-index:1;opacity:0;-webkit-transition:opacity 0.25s ease-in-out;transition:opacity 0.25s ease-in-out;}/*!sc*/ .kZamtW:hover:before{opacity:1;}/*!sc*/ .kZamtW:hover .sc-1akycv5-0{background:#3F59E4;opacity:1;}/*!sc*/ .kZamtW:first-child{-webkit-transform:translateY(8.4rem);-ms-transform:translateY(8.4rem);transform:translateY(8.4rem);}/*!sc*/ .kZamtW:nth-child(3){-webkit-transform:translateY(24.4rem);-ms-transform:translateY(24.4rem);transform:translateY(24.4rem);}/*!sc*/ data-styled.g565[id="sc-1akycv5-2"]{content:"kZamtW,"}/*!sc*/ @media screen and (min-width:1200px){.kKvwZS{-webkit-align-items:center;-webkit-box-align:center;-ms-flex-align:center;align-items:center;display:-webkit-box;display:-webkit-flex;display:-ms-flexbox;display:flex;-webkit-box-pack:start;-webkit-justify-content:flex-start;-ms-flex-pack:start;justify-content:flex-start;margin-bottom:0.8rem;gap:1.6rem;}}/*!sc*/ data-styled.g566[id="sc-1akycv5-3"]{content:"kKvwZS,"}/*!sc*/ .faaFJY{padding:2.4rem;display:-webkit-box;display:-webkit-flex;display:-ms-flexbox;display:flex;-webkit-flex-direction:column;-ms-flex-direction:column;flex-direction:column;-webkit-box-pack:start;-webkit-justify-content:flex-start;-ms-flex-pack:start;justify-content:flex-start;z-index:1;}/*!sc*/ @media screen and (min-width:1200px){.faaFJY{min-height:29.6rem;}}/*!sc*/ data-styled.g567[id="sc-1akycv5-4"]{content:"faaFJY,"}/*!sc*/ .fRqgPG{display:-webkit-box;display:-webkit-flex;display:-ms-flexbox;display:flex;margin:auto 0 0;-webkit-flex-wrap:wrap;-ms-flex-wrap:wrap;flex-wrap:wrap;gap:0 1.2rem;}/*!sc*/ .fRqgPG button{padding:0;}/*!sc*/ .fRqgPG button p:hover{-webkit-text-decoration:none;text-decoration:none;}/*!sc*/ data-styled.g568[id="sc-1akycv5-5"]{content:"fRqgPG,"}/*!sc*/ .bqSjfU{max-width:144rem;padding:9.6rem 1.6rem 0;margin:0 auto 4rem;}/*!sc*/ @media screen and (min-width:900px){.bqSjfU{padding:9.6rem 6.4rem 0;}}/*!sc*/ @media screen and (min-width:1200px){.bqSjfU{padding:23.6rem 6.4rem 0;position:relative;margin-bottom:4.8rem;}}/*!sc*/ data-styled.g623[id="sc-14t63q7-0"]{content:"bqSjfU,"}/*!sc*/ .kUZLOE{list-style:none;display:-webkit-box;display:-webkit-flex;display:-ms-flexbox;display:flex;-webkit-align-items:center;-webkit-box-align:center;-ms-flex-align:center;align-items:center;gap:0.8rem;margin:0 0 0.8rem;padding:0;}/*!sc*/ .kUZLOE li:not(:first-of-type) >:first-child:before{content:'/';display:inline-block;margin-right:0.8rem;}/*!sc*/ .kUZLOE a:hover{cursor:pointer;color:#B6CAFF;-webkit-text-decoration:underline;text-decoration:underline;text-underline-offset:0.2rem;}/*!sc*/ @media screen and (min-width:1200px){.kUZLOE{margin:0 0 2.4rem;}}/*!sc*/ data-styled.g624[id="sc-14t63q7-1"]{content:"kUZLOE,"}/*!sc*/ .jNxgOl{margin-top:2.4rem;}/*!sc*/ .jNxgOl img{grid-area:img;width:8rem;height:8rem;border-radius:1.6rem;margin-bottom:1.6rem;}/*!sc*/ @media screen and (min-width:900px){.jNxgOl{display:grid;grid-template-areas: 'img name' 'img job';grid-template-columns:8rem auto;gap:0 1.6rem;}.jNxgOl img{margin-bottom:0;}}/*!sc*/ @media screen and (min-width:1200px){.jNxgOl{margin-top:0;}}/*!sc*/ data-styled.g625[id="sc-14t63q7-2"]{content:"jNxgOl,"}/*!sc*/ .hhWMTM{width:100%;display:grid;-webkit-box-pack:center;-webkit-justify-content:center;-ms-flex-pack:center;justify-content:center;margin:2.4rem auto;}/*!sc*/ data-styled.g626[id="sc-88q8hx-0"]{content:"hhWMTM,"}/*!sc*/ .kfYqEB{max-width:100%;}/*!sc*/ data-styled.g648[id="sc-1rc3wko-0"]{content:"kfYqEB,"}/*!sc*/ .fYNeXn{-webkit-align-items:center;-webkit-box-align:center;-ms-flex-align:center;align-items:center;display:-webkit-box;display:-webkit-flex;display:-ms-flexbox;display:flex;gap:1.6rem;margin-bottom:1.6rem;border-bottom:0.1rem solid #555555;}/*!sc*/ .fYNeXn > div:first-child{border:none;}/*!sc*/ .fYNeXn label{min-width:17.6rem;display:none;}/*!sc*/ @media screen and (min-width:1200px){.fYNeXn{margin-bottom:2.4rem;border-bottom:none;}.fYNeXn > div:first-child{border-bottom:0.1rem solid #555555;}.fYNeXn label{display:-webkit-box;display:-webkit-flex;display:-ms-flexbox;display:flex;}}/*!sc*/ data-styled.g649[id="sc-1rc3wko-1"]{content:"fYNeXn,"}/*!sc*/ .jsCONy{display:grid;gap:0.8rem;}/*!sc*/ @media screen and (min-width:900px){.jsCONy{gap:1.6rem;}}/*!sc*/ @media screen and (min-width:1200px){.jsCONy{margin-bottom:2.4rem;grid-template-columns:1fr 1fr;}}/*!sc*/ data-styled.g650[id="sc-1rc3wko-2"]{content:"jsCONy,"}/*!sc*/ .enauqK{margin-bottom:0.8rem;}/*!sc*/ @media screen and (min-width:1200px){.enauqK{display:none;}}/*!sc*/ data-styled.g651[id="sc-1rc3wko-3"]{content:"enauqK,"}/*!sc*/ .hibgHG{-webkit-align-items:center;-webkit-box-align:center;-ms-flex-align:center;align-items:center;background-color:transparent;border:0.1rem solid #FFFEFA;border-radius:0.8rem;color:#E5E5E5;font-family:Aeonik,sans-serif;font-size:1.4rem;display:-webkit-box;display:-webkit-flex;display:-ms-flexbox;display:flex;-webkit-letter-spacing:0.021rem;-moz-letter-spacing:0.021rem;-ms-letter-spacing:0.021rem;letter-spacing:0.021rem;line-height:2rem;outline:none;padding:0.8rem 1.6rem;-webkit-transition:all 0.2s ease;transition:all 0.2s ease;}/*!sc*/ .hibgHG > span{margin-left:0.4rem;}/*!sc*/ data-styled.g652[id="sc-1rc3wko-4"]{content:"hibgHG,"}/*!sc*/ .eXHVdQ{margin:0;}/*!sc*/ data-styled.g698[id="sc-1pbwyx0-0"]{content:"eXHVdQ,"}/*!sc*/ .hsBpeS{display:block;grid-column:1 / 4;margin:0 auto 4rem;}/*!sc*/ .hsBpeS strong{font-weight:400;}/*!sc*/ data-styled.g703[id="sc-1koe8c4-0"]{content:"hsBpeS,"}/*!sc*/ .hUalbP{display:-webkit-box;display:-webkit-flex;display:-ms-flexbox;display:flex;gap:1.2rem;margin-top:1.6rem;}/*!sc*/ data-styled.g704[id="sc-1koe8c4-1"]{content:"hUalbP,"}/*!sc*/ .ecAsOz{-webkit-align-items:center;-webkit-box-align:center;-ms-flex-align:center;align-items:center;border-radius:0.8rem;border:0.1rem solid #555555;display:-webkit-box;display:-webkit-flex;display:-ms-flexbox;display:flex;-webkit-box-pack:center;-webkit-justify-content:center;-ms-flex-pack:center;justify-content:center;height:4rem;width:4rem;}/*!sc*/ .ecAsOz > img{height:2.4rem;width:2.4rem;}/*!sc*/ .ecAsOz:hover{background:linear-gradient( 180deg, rgba(153,153,153,0.23) -4.35%, rgba(255,255,255,0) 100% );border-radius:0.8rem;border:0.01rem solid #808080;}/*!sc*/ data-styled.g705[id="sc-1koe8c4-2"]{content:"ecAsOz,"}/*!sc*/ .dczHYa{display:none;}/*!sc*/ @media screen and (min-width:1200px){.dczHYa{display:block;}}/*!sc*/ data-styled.g706[id="sc-1koe8c4-3"]{content:"dczHYa,"}/*!sc*/ .jGekvD{max-width:144rem;margin:0 auto;padding:0 1.6rem;}/*!sc*/ @media screen and (min-width:900px){.jGekvD{padding:0 6.4rem;}}/*!sc*/ @media screen and (min-width:1200px){.jGekvD{display:grid;grid-template-columns:repeat(12,1fr);gap:3.2rem;}}/*!sc*/ data-styled.g707[id="sc-1j5y5w8-0"]{content:"jGekvD,"}/*!sc*/ .dllpZZ{grid-column:5 / 13;}/*!sc*/ data-styled.g708[id="sc-1j5y5w8-1"]{content:"dllpZZ,"}/*!sc*/ .joqbUW{background:#111111;padding-top:1.2rem;}/*!sc*/ data-styled.g710[id="styled__Wrapper-sc-1gk46x3-0"]{content:"joqbUW,"}/*!sc*/ .gDWHCk{width:100%;max-width:144rem;margin:auto;font-family:Inter,sans-serif;padding:0 1.6rem;}/*!sc*/ @media screen and (min-width:900px){.gDWHCk{padding:0 6.4rem;}}/*!sc*/ data-styled.g711[id="styled__Content-sc-1gk46x3-1"]{content:"gDWHCk,"}/*!sc*/ .fvSMPF{display:grid;grid-template-columns:1fr 1fr;grid-row-gap:4.8rem;margin:4.8rem auto auto;}/*!sc*/ @media screen and (min-width:900px){.fvSMPF{margin:6.4rem auto auto;}}/*!sc*/ @media screen and (min-width:1200px){.fvSMPF{grid-template-columns:1fr 1fr 1fr 1fr;grid-template-rows:1fr 1fr;margin:8rem auto auto;max-width:131.2rem;}}/*!sc*/ data-styled.g712[id="styled__Nav-sc-1gk46x3-2"]{content:"fvSMPF,"}/*!sc*/ .fLDEkJ{list-style:none;margin-bottom:0;padding-left:0;}/*!sc*/ data-styled.g713[id="styled__LinksList-sc-1gk46x3-3"]{content:"fLDEkJ,"}/*!sc*/ .mYoth{font-weight:500;font-size:1.4rem;line-height:3.2rem;-webkit-letter-spacing:-0.001rem;-moz-letter-spacing:-0.001rem;-ms-letter-spacing:-0.001rem;letter-spacing:-0.001rem;padding-right:3.2rem;}/*!sc*/ .mYoth a{color:#fff;}/*!sc*/ .mYoth a span{background:linear-gradient( 59deg,#4016a0 -18.49%,#3f59e4 38.74%,#4cb7a3 106.36% );padding:0.1rem 0.6rem;border-radius:0.4rem;margin-left:0.8rem;color:#fff;font-weight:600;}/*!sc*/ .mYoth a:hover{color:#bcbaff;}/*!sc*/ @media screen and (min-width:900px){.mYoth p::before{content:'';margin-right:0.8rem;border-left:0.1rem solid #8c929c;height:1.2rem;display:inline-block;}}/*!sc*/ data-styled.g715[id="styled__LinksListItem-sc-1gk46x3-5"]{content:"mYoth,"}/*!sc*/ .bIoZHy{display:-webkit-box;display:-webkit-flex;display:-ms-flexbox;display:flex;-webkit-flex-direction:column;-ms-flex-direction:column;flex-direction:column;}/*!sc*/ .bIoZHy > ul{-webkit-flex:1;-ms-flex:1;flex:1;}/*!sc*/ data-styled.g716[id="styled__LastSection-sc-1gk46x3-6"]{content:"bIoZHy,"}/*!sc*/ .ePaSVl{display:-webkit-box;display:-webkit-flex;display:-ms-flexbox;display:flex;grid-gap:1.6rem;margin-left:1.6rem;display:none;}/*!sc*/ @media screen and (min-width:900px){.ePaSVl{display:-webkit-box;display:-webkit-flex;display:-ms-flexbox;display:flex;margin-left:0;}}/*!sc*/ .bqmjrK{display:-webkit-box;display:-webkit-flex;display:-ms-flexbox;display:flex;grid-gap:1.6rem;margin-left:1.6rem;}/*!sc*/ @media screen and (min-width:900px){.bqmjrK{display:none;}}/*!sc*/ data-styled.g717[id="styled__Icons-sc-1gk46x3-7"]{content:"ePaSVl,bqmjrK,"}/*!sc*/ .bqgUVT{height:2.4rem;}/*!sc*/ .bqgUVT:hover{cursor:pointer;}/*!sc*/ .bqgUVT:hover path{fill:#bcbaff;}/*!sc*/ data-styled.g718[id="styled__IconsLink-sc-1gk46x3-8"]{content:"bqgUVT,"}/*!sc*/ .gobPqK{padding:2.4rem 0 0;position:relative;margin-top:4.8rem;}/*!sc*/ @media screen and (min-width:900px){.gobPqK{display:none;}}/*!sc*/ data-styled.g719[id="styled__FooterBottomMobile-sc-1gk46x3-9"]{content:"gobPqK,"}/*!sc*/ .iyAPaK{display:none;}/*!sc*/ @media screen and (min-width:900px){.iyAPaK{display:block;border-top:0.1rem solid #5a5f66;display:-webkit-box;display:-webkit-flex;display:-ms-flexbox;display:flex;padding:2.4rem 0;position:relative;margin-top:4.8rem;}}/*!sc*/ @media screen and (min-width:1200px){.iyAPaK{margin-top:10rem;}}/*!sc*/ data-styled.g720[id="styled__FooterBottom-sc-1gk46x3-10"]{content:"iyAPaK,"}/*!sc*/ .hyLWBj{display:-webkit-box;display:-webkit-flex;display:-ms-flexbox;display:flex;margin:2.4rem 1.6rem;}/*!sc*/ data-styled.g721[id="styled__LegalAndLangMobile-sc-1gk46x3-11"]{content:"hyLWBj,"}/*!sc*/ .blPSfp{display:-webkit-inline-box;display:-webkit-inline-flex;display:-ms-inline-flexbox;display:inline-flex;-webkit-align-items:center;-webkit-box-align:center;-ms-flex-align:center;align-items:center;font-weight:500;color:#8c929c;grid-gap:0.6rem;font-size:1.2rem;line-height:1.8rem;-webkit-flex:1;-ms-flex:1;flex:1;-webkit-flex-flow:wrap;-ms-flex-flow:wrap;flex-flow:wrap;}/*!sc*/ .blPSfp img{max-width:4rem;}/*!sc*/ .blPSfp a{color:#8c929c;}/*!sc*/ .blPSfp a:hover{color:#bcbaff;}/*!sc*/ @media screen and (min-width:900px){.blPSfp{-webkit-box-pack:end;-webkit-justify-content:flex-end;-ms-flex-pack:end;justify-content:flex-end;}}/*!sc*/ @media screen and (min-width:1200px){.blPSfp{font-size:1.4rem;line-height:2.2rem;}}/*!sc*/ data-styled.g722[id="styled__Legal-sc-1gk46x3-12"]{content:"blPSfp,"}/*!sc*/ body{background:#111;}/*!sc*/ data-styled.g757[id="sc-global-kwhGru1"]{content:"sc-global-kwhGru1,"}/*!sc*/ @-webkit-keyframes DPLcZ{from{opacity:0;}to{opacity:1;-webkit-transform:translateX(0);-ms-transform:translateX(0);transform:translateX(0);}}/*!sc*/ @keyframes DPLcZ{from{opacity:0;}to{opacity:1;-webkit-transform:translateX(0);-ms-transform:translateX(0);transform:translateX(0);}}/*!sc*/ data-styled.g829[id="sc-keyframes-DPLcZ"]{content:"DPLcZ,"}/*!sc*/ </style></head><body itemscope="" itemType="http://schema.org/WebPage"><div id="__next"><script src="https://cdn.cookielaw.org/scripttemplates/otSDKStub.js" type="text/javascript" charSet="UTF-8" data-domain-script="96e22fd8-d619-4cdd-a3c6-d51529d21faf" id="consent-script"></script><script> function OptanonWrapper() { const status = document.getElementById("onetrust-accept-btn-handler") ? 'waitingForConsent' : 'expressedConsent'; window.top.postMessage(status, '*'); } </script><div class="styled__ObservedPixel-sc-1755fzv-2 TGnyL"></div><div class="styled__HeaderBackMobile-sc-1755fzv-1 dHTtIj"></div><header class="styled__Header-sc-1755fzv-3 kwaEt"><div class="styled__Wrapper-q607n8-0 kXBJzn"><div class="styled__Container-q607n8-1 bTcOHV"><a class="styled__Message-q607n8-5 iXBkOf"></a><div class="styled__Buttons-q607n8-6 gncCYg"><a href="/api/auth/login?redirectTo=dashboard" rel="external" class="styled__Login-q607n8-7 gGyWpQ">Login</a></div></div></div><nav aria-label="Mobile nav" class="styled__NavMobile-sc-1755fzv-9 gZnwIf"><a rel="external" href="/" aria-label="Auth0 logo" class="styled__LogoWrapperMobile-sc-1755fzv-5 cUYhhG"><svg xmlns="http://www.w3.org/2000/svg" width="106" height="40" viewBox="0 0 106 40" fill="none"><path d="M1.69096 17.4795C6.93608 16.6184 11.0487 12.5058 11.9098 7.26068L12.3326 4.70858C12.4108 4.21277 12.009 3.77959 11.5079 3.81612C7.51539 4.12404 3.75249 5.44967 1.67009 6.30037C0.662823 6.71268 0 7.69386 0 8.78985V16.8532C0 17.3282 0.422753 17.6883 0.892465 17.61L1.69096 17.4795Z" fill="#FFFEFA"></path><path d="M14.4356 7.26056C15.2968 12.5057 19.4094 16.6183 24.6545 17.4794L25.453 17.6099C25.9227 17.6882 26.3454 17.3281 26.3454 16.8531V8.78973C26.3454 7.69895 25.6826 6.71777 24.6753 6.30025C22.5982 5.44433 18.83 4.12392 14.8375 3.816C14.3365 3.77947 13.9294 4.21265 14.0129 4.70846L14.4356 7.26056Z" fill="#FFFEFA"></path><path d="M24.6589 20.0112C19.4138 20.8723 15.3012 24.9849 14.44 30.23L13.9181 35.209C13.8712 35.6578 14.367 35.9762 14.7428 35.7257C14.7428 35.7257 14.748 35.7257 14.7532 35.7205C18.0412 33.5024 25.5461 27.6936 26.2872 20.4392C26.3238 20.0843 26.0054 19.792 25.6557 19.8494L24.6641 20.0112H24.6589Z" fill="#FFFEFA"></path><path d="M11.9075 30.2277C11.0464 24.9826 6.9338 20.87 1.68868 20.0088L0.618783 19.8314C0.305641 19.7792 0.0238052 20.0401 0.0551193 20.3585C0.759688 27.6547 8.36904 33.5 11.6831 35.7181C12.0276 35.9477 12.4816 35.6711 12.4399 35.2588L11.9128 30.2225L11.9075 30.2277Z" fill="#FFFEFA"></path><path d="M62.7942 13.954H60.297C60.1456 13.954 60.0267 14.073 60.0267 14.2243V21.4295C60.0267 22.3105 59.8807 23.0835 59.5889 23.7483C59.297 24.4132 58.8862 24.9213 58.3511 25.2672C57.8159 25.6132 57.1835 25.7861 56.4538 25.7861C55.4052 25.7861 54.616 25.4402 54.0917 24.7483C53.5674 24.0564 53.3026 23.0619 53.3026 21.77V14.2243C53.3026 14.073 53.1837 13.954 53.0323 13.954H50.5081C50.3567 13.954 50.2378 14.073 50.2378 14.2243V22.0781C50.2378 23.2943 50.3891 24.3105 50.6864 25.1267C50.9837 25.9429 51.3945 26.6023 51.908 27.1104C52.4215 27.6185 53.0107 27.9752 53.6809 28.1915C54.3458 28.4077 55.0431 28.5158 55.7728 28.5158C56.8214 28.5158 57.6916 28.3158 58.3889 27.9104C58.9024 27.6131 59.3348 27.2834 59.697 26.9158C59.8483 26.7591 60.1078 26.8455 60.151 27.0564L60.3456 28.1212C60.3672 28.2509 60.4807 28.3428 60.6105 28.3428H62.7834C62.9347 28.3428 63.0536 28.2239 63.0536 28.0725V14.2243C63.0536 14.073 62.9347 13.954 62.7834 13.954H62.7942Z" fill="#FFFEFA"></path><path d="M73.644 25.6751H70.3846C69.8062 25.6751 69.3954 25.5562 69.163 25.3237C68.9306 25.0913 68.8117 24.6913 68.8117 24.1292V16.897C68.8117 16.7456 68.9306 16.6267 69.0819 16.6267H73.5034C73.6548 16.6267 73.7737 16.5078 73.7737 16.3564V14.2268C73.7737 14.0754 73.6548 13.9565 73.5034 13.9565H69.3522C69.0549 13.9565 68.8117 13.7133 68.8117 13.416V9.85394C68.8117 9.70259 68.6928 9.58368 68.5414 9.58368H66.0442C65.8928 9.58368 65.7739 9.70259 65.7739 9.85394V24.4427C65.7739 25.7562 66.082 26.7345 66.7036 27.3777C67.3198 28.0264 68.3144 28.3453 69.6819 28.3453H73.644C73.7953 28.3453 73.9142 28.2264 73.9142 28.075V25.9453C73.9142 25.794 73.7953 25.6751 73.644 25.6751Z" fill="#FFFEFA"></path><path d="M86.3392 14.5169C85.4852 14.0304 84.4907 13.7872 83.3447 13.7872C82.4475 13.7872 81.6205 13.9655 80.8691 14.3223C80.3286 14.5817 79.8475 14.9006 79.4367 15.2844C79.2638 15.4466 78.9881 15.3223 78.9881 15.0898V8.93866C78.9881 8.78731 78.8692 8.6684 78.7178 8.6684H76.1936C76.0423 8.6684 75.9233 8.78731 75.9233 8.93866V28.0732C75.9233 28.2246 76.0423 28.3435 76.1936 28.3435H78.7178C78.8692 28.3435 78.9881 28.2246 78.9881 28.0732V21.0626C78.9881 20.1275 79.1395 19.3167 79.4367 18.6303C79.734 17.9492 80.1611 17.4195 80.7178 17.0411C81.2691 16.6682 81.9232 16.479 82.6691 16.479C83.415 16.479 84.0096 16.6465 84.4961 16.9871C84.9825 17.3222 85.3501 17.7979 85.5933 18.4086C85.8366 19.0194 85.9609 19.7437 85.9609 20.587V28.0732C85.9609 28.2246 86.0798 28.3435 86.2311 28.3435H88.7284C88.8797 28.3435 88.9986 28.2246 88.9986 28.0732V20.3329C88.9986 18.8735 88.7716 17.6573 88.3122 16.6952C87.8527 15.7276 87.1987 15.0033 86.3446 14.5169H86.3392Z" fill="#FFFEFA"></path><path d="M104.469 12.9455C103.891 11.5239 103.064 10.4267 101.994 9.65913C100.923 8.89158 99.6423 8.50781 98.1451 8.50781C96.6478 8.50781 95.3884 8.89158 94.3073 9.65913C93.2317 10.4267 92.3993 11.5239 91.8209 12.9455C91.2426 14.3725 90.9507 16.0752 90.9507 18.0589V18.9561C90.9507 20.9615 91.2426 22.6804 91.8209 24.1128C92.3993 25.5451 93.2317 26.637 94.3073 27.3883C95.383 28.1397 96.664 28.5126 98.1451 28.5126C99.6261 28.5126 100.929 28.1397 101.994 27.3883C103.058 26.637 103.885 25.5451 104.469 24.1128C105.048 22.6804 105.339 20.9615 105.339 18.9561V18.0589C105.339 16.0752 105.048 14.3671 104.469 12.9455ZM94.0155 19.3021C94.0155 19.1507 94.0155 18.9994 94.0155 18.848V18.1724C94.0155 15.886 94.3722 14.1347 95.0857 12.9185C95.7992 11.7023 96.8208 11.0915 98.1505 11.0915C99.3883 11.0915 100.356 11.6158 101.058 12.6699C101.329 13.0482 101.096 13.5293 100.983 13.659L95.4424 19.8372C94.9506 20.3885 94.0425 20.048 94.0263 19.3129L94.0155 19.3021ZM102.275 18.848C102.275 21.1182 101.918 22.8587 101.204 24.0749C100.491 25.2911 99.4693 25.9019 98.1397 25.9019C96.9181 25.9019 95.9559 25.3884 95.2587 24.3614C94.9884 23.9884 95.2208 23.5128 95.3343 23.3776L100.853 17.1886C101.345 16.6373 102.253 16.9724 102.269 17.7129C102.269 17.8643 102.269 18.021 102.269 18.1778V18.8534L102.275 18.848Z" fill="#FFFEFA"></path><path d="M48.5034 25.7039H48.4277C48.125 25.7039 47.9142 25.6391 47.7791 25.5093C47.6493 25.3796 47.5845 25.1364 47.5845 24.7796V19.0176C47.5845 17.315 47.0602 16.0177 46.0115 15.1259C44.9629 14.234 43.4927 13.7908 41.6009 13.7908C40.4009 13.7908 39.3469 13.98 38.4388 14.3529C37.5307 14.7259 36.8064 15.2556 36.2605 15.9421C35.7794 16.5474 35.4767 17.2447 35.347 18.0339C35.32 18.196 35.4551 18.3474 35.6173 18.3474H38.0712C38.1956 18.3474 38.2983 18.2609 38.3307 18.1366C38.4766 17.5961 38.7955 17.1528 39.2982 16.8123C39.8604 16.4285 40.5793 16.2339 41.4603 16.2339C42.4333 16.2339 43.1954 16.461 43.7359 16.9204C44.2765 17.3799 44.5521 18.0123 44.5521 18.8176V19.4176C44.5521 19.569 44.4332 19.6879 44.2819 19.6879H41.0117C39.028 19.6879 37.5145 20.0879 36.4713 20.8825C35.4335 21.677 34.9092 22.8175 34.9092 24.2986C34.9092 25.1796 35.1362 25.9364 35.5848 26.5742C36.0335 27.212 36.6551 27.6931 37.455 28.0228C38.2496 28.3525 39.1631 28.5147 40.1955 28.5147C41.5468 28.5147 42.6441 28.2012 43.4981 27.5741C43.8711 27.2985 44.2062 26.985 44.4981 26.6444C44.6386 26.4769 44.9143 26.5363 44.9629 26.7471C45.0386 27.1039 45.1845 27.4174 45.3954 27.6714C45.7683 28.1201 46.4656 28.3471 47.4764 28.3471H48.779C48.9304 28.3471 49.0493 28.2282 49.0493 28.0768V26.1526C49.0493 25.785 48.9304 25.7039 48.5088 25.7039H48.5034ZM44.5467 22.5311C44.5467 23.2229 44.39 23.8499 44.0711 24.4013C43.7522 24.9526 43.3035 25.385 42.7198 25.6931C42.1414 26.0012 41.4333 26.158 40.6117 26.158C39.7901 26.158 39.1631 25.9634 38.6874 25.5796C38.2118 25.1958 37.9685 24.704 37.9685 24.104C37.9685 23.3743 38.2172 22.8283 38.7145 22.4716C39.2118 22.1148 39.9252 21.9365 40.8658 21.9365H44.5467V22.5256V22.5311Z" fill="#FFFEFA"></path></svg></a><div class="styled__RightColumnMobile-sc-1755fzv-10 UKpEE"><button aria-label="Menu" aria-expanded="false" class="styled__BurgerIconWrapper-sc-1755fzv-11 iHuLVG"><span class="styled__BurgerIcon-sc-1755fzv-12 dGpEKR"></span></button></div><section class="styled__Wrapper-sc-85iotp-0 hdiybx"><ul class="styled__ContentWrapper-sc-85iotp-1 iZzMFn"><li class="styled__NavItemContainer-sc-85iotp-2 fbKXcX"><p class="styled__NavItemTitle-sc-85iotp-5 jJmhNW">Developers</p><div class="styled__NavItem-sc-85iotp-6 dAmhCz"><div class="styled__ColumnContainer-sc-85iotp-7 QEhDV"><p class="styled__ColumnItemTitle-sc-85iotp-8 dhdvtD">Developers</p><ul class="styled__ColumnList-sc-85iotp-10 lbxxTt"><li class="styled__ColumnListItem-sc-85iotp-11 ihpWnt"><a href="https://developer.auth0.com/" rel="external">Developer Center</a></li><li class="styled__ColumnListItem-sc-85iotp-11 ihpWnt"><a href="https://developer.auth0.com/resources/code-samples" rel="external">Code Samples</a></li><li class="styled__ColumnListItem-sc-85iotp-11 ihpWnt"><a href="https://developer.auth0.com/resources/guides" rel="external">Guides</a></li><li class="styled__ColumnListItem-sc-85iotp-11 ihpWnt"><a href="https://identityunlocked.auth0.com/public/49/Identity,-Unlocked.--bed7fada" rel="external">Identity Unlocked - Podcasts</a></li><li class="styled__ColumnListItem-sc-85iotp-11 ihpWnt"><a href="https://developer.auth0.com/newsletter" rel="external">Zero Index Newsletter</a></li></ul></div><div class="styled__ColumnContainer-sc-85iotp-7 QEhDV"><p class="styled__ColumnItemTitle-sc-85iotp-8 dhdvtD">Developer Tools</p><ul class="styled__ColumnList-sc-85iotp-10 lbxxTt"><li class="styled__ColumnListItem-sc-85iotp-11 ihpWnt"><a href="https://openidconnect.net/" rel="external">OIDC Connect Playground</a></li><li class="styled__ColumnListItem-sc-85iotp-11 ihpWnt"><a href="https://samltool.io/" rel="external">SAML Tool</a></li><li class="styled__ColumnListItem-sc-85iotp-11 ihpWnt"><a href="http://jwt.io/" rel="external">JWT.io</a></li><li class="styled__ColumnListItem-sc-85iotp-11 ihpWnt"><a href="http://webauthn.me/" rel="external">Webauthn.me</a></li></ul></div><div class="styled__ColumnContainer-sc-85iotp-7 QEhDV"><p class="styled__ColumnItemTitle-sc-85iotp-8 dhdvtD">Get Involved</p><ul class="styled__ColumnList-sc-85iotp-10 lbxxTt"><li class="styled__ColumnListItem-sc-85iotp-11 ihpWnt"><a href="https://developer.auth0.com/events" rel="external">Events</a></li><li class="styled__ColumnListItem-sc-85iotp-11 ihpWnt"><a href="/research-program" rel="external">Auth0 Research Program</a></li></ul></div></div></li><li class="styled__NavItemContainer-sc-85iotp-2 fbKXcX"><p class="styled__NavItemTitle-sc-85iotp-5 jJmhNW">Documentation</p><div class="styled__NavItem-sc-85iotp-6 dAmhCz"><div class="styled__ColumnContainer-sc-85iotp-7 QEhDV"><p class="styled__ColumnItemTitle-sc-85iotp-8 dhdvtD">Documentation</p><ul class="styled__ColumnList-sc-85iotp-10 lbxxTt"><li class="styled__ColumnListItem-sc-85iotp-11 ihpWnt"><a href="/docs" rel="external">Auth0 Docs</a></li><li class="styled__ColumnListItem-sc-85iotp-11 ihpWnt"><a href="/docs/articles" rel="external">Articles</a></li><li class="styled__ColumnListItem-sc-85iotp-11 ihpWnt"><a href="/docs/quickstarts" rel="external">Quickstarts</a></li><li class="styled__ColumnListItem-sc-85iotp-11 ihpWnt"><a href="/docs/api" rel="external">APIs</a></li><li class="styled__ColumnListItem-sc-85iotp-11 ihpWnt"><a href="/docs/libraries" rel="external">SDK Libraries</a></li></ul></div><div class="styled__ColumnContainer-sc-85iotp-7 QEhDV"><p class="styled__ColumnItemTitle-sc-85iotp-8 dhdvtD">Support Center</p><ul class="styled__ColumnList-sc-85iotp-10 lbxxTt"><li class="styled__ColumnListItem-sc-85iotp-11 ihpWnt"><a href="https://community.auth0.com/" rel="external">Community</a></li><li class="styled__ColumnListItem-sc-85iotp-11 ihpWnt"><a href="https://support.auth0.com/" rel="external">Support</a></li><li class="styled__ColumnListItem-sc-85iotp-11 ihpWnt"><a href="https://community.auth0.com/c/help/6" rel="external">Help</a></li><li class="styled__ColumnListItem-sc-85iotp-11 ihpWnt"><a href="https://community.auth0.com/c/faq/42" rel="external">FAQs</a></li><li class="styled__ColumnListItem-sc-85iotp-11 ihpWnt"><a href="https://marketplace.auth0.com" rel="external">Explore Auth0 Marketplace</a></li><li class="styled__ColumnListItem-sc-85iotp-11 ihpWnt"><a href="/resources" rel="external">Resources</a></li></ul></div><div class="styled__ColumnContainer-sc-85iotp-7 QEhDV"><ul class="styled__ColumnList-sc-85iotp-10 lbxxTt"><li class="styled__ColumnListItem-sc-85iotp-11 ihpWnt"><a href="/blog/" rel="external">Blog</a></li><li class="styled__ColumnListItem-sc-85iotp-11 ihpWnt"><a href="/learn" rel="external">Learn</a></li><li class="styled__ColumnListItem-sc-85iotp-11 ihpWnt"><a href="/intro-to-iam" rel="external">Intro to IAM (CIAM)</a></li></ul></div></div></li><li class="styled__NavItemContainer-sc-85iotp-2 fbKXcX"><p class="styled__NavItemTitle-sc-85iotp-5 jJmhNW">Product</p><div class="styled__NavItem-sc-85iotp-6 dAmhCz"><div class="styled__ColumnContainer-sc-85iotp-7 QEhDV"><p class="styled__ColumnItemTitle-sc-85iotp-8 dhdvtD">Platform</p><ul class="styled__ColumnList-sc-85iotp-10 lbxxTt"><li class="styled__ColumnListItem-sc-85iotp-11 ihpWnt"><a href="/platform/access-management" rel="external">Access Management</a></li><li class="styled__ColumnListItem-sc-85iotp-11 ihpWnt"><a href="/platform/extensibility" rel="external">Extensibility</a></li><li class="styled__ColumnListItem-sc-85iotp-11 ihpWnt"><a href="/platform/login-security" rel="external">Security</a></li><li class="styled__ColumnListItem-sc-85iotp-11 ihpWnt"><a href="/platform/user-management" rel="external">User Management</a></li><li class="styled__ColumnListItem-sc-85iotp-11 ihpWnt"><a href="/platform/authentication" rel="external">Authentication</a></li><li class="styled__ColumnListItem-sc-85iotp-11 ihpWnt"><a href="/fine-grained-authorization" rel="external">Fine Grained Authorization</a></li><li class="styled__ColumnListItem-sc-85iotp-11 ihpWnt"><a href="https://auth0.com/platform" class="styled__Link-sc-bubr9x-0 utils-sc-11hlfw-0 butiik FYDuM">View platform</a></li></ul></div><div class="styled__ColumnContainer-sc-85iotp-7 QEhDV"><p class="styled__ColumnItemTitle-sc-85iotp-8 dhdvtD">Features</p><ul class="styled__ColumnList-sc-85iotp-10 lbxxTt"><li class="styled__ColumnListItem-sc-85iotp-11 ihpWnt"><a href="/features/universal-login" rel="external">Universal Login</a></li><li class="styled__ColumnListItem-sc-85iotp-11 ihpWnt"><a href="/features/single-sign-on" rel="external">Single Sign On</a></li><li class="styled__ColumnListItem-sc-85iotp-11 ihpWnt"><a href="/features/multifactor-authentication" rel="external">Multifactor Authentication</a></li><li class="styled__ColumnListItem-sc-85iotp-11 ihpWnt"><a href="/features/actions" rel="external">Actions</a></li><li class="styled__ColumnListItem-sc-85iotp-11 ihpWnt"><a href="/features/machine-to-machine" rel="external">Machine to Machine</a></li><li class="styled__ColumnListItem-sc-85iotp-11 ihpWnt"><a href="/features/passwordless" rel="external">Passwordless</a></li><li class="styled__ColumnListItem-sc-85iotp-11 ihpWnt"><a href="/features/breached-passwords" rel="external">Breached Passwords</a></li><li class="styled__ColumnListItem-sc-85iotp-11 ihpWnt"><a href="https://auth0.com/features" class="styled__Link-sc-bubr9x-0 utils-sc-11hlfw-0 butiik FYDuM">View features</a></li></ul></div></div></li><li class="styled__NavItemContainer-sc-85iotp-2 fbKXcX"><p class="styled__NavItemTitle-sc-85iotp-5 jJmhNW">Solutions</p><div class="styled__NavItem-sc-85iotp-6 dAmhCz"><div class="styled__ColumnContainer-sc-85iotp-7 QEhDV"><p class="styled__ColumnItemTitle-sc-85iotp-8 dhdvtD">Industries</p><ul class="styled__ColumnList-sc-85iotp-10 lbxxTt"><li class="styled__ColumnListItem-sc-85iotp-11 ihpWnt"><a href="/nonprofits" rel="external">Nonprofits & Charities</a></li><li class="styled__ColumnListItem-sc-85iotp-11 ihpWnt"><a href="/startups" rel="external">Startups</a></li></ul></div><div class="styled__ColumnContainer-sc-85iotp-7 QEhDV"><p class="styled__ColumnItemTitle-sc-85iotp-8 dhdvtD">Use Cases</p><ul class="styled__ColumnList-sc-85iotp-10 lbxxTt"><li class="styled__ColumnListItem-sc-85iotp-11 ihpWnt"><a href="/b2c-customer-identity-management" rel="external">Consumer Applications</a></li><li class="styled__ColumnListItem-sc-85iotp-11 ihpWnt"><a href="/b2b-saas" rel="external">B2B SaaS Applications</a></li></ul></div></div></li><li class="styled__NavItemContainer-sc-85iotp-2 styled__NavLinkContainer-sc-85iotp-3 fbKXcX bUCOoz"><a href="/blog/" rel="external" class="styled__NavLink-sc-85iotp-4 dETrsJ">Blog</a></li><li class="styled__NavItemContainer-sc-85iotp-2 styled__NavLinkContainer-sc-85iotp-3 fbKXcX bUCOoz"><a href="/pricing/" rel="external" class="styled__NavLink-sc-85iotp-4 dETrsJ">Pricing</a></li></ul><div class="styled__ButtonContainer-sc-85iotp-15 hiEELR"><div class="styled__SecondaryButtonContainer-sc-85iotp-18 epRiIO"><a rel="external" href="/signup?place=header&type=button&text=sign%20up" role="button" tabindex="0" class="styled__Button-sc-1hwml9q-0 utils-sc-11hlfw-0 etdOck bPWQw"><span>Sign up</span></a><a href="/api/auth/login?redirectTo=dashboard" rel="external" role="button" tabindex="0" class="styled__Button-sc-1hwml9q-0 utils-sc-11hlfw-0 cmgpvv bPWQw"><span>Login</span></a></div><a href="/contact-us?place=header&type=button&text=contact%20sales" role="button" tabindex="0" class="styled__Button-sc-1hwml9q-0 utils-sc-11hlfw-0 dmEnyJ bKQnZO"><span>Contact sales</span></a></div></section></nav><nav aria-label="Desktop nav" class="styled__NavDesktop-sc-1755fzv-6 fblBoo"><div class="styled__NavDesktopContainer-sc-1755fzv-7 bCnrpr"><a rel="external" href="/" aria-label="Auth0 logo" class="styled__LogoWrapper-sc-1755fzv-4 hfWran"><svg xmlns="http://www.w3.org/2000/svg" width="106" height="40" viewBox="0 0 106 40" fill="none"><path d="M1.69096 17.4795C6.93608 16.6184 11.0487 12.5058 11.9098 7.26068L12.3326 4.70858C12.4108 4.21277 12.009 3.77959 11.5079 3.81612C7.51539 4.12404 3.75249 5.44967 1.67009 6.30037C0.662823 6.71268 0 7.69386 0 8.78985V16.8532C0 17.3282 0.422753 17.6883 0.892465 17.61L1.69096 17.4795Z" fill="#FFFEFA"></path><path d="M14.4356 7.26056C15.2968 12.5057 19.4094 16.6183 24.6545 17.4794L25.453 17.6099C25.9227 17.6882 26.3454 17.3281 26.3454 16.8531V8.78973C26.3454 7.69895 25.6826 6.71777 24.6753 6.30025C22.5982 5.44433 18.83 4.12392 14.8375 3.816C14.3365 3.77947 13.9294 4.21265 14.0129 4.70846L14.4356 7.26056Z" fill="#FFFEFA"></path><path d="M24.6589 20.0112C19.4138 20.8723 15.3012 24.9849 14.44 30.23L13.9181 35.209C13.8712 35.6578 14.367 35.9762 14.7428 35.7257C14.7428 35.7257 14.748 35.7257 14.7532 35.7205C18.0412 33.5024 25.5461 27.6936 26.2872 20.4392C26.3238 20.0843 26.0054 19.792 25.6557 19.8494L24.6641 20.0112H24.6589Z" fill="#FFFEFA"></path><path d="M11.9075 30.2277C11.0464 24.9826 6.9338 20.87 1.68868 20.0088L0.618783 19.8314C0.305641 19.7792 0.0238052 20.0401 0.0551193 20.3585C0.759688 27.6547 8.36904 33.5 11.6831 35.7181C12.0276 35.9477 12.4816 35.6711 12.4399 35.2588L11.9128 30.2225L11.9075 30.2277Z" fill="#FFFEFA"></path><path d="M62.7942 13.954H60.297C60.1456 13.954 60.0267 14.073 60.0267 14.2243V21.4295C60.0267 22.3105 59.8807 23.0835 59.5889 23.7483C59.297 24.4132 58.8862 24.9213 58.3511 25.2672C57.8159 25.6132 57.1835 25.7861 56.4538 25.7861C55.4052 25.7861 54.616 25.4402 54.0917 24.7483C53.5674 24.0564 53.3026 23.0619 53.3026 21.77V14.2243C53.3026 14.073 53.1837 13.954 53.0323 13.954H50.5081C50.3567 13.954 50.2378 14.073 50.2378 14.2243V22.0781C50.2378 23.2943 50.3891 24.3105 50.6864 25.1267C50.9837 25.9429 51.3945 26.6023 51.908 27.1104C52.4215 27.6185 53.0107 27.9752 53.6809 28.1915C54.3458 28.4077 55.0431 28.5158 55.7728 28.5158C56.8214 28.5158 57.6916 28.3158 58.3889 27.9104C58.9024 27.6131 59.3348 27.2834 59.697 26.9158C59.8483 26.7591 60.1078 26.8455 60.151 27.0564L60.3456 28.1212C60.3672 28.2509 60.4807 28.3428 60.6105 28.3428H62.7834C62.9347 28.3428 63.0536 28.2239 63.0536 28.0725V14.2243C63.0536 14.073 62.9347 13.954 62.7834 13.954H62.7942Z" fill="#FFFEFA"></path><path d="M73.644 25.6751H70.3846C69.8062 25.6751 69.3954 25.5562 69.163 25.3237C68.9306 25.0913 68.8117 24.6913 68.8117 24.1292V16.897C68.8117 16.7456 68.9306 16.6267 69.0819 16.6267H73.5034C73.6548 16.6267 73.7737 16.5078 73.7737 16.3564V14.2268C73.7737 14.0754 73.6548 13.9565 73.5034 13.9565H69.3522C69.0549 13.9565 68.8117 13.7133 68.8117 13.416V9.85394C68.8117 9.70259 68.6928 9.58368 68.5414 9.58368H66.0442C65.8928 9.58368 65.7739 9.70259 65.7739 9.85394V24.4427C65.7739 25.7562 66.082 26.7345 66.7036 27.3777C67.3198 28.0264 68.3144 28.3453 69.6819 28.3453H73.644C73.7953 28.3453 73.9142 28.2264 73.9142 28.075V25.9453C73.9142 25.794 73.7953 25.6751 73.644 25.6751Z" fill="#FFFEFA"></path><path d="M86.3392 14.5169C85.4852 14.0304 84.4907 13.7872 83.3447 13.7872C82.4475 13.7872 81.6205 13.9655 80.8691 14.3223C80.3286 14.5817 79.8475 14.9006 79.4367 15.2844C79.2638 15.4466 78.9881 15.3223 78.9881 15.0898V8.93866C78.9881 8.78731 78.8692 8.6684 78.7178 8.6684H76.1936C76.0423 8.6684 75.9233 8.78731 75.9233 8.93866V28.0732C75.9233 28.2246 76.0423 28.3435 76.1936 28.3435H78.7178C78.8692 28.3435 78.9881 28.2246 78.9881 28.0732V21.0626C78.9881 20.1275 79.1395 19.3167 79.4367 18.6303C79.734 17.9492 80.1611 17.4195 80.7178 17.0411C81.2691 16.6682 81.9232 16.479 82.6691 16.479C83.415 16.479 84.0096 16.6465 84.4961 16.9871C84.9825 17.3222 85.3501 17.7979 85.5933 18.4086C85.8366 19.0194 85.9609 19.7437 85.9609 20.587V28.0732C85.9609 28.2246 86.0798 28.3435 86.2311 28.3435H88.7284C88.8797 28.3435 88.9986 28.2246 88.9986 28.0732V20.3329C88.9986 18.8735 88.7716 17.6573 88.3122 16.6952C87.8527 15.7276 87.1987 15.0033 86.3446 14.5169H86.3392Z" fill="#FFFEFA"></path><path d="M104.469 12.9455C103.891 11.5239 103.064 10.4267 101.994 9.65913C100.923 8.89158 99.6423 8.50781 98.1451 8.50781C96.6478 8.50781 95.3884 8.89158 94.3073 9.65913C93.2317 10.4267 92.3993 11.5239 91.8209 12.9455C91.2426 14.3725 90.9507 16.0752 90.9507 18.0589V18.9561C90.9507 20.9615 91.2426 22.6804 91.8209 24.1128C92.3993 25.5451 93.2317 26.637 94.3073 27.3883C95.383 28.1397 96.664 28.5126 98.1451 28.5126C99.6261 28.5126 100.929 28.1397 101.994 27.3883C103.058 26.637 103.885 25.5451 104.469 24.1128C105.048 22.6804 105.339 20.9615 105.339 18.9561V18.0589C105.339 16.0752 105.048 14.3671 104.469 12.9455ZM94.0155 19.3021C94.0155 19.1507 94.0155 18.9994 94.0155 18.848V18.1724C94.0155 15.886 94.3722 14.1347 95.0857 12.9185C95.7992 11.7023 96.8208 11.0915 98.1505 11.0915C99.3883 11.0915 100.356 11.6158 101.058 12.6699C101.329 13.0482 101.096 13.5293 100.983 13.659L95.4424 19.8372C94.9506 20.3885 94.0425 20.048 94.0263 19.3129L94.0155 19.3021ZM102.275 18.848C102.275 21.1182 101.918 22.8587 101.204 24.0749C100.491 25.2911 99.4693 25.9019 98.1397 25.9019C96.9181 25.9019 95.9559 25.3884 95.2587 24.3614C94.9884 23.9884 95.2208 23.5128 95.3343 23.3776L100.853 17.1886C101.345 16.6373 102.253 16.9724 102.269 17.7129C102.269 17.8643 102.269 18.021 102.269 18.1778V18.8534L102.275 18.848Z" fill="#FFFEFA"></path><path d="M48.5034 25.7039H48.4277C48.125 25.7039 47.9142 25.6391 47.7791 25.5093C47.6493 25.3796 47.5845 25.1364 47.5845 24.7796V19.0176C47.5845 17.315 47.0602 16.0177 46.0115 15.1259C44.9629 14.234 43.4927 13.7908 41.6009 13.7908C40.4009 13.7908 39.3469 13.98 38.4388 14.3529C37.5307 14.7259 36.8064 15.2556 36.2605 15.9421C35.7794 16.5474 35.4767 17.2447 35.347 18.0339C35.32 18.196 35.4551 18.3474 35.6173 18.3474H38.0712C38.1956 18.3474 38.2983 18.2609 38.3307 18.1366C38.4766 17.5961 38.7955 17.1528 39.2982 16.8123C39.8604 16.4285 40.5793 16.2339 41.4603 16.2339C42.4333 16.2339 43.1954 16.461 43.7359 16.9204C44.2765 17.3799 44.5521 18.0123 44.5521 18.8176V19.4176C44.5521 19.569 44.4332 19.6879 44.2819 19.6879H41.0117C39.028 19.6879 37.5145 20.0879 36.4713 20.8825C35.4335 21.677 34.9092 22.8175 34.9092 24.2986C34.9092 25.1796 35.1362 25.9364 35.5848 26.5742C36.0335 27.212 36.6551 27.6931 37.455 28.0228C38.2496 28.3525 39.1631 28.5147 40.1955 28.5147C41.5468 28.5147 42.6441 28.2012 43.4981 27.5741C43.8711 27.2985 44.2062 26.985 44.4981 26.6444C44.6386 26.4769 44.9143 26.5363 44.9629 26.7471C45.0386 27.1039 45.1845 27.4174 45.3954 27.6714C45.7683 28.1201 46.4656 28.3471 47.4764 28.3471H48.779C48.9304 28.3471 49.0493 28.2282 49.0493 28.0768V26.1526C49.0493 25.785 48.9304 25.7039 48.5088 25.7039H48.5034ZM44.5467 22.5311C44.5467 23.2229 44.39 23.8499 44.0711 24.4013C43.7522 24.9526 43.3035 25.385 42.7198 25.6931C42.1414 26.0012 41.4333 26.158 40.6117 26.158C39.7901 26.158 39.1631 25.9634 38.6874 25.5796C38.2118 25.1958 37.9685 24.704 37.9685 24.104C37.9685 23.3743 38.2172 22.8283 38.7145 22.4716C39.2118 22.1148 39.9252 21.9365 40.8658 21.9365H44.5467V22.5256V22.5311Z" fill="#FFFEFA"></path></svg></a><ul role="menubar" class="styled__NavList-sc-1755fzv-13 gJozFS"><li role="menuitem" aria-haspopup="true" tabindex="0" class="styled__NavListEl-sc-1755fzv-16 dnWatv"><div class="styled__NavElementButton-sc-1755fzv-15 goPIno"><span>Developers</span><svg width="16" height="16" viewBox="0 0 16 16" fill="none" xmlns="http://www.w3.org/2000/svg"><g id="chevron-down"><path id="icon" fill-rule="evenodd" clip-rule="evenodd" d="M7.99994 9.93934L12.4696 5.46967L13.5303 6.53033L8.53027 11.5303C8.23738 11.8232 7.76251 11.8232 7.46961 11.5303L2.46961 6.53033L3.53027 5.46967L7.99994 9.93934Z" fill="#FFFEFA"></path></g></svg></div><div class="styled__NavElementContentWrapper-sc-1755fzv-14 iyaTlV"><section class="styled__NavElementContent-sc-1755fzv-17 jtpgRu"><section class="styled__Column-sc-1ff7bch-0 styled__FirstColumn-sc-1ff7bch-1 xvieK ksvdhq"><p class="styled__Overline-sc-165cfko-0 utils-sc-11hlfw-0 jOKDAt iCUAvT">Developers</p><ul role="menubar" class="styled__List-sc-1p6pq9n-1 guYaGV"><li role="menuitem" class="styled__Element-sc-1p6pq9n-2 jSbSuj"><a rel="external" href="https://developer.auth0.com/" class="styled__Link-sc-bubr9x-0 utils-sc-11hlfw-0 bhxyxO eldvFb">Developer Center</a></li><li role="menuitem" class="styled__Element-sc-1p6pq9n-2 jSbSuj"><a rel="external" href="https://developer.auth0.com/resources/code-samples" class="styled__Link-sc-bubr9x-0 utils-sc-11hlfw-0 bhxyxO eldvFb">Code Samples</a></li><li role="menuitem" class="styled__Element-sc-1p6pq9n-2 jSbSuj"><a rel="external" href="https://developer.auth0.com/resources/guides" class="styled__Link-sc-bubr9x-0 utils-sc-11hlfw-0 bhxyxO eldvFb">Guides</a></li><li role="menuitem" class="styled__Element-sc-1p6pq9n-2 jSbSuj"><a rel="external" href="https://identityunlocked.auth0.com/public/49/Identity,-Unlocked.--bed7fada" class="styled__Link-sc-bubr9x-0 utils-sc-11hlfw-0 bhxyxO eldvFb">Identity Unlocked - Podcasts</a></li><li role="menuitem" class="styled__Element-sc-1p6pq9n-2 jSbSuj"><a rel="external" href="https://developer.auth0.com/newsletter" class="styled__Link-sc-bubr9x-0 utils-sc-11hlfw-0 bhxyxO eldvFb">Zero Index Newsletter</a></li></ul></section><section class="styled__Column-sc-1ff7bch-0 styled__SecondColumn-sc-1ff7bch-2 xvieK bpIsaL"><p class="styled__Overline-sc-165cfko-0 utils-sc-11hlfw-0 jOKDAt iCUAvT">Developer Tools</p><ul role="menubar" class="styled__List-sc-1p6pq9n-1 guYaGV"><li role="menuitem" class="styled__Element-sc-1p6pq9n-2 jSbSuj"><a rel="external" href="https://openidconnect.net/" class="styled__Link-sc-bubr9x-0 utils-sc-11hlfw-0 bhxyxO eldvFb">OIDC Connect Playground</a></li><li role="menuitem" class="styled__Element-sc-1p6pq9n-2 jSbSuj"><a rel="external" href="https://samltool.io/" class="styled__Link-sc-bubr9x-0 utils-sc-11hlfw-0 bhxyxO eldvFb">SAML Tool</a></li><li role="menuitem" class="styled__Element-sc-1p6pq9n-2 jSbSuj"><a rel="external" href="http://jwt.io/" class="styled__Link-sc-bubr9x-0 utils-sc-11hlfw-0 bhxyxO eldvFb">JWT.io</a></li><li role="menuitem" class="styled__Element-sc-1p6pq9n-2 jSbSuj"><a rel="external" href="http://webauthn.me/" class="styled__Link-sc-bubr9x-0 utils-sc-11hlfw-0 bhxyxO eldvFb">Webauthn.me</a></li></ul></section><section class="styled__Column-sc-1ff7bch-0 styled__ThirdColumn-sc-1ff7bch-3 xvieK cUYhhd"><p class="styled__Overline-sc-165cfko-0 utils-sc-11hlfw-0 jOKDAt iCUAvT">Get Involved</p><ul role="menubar" class="styled__List-sc-1p6pq9n-1 guYaGV"><li role="menuitem" class="styled__Element-sc-1p6pq9n-2 jSbSuj"><a rel="external" href="https://developer.auth0.com/events" class="styled__Link-sc-bubr9x-0 utils-sc-11hlfw-0 bhxyxO eldvFb">Events</a></li><li role="menuitem" class="styled__Element-sc-1p6pq9n-2 jSbSuj"><a rel="external" href="/research-program" class="styled__Link-sc-bubr9x-0 utils-sc-11hlfw-0 bhxyxO eldvFb">Auth0 Research Program</a></li></ul></section></section></div></li><li role="menuitem" aria-haspopup="true" tabindex="0" class="styled__NavListEl-sc-1755fzv-16 dnWatv"><div class="styled__NavElementButton-sc-1755fzv-15 goPIno"><span>Documentation</span><svg width="16" height="16" viewBox="0 0 16 16" fill="none" xmlns="http://www.w3.org/2000/svg"><g id="chevron-down"><path id="icon" fill-rule="evenodd" clip-rule="evenodd" d="M7.99994 9.93934L12.4696 5.46967L13.5303 6.53033L8.53027 11.5303C8.23738 11.8232 7.76251 11.8232 7.46961 11.5303L2.46961 6.53033L3.53027 5.46967L7.99994 9.93934Z" fill="#FFFEFA"></path></g></svg></div><div class="styled__NavElementContentWrapper-sc-1755fzv-14 iyaTlV"><section class="styled__NavElementContent-sc-1755fzv-17 jtpgRu"><section class="styled__Column-sc-1ff7bch-0 styled__FirstColumn-sc-1ff7bch-1 xvieK kIFVcf"><p class="styled__Overline-sc-165cfko-0 utils-sc-11hlfw-0 jOKDAt iCUAvT">Documentation</p><ul role="menubar" class="styled__List-sc-1p6pq9n-1 guYaGV"><li role="menuitem" class="styled__Element-sc-1p6pq9n-2 jSbSuj"><a rel="external" href="/docs" class="styled__Link-sc-bubr9x-0 utils-sc-11hlfw-0 bhxyxO eldvFb">Auth0 Docs</a></li><li role="menuitem" class="styled__Element-sc-1p6pq9n-2 jSbSuj"><a rel="external" href="/docs/articles" class="styled__Link-sc-bubr9x-0 utils-sc-11hlfw-0 bhxyxO eldvFb">Articles</a></li><li role="menuitem" class="styled__Element-sc-1p6pq9n-2 jSbSuj"><a rel="external" href="/docs/quickstarts" class="styled__Link-sc-bubr9x-0 utils-sc-11hlfw-0 bhxyxO eldvFb">Quickstarts</a></li><li role="menuitem" class="styled__Element-sc-1p6pq9n-2 jSbSuj"><a rel="external" href="/docs/api" class="styled__Link-sc-bubr9x-0 utils-sc-11hlfw-0 bhxyxO eldvFb">APIs</a></li><li role="menuitem" class="styled__Element-sc-1p6pq9n-2 jSbSuj"><a rel="external" href="/docs/libraries" class="styled__Link-sc-bubr9x-0 utils-sc-11hlfw-0 bhxyxO eldvFb">SDK Libraries</a></li></ul></section><section class="styled__Column-sc-1ff7bch-0 styled__SecondColumn-sc-1ff7bch-2 xvieK fbRjZO"><p class="styled__Overline-sc-165cfko-0 utils-sc-11hlfw-0 jOKDAt iCUAvT">Support Center</p><ul role="menubar" class="styled__List-sc-1p6pq9n-1 guYaGV"><li role="menuitem" class="styled__Element-sc-1p6pq9n-2 jSbSuj"><a rel="external" href="https://community.auth0.com/" class="styled__Link-sc-bubr9x-0 utils-sc-11hlfw-0 bhxyxO eldvFb">Community</a></li><li role="menuitem" class="styled__Element-sc-1p6pq9n-2 jSbSuj"><a rel="external" href="https://support.auth0.com/" class="styled__Link-sc-bubr9x-0 utils-sc-11hlfw-0 bhxyxO eldvFb">Support</a></li><li role="menuitem" class="styled__Element-sc-1p6pq9n-2 jSbSuj"><a rel="external" href="https://community.auth0.com/c/help/6" class="styled__Link-sc-bubr9x-0 utils-sc-11hlfw-0 bhxyxO eldvFb">Help</a></li><li role="menuitem" class="styled__Element-sc-1p6pq9n-2 jSbSuj"><a rel="external" href="https://community.auth0.com/c/faq/42" class="styled__Link-sc-bubr9x-0 utils-sc-11hlfw-0 bhxyxO eldvFb">FAQs</a></li><li role="menuitem" class="styled__Element-sc-1p6pq9n-2 jSbSuj"><a rel="external" href="https://marketplace.auth0.com" class="styled__Link-sc-bubr9x-0 utils-sc-11hlfw-0 bhxyxO eldvFb">Explore Auth0 Marketplace</a></li><li role="menuitem" class="styled__Element-sc-1p6pq9n-2 jSbSuj"><a rel="external" href="/resources" class="styled__Link-sc-bubr9x-0 utils-sc-11hlfw-0 bhxyxO eldvFb">Resources</a></li></ul></section><section class="styled__Column-sc-1ff7bch-0 styled__ThirdColumn-sc-1ff7bch-3 xvieK dDttGJ"><a href="/blog/getting-unlimited-scalability-with-okta-fine-grained-authorization/" rel="external" class="styled__Link-k7d9qa-0 dNLwir"><div class="styled__Container-k7d9qa-1 dXPgwV"><img loading="lazy" src="https://cdn.auth0.com/website/website/cic-header/hero/blog-thumbnail.png" alt="" class="styled__Image-k7d9qa-3 iACfSx"/><div><p class="styled__Overline-sc-165cfko-0 utils-sc-11hlfw-0 jOKDAt bdewcp">BLOG</p><p class="styled__Paragraph-sc-165cfko-1 utils-sc-11hlfw-0 bkTDvW eTNTBu">Getting Unlimited Scalability with Okta Fine Grained Authorization</p></div></div></a><div class="styled__Divider-sc-25clja-0 iJOdtI"></div><div class="styled__ItemsListContainer-sc-25clja-1 gYCAsK"><ul role="menubar" class="styled__List-sc-1p6pq9n-1 guYaGV"><li role="menuitem" class="styled__Element-sc-1p6pq9n-2 jSbSuj"><a rel="external" href="/blog/" class="styled__Link-sc-bubr9x-0 utils-sc-11hlfw-0 bhxyxO eldvFb">Blog</a></li><li role="menuitem" class="styled__Element-sc-1p6pq9n-2 jSbSuj"><a rel="external" href="/learn" class="styled__Link-sc-bubr9x-0 utils-sc-11hlfw-0 bhxyxO eldvFb">Learn</a></li><li role="menuitem" class="styled__Element-sc-1p6pq9n-2 jSbSuj"><a rel="external" href="/intro-to-iam" class="styled__Link-sc-bubr9x-0 utils-sc-11hlfw-0 bhxyxO eldvFb">Intro to IAM (CIAM)</a></li></ul></div></section></section></div></li><li role="menuitem" aria-haspopup="true" tabindex="0" class="styled__NavListEl-sc-1755fzv-16 dnWatv"><div class="styled__NavElementButton-sc-1755fzv-15 goPIno"><span>Product</span><svg width="16" height="16" viewBox="0 0 16 16" fill="none" xmlns="http://www.w3.org/2000/svg"><g id="chevron-down"><path id="icon" fill-rule="evenodd" clip-rule="evenodd" d="M7.99994 9.93934L12.4696 5.46967L13.5303 6.53033L8.53027 11.5303C8.23738 11.8232 7.76251 11.8232 7.46961 11.5303L2.46961 6.53033L3.53027 5.46967L7.99994 9.93934Z" fill="#FFFEFA"></path></g></svg></div><div class="styled__NavElementContentWrapper-sc-1755fzv-14 iyaTlV"><section class="styled__NavElementContent-sc-1755fzv-17 jtpgRu"><section class="styled__Column-sc-1ff7bch-0 styled__FirstColumn-sc-1ff7bch-1 xvieK ksvdhq"><p class="styled__Overline-sc-165cfko-0 utils-sc-11hlfw-0 jOKDAt iCUAvT">Platform</p><ul role="menubar" class="styled__List-sc-1p6pq9n-1 guYaGV"><li role="menuitem" class="styled__Element-sc-1p6pq9n-2 jSbSuj"><a rel="external" href="/platform/access-management" class="styled__Link-sc-bubr9x-0 utils-sc-11hlfw-0 bhxyxO eldvFb">Access Management</a></li><li role="menuitem" class="styled__Element-sc-1p6pq9n-2 jSbSuj"><a rel="external" href="/platform/extensibility" class="styled__Link-sc-bubr9x-0 utils-sc-11hlfw-0 bhxyxO eldvFb">Extensibility</a></li><li role="menuitem" class="styled__Element-sc-1p6pq9n-2 jSbSuj"><a rel="external" href="/platform/login-security" class="styled__Link-sc-bubr9x-0 utils-sc-11hlfw-0 bhxyxO eldvFb">Security</a></li><li role="menuitem" class="styled__Element-sc-1p6pq9n-2 jSbSuj"><a rel="external" href="/platform/user-management" class="styled__Link-sc-bubr9x-0 utils-sc-11hlfw-0 bhxyxO eldvFb">User Management</a></li><li role="menuitem" class="styled__Element-sc-1p6pq9n-2 jSbSuj"><a rel="external" href="/platform/authentication" class="styled__Link-sc-bubr9x-0 utils-sc-11hlfw-0 bhxyxO eldvFb">Authentication</a></li><li role="menuitem" class="styled__Element-sc-1p6pq9n-2 jSbSuj"><a rel="external" href="/fine-grained-authorization" class="styled__Link-sc-bubr9x-0 utils-sc-11hlfw-0 bhxyxO eldvFb">Fine Grained Authorization</a></li></ul><div class="styled__BottomLinkWrapper-sc-1p6pq9n-4 eDzJqf"><a href="https://auth0.com/platform" class="styled__Link-sc-bubr9x-0 utils-sc-11hlfw-0 jSunBo czoLEI">View platform</a></div></section><section class="styled__Column-sc-1ff7bch-0 styled__SecondColumn-sc-1ff7bch-2 xvieK bpIsaL"><p class="styled__Overline-sc-165cfko-0 utils-sc-11hlfw-0 jOKDAt iCUAvT">Features</p><ul role="menubar" class="styled__List-sc-1p6pq9n-1 guYaGV"><li role="menuitem" class="styled__Element-sc-1p6pq9n-2 jSbSuj"><a rel="external" href="/features/universal-login" class="styled__Link-sc-bubr9x-0 utils-sc-11hlfw-0 bhxyxO eldvFb">Universal Login</a></li><li role="menuitem" class="styled__Element-sc-1p6pq9n-2 jSbSuj"><a rel="external" href="/features/single-sign-on" class="styled__Link-sc-bubr9x-0 utils-sc-11hlfw-0 bhxyxO eldvFb">Single Sign On</a></li><li role="menuitem" class="styled__Element-sc-1p6pq9n-2 jSbSuj"><a rel="external" href="/features/multifactor-authentication" class="styled__Link-sc-bubr9x-0 utils-sc-11hlfw-0 bhxyxO eldvFb">Multifactor Authentication</a></li><li role="menuitem" class="styled__Element-sc-1p6pq9n-2 jSbSuj"><a rel="external" href="/features/actions" class="styled__Link-sc-bubr9x-0 utils-sc-11hlfw-0 bhxyxO eldvFb">Actions</a></li><li role="menuitem" class="styled__Element-sc-1p6pq9n-2 jSbSuj"><a rel="external" href="/features/machine-to-machine" class="styled__Link-sc-bubr9x-0 utils-sc-11hlfw-0 bhxyxO eldvFb">Machine to Machine</a></li><li role="menuitem" class="styled__Element-sc-1p6pq9n-2 jSbSuj"><a rel="external" href="/features/passwordless" class="styled__Link-sc-bubr9x-0 utils-sc-11hlfw-0 bhxyxO eldvFb">Passwordless</a></li><li role="menuitem" class="styled__Element-sc-1p6pq9n-2 jSbSuj"><a rel="external" href="/features/breached-passwords" class="styled__Link-sc-bubr9x-0 utils-sc-11hlfw-0 bhxyxO eldvFb">Breached Passwords</a></li></ul><div class="styled__BottomLinkWrapper-sc-1p6pq9n-4 eDzJqf"><a href="https://auth0.com/features" class="styled__Link-sc-bubr9x-0 utils-sc-11hlfw-0 jSunBo czoLEI">View features</a></div></section><section class="styled__Column-sc-1ff7bch-0 styled__ThirdColumn-sc-1ff7bch-3 xvieK gMGasY"><ul class="styled__List-sc-12vkkep-0 dURBhZ"><li class="styled__Element-sc-12vkkep-1 cetBpD"><a rel="external" href="/resources/videos/platform-introduction-video-2020" class="styled__Link-sc-bubr9x-0 utils-sc-11hlfw-0 hfCwZi jrcqSi"><div><p>Technology Overview</p><p class="styled__Paragraph-sc-165cfko-1 utils-sc-11hlfw-0 fXa-dFL kXdnOe">Watch a walkthrough of the Auth0 Platform</p></div></a></li><li class="styled__Element-sc-12vkkep-1 cetBpD"><a rel="external" href="/platform/cloud-deployment" class="styled__Link-sc-bubr9x-0 utils-sc-11hlfw-0 hfCwZi jrcqSi"><div><p>Cloud Deployments</p><p class="styled__Paragraph-sc-165cfko-1 utils-sc-11hlfw-0 fXa-dFL kXdnOe">Deploy to the cloud, your way</p></div></a></li><li class="styled__Element-sc-12vkkep-1 cetBpD"><a rel="external" href="/marketplace" class="styled__Link-sc-bubr9x-0 utils-sc-11hlfw-0 hfCwZi jrcqSi"><div><p>Auth0 Marketplace</p><p class="styled__Paragraph-sc-165cfko-1 utils-sc-11hlfw-0 fXa-dFL kXdnOe">Discover the integrations you need to solve identity</p></div></a></li></ul></section></section></div></li><li role="menuitem" aria-haspopup="true" tabindex="0" class="styled__NavListEl-sc-1755fzv-16 dnWatv"><div class="styled__NavElementButton-sc-1755fzv-15 goPIno"><span>Solutions</span><svg width="16" height="16" viewBox="0 0 16 16" fill="none" xmlns="http://www.w3.org/2000/svg"><g id="chevron-down"><path id="icon" fill-rule="evenodd" clip-rule="evenodd" d="M7.99994 9.93934L12.4696 5.46967L13.5303 6.53033L8.53027 11.5303C8.23738 11.8232 7.76251 11.8232 7.46961 11.5303L2.46961 6.53033L3.53027 5.46967L7.99994 9.93934Z" fill="#FFFEFA"></path></g></svg></div><div class="styled__NavElementContentWrapper-sc-1755fzv-14 iyaTlV"><section class="styled__NavElementContent-sc-1755fzv-17 jtpgRu"><section class="styled__Column-sc-1ff7bch-0 styled__FirstColumn-sc-1ff7bch-1 xvieK kIFVcf"><p class="styled__Overline-sc-165cfko-0 utils-sc-11hlfw-0 jOKDAt iCUAvT">Industries</p><ul role="menubar" class="styled__List-sc-1p6pq9n-1 guYaGV"><li role="menuitem" class="styled__Element-sc-1p6pq9n-2 jSbSuj"><a rel="external" href="/nonprofits" class="styled__Link-sc-bubr9x-0 utils-sc-11hlfw-0 bhxyxO eldvFb">Nonprofits & Charities</a></li><li role="menuitem" class="styled__Element-sc-1p6pq9n-2 jSbSuj"><a rel="external" href="/startups" class="styled__Link-sc-bubr9x-0 utils-sc-11hlfw-0 bhxyxO eldvFb">Startups</a></li></ul></section><section class="styled__Column-sc-1ff7bch-0 styled__SecondColumn-sc-1ff7bch-2 xvieK fbRjZO"><div class="styled__Wrapper-mvo3b8-0 gXQAAw"><p class="styled__Overline-sc-165cfko-0 utils-sc-11hlfw-0 jOKDAt dKTRwW">Use Cases</p><a rel="external" href="/b2c-customer-identity-management" class="styled__Link-sc-bubr9x-0 utils-sc-11hlfw-0 bhxyxO crZFdA"><span>Consumer Applications</span></a><a rel="external" href="/b2b-saas" class="styled__Link-sc-bubr9x-0 utils-sc-11hlfw-0 bhxyxO crZFdA"><span>B2B SaaS Applications</span></a><p class="styled__Overline-sc-165cfko-0 utils-sc-11hlfw-0 jOKDAt dKTRwW">Case Studies</p><a rel="external" href="/customers/" class="styled__Link-sc-bubr9x-0 utils-sc-11hlfw-0 bhxyxO crZFdA"><span>Read our customers stories</span></a></div></section><section class="styled__Column-sc-1ff7bch-0 styled__ThirdColumn-sc-1ff7bch-3 xvieK dDttGJ"><a href="https://okta.valuestoryapp.com/okta/?utm_Origin=Auth0" rel="external" class="styled__Link-k7d9qa-0 dNLwir"><div class="styled__Container-k7d9qa-1 dXPgwV"><img loading="lazy" src="https://cdn.auth0.com/website/header/ROI_thumb_2x.png" alt="" class="styled__Image-k7d9qa-3 iACfSx"/><div><p class="styled__Overline-sc-165cfko-0 utils-sc-11hlfw-0 jOKDAt bdewcp">CIAM ROI Calculator</p><p class="styled__Paragraph-sc-165cfko-1 utils-sc-11hlfw-0 bkTDvW eTNTBu">Estimate the revenue impact to your customer-facing business</p></div></div></a></section></section></div></li><li role="menuitem" aria-haspopup="false" tabindex="0" class="styled__NavListEl-sc-1755fzv-16 dnWatv"><a href="/blog/" rel="external" class="styled__NavElementButton-sc-1755fzv-15 goPIno"><span>Blog</span></a></li><li role="menuitem" aria-haspopup="false" class="styled__NavListEl-sc-1755fzv-16 dnWatv"><a href="/pricing/" rel="external" class="styled__NavElementButton-sc-1755fzv-15 goPIno"><span>Pricing</span></a></li></ul><div class="styled__ButtonList-sc-1755fzv-8 hLHYiD"><a role="button" rel="external" href="/signup?place=header&type=button&text=sign%20up" tabindex="0" class="styled__Button-sc-1hwml9q-0 utils-sc-11hlfw-0 etdOck iyreho"><span>Sign up</span></a><a role="button" rel="external" href="/contact-us?place=header&type=button&text=contact%20sales" tabindex="0" class="styled__Button-sc-1hwml9q-0 utils-sc-11hlfw-0 cmgpvv dTOMa-D"><span>Contact sales</span></a></div></div></nav></header><nav id="blog-header" class="sc-1gkkh2j-0 cmMjKH"><div class="sc-1gkkh2j-1 hfnTjw"><div class="sc-1gkkh2j-5 ktqmki"><a href="/blog" class="styled__Paragraph-sc-165cfko-1 utils-sc-11hlfw-0 kVgWkQ cvLfHs">Blog</a><button aria-label="chevron icon, open menu" class="sc-1gkkh2j-4 jqUhwM"><svg width="25" height="24" viewBox="0 0 25 24" fill="none" xmlns="http://www.w3.org/2000/svg"><g id="icon-chevron-down"><path id="Vector" d="M13.6314 15.7829L19.7072 9.70712L18.293 8.29291L12.5001 14.0858L6.70718 8.29291L5.29297 9.70712L11.3687 15.7829C11.9935 16.4077 13.0066 16.4077 13.6314 15.7829Z" fill="#FFFEFA"></path></g></svg></button></div><div class="sc-1gkkh2j-2 djkNR"><div class="sc-1gkkh2j-11 kpLfjt"><p class="styled__Overline-sc-165cfko-0 utils-sc-11hlfw-0 calwMa lmzreS">Explore Topics</p></div><ul class="sc-1gkkh2j-6 drcxHp"><li class="sc-1gkkh2j-8 jZeTEE"><a href="/blog/developers" class="sc-1gkkh2j-7 eAKUYk"><p class="styled__Paragraph-sc-165cfko-1 utils-sc-11hlfw-0 gXwSZc lbFYLj">Developers</p><svg width="25" height="24" viewBox="0 0 25 24" fill="none" xmlns="http://www.w3.org/2000/svg"><path d="M16.9572 12.7071L10.4572 19.2071L9.04297 17.7928L14.8359 12L9.04297 6.20706L10.4572 4.79285L16.9572 11.2928C17.1447 11.4804 17.2501 11.7347 17.2501 12C17.2501 12.2652 17.1447 12.5195 16.9572 12.7071Z" fill="#FFFEFA"></path></svg></a></li><li class="sc-1gkkh2j-8 eMQqDZ"><a href="/blog/identity-and-security" class="sc-1gkkh2j-7 eAKUYk"><p class="styled__Paragraph-sc-165cfko-1 utils-sc-11hlfw-0 gXwSZc lbFYLj">Identity & Security</p><svg width="25" height="24" viewBox="0 0 25 24" fill="none" xmlns="http://www.w3.org/2000/svg"><path d="M16.9572 12.7071L10.4572 19.2071L9.04297 17.7928L14.8359 12L9.04297 6.20706L10.4572 4.79285L16.9572 11.2928C17.1447 11.4804 17.2501 11.7347 17.2501 12C17.2501 12.2652 17.1447 12.5195 16.9572 12.7071Z" fill="#FFFEFA"></path></svg></a></li><li class="sc-1gkkh2j-8 fiENtL"><a href="/blog/business" class="sc-1gkkh2j-7 eAKUYk"><p class="styled__Paragraph-sc-165cfko-1 utils-sc-11hlfw-0 gXwSZc lbFYLj">Business</p><svg width="25" height="24" viewBox="0 0 25 24" fill="none" xmlns="http://www.w3.org/2000/svg"><path d="M16.9572 12.7071L10.4572 19.2071L9.04297 17.7928L14.8359 12L9.04297 6.20706L10.4572 4.79285L16.9572 11.2928C17.1447 11.4804 17.2501 11.7347 17.2501 12C17.2501 12.2652 17.1447 12.5195 16.9572 12.7071Z" fill="#FFFEFA"></path></svg></a></li><li class="sc-1gkkh2j-8 dPGYxJ"><a href="/blog/leadership" class="sc-1gkkh2j-7 eAKUYk"><p class="styled__Paragraph-sc-165cfko-1 utils-sc-11hlfw-0 gXwSZc lbFYLj">Leadership</p><svg width="25" height="24" viewBox="0 0 25 24" fill="none" xmlns="http://www.w3.org/2000/svg"><path d="M16.9572 12.7071L10.4572 19.2071L9.04297 17.7928L14.8359 12L9.04297 6.20706L10.4572 4.79285L16.9572 11.2928C17.1447 11.4804 17.2501 11.7347 17.2501 12C17.2501 12.2652 17.1447 12.5195 16.9572 12.7071Z" fill="#FFFEFA"></path></svg></a></li><li class="sc-1gkkh2j-8 bUbYVZ"><a href="/blog/culture" class="sc-1gkkh2j-7 eAKUYk"><p class="styled__Paragraph-sc-165cfko-1 utils-sc-11hlfw-0 gXwSZc lbFYLj">Culture</p><svg width="25" height="24" viewBox="0 0 25 24" fill="none" xmlns="http://www.w3.org/2000/svg"><path d="M16.9572 12.7071L10.4572 19.2071L9.04297 17.7928L14.8359 12L9.04297 6.20706L10.4572 4.79285L16.9572 11.2928C17.1447 11.4804 17.2501 11.7347 17.2501 12C17.2501 12.2652 17.1447 12.5195 16.9572 12.7071Z" fill="#FFFEFA"></path></svg></a></li><li class="sc-1gkkh2j-8 jtthK"><a href="/blog/engineering" class="sc-1gkkh2j-7 eAKUYk"><p class="styled__Paragraph-sc-165cfko-1 utils-sc-11hlfw-0 gXwSZc lbFYLj">Engineering</p><svg width="25" height="24" viewBox="0 0 25 24" fill="none" xmlns="http://www.w3.org/2000/svg"><path d="M16.9572 12.7071L10.4572 19.2071L9.04297 17.7928L14.8359 12L9.04297 6.20706L10.4572 4.79285L16.9572 11.2928C17.1447 11.4804 17.2501 11.7347 17.2501 12C17.2501 12.2652 17.1447 12.5195 16.9572 12.7071Z" fill="#FFFEFA"></path></svg></a></li><li class="sc-1gkkh2j-8 kvjbE"><a href="/blog/announcements" class="sc-1gkkh2j-7 eAKUYk"><p class="styled__Paragraph-sc-165cfko-1 utils-sc-11hlfw-0 gXwSZc lbFYLj">Announcements</p><svg width="25" height="24" viewBox="0 0 25 24" fill="none" xmlns="http://www.w3.org/2000/svg"><path d="M16.9572 12.7071L10.4572 19.2071L9.04297 17.7928L14.8359 12L9.04297 6.20706L10.4572 4.79285L16.9572 11.2928C17.1447 11.4804 17.2501 11.7347 17.2501 12C17.2501 12.2652 17.1447 12.5195 16.9572 12.7071Z" fill="#FFFEFA"></path></svg></a></li></ul></div><div class="sc-1gkkh2j-9 hAGWZa"><div class="sc-1gkkh2j-16 dOVPCc"><div class="sc-1q6s0ef-0 iPbnr"><div class="sc-8jxe5n-0 gRIKWN"><button aria-label="Open search bar" id="open-search-mobile" class="sc-8jxe5n-3 exdfoO"><svg width="17" height="16" viewBox="0 0 17 16" fill="#FFFEFA" xmlns="http://www.w3.org/2000/svg"><path fill-rule="evenodd" clip-rule="evenodd" d="M7.16634 1.33331C4.22082 1.33331 1.83301 3.72113 1.83301 6.66665C1.83301 9.61217 4.22082 12 7.16634 12C8.38796 12 9.51365 11.5893 10.4129 10.8984L14.0283 14.5138L14.9711 13.571L11.361 9.96087C12.0742 9.05392 12.4997 7.90997 12.4997 6.66665C12.4997 3.72113 10.1119 1.33331 7.16634 1.33331ZM3.16634 6.66665C3.16634 4.45751 4.9572 2.66665 7.16634 2.66665C9.37548 2.66665 11.1663 4.45751 11.1663 6.66665C11.1663 8.87579 9.37548 10.6666 7.16634 10.6666C4.9572 10.6666 3.16634 8.87579 3.16634 6.66665Z" fill="#FFFEFA"></path></svg></button><form action="/blog/search" method="get" class="sc-8jxe5n-1 bHAfBe"><div class="sc-8jxe5n-4 fcGWOt"><fieldset id="react-aria5119939997-132330" class="styled__InputWrapper-sc-zjpc1c-2 lrdPx"><svg class="styled__SearchIcon-sc-zjpc1c-3 dNHNJo" width="16" height="16" fill="none" xmlns="http://www.w3.org/2000/svg"><path clip-rule="evenodd" d="M7 12A5 5 0 1 0 7 2a5 5 0 0 0 0 10Z" stroke="#8C929C" stroke-width="1.5" stroke-linecap="round" stroke-linejoin="round"></path><path d="m14 14-3.467-3.467" stroke="#8C929C" stroke-width="1.5" stroke-linecap="round" stroke-linejoin="round"></path></svg><input type="text" placeholder="Search..." aria-label="search" aria-invalid="false" aria-errormessage="false" value="" autoComplete="off" name="query" id="react-aria5119939997-132326" aria-describedby="react-aria5119939997-132328 react-aria5119939997-132329" class="styled__TextInput-sc-zjpc1c-1 bLVyXv"/></fieldset></div><input type="hidden" name="page" value="1"/></form></div></div></div><div class="sc-8aqj4j-0 gCBQiB"><button id="theme__selector" aria-label="Open theme selector" class="sc-8aqj4j-1 fjEeoE"><svg xmlns="http://www.w3.org/2000/svg" width="16" height="16" viewBox="0 0 16 16" fill="none"><path d="M13.3335 2H2.66683C1.93045 2 1.3335 2.59695 1.3335 3.33333V10C1.3335 10.7364 1.93045 11.3333 2.66683 11.3333H13.3335C14.0699 11.3333 14.6668 10.7364 14.6668 10V3.33333C14.6668 2.59695 14.0699 2 13.3335 2Z" stroke="#FFFEFA" stroke-width="1.33333" stroke-linecap="round" stroke-linejoin="round"></path><path d="M5.3335 14H10.6668" stroke="#FFFEFA" stroke-width="1.33333" stroke-linecap="square" stroke-linejoin="round"></path><path d="M8 11.3335V14.0002" stroke="#FFFEFA" stroke-width="1.33333" stroke-linecap="round" stroke-linejoin="round"></path></svg></button><ul class="sc-8aqj4j-2 gdIxpa"><li class="sc-8aqj4j-3 iaowVa"><button id="theme__system" selected="" class="sc-8aqj4j-4 kTELOh"><svg xmlns="http://www.w3.org/2000/svg" width="16" height="16" viewBox="0 0 16 16" fill="none"><path d="M13.3335 2H2.66683C1.93045 2 1.3335 2.59695 1.3335 3.33333V10C1.3335 10.7364 1.93045 11.3333 2.66683 11.3333H13.3335C14.0699 11.3333 14.6668 10.7364 14.6668 10V3.33333C14.6668 2.59695 14.0699 2 13.3335 2Z" stroke="#FFFEFA" stroke-width="1.33333" stroke-linecap="round" stroke-linejoin="round"></path><path d="M5.3335 14H10.6668" stroke="#FFFEFA" stroke-width="1.33333" stroke-linecap="square" stroke-linejoin="round"></path><path d="M8 11.3335V14.0002" stroke="#FFFEFA" stroke-width="1.33333" stroke-linecap="round" stroke-linejoin="round"></path></svg> <span class="styled__Paragraph-sc-165cfko-1 utils-sc-11hlfw-0 gWBdwk lbFYLj">System</span></button></li><li class="sc-8aqj4j-3 iaowVa"><button id="theme__dark" class="sc-8aqj4j-4 jmjPHc"><svg width="17" height="16" viewBox="0 0 17 16" fill="none" xmlns="http://www.w3.org/2000/svg"><path fill-rule="evenodd" clip-rule="evenodd" d="M8.55426 1.6727C8.68328 1.90162 8.66579 2.18497 8.50959 2.39629C7.33265 3.98854 7.49774 6.20226 8.89782 7.60234C10.2979 9.00243 12.5116 9.16751 14.1039 7.99057C14.3152 7.83438 14.5985 7.81688 14.8275 7.9459C15.0564 8.07491 15.1882 8.32637 15.164 8.58803C14.8398 12.096 11.8421 14.7463 8.32086 14.6381C4.79957 14.5299 1.97028 11.7006 1.86208 8.1793C1.75389 4.65801 4.40413 1.66036 7.91213 1.33618C8.17379 1.312 8.42525 1.44377 8.55426 1.6727ZM6.71057 2.95845C4.58978 3.72467 3.12249 5.78538 3.19479 8.13835C3.28135 10.9554 5.54477 13.2188 8.36181 13.3054C10.7148 13.3777 12.7755 11.9104 13.5417 9.78959C11.6386 10.4786 9.44928 10.0394 7.95501 8.54515C6.46075 7.05089 6.02154 4.86154 6.71057 2.95845Z" fill="#FFFEFA"></path></svg> <span class="styled__Paragraph-sc-165cfko-1 utils-sc-11hlfw-0 gWBdwk lbFYLj">Dark mode</span></button></li><li class="sc-8aqj4j-3 iaowVa"><button id="theme__light" class="sc-8aqj4j-4 jmjPHc"><svg width="17" height="16" viewBox="0 0 17 16" fill="none" xmlns="http://www.w3.org/2000/svg"><path d="M7.83317 2.66667V0.666672H9.1665V2.66667H7.83317Z" fill="#FFFEFA"></path><path d="M4.36175 4.80474L2.84175 3.28474L3.78456 2.34193L5.30455 3.86193L4.36175 4.80474Z" fill="#FFFEFA"></path><path d="M14.1579 3.28474L12.6379 4.80474L11.6951 3.86194L13.2151 2.34194L14.1579 3.28474Z" fill="#FFFEFA"></path><path fill-rule="evenodd" clip-rule="evenodd" d="M4.49984 8C4.49984 5.79087 6.2907 4 8.49984 4C10.709 4 12.4998 5.79087 12.4998 8C12.4998 10.2091 10.709 12 8.49984 12C6.2907 12 4.49984 10.2091 4.49984 8ZM8.49984 5.33334C7.02708 5.33334 5.83317 6.52725 5.83317 8C5.83317 9.47276 7.02708 10.6667 8.49984 10.6667C9.9726 10.6667 11.1665 9.47276 11.1665 8C11.1665 6.52725 9.9726 5.33334 8.49984 5.33334Z" fill="#FFFEFA"></path><path d="M3.1665 8.66667H1.1665V7.33334H3.1665V8.66667Z" fill="#FFFEFA"></path><path d="M15.8332 8.66667H13.8332V7.33334H15.8332V8.66667Z" fill="#FFFEFA"></path><path d="M5.30455 12.1381L3.78456 13.6581L2.84175 12.7153L4.36175 11.1953L5.30455 12.1381Z" fill="#FFFEFA"></path><path d="M13.2151 13.6581L11.6951 12.1381L12.6379 11.1953L14.1579 12.7153L13.2151 13.6581Z" fill="#FFFEFA"></path><path d="M7.83317 15.3333V13.3333H9.1665V15.3333H7.83317Z" fill="#FFFEFA"></path></svg> <span class="styled__Paragraph-sc-165cfko-1 utils-sc-11hlfw-0 gWBdwk lbFYLj">Light mode</span></button></li></ul></div></div></div></nav><nav class="sc-19z8ym3-0 iyxCTh"><div class="sc-19z8ym3-1 fAWgzp"></div><div class="sc-19z8ym3-2 ePjeMY"><a href="/blog" class="styled__Paragraph-sc-165cfko-1 utils-sc-11hlfw-0 hZdkzi lbFYLj">Blog</a><ul class="sc-19z8ym3-3 jdjutH"><li class="sc-19z8ym3-4 kKvPZn"><a href="/blog/developers" class="styled__Paragraph-sc-165cfko-1 utils-sc-11hlfw-0 gXwSZc lbFYLj">Developers</a></li><li class="sc-19z8ym3-4 iVeAMP"><a href="/blog/identity-and-security" class="styled__Paragraph-sc-165cfko-1 utils-sc-11hlfw-0 gXwSZc lbFYLj">Identity & Security</a></li><li class="sc-19z8ym3-4 fJixJm"><a href="/blog/business" class="styled__Paragraph-sc-165cfko-1 utils-sc-11hlfw-0 gXwSZc lbFYLj">Business</a></li><li class="sc-19z8ym3-4 gbVuTJ"><a href="/blog/leadership" class="styled__Paragraph-sc-165cfko-1 utils-sc-11hlfw-0 gXwSZc lbFYLj">Leadership</a></li><li class="sc-19z8ym3-4 cIIkJD"><a href="/blog/culture" class="styled__Paragraph-sc-165cfko-1 utils-sc-11hlfw-0 gXwSZc lbFYLj">Culture</a></li><li class="sc-19z8ym3-4 hFAXQk"><a href="/blog/engineering" class="styled__Paragraph-sc-165cfko-1 utils-sc-11hlfw-0 gXwSZc lbFYLj">Engineering</a></li><li class="sc-19z8ym3-4 fInsdZ"><a href="/blog/announcements" class="styled__Paragraph-sc-165cfko-1 utils-sc-11hlfw-0 gXwSZc lbFYLj">Announcements</a></li></ul><div class="sc-19z8ym3-5 hkZJsJ"><div class="sc-1q6s0ef-0 iPbnr"><div class="sc-8jxe5n-0 gRIKWN"><button aria-label="Open search bar" id="open-search-mobile" class="sc-8jxe5n-3 exdfoO"><svg width="17" height="16" viewBox="0 0 17 16" fill="#FFFEFA" xmlns="http://www.w3.org/2000/svg"><path fill-rule="evenodd" clip-rule="evenodd" d="M7.16634 1.33331C4.22082 1.33331 1.83301 3.72113 1.83301 6.66665C1.83301 9.61217 4.22082 12 7.16634 12C8.38796 12 9.51365 11.5893 10.4129 10.8984L14.0283 14.5138L14.9711 13.571L11.361 9.96087C12.0742 9.05392 12.4997 7.90997 12.4997 6.66665C12.4997 3.72113 10.1119 1.33331 7.16634 1.33331ZM3.16634 6.66665C3.16634 4.45751 4.9572 2.66665 7.16634 2.66665C9.37548 2.66665 11.1663 4.45751 11.1663 6.66665C11.1663 8.87579 9.37548 10.6666 7.16634 10.6666C4.9572 10.6666 3.16634 8.87579 3.16634 6.66665Z" fill="#FFFEFA"></path></svg></button><form action="/blog/search" method="get" class="sc-8jxe5n-1 bHAfBe"><div class="sc-8jxe5n-4 fcGWOt"><fieldset id="react-aria5119939997-132335" class="styled__InputWrapper-sc-zjpc1c-2 lrdPx"><svg class="styled__SearchIcon-sc-zjpc1c-3 dNHNJo" width="16" height="16" fill="none" xmlns="http://www.w3.org/2000/svg"><path clip-rule="evenodd" d="M7 12A5 5 0 1 0 7 2a5 5 0 0 0 0 10Z" stroke="#8C929C" stroke-width="1.5" stroke-linecap="round" stroke-linejoin="round"></path><path d="m14 14-3.467-3.467" stroke="#8C929C" stroke-width="1.5" stroke-linecap="round" stroke-linejoin="round"></path></svg><input type="text" placeholder="Search..." aria-label="search" aria-invalid="false" aria-errormessage="false" value="" autoComplete="off" name="query" id="react-aria5119939997-132331" aria-describedby="react-aria5119939997-132333 react-aria5119939997-132334" class="styled__TextInput-sc-zjpc1c-1 bLVyXv"/></fieldset></div><input type="hidden" name="page" value="1"/></form></div></div><div class="sc-8aqj4j-0 gCBQiB"><button id="theme__selector" aria-label="Open theme selector" class="sc-8aqj4j-1 fjEeoE"><svg xmlns="http://www.w3.org/2000/svg" width="16" height="16" viewBox="0 0 16 16" fill="none"><path d="M13.3335 2H2.66683C1.93045 2 1.3335 2.59695 1.3335 3.33333V10C1.3335 10.7364 1.93045 11.3333 2.66683 11.3333H13.3335C14.0699 11.3333 14.6668 10.7364 14.6668 10V3.33333C14.6668 2.59695 14.0699 2 13.3335 2Z" stroke="#FFFEFA" stroke-width="1.33333" stroke-linecap="round" stroke-linejoin="round"></path><path d="M5.3335 14H10.6668" stroke="#FFFEFA" stroke-width="1.33333" stroke-linecap="square" stroke-linejoin="round"></path><path d="M8 11.3335V14.0002" stroke="#FFFEFA" stroke-width="1.33333" stroke-linecap="round" stroke-linejoin="round"></path></svg></button><ul class="sc-8aqj4j-2 gdIxpa"><li class="sc-8aqj4j-3 iaowVa"><button id="theme__system" selected="" class="sc-8aqj4j-4 kTELOh"><svg xmlns="http://www.w3.org/2000/svg" width="16" height="16" viewBox="0 0 16 16" fill="none"><path d="M13.3335 2H2.66683C1.93045 2 1.3335 2.59695 1.3335 3.33333V10C1.3335 10.7364 1.93045 11.3333 2.66683 11.3333H13.3335C14.0699 11.3333 14.6668 10.7364 14.6668 10V3.33333C14.6668 2.59695 14.0699 2 13.3335 2Z" stroke="#FFFEFA" stroke-width="1.33333" stroke-linecap="round" stroke-linejoin="round"></path><path d="M5.3335 14H10.6668" stroke="#FFFEFA" stroke-width="1.33333" stroke-linecap="square" stroke-linejoin="round"></path><path d="M8 11.3335V14.0002" stroke="#FFFEFA" stroke-width="1.33333" stroke-linecap="round" stroke-linejoin="round"></path></svg> <span class="styled__Paragraph-sc-165cfko-1 utils-sc-11hlfw-0 gWBdwk lbFYLj">System</span></button></li><li class="sc-8aqj4j-3 iaowVa"><button id="theme__dark" class="sc-8aqj4j-4 jmjPHc"><svg width="17" height="16" viewBox="0 0 17 16" fill="none" xmlns="http://www.w3.org/2000/svg"><path fill-rule="evenodd" clip-rule="evenodd" d="M8.55426 1.6727C8.68328 1.90162 8.66579 2.18497 8.50959 2.39629C7.33265 3.98854 7.49774 6.20226 8.89782 7.60234C10.2979 9.00243 12.5116 9.16751 14.1039 7.99057C14.3152 7.83438 14.5985 7.81688 14.8275 7.9459C15.0564 8.07491 15.1882 8.32637 15.164 8.58803C14.8398 12.096 11.8421 14.7463 8.32086 14.6381C4.79957 14.5299 1.97028 11.7006 1.86208 8.1793C1.75389 4.65801 4.40413 1.66036 7.91213 1.33618C8.17379 1.312 8.42525 1.44377 8.55426 1.6727ZM6.71057 2.95845C4.58978 3.72467 3.12249 5.78538 3.19479 8.13835C3.28135 10.9554 5.54477 13.2188 8.36181 13.3054C10.7148 13.3777 12.7755 11.9104 13.5417 9.78959C11.6386 10.4786 9.44928 10.0394 7.95501 8.54515C6.46075 7.05089 6.02154 4.86154 6.71057 2.95845Z" fill="#FFFEFA"></path></svg> <span class="styled__Paragraph-sc-165cfko-1 utils-sc-11hlfw-0 gWBdwk lbFYLj">Dark mode</span></button></li><li class="sc-8aqj4j-3 iaowVa"><button id="theme__light" class="sc-8aqj4j-4 jmjPHc"><svg width="17" height="16" viewBox="0 0 17 16" fill="none" xmlns="http://www.w3.org/2000/svg"><path d="M7.83317 2.66667V0.666672H9.1665V2.66667H7.83317Z" fill="#FFFEFA"></path><path d="M4.36175 4.80474L2.84175 3.28474L3.78456 2.34193L5.30455 3.86193L4.36175 4.80474Z" fill="#FFFEFA"></path><path d="M14.1579 3.28474L12.6379 4.80474L11.6951 3.86194L13.2151 2.34194L14.1579 3.28474Z" fill="#FFFEFA"></path><path fill-rule="evenodd" clip-rule="evenodd" d="M4.49984 8C4.49984 5.79087 6.2907 4 8.49984 4C10.709 4 12.4998 5.79087 12.4998 8C12.4998 10.2091 10.709 12 8.49984 12C6.2907 12 4.49984 10.2091 4.49984 8ZM8.49984 5.33334C7.02708 5.33334 5.83317 6.52725 5.83317 8C5.83317 9.47276 7.02708 10.6667 8.49984 10.6667C9.9726 10.6667 11.1665 9.47276 11.1665 8C11.1665 6.52725 9.9726 5.33334 8.49984 5.33334Z" fill="#FFFEFA"></path><path d="M3.1665 8.66667H1.1665V7.33334H3.1665V8.66667Z" fill="#FFFEFA"></path><path d="M15.8332 8.66667H13.8332V7.33334H15.8332V8.66667Z" fill="#FFFEFA"></path><path d="M5.30455 12.1381L3.78456 13.6581L2.84175 12.7153L4.36175 11.1953L5.30455 12.1381Z" fill="#FFFEFA"></path><path d="M13.2151 13.6581L11.6951 12.1381L12.6379 11.1953L14.1579 12.7153L13.2151 13.6581Z" fill="#FFFEFA"></path><path d="M7.83317 15.3333V13.3333H9.1665V15.3333H7.83317Z" fill="#FFFEFA"></path></svg> <span class="styled__Paragraph-sc-165cfko-1 utils-sc-11hlfw-0 gWBdwk lbFYLj">Light mode</span></button></li></ul></div></div></div></nav><section class="sc-14t63q7-0 bqSjfU"><ul class="sc-14t63q7-1 kUZLOE"><li><a href="/blog" class="styled__Overline-sc-165cfko-0 utils-sc-11hlfw-0 calwMa hZxSJK">Blog</a></li><li><a href="/blog/authors" class="styled__Overline-sc-165cfko-0 utils-sc-11hlfw-0 calwMa hZxSJK">Authors</a></li><li><p class="styled__Overline-sc-165cfko-0 utils-sc-11hlfw-0 calwMa gCRKXL">Juan Cruz Martinez</p></li></ul><div class="sc-14t63q7-2 jNxgOl"><img src="https://images.ctfassets.net/23aumh6u8s0i/5b3YvfAb53h2I5U6uanww4/f1dfa0e19f15f5df8eacd53f78a813f6/jcm.jpeg" alt=""/><h1 class="styled__Heading-sc-165cfko-2 utils-sc-11hlfw-0 fqVxFN lbFYLj">Juan Cruz Martinez</h1><p class="styled__Paragraph-sc-165cfko-1 utils-sc-11hlfw-0 jpqCEe dzhwtc">Staff Developer Advocate</p></div></section><div class="sc-1j5y5w8-0 jGekvD"><aside class="sc-1koe8c4-0 hsBpeS"><div class="dh4ait-0 ePAqkg"><p class="styled__Overline-sc-165cfko-0 utils-sc-11hlfw-0 bvimfW keBOjr">About the author</p></div><p class="styled__Paragraph-sc-165cfko-1 utils-sc-11hlfw-0 CBuMa hvtcVw">I stream, blog, and make youtube videos about tech stuff. I love coding, I love AI, and I love building stuff!</p><div class="sc-1koe8c4-3 dczHYa"><div class="wiotl7-0 egvjS"><div class="dh4ait-0 ePAqkg"><p class="styled__Overline-sc-165cfko-0 utils-sc-11hlfw-0 bvimfW keBOjr">Usually writes about</p></div><div class="wiotl7-1 keAMQj"><button class="sc-1xszjru-0 dDTyLk"><p class="styled__Paragraph-sc-165cfko-1 utils-sc-11hlfw-0 gWBdwk bBeyP">#authentication</p></button><button class="sc-1xszjru-0 dDTyLk"><p class="styled__Paragraph-sc-165cfko-1 utils-sc-11hlfw-0 gWBdwk bBeyP">#identity</p></button><button class="sc-1xszjru-0 dDTyLk"><p class="styled__Paragraph-sc-165cfko-1 utils-sc-11hlfw-0 gWBdwk bBeyP">#authorization</p></button><button class="sc-1xszjru-0 dDTyLk"><p class="styled__Paragraph-sc-165cfko-1 utils-sc-11hlfw-0 gWBdwk bBeyP">#javascript</p></button><button class="sc-1xszjru-0 dDTyLk"><p class="styled__Paragraph-sc-165cfko-1 utils-sc-11hlfw-0 gWBdwk bBeyP">#auth0</p></button><button class="sc-1xszjru-0 dDTyLk"><p class="styled__Paragraph-sc-165cfko-1 utils-sc-11hlfw-0 gWBdwk bBeyP">#api</p></button><button class="sc-1xszjru-0 dDTyLk"><p class="styled__Paragraph-sc-165cfko-1 utils-sc-11hlfw-0 gWBdwk bBeyP">#universal-login</p></button><button class="sc-1xszjru-0 dDTyLk"><p class="styled__Paragraph-sc-165cfko-1 utils-sc-11hlfw-0 gWBdwk bBeyP">#saas</p></button><button class="sc-1xszjru-0 dDTyLk"><p class="styled__Paragraph-sc-165cfko-1 utils-sc-11hlfw-0 gWBdwk bBeyP">#release</p></button><button class="sc-1xszjru-0 dDTyLk"><p class="styled__Paragraph-sc-165cfko-1 utils-sc-11hlfw-0 gWBdwk bBeyP">#announcement</p></button><button class="sc-1xszjru-0 dDTyLk"><p class="styled__Paragraph-sc-165cfko-1 utils-sc-11hlfw-0 gWBdwk bBeyP">#python</p></button><button class="sc-1xszjru-0 dDTyLk"><p class="styled__Paragraph-sc-165cfko-1 utils-sc-11hlfw-0 gWBdwk bBeyP">#security</p></button><button class="sc-1xszjru-0 dDTyLk"><p class="styled__Paragraph-sc-165cfko-1 utils-sc-11hlfw-0 gWBdwk bBeyP">#fga</p></button><button class="sc-1xszjru-0 dDTyLk"><p class="styled__Paragraph-sc-165cfko-1 utils-sc-11hlfw-0 gWBdwk bBeyP">#login</p></button><button class="sc-1xszjru-0 dDTyLk"><p class="styled__Paragraph-sc-165cfko-1 utils-sc-11hlfw-0 gWBdwk bBeyP">#passkeys</p></button><button class="sc-1xszjru-0 dDTyLk"><p class="styled__Paragraph-sc-165cfko-1 utils-sc-11hlfw-0 gWBdwk bBeyP">#management</p></button><button class="sc-1xszjru-0 dDTyLk"><p class="styled__Paragraph-sc-165cfko-1 utils-sc-11hlfw-0 gWBdwk bBeyP">#next.js</p></button><button class="sc-1xszjru-0 dDTyLk"><p class="styled__Paragraph-sc-165cfko-1 utils-sc-11hlfw-0 gWBdwk bBeyP">#nextjs</p></button><button class="sc-1xszjru-0 dDTyLk"><p class="styled__Paragraph-sc-165cfko-1 utils-sc-11hlfw-0 gWBdwk bBeyP">#customer-identity</p></button><button class="sc-1xszjru-0 dDTyLk"><p class="styled__Paragraph-sc-165cfko-1 utils-sc-11hlfw-0 gWBdwk bBeyP">#demos</p></button><button class="sc-1xszjru-0 dDTyLk"><p class="styled__Paragraph-sc-165cfko-1 utils-sc-11hlfw-0 gWBdwk bBeyP">#actions</p></button><button class="sc-1xszjru-0 dDTyLk"><p class="styled__Paragraph-sc-165cfko-1 utils-sc-11hlfw-0 gWBdwk bBeyP">#cli</p></button><button class="sc-1xszjru-0 dDTyLk"><p class="styled__Paragraph-sc-165cfko-1 utils-sc-11hlfw-0 gWBdwk bBeyP">#react</p></button><button class="sc-1xszjru-0 dDTyLk"><p class="styled__Paragraph-sc-165cfko-1 utils-sc-11hlfw-0 gWBdwk bBeyP">#sdk</p></button><button class="sc-1xszjru-0 dDTyLk"><p class="styled__Paragraph-sc-165cfko-1 utils-sc-11hlfw-0 gWBdwk bBeyP">#ios</p></button><button class="sc-1xszjru-0 dDTyLk"><p class="styled__Paragraph-sc-165cfko-1 utils-sc-11hlfw-0 gWBdwk bBeyP">#flutter</p></button><button class="sc-1xszjru-0 dDTyLk"><p class="styled__Paragraph-sc-165cfko-1 utils-sc-11hlfw-0 gWBdwk bBeyP">#flask</p></button><button class="sc-1xszjru-0 dDTyLk"><p class="styled__Paragraph-sc-165cfko-1 utils-sc-11hlfw-0 gWBdwk bBeyP">#openid-connect</p></button><button class="sc-1xszjru-0 dDTyLk"><p class="styled__Paragraph-sc-165cfko-1 utils-sc-11hlfw-0 gWBdwk bBeyP">#rag</p></button><button class="sc-1xszjru-0 dDTyLk"><p class="styled__Paragraph-sc-165cfko-1 utils-sc-11hlfw-0 gWBdwk bBeyP">#ai</p></button><button class="sc-1xszjru-0 dDTyLk"><p class="styled__Paragraph-sc-165cfko-1 utils-sc-11hlfw-0 gWBdwk bBeyP">#langchain</p></button><button class="sc-1xszjru-0 dDTyLk"><p class="styled__Paragraph-sc-165cfko-1 utils-sc-11hlfw-0 gWBdwk bBeyP">#rebac</p></button><button class="sc-1xszjru-0 dDTyLk"><p class="styled__Paragraph-sc-165cfko-1 utils-sc-11hlfw-0 gWBdwk bBeyP">#abac</p></button><button class="sc-1xszjru-0 dDTyLk"><p class="styled__Paragraph-sc-165cfko-1 utils-sc-11hlfw-0 gWBdwk bBeyP">#rbac</p></button><button class="sc-1xszjru-0 dDTyLk"><p class="styled__Paragraph-sc-165cfko-1 utils-sc-11hlfw-0 gWBdwk bBeyP">#mfa</p></button><button class="sc-1xszjru-0 dDTyLk"><p class="styled__Paragraph-sc-165cfko-1 utils-sc-11hlfw-0 gWBdwk bBeyP">#fido</p></button><button class="sc-1xszjru-0 dDTyLk"><p class="styled__Paragraph-sc-165cfko-1 utils-sc-11hlfw-0 gWBdwk bBeyP">#passwordless</p></button><button class="sc-1xszjru-0 dDTyLk"><p class="styled__Paragraph-sc-165cfko-1 utils-sc-11hlfw-0 gWBdwk bBeyP">#passwords</p></button><button class="sc-1xszjru-0 dDTyLk"><p class="styled__Paragraph-sc-165cfko-1 utils-sc-11hlfw-0 gWBdwk bBeyP">#m2m</p></button><button class="sc-1xszjru-0 dDTyLk"><p class="styled__Paragraph-sc-165cfko-1 utils-sc-11hlfw-0 gWBdwk bBeyP">#scopes</p></button><button class="sc-1xszjru-0 dDTyLk"><p class="styled__Paragraph-sc-165cfko-1 utils-sc-11hlfw-0 gWBdwk bBeyP">#templates</p></button><button class="sc-1xszjru-0 dDTyLk"><p class="styled__Paragraph-sc-165cfko-1 utils-sc-11hlfw-0 gWBdwk bBeyP">#js</p></button><button class="sc-1xszjru-0 dDTyLk"><p class="styled__Paragraph-sc-165cfko-1 utils-sc-11hlfw-0 gWBdwk bBeyP">#scripts</p></button><button class="sc-1xszjru-0 dDTyLk"><p class="styled__Paragraph-sc-165cfko-1 utils-sc-11hlfw-0 gWBdwk bBeyP">#cloud</p></button><button class="sc-1xszjru-0 dDTyLk"><p class="styled__Paragraph-sc-165cfko-1 utils-sc-11hlfw-0 gWBdwk bBeyP">#pulumi</p></button><button class="sc-1xszjru-0 dDTyLk"><p class="styled__Paragraph-sc-165cfko-1 utils-sc-11hlfw-0 gWBdwk bBeyP">#infrastructure</p></button><button class="sc-1xszjru-0 dDTyLk"><p class="styled__Paragraph-sc-165cfko-1 utils-sc-11hlfw-0 gWBdwk bBeyP">#typescript</p></button><button class="sc-1xszjru-0 dDTyLk"><p class="styled__Paragraph-sc-165cfko-1 utils-sc-11hlfw-0 gWBdwk bBeyP">#mobile</p></button><button class="sc-1xszjru-0 dDTyLk"><p class="styled__Paragraph-sc-165cfko-1 utils-sc-11hlfw-0 gWBdwk bBeyP">#android</p></button><button class="sc-1xszjru-0 dDTyLk"><p class="styled__Paragraph-sc-165cfko-1 utils-sc-11hlfw-0 gWBdwk bBeyP">#native</p></button></div><button class="wiotl7-3 gpkRVN"><span>View more</span> <span>(<!-- -->63<!-- -->)</span><svg width="17" height="17" viewBox="0 0 17 17" fill="none" xmlns="http://www.w3.org/2000/svg" class="wiotl7-2 jbIORl"><g id="icon"><path id="icon_2" d="M8.25005 9.87099L4.38812 6.00906L3.44531 6.95187L7.77865 11.2852C7.90367 11.4102 8.07324 11.4805 8.25005 11.4805C8.42686 11.4805 8.59643 11.4102 8.72145 11.2852L13.0548 6.95187L12.112 6.00906L8.25005 9.87099Z" fill="#99A7F1"></path></g></svg></button></div></div><div class="dh4ait-0 ePAqkg"><p class="styled__Overline-sc-165cfko-0 utils-sc-11hlfw-0 bvimfW keBOjr">Author's social networks</p></div><div class="sc-1koe8c4-1 hUalbP"><a href="https://twitter.com/bajcmartinez" rel="noopener" target="_blank" aria-label="([object Object], open in a new window)" class="styled__Link-sc-bubr9x-0 utils-sc-11hlfw-0 gnISOU lbFYLj"><div class="sc-1koe8c4-2 ecAsOz"><svg xmlns="http://www.w3.org/2000/svg" width="16" height="17" viewBox="0 0 16 17" fill="none"><path d="M9.37992 7.45655L15.2082 0.681641H13.8271L8.76639 6.5642L4.72443 0.681641H0.0625L6.17474 9.57711L0.0625 16.6816H1.44369L6.78792 10.4695L11.0565 16.6816H15.7185L9.37958 7.45655H9.37992ZM7.48819 9.65548L6.86889 8.76969L1.94136 1.72138H4.06279L8.03937 7.40959L8.65867 8.29538L13.8277 15.6892H11.7063L7.48819 9.65582V9.65548Z" fill="#FFFFFF"></path></svg></div></a><a href="https://www.linkedin.com/in/bajcmartinez/" rel="noopener" target="_blank" aria-label="([object Object], open in a new window)" class="styled__Link-sc-bubr9x-0 utils-sc-11hlfw-0 gnISOU lbFYLj"><div class="sc-1koe8c4-2 ecAsOz"><svg xmlns="http://www.w3.org/2000/svg" width="25" height="25" viewBox="0 0 25 25" fill="none"><path d="M19.7691 3.68164H4.43047C3.6957 3.68164 3.10156 4.26172 3.10156 4.97891V20.3809C3.10156 21.098 3.6957 21.6816 4.43047 21.6816H19.7691C20.5039 21.6816 21.1016 21.098 21.1016 20.3844V4.97891C21.1016 4.26172 20.5039 3.68164 19.7691 3.68164ZM8.4418 19.0203H5.76992V10.4281H8.4418V19.0203ZM7.10586 9.25742C6.24805 9.25742 5.55547 8.56484 5.55547 7.71055C5.55547 6.85625 6.24805 6.16367 7.10586 6.16367C7.96016 6.16367 8.65273 6.85625 8.65273 7.71055C8.65273 8.56133 7.96016 9.25742 7.10586 9.25742ZM18.4402 19.0203H15.7719V14.8438C15.7719 13.8488 15.7543 12.5656 14.3832 12.5656C12.9945 12.5656 12.7836 13.652 12.7836 14.7734V19.0203H10.1188V10.4281H12.6781V11.6023H12.7133C13.0684 10.9273 13.9402 10.2137 15.2375 10.2137C17.941 10.2137 18.4402 11.9926 18.4402 14.3059V19.0203Z" fill="#FFFFFF"></path></svg></div></a><a href="https://github.com/bajcmartinez" rel="noopener" target="_blank" aria-label="([object Object], open in a new window)" class="styled__Link-sc-bubr9x-0 utils-sc-11hlfw-0 gnISOU lbFYLj"><div class="sc-1koe8c4-2 ecAsOz"><svg xmlns="http://www.w3.org/2000/svg" width="21" height="22" viewBox="0 0 21 22" fill="none"><path d="M10.5 0.681641C4.70156 0.681641 0 5.50508 0 11.4488C0 16.2066 3.00937 20.2379 7.18125 21.6629C7.24687 21.677 7.30312 21.6816 7.35938 21.6816C7.74844 21.6816 7.89844 21.3957 7.89844 21.1473C7.89844 20.8895 7.88906 20.2145 7.88437 19.3145C7.49062 19.4035 7.13906 19.441 6.825 19.441C4.80469 19.441 4.34531 17.8707 4.34531 17.8707C3.86719 16.6285 3.17813 16.2957 3.17813 16.2957C2.26406 15.6535 3.17344 15.6348 3.24375 15.6348H3.24844C4.30313 15.7285 4.85625 16.7504 4.85625 16.7504C5.38125 17.6691 6.08437 17.927 6.7125 17.927C7.20469 17.927 7.65 17.7676 7.9125 17.6457C8.00625 16.952 8.27812 16.4785 8.57812 16.2066C6.24844 15.9348 3.79688 15.0113 3.79688 10.8863C3.79688 9.70977 4.20469 8.74883 4.875 7.99883C4.76719 7.72695 4.40625 6.63008 4.97812 5.14883C4.97812 5.14883 5.05312 5.12539 5.2125 5.12539C5.59219 5.12539 6.45 5.2707 7.86563 6.25508C8.70469 6.01602 9.6 5.89883 10.4953 5.89414C11.3859 5.89883 12.2859 6.01602 13.125 6.25508C14.5406 5.2707 15.3984 5.12539 15.7781 5.12539C15.9375 5.12539 16.0125 5.14883 16.0125 5.14883C16.5844 6.63008 16.2234 7.72695 16.1156 7.99883C16.7859 8.75352 17.1937 9.71445 17.1937 10.8863C17.1937 15.0207 14.7375 15.9301 12.3984 16.1973C12.7734 16.5301 13.1109 17.1863 13.1109 18.1895C13.1109 19.6285 13.0969 20.791 13.0969 21.1426C13.0969 21.3957 13.2422 21.6816 13.6312 21.6816C13.6875 21.6816 13.7531 21.677 13.8187 21.6629C17.9953 20.2379 21 16.202 21 11.4488C21 5.50508 16.2984 0.681641 10.5 0.681641Z" fill="#FFFFFF"></path></svg></div></a><a href="https://jcmartinez.dev/" rel="noopener" target="_blank" aria-label="([object Object], open in a new window)" class="styled__Link-sc-bubr9x-0 utils-sc-11hlfw-0 gnISOU lbFYLj"><div class="sc-1koe8c4-2 ecAsOz"><svg xmlns="http://www.w3.org/2000/svg" width="25" height="25" viewBox="0 0 25 25" fill="none"><path fill-rule="evenodd" clip-rule="evenodd" d="M23.1035 12.5625C23.1035 18.6376 18.1786 23.5625 12.1035 23.5625C6.02838 23.5625 1.10352 18.6376 1.10352 12.5625C1.10352 6.48737 6.02838 1.5625 12.1035 1.5625C18.1786 1.5625 23.1035 6.48737 23.1035 12.5625ZM11.2731 4.03546C11.6338 3.654 11.9148 3.5625 12.1035 3.5625C12.2922 3.5625 12.5732 3.654 12.9339 4.03546C13.2967 4.41903 13.6694 5.02773 14.0035 5.86282C14.5848 7.31622 14.9896 9.30599 15.083 11.5625H9.12408C9.21745 9.30599 9.62221 7.31622 10.2036 5.86282C10.5376 5.02773 10.9103 4.41903 11.2731 4.03546ZM7.12252 11.5625C7.21672 9.09533 7.65693 6.84425 8.34661 5.12004C8.47451 4.80029 8.61311 4.49333 8.76261 4.20299C5.74201 5.41127 3.52912 8.20927 3.15844 11.5625H7.12252ZM3.15844 13.5625C3.52912 16.9157 5.74201 19.7137 8.7626 20.922C8.61311 20.6317 8.47451 20.3247 8.34661 20.005C7.65693 18.2807 7.21672 16.0297 7.12252 13.5625H3.15844ZM9.12408 13.5625H15.083C14.9896 15.819 14.5848 17.8088 14.0035 19.2622C13.6694 20.0973 13.2967 20.706 12.9339 21.0895C12.5732 21.471 12.2922 21.5625 12.1035 21.5625C11.9148 21.5625 11.6338 21.471 11.2731 21.0895C10.9103 20.706 10.5376 20.0973 10.2036 19.2622C9.62221 17.8088 9.21745 15.819 9.12408 13.5625ZM17.0845 13.5625C16.9903 16.0297 16.5501 18.2807 15.8604 20.005C15.7325 20.3247 15.5939 20.6317 15.4444 20.922C18.465 19.7137 20.6779 16.9157 21.0486 13.5625H17.0845ZM21.0486 11.5625C20.6779 8.20927 18.465 5.41127 15.4444 4.20299C15.5939 4.49333 15.7325 4.80029 15.8604 5.12004C16.5501 6.84425 16.9903 9.09533 17.0845 11.5625H21.0486Z" fill="#FFFFFF"></path><script xmlns="" id="4dff4e29-eb7f-4f0b-83aa-03ebc1ee6c88"></script></svg></div></a></div></aside><div class="sc-1j5y5w8-1 dllpZZ"><section class="sc-1pbwyx0-0 eXHVdQ"><section class="sc-1rc3wko-0 kfYqEB"><div class="sc-1rc3wko-1 fYNeXn"><div class="dh4ait-0 ePAqkg"><p class="styled__Overline-sc-165cfko-0 utils-sc-11hlfw-0 bvimfW keBOjr">Latest posts (<!-- -->10<!-- --> of <!-- -->28<!-- --> results)</p></div><div class="sc-1rc3wko-3 enauqK"><button id="filter__tags" class="sc-1rc3wko-4 hibgHG"><svg xmlns="http://www.w3.org/2000/svg" width="16" height="17" viewBox="0 0 16 17" fill="none"><path d="M0.66626 3.25423H15.3329V1.9209H0.66626V3.25423Z" fill="#E5E5E5"></path><path d="M2.66626 7.25423H13.3329V5.9209H2.66626V7.25423Z" fill="#E5E5E5"></path><path d="M11.3329 11.2542H4.66626V9.9209H11.3329V11.2542Z" fill="#E5E5E5"></path><path d="M6.66626 15.2542H9.33293V13.9209H6.66626V15.2542Z" fill="#E5E5E5"></path></svg><span>Filter</span></button></div><label class="sc-8t61xl-0 guGDRs"><input type="checkbox" aria-hidden="true" class="sc-8t61xl-1 huAclX"/><button id="grid__view" selected="" class="sc-8t61xl-2 loMVLS"><svg xmlns="http://www.w3.org/2000/svg" width="16" height="16" viewBox="0 0 16 16" fill="none"><path d="M4.66667 3.33333C4.66667 4.06971 4.06971 4.66667 3.33333 4.66667C2.59695 4.66667 2 4.06971 2 3.33333C2 2.59695 2.59695 2 3.33333 2C4.06971 2 4.66667 2.59695 4.66667 3.33333Z" fill="#FFFEFA"></path><path d="M4.66667 8C4.66667 8.73638 4.06971 9.33333 3.33333 9.33333C2.59695 9.33333 2 8.73638 2 8C2 7.26362 2.59695 6.66667 3.33333 6.66667C4.06971 6.66667 4.66667 7.26362 4.66667 8Z" fill="#FFFEFA"></path><path d="M3.33333 14C4.06971 14 4.66667 13.403 4.66667 12.6667C4.66667 11.9303 4.06971 11.3333 3.33333 11.3333C2.59695 11.3333 2 11.9303 2 12.6667C2 13.403 2.59695 14 3.33333 14Z" fill="#FFFEFA"></path><path d="M9.33333 3.33333C9.33333 4.06971 8.73638 4.66667 8 4.66667C7.26362 4.66667 6.66667 4.06971 6.66667 3.33333C6.66667 2.59695 7.26362 2 8 2C8.73638 2 9.33333 2.59695 9.33333 3.33333Z" fill="#FFFEFA"></path><path d="M8 9.33333C8.73638 9.33333 9.33333 8.73638 9.33333 8C9.33333 7.26362 8.73638 6.66667 8 6.66667C7.26362 6.66667 6.66667 7.26362 6.66667 8C6.66667 8.73638 7.26362 9.33333 8 9.33333Z" fill="#FFFEFA"></path><path d="M9.33333 12.6667C9.33333 13.403 8.73638 14 8 14C7.26362 14 6.66667 13.403 6.66667 12.6667C6.66667 11.9303 7.26362 11.3333 8 11.3333C8.73638 11.3333 9.33333 11.9303 9.33333 12.6667Z" fill="#FFFEFA"></path><path d="M12.6667 4.66667C13.403 4.66667 14 4.06971 14 3.33333C14 2.59695 13.403 2 12.6667 2C11.9303 2 11.3333 2.59695 11.3333 3.33333C11.3333 4.06971 11.9303 4.66667 12.6667 4.66667Z" fill="#FFFEFA"></path><path d="M14 8C14 8.73638 13.403 9.33333 12.6667 9.33333C11.9303 9.33333 11.3333 8.73638 11.3333 8C11.3333 7.26362 11.9303 6.66667 12.6667 6.66667C13.403 6.66667 14 7.26362 14 8Z" fill="#FFFEFA"></path><path d="M12.6667 14C13.403 14 14 13.403 14 12.6667C14 11.9303 13.403 11.3333 12.6667 11.3333C11.9303 11.3333 11.3333 11.9303 11.3333 12.6667C11.3333 13.403 11.9303 14 12.6667 14Z" fill="#FFFEFA"></path></svg></button><button id="list__view" class="sc-8t61xl-2 bWbXhw"><svg xmlns="http://www.w3.org/2000/svg" width="16" height="16" viewBox="0 0 16 16" fill="none"><path d="M3.33335 4.00001C3.33335 4.73638 2.7364 5.33334 2.00002 5.33334C1.26364 5.33334 0.666687 4.73638 0.666687 4.00001C0.666687 3.26363 1.26364 2.66667 2.00002 2.66667C2.7364 2.66667 3.33335 3.26363 3.33335 4.00001Z" fill="#FFFEFA"></path><path d="M2.00002 9.33334C2.7364 9.33334 3.33335 8.73638 3.33335 8C3.33335 7.26363 2.7364 6.66667 2.00002 6.66667C1.26364 6.66667 0.666687 7.26363 0.666687 8C0.666687 8.73638 1.26364 9.33334 2.00002 9.33334Z" fill="#FFFEFA"></path><path d="M2.00002 13.3333C2.7364 13.3333 3.33335 12.7364 3.33335 12C3.33335 11.2636 2.7364 10.6667 2.00002 10.6667C1.26364 10.6667 0.666687 11.2636 0.666687 12C0.666687 12.7364 1.26364 13.3333 2.00002 13.3333Z" fill="#FFFEFA"></path><path d="M5.33335 8.66667H15.3334V7.33334H5.33335V8.66667Z" fill="#FFFEFA"></path><path d="M15.3334 4.66667H5.33335V3.33334H15.3334V4.66667Z" fill="#FFFEFA"></path><path d="M5.33335 12.6667H15.3334V11.3333H5.33335V12.6667Z" fill="#FFFEFA"></path></svg></button></label></div><div class="sc-1rc3wko-2 jsCONy"><a href="/blog/building-a-secure-rag-with-python-langchain-and-openfga/" class="sc-1akycv5-2 kZamtW"><div class="sc-1akycv5-0 hirdXK"><figure class="sc-1akycv5-1 jfOuiK"></figure></div><div class="sc-1akycv5-4 faaFJY"><div class="sc-1akycv5-3 kKvwZS"><span class="styled__Paragraph-sc-165cfko-1 utils-sc-11hlfw-0 gWBdwk hbRhns">developers</span><p class="styled__Overline-sc-165cfko-0 utils-sc-11hlfw-0 jPTHXi gbKHFx">Feb 12, 2025 • 10 min read</p></div><h3 class="styled__Paragraph-sc-165cfko-1 utils-sc-11hlfw-0 eoMTCq glCwmv">Building a Secure RAG with Python, LangChain, and OpenFGA</h3><p class="styled__Overline-sc-165cfko-0 utils-sc-11hlfw-0 gHcESW lbFYLj">Juan Cruz Martinez</p><div class="sc-1akycv5-5 fRqgPG"><button class="sc-1xszjru-0 dDTyLk"><p class="styled__Paragraph-sc-165cfko-1 utils-sc-11hlfw-0 gWBdwk bBeyP">#rag</p></button><button class="sc-1xszjru-0 dDTyLk"><p class="styled__Paragraph-sc-165cfko-1 utils-sc-11hlfw-0 gWBdwk bBeyP">#ai</p></button><button class="sc-1xszjru-0 dDTyLk"><p class="styled__Paragraph-sc-165cfko-1 utils-sc-11hlfw-0 gWBdwk bBeyP">#fga</p></button></div></div></a><a href="/blog/how-to-choose-the-right-authorization-model-for-your-multi-tenant-saas-application/" class="sc-1akycv5-2 kZamtW"><div class="sc-1akycv5-0 hirdXK"><figure class="sc-1akycv5-1 nrvze"></figure></div><div class="sc-1akycv5-4 faaFJY"><div class="sc-1akycv5-3 kKvwZS"><span class="styled__Paragraph-sc-165cfko-1 utils-sc-11hlfw-0 gWBdwk hbRhns">developers</span><p class="styled__Overline-sc-165cfko-0 utils-sc-11hlfw-0 jPTHXi gbKHFx">Oct 29, 2024 • 8 min read</p></div><h3 class="styled__Paragraph-sc-165cfko-1 utils-sc-11hlfw-0 eoMTCq glCwmv">How to Choose the Right Authorization Model for Your Multi-Tenant SaaS Application</h3><p class="styled__Overline-sc-165cfko-0 utils-sc-11hlfw-0 gHcESW lbFYLj">Juan Cruz Martinez</p><div class="sc-1akycv5-5 fRqgPG"><button class="sc-1xszjru-0 dDTyLk"><p class="styled__Paragraph-sc-165cfko-1 utils-sc-11hlfw-0 gWBdwk bBeyP">#authorization</p></button><button class="sc-1xszjru-0 dDTyLk"><p class="styled__Paragraph-sc-165cfko-1 utils-sc-11hlfw-0 gWBdwk bBeyP">#rebac</p></button><button class="sc-1xszjru-0 dDTyLk"><p class="styled__Paragraph-sc-165cfko-1 utils-sc-11hlfw-0 gWBdwk bBeyP">#abac</p></button></div></div></a><a href="/blog/using-auth0-to-collect-consent-for-newsletter-signups/" class="sc-1akycv5-2 kZamtW"><div class="sc-1akycv5-0 hirdXK"><figure class="sc-1akycv5-1 cgJtWC"></figure></div><div class="sc-1akycv5-4 faaFJY"><div class="sc-1akycv5-3 kKvwZS"><span class="styled__Paragraph-sc-165cfko-1 utils-sc-11hlfw-0 gWBdwk hDAMWg">identity & security</span><p class="styled__Overline-sc-165cfko-0 utils-sc-11hlfw-0 jPTHXi gbKHFx">Jul 3, 2024 • 7 min read</p></div><h3 class="styled__Paragraph-sc-165cfko-1 utils-sc-11hlfw-0 eoMTCq glCwmv">Using Auth0 to Collect Consent for Newsletter Signups</h3><p class="styled__Overline-sc-165cfko-0 utils-sc-11hlfw-0 gHcESW lbFYLj">Juan Cruz Martinez</p><div class="sc-1akycv5-5 fRqgPG"><button class="sc-1xszjru-0 dDTyLk"><p class="styled__Paragraph-sc-165cfko-1 utils-sc-11hlfw-0 gWBdwk bBeyP">#identity</p></button><button class="sc-1xszjru-0 dDTyLk"><p class="styled__Paragraph-sc-165cfko-1 utils-sc-11hlfw-0 gWBdwk bBeyP">#login</p></button><button class="sc-1xszjru-0 dDTyLk"><p class="styled__Paragraph-sc-165cfko-1 utils-sc-11hlfw-0 gWBdwk bBeyP">#universal-login</p></button></div></div></a><a href="/blog/using-actions-to-customize-your-mfa-factors/" class="sc-1akycv5-2 kZamtW"><div class="sc-1akycv5-0 hirdXK"><figure class="sc-1akycv5-1 cgJtWC"></figure></div><div class="sc-1akycv5-4 faaFJY"><div class="sc-1akycv5-3 kKvwZS"><span class="styled__Paragraph-sc-165cfko-1 utils-sc-11hlfw-0 gWBdwk hDAMWg">identity & security</span><p class="styled__Overline-sc-165cfko-0 utils-sc-11hlfw-0 jPTHXi gbKHFx">Jun 18, 2024 • 9 min read</p></div><h3 class="styled__Paragraph-sc-165cfko-1 utils-sc-11hlfw-0 eoMTCq glCwmv">Using Actions to Customize Your MFA Factors</h3><p class="styled__Overline-sc-165cfko-0 utils-sc-11hlfw-0 gHcESW lbFYLj">Juan Cruz Martinez</p><div class="sc-1akycv5-5 fRqgPG"><button class="sc-1xszjru-0 dDTyLk"><p class="styled__Paragraph-sc-165cfko-1 utils-sc-11hlfw-0 gWBdwk bBeyP">#identity</p></button><button class="sc-1xszjru-0 dDTyLk"><p class="styled__Paragraph-sc-165cfko-1 utils-sc-11hlfw-0 gWBdwk bBeyP">#login</p></button><button class="sc-1xszjru-0 dDTyLk"><p class="styled__Paragraph-sc-165cfko-1 utils-sc-11hlfw-0 gWBdwk bBeyP">#universal-login</p></button></div></div></a><a href="/blog/reasons-to-fall-in-love-with-passkeys/" class="sc-1akycv5-2 kZamtW"><div class="sc-1akycv5-0 hirdXK"><figure class="sc-1akycv5-1 gLGwaz"></figure></div><div class="sc-1akycv5-4 faaFJY"><div class="sc-1akycv5-3 kKvwZS"><span class="styled__Paragraph-sc-165cfko-1 utils-sc-11hlfw-0 gWBdwk hDAMWg">identity & security</span><p class="styled__Overline-sc-165cfko-0 utils-sc-11hlfw-0 jPTHXi gbKHFx">Feb 14, 2024 • 3 min read</p></div><h3 class="styled__Paragraph-sc-165cfko-1 utils-sc-11hlfw-0 eoMTCq glCwmv">Reasons to Fall in Love with Passkeys</h3><p class="styled__Overline-sc-165cfko-0 utils-sc-11hlfw-0 gHcESW lbFYLj">Juan Cruz Martinez</p><div class="sc-1akycv5-5 fRqgPG"><button class="sc-1xszjru-0 dDTyLk"><p class="styled__Paragraph-sc-165cfko-1 utils-sc-11hlfw-0 gWBdwk bBeyP">#passkeys</p></button><button class="sc-1xszjru-0 dDTyLk"><p class="styled__Paragraph-sc-165cfko-1 utils-sc-11hlfw-0 gWBdwk bBeyP">#identity</p></button><button class="sc-1xszjru-0 dDTyLk"><p class="styled__Paragraph-sc-165cfko-1 utils-sc-11hlfw-0 gWBdwk bBeyP">#fido</p></button></div></div></a><a href="/blog/a-farewell-letter-to-passwords/" class="sc-1akycv5-2 kZamtW"><div class="sc-1akycv5-0 hirdXK"><figure class="sc-1akycv5-1 cVhJLF"></figure></div><div class="sc-1akycv5-4 faaFJY"><div class="sc-1akycv5-3 kKvwZS"><span class="styled__Paragraph-sc-165cfko-1 utils-sc-11hlfw-0 gWBdwk hDAMWg">identity & security</span><p class="styled__Overline-sc-165cfko-0 utils-sc-11hlfw-0 jPTHXi gbKHFx">Feb 13, 2024 • 3 min read</p></div><h3 class="styled__Paragraph-sc-165cfko-1 utils-sc-11hlfw-0 eoMTCq glCwmv">A Farewell Letter to Passwords</h3><p class="styled__Overline-sc-165cfko-0 utils-sc-11hlfw-0 gHcESW lbFYLj">Juan Cruz Martinez</p><div class="sc-1akycv5-5 fRqgPG"><button class="sc-1xszjru-0 dDTyLk"><p class="styled__Paragraph-sc-165cfko-1 utils-sc-11hlfw-0 gWBdwk bBeyP">#passkeys</p></button><button class="sc-1xszjru-0 dDTyLk"><p class="styled__Paragraph-sc-165cfko-1 utils-sc-11hlfw-0 gWBdwk bBeyP">#passwords</p></button></div></div></a><a href="/blog/digital-identity-management/" class="sc-1akycv5-2 kZamtW"><div class="sc-1akycv5-0 hirdXK"><figure class="sc-1akycv5-1 ggmvVw"></figure></div><div class="sc-1akycv5-4 faaFJY"><div class="sc-1akycv5-3 kKvwZS"><span class="styled__Paragraph-sc-165cfko-1 utils-sc-11hlfw-0 gWBdwk hDAMWg">identity & security</span><p class="styled__Overline-sc-165cfko-0 utils-sc-11hlfw-0 jPTHXi gbKHFx">Jan 17, 2024 • 11 min read</p></div><h3 class="styled__Paragraph-sc-165cfko-1 utils-sc-11hlfw-0 eoMTCq glCwmv">Solving Digital Identity Management for Your SaaS Application</h3><p class="styled__Overline-sc-165cfko-0 utils-sc-11hlfw-0 gHcESW lbFYLj">Juan Cruz Martinez</p><div class="sc-1akycv5-5 fRqgPG"><button class="sc-1xszjru-0 dDTyLk"><p class="styled__Paragraph-sc-165cfko-1 utils-sc-11hlfw-0 gWBdwk bBeyP">#saas</p></button><button class="sc-1xszjru-0 dDTyLk"><p class="styled__Paragraph-sc-165cfko-1 utils-sc-11hlfw-0 gWBdwk bBeyP">#identity</p></button><button class="sc-1xszjru-0 dDTyLk"><p class="styled__Paragraph-sc-165cfko-1 utils-sc-11hlfw-0 gWBdwk bBeyP">#management</p></button></div></div></a><a href="/blog/using-nextjs-server-actions-to-call-external-apis/" class="sc-1akycv5-2 kZamtW"><div class="sc-1akycv5-0 hirdXK"><figure class="sc-1akycv5-1 gjWrIj"></figure></div><div class="sc-1akycv5-4 faaFJY"><div class="sc-1akycv5-3 kKvwZS"><span class="styled__Paragraph-sc-165cfko-1 utils-sc-11hlfw-0 gWBdwk hbRhns">developers</span><p class="styled__Overline-sc-165cfko-0 utils-sc-11hlfw-0 jPTHXi gbKHFx">Dec 1, 2023 • 14 min read</p></div><h3 class="styled__Paragraph-sc-165cfko-1 utils-sc-11hlfw-0 eoMTCq glCwmv">Using Next.js Server Actions to Call External APIs</h3><p class="styled__Overline-sc-165cfko-0 utils-sc-11hlfw-0 gHcESW lbFYLj">Juan Cruz Martinez</p><div class="sc-1akycv5-5 fRqgPG"><button class="sc-1xszjru-0 dDTyLk"><p class="styled__Paragraph-sc-165cfko-1 utils-sc-11hlfw-0 gWBdwk bBeyP">#javascript</p></button><button class="sc-1xszjru-0 dDTyLk"><p class="styled__Paragraph-sc-165cfko-1 utils-sc-11hlfw-0 gWBdwk bBeyP">#release</p></button><button class="sc-1xszjru-0 dDTyLk"><p class="styled__Paragraph-sc-165cfko-1 utils-sc-11hlfw-0 gWBdwk bBeyP">#announcement</p></button></div></div></a><a href="/blog/auth0-stable-support-for-nextjs-app-router/" class="sc-1akycv5-2 kZamtW"><div class="sc-1akycv5-0 hirdXK"><figure class="sc-1akycv5-1 gjWrIj"></figure></div><div class="sc-1akycv5-4 faaFJY"><div class="sc-1akycv5-3 kKvwZS"><span class="styled__Paragraph-sc-165cfko-1 utils-sc-11hlfw-0 gWBdwk hbRhns">developers</span><p class="styled__Overline-sc-165cfko-0 utils-sc-11hlfw-0 jPTHXi gbKHFx">Oct 19, 2023 • 6 min read</p></div><h3 class="styled__Paragraph-sc-165cfko-1 utils-sc-11hlfw-0 eoMTCq glCwmv">Auth0 Stable Support For Next.js App Router!</h3><p class="styled__Overline-sc-165cfko-0 utils-sc-11hlfw-0 gHcESW lbFYLj">Juan Cruz Martinez</p><div class="sc-1akycv5-5 fRqgPG"><button class="sc-1xszjru-0 dDTyLk"><p class="styled__Paragraph-sc-165cfko-1 utils-sc-11hlfw-0 gWBdwk bBeyP">#javascript</p></button><button class="sc-1xszjru-0 dDTyLk"><p class="styled__Paragraph-sc-165cfko-1 utils-sc-11hlfw-0 gWBdwk bBeyP">#nextjs</p></button><button class="sc-1xszjru-0 dDTyLk"><p class="styled__Paragraph-sc-165cfko-1 utils-sc-11hlfw-0 gWBdwk bBeyP">#release</p></button></div></div></a><a href="/blog/use-the-auth0-python-sdk-for-querying-and-storing-users-data/" class="sc-1akycv5-2 kZamtW"><div class="sc-1akycv5-0 hirdXK"><figure class="sc-1akycv5-1 lmPuun"></figure></div><div class="sc-1akycv5-4 faaFJY"><div class="sc-1akycv5-3 kKvwZS"><span class="styled__Paragraph-sc-165cfko-1 utils-sc-11hlfw-0 gWBdwk hbRhns">developers</span><p class="styled__Overline-sc-165cfko-0 utils-sc-11hlfw-0 jPTHXi gbKHFx">Jul 25, 2023 • 12 min read</p></div><h3 class="styled__Paragraph-sc-165cfko-1 utils-sc-11hlfw-0 eoMTCq glCwmv">Use the Auth0 Python SDK for Querying and Storing Users’ Data</h3><p class="styled__Overline-sc-165cfko-0 utils-sc-11hlfw-0 gHcESW lbFYLj">Juan Cruz Martinez</p><div class="sc-1akycv5-5 fRqgPG"><button class="sc-1xszjru-0 dDTyLk"><p class="styled__Paragraph-sc-165cfko-1 utils-sc-11hlfw-0 gWBdwk bBeyP">#python</p></button><button class="sc-1xszjru-0 dDTyLk"><p class="styled__Paragraph-sc-165cfko-1 utils-sc-11hlfw-0 gWBdwk bBeyP">#api</p></button><button class="sc-1xszjru-0 dDTyLk"><p class="styled__Paragraph-sc-165cfko-1 utils-sc-11hlfw-0 gWBdwk bBeyP">#auth0</p></button></div></div></a></div></section><section id="linkViewMore" class="sc-88q8hx-0 hhWMTM"><a class="styled__Link-sc-bubr9x-0 utils-sc-11hlfw-0 dpsQkm gINUVb">Load more<svg width="16" height="17" fill="none" xmlns="http://www.w3.org/2000/svg"><path d="M8 10.312L4.138 6.45l-.943.943 4.334 4.334a.667.667 0 00.942 0l4.334-4.334-.943-.943L8 10.312z" fill="#B6CAFF"></path></svg></a></section></section></div></div><div color="#fffefa" class="styled__Grid-sc-vosx1t-0 utils-sc-11hlfw-0 gfVdta fMkBdy"><div class="styled__Content-sc-vosx1t-1 cvYPGz"><div span="7" class="styled__GridItem-sc-vosx1t-2 utils-sc-11hlfw-0 hmZChk jbTxDN"><h3 class="styled__Heading-sc-165cfko-2 utils-sc-11hlfw-0 OWQrv lbFYLj">Try for free today</h3><p class="styled__Paragraph-sc-165cfko-1 utils-sc-11hlfw-0 jXSJzE lbFYLj">Stop reading and start building.</p><div class="styled__ButtonWrapper-sc-2ky66j-2 iWCUjn"><a href="https://auth0.com/signup?place=blog-bottom-banner&type=button&text=try%20for%20free" role="button" tabindex="0" class="styled__Button-sc-1hwml9q-0 utils-sc-11hlfw-0 etdOck lbFYLj"><span>Try for free →</span></a><a href="https://auth0.com/contact-us?place=blog-bottom-banner&type=button&text=contact%20sales" role="button" tabindex="0" class="styled__Button-sc-1hwml9q-0 utils-sc-11hlfw-0 cmgpvv lbFYLj"><span>Contact sales</span></a></div></div></div></div><div class="styled__Wrapper-sc-1gk46x3-0 joqbUW"><footer class="styled__Content-sc-1gk46x3-1 gDWHCk"><nav class="styled__Nav-sc-1gk46x3-2 fvSMPF"><section><p class="styled__Overline-sc-165cfko-0 utils-sc-11hlfw-0 VzOyt hlbQwp">Developers</p><ul class="styled__LinksList-sc-1gk46x3-3 fLDEkJ"><li class="styled__LinksListItem-sc-1gk46x3-5 mYoth"><a href="https://developer.auth0.com/resources" class="styled__Link-sc-bubr9x-0 utils-sc-11hlfw-0 hwiOrq dViOmG">Developer Hub<!-- --> </a></li><li class="styled__LinksListItem-sc-1gk46x3-5 mYoth"><a href="https://developer.auth0.com/resources/code-samples" class="styled__Link-sc-bubr9x-0 utils-sc-11hlfw-0 hwiOrq dViOmG">Code Samples and Guides<!-- --> </a></li><li class="styled__LinksListItem-sc-1gk46x3-5 mYoth"><a href="/blog/developers/" class="styled__Link-sc-bubr9x-0 utils-sc-11hlfw-0 hwiOrq dViOmG">Blog posts<!-- --> </a></li><li class="styled__LinksListItem-sc-1gk46x3-5 mYoth"><a href="https://identityunlocked.auth0.com/public/49/Identity,-Unlocked.--bed7fada" class="styled__Link-sc-bubr9x-0 utils-sc-11hlfw-0 hwiOrq dViOmG">Identity Unlocked - Podcasts<!-- --> </a></li><li class="styled__LinksListItem-sc-1gk46x3-5 mYoth"><a href="https://developer.auth0.com/newsletter" class="styled__Link-sc-bubr9x-0 utils-sc-11hlfw-0 hwiOrq dViOmG">Zero Index Newsletter<!-- --> </a></li></ul></section><section><p class="styled__Overline-sc-165cfko-0 utils-sc-11hlfw-0 VzOyt hlbQwp">Documentation</p><ul class="styled__LinksList-sc-1gk46x3-3 fLDEkJ"><li class="styled__LinksListItem-sc-1gk46x3-5 mYoth"><a href="/docs/articles" class="styled__Link-sc-bubr9x-0 utils-sc-11hlfw-0 hwiOrq dViOmG">Articles<!-- --> </a></li><li class="styled__LinksListItem-sc-1gk46x3-5 mYoth"><a href="/docs/quickstarts" class="styled__Link-sc-bubr9x-0 utils-sc-11hlfw-0 hwiOrq dViOmG">Quickstarts<!-- --> </a></li><li class="styled__LinksListItem-sc-1gk46x3-5 mYoth"><a href="/docs/api" class="styled__Link-sc-bubr9x-0 utils-sc-11hlfw-0 hwiOrq dViOmG">APIs<!-- --> </a></li><li class="styled__LinksListItem-sc-1gk46x3-5 mYoth"><a href="/docs/libraries" class="styled__Link-sc-bubr9x-0 utils-sc-11hlfw-0 hwiOrq dViOmG">SDK Libraries<!-- --> </a></li><li class="styled__LinksListItem-sc-1gk46x3-5 mYoth"><a href="https://auth0.com/blog/" class="styled__Link-sc-bubr9x-0 utils-sc-11hlfw-0 hwiOrq dViOmG">Blog<!-- --> </a></li><li class="styled__LinksListItem-sc-1gk46x3-5 mYoth"><a href="https://auth0.com/resources/ebooks" class="styled__Link-sc-bubr9x-0 utils-sc-11hlfw-0 hwiOrq dViOmG">Reports<!-- --> </a></li><li class="styled__LinksListItem-sc-1gk46x3-5 mYoth"><a href="https://auth0.com/resources/webinars" class="styled__Link-sc-bubr9x-0 utils-sc-11hlfw-0 hwiOrq dViOmG">Webinars<!-- --> </a></li></ul></section><section><p class="styled__Overline-sc-165cfko-0 utils-sc-11hlfw-0 VzOyt hlbQwp">Support Center</p><ul class="styled__LinksList-sc-1gk46x3-3 fLDEkJ"><li class="styled__LinksListItem-sc-1gk46x3-5 mYoth"><a href="https://community.auth0.com/" class="styled__Link-sc-bubr9x-0 utils-sc-11hlfw-0 hwiOrq dViOmG">Community<!-- --> </a></li><li class="styled__LinksListItem-sc-1gk46x3-5 mYoth"><a href="https://support.auth0.com/" class="styled__Link-sc-bubr9x-0 utils-sc-11hlfw-0 hwiOrq dViOmG">Support<!-- --> </a></li><li class="styled__LinksListItem-sc-1gk46x3-5 mYoth"><a href="https://community.auth0.com/c/help/6" class="styled__Link-sc-bubr9x-0 utils-sc-11hlfw-0 hwiOrq dViOmG">Help<!-- --> </a></li><li class="styled__LinksListItem-sc-1gk46x3-5 mYoth"><a href="https://community.auth0.com/c/faq/42" class="styled__Link-sc-bubr9x-0 utils-sc-11hlfw-0 hwiOrq dViOmG">FAQs<!-- --> </a></li><li class="styled__LinksListItem-sc-1gk46x3-5 mYoth"><a href="https://marketplace.auth0.com" class="styled__Link-sc-bubr9x-0 utils-sc-11hlfw-0 hwiOrq dViOmG">Auth0 Marketplace<!-- --> </a></li></ul></section><section><p class="styled__Overline-sc-165cfko-0 utils-sc-11hlfw-0 VzOyt hlbQwp">Company</p><ul class="styled__LinksList-sc-1gk46x3-3 fLDEkJ"><li class="styled__LinksListItem-sc-1gk46x3-5 mYoth"><a href="/customers" class="styled__Link-sc-bubr9x-0 utils-sc-11hlfw-0 hwiOrq dViOmG">Our Customers<!-- --> </a></li><li class="styled__LinksListItem-sc-1gk46x3-5 mYoth"><a href="/security" class="styled__Link-sc-bubr9x-0 utils-sc-11hlfw-0 hwiOrq dViOmG">Compliance - Ensuring privacy and security<!-- --> </a></li><li class="styled__LinksListItem-sc-1gk46x3-5 mYoth"><a href="/partners" class="styled__Link-sc-bubr9x-0 utils-sc-11hlfw-0 hwiOrq dViOmG">Partners<!-- --> </a></li><li class="styled__LinksListItem-sc-1gk46x3-5 mYoth"><a href="https://www.okta.com/company/careers/" class="styled__Link-sc-bubr9x-0 utils-sc-11hlfw-0 hwiOrq dViOmG">Careers<!-- --> <span class="styled__Paragraph-sc-165cfko-1 utils-sc-11hlfw-0 hYaXSW lbFYLj">We're hiring!</span></a></li><li class="styled__LinksListItem-sc-1gk46x3-5 mYoth"><a href="https://www.okta.com/company/" class="styled__Link-sc-bubr9x-0 utils-sc-11hlfw-0 hwiOrq dViOmG">About us<!-- --> </a></li></ul></section><section><p class="styled__Overline-sc-165cfko-0 utils-sc-11hlfw-0 VzOyt hlbQwp">Get Involved</p><ul class="styled__LinksList-sc-1gk46x3-3 fLDEkJ"><li class="styled__LinksListItem-sc-1gk46x3-5 mYoth"><a href="https://developer.auth0.com/events" class="styled__Link-sc-bubr9x-0 utils-sc-11hlfw-0 hwiOrq dViOmG">Events<!-- --> </a></li><li class="styled__LinksListItem-sc-1gk46x3-5 mYoth"><a href="/research-program" class="styled__Link-sc-bubr9x-0 utils-sc-11hlfw-0 hwiOrq dViOmG">Auth0 Research Program<!-- --> </a></li></ul></section><section><p class="styled__Overline-sc-165cfko-0 utils-sc-11hlfw-0 VzOyt hlbQwp">Learning</p><ul class="styled__LinksList-sc-1gk46x3-3 fLDEkJ"><li class="styled__LinksListItem-sc-1gk46x3-5 mYoth"><a href="/learn" class="styled__Link-sc-bubr9x-0 utils-sc-11hlfw-0 hwiOrq dViOmG">Learn<!-- --> </a></li><li class="styled__LinksListItem-sc-1gk46x3-5 mYoth"><a href="/intro-to-iam" class="styled__Link-sc-bubr9x-0 utils-sc-11hlfw-0 hwiOrq dViOmG">Intro to IAM (CIAM)<!-- --> </a></li><li class="styled__LinksListItem-sc-1gk46x3-5 mYoth"><a href="https://auth0.com/blog/" class="styled__Link-sc-bubr9x-0 utils-sc-11hlfw-0 hwiOrq dViOmG">Blog<!-- --> </a></li></ul></section><section><p class="styled__Overline-sc-165cfko-0 utils-sc-11hlfw-0 VzOyt hlbQwp">Platform</p><ul class="styled__LinksList-sc-1gk46x3-3 fLDEkJ"><li class="styled__LinksListItem-sc-1gk46x3-5 mYoth"><a href="/platform/access-management" class="styled__Link-sc-bubr9x-0 utils-sc-11hlfw-0 hwiOrq dViOmG">Access Management<!-- --> </a></li><li class="styled__LinksListItem-sc-1gk46x3-5 mYoth"><a href="/platform/extensibility" class="styled__Link-sc-bubr9x-0 utils-sc-11hlfw-0 hwiOrq dViOmG">Extensibility<!-- --> </a></li><li class="styled__LinksListItem-sc-1gk46x3-5 mYoth"><a href="/platform/login-security" class="styled__Link-sc-bubr9x-0 utils-sc-11hlfw-0 hwiOrq dViOmG">Security<!-- --> </a></li><li class="styled__LinksListItem-sc-1gk46x3-5 mYoth"><a href="/platform/user-management" class="styled__Link-sc-bubr9x-0 utils-sc-11hlfw-0 hwiOrq dViOmG">User Management<!-- --> </a></li><li class="styled__LinksListItem-sc-1gk46x3-5 mYoth"><a href="/platform/authentication" class="styled__Link-sc-bubr9x-0 utils-sc-11hlfw-0 hwiOrq dViOmG">Authentication<!-- --> </a></li><li class="styled__LinksListItem-sc-1gk46x3-5 mYoth"><a href="/platform/cloud-deployment" class="styled__Link-sc-bubr9x-0 utils-sc-11hlfw-0 hwiOrq dViOmG">Cloud deployments<!-- --> </a></li><li class="styled__LinksListItem-sc-1gk46x3-5 mYoth"><a href="/fine-grained-authorization" class="styled__Link-sc-bubr9x-0 utils-sc-11hlfw-0 hwiOrq dViOmG">Fine Grained Authorization<!-- --> </a></li></ul></section><section><p class="styled__Overline-sc-165cfko-0 utils-sc-11hlfw-0 VzOyt hlbQwp">Features</p><ul class="styled__LinksList-sc-1gk46x3-3 fLDEkJ"><li class="styled__LinksListItem-sc-1gk46x3-5 mYoth"><a href="/features/universal-login" class="styled__Link-sc-bubr9x-0 utils-sc-11hlfw-0 hwiOrq dViOmG">Universal Login<!-- --> </a></li><li class="styled__LinksListItem-sc-1gk46x3-5 mYoth"><a href="/features/single-sign-on" class="styled__Link-sc-bubr9x-0 utils-sc-11hlfw-0 hwiOrq dViOmG">Single Sign On<!-- --> </a></li><li class="styled__LinksListItem-sc-1gk46x3-5 mYoth"><a href="/features/multifactor-authentication" class="styled__Link-sc-bubr9x-0 utils-sc-11hlfw-0 hwiOrq dViOmG">Multifactor Authentication<!-- --> </a></li><li class="styled__LinksListItem-sc-1gk46x3-5 mYoth"><a href="/features/actions" class="styled__Link-sc-bubr9x-0 utils-sc-11hlfw-0 hwiOrq dViOmG">Actions<!-- --> </a></li><li class="styled__LinksListItem-sc-1gk46x3-5 mYoth"><a href="/features/machine-to-machine" class="styled__Link-sc-bubr9x-0 utils-sc-11hlfw-0 hwiOrq dViOmG">Machine to Machine<!-- --> </a></li><li class="styled__LinksListItem-sc-1gk46x3-5 mYoth"><a href="/features/passwordless" class="styled__Link-sc-bubr9x-0 utils-sc-11hlfw-0 hwiOrq dViOmG">Passwordless<!-- --> </a></li><li class="styled__LinksListItem-sc-1gk46x3-5 mYoth"><a href="/features/breached-passwords" class="styled__Link-sc-bubr9x-0 utils-sc-11hlfw-0 hwiOrq dViOmG">Breached Passwords<!-- --> </a></li></ul></section><section class="styled__LastSection-sc-1gk46x3-6 bIoZHy"><div class="styled__Icons-sc-1gk46x3-7 ePaSVl"><a href="https://twitter.com/auth0" target="_blank" rel="noopener noreferrer" aria-label="Twitter link" class="styled__IconsLink-sc-1gk46x3-8 bqgUVT"><svg viewBox="0 0 24 24" aria-hidden="true" width="24" height="24" fill="none"><g><path fill="#fff" d="M18.244 2.25h3.308l-7.227 8.26 8.502 11.24H16.17l-5.214-6.817L4.99 21.75H1.68l7.73-8.835L1.254 2.25H8.08l4.713 6.231zm-1.161 17.52h1.833L7.084 4.126H5.117z"></path></g></svg></a><a href="https://linkedin.com/company/auth0" target="_blank" rel="noopener noreferrer" aria-label="Linkedin link" class="styled__IconsLink-sc-1gk46x3-8 bqgUVT"><svg width="24" height="24" viewBox="0 0 24 24" fill="none" xmlns="http://www.w3.org/2000/svg"><path d="M19.5561 3H4.53738C3.71707 3 2.99988 3.59063 2.99988 4.40156V19.4531C2.99988 20.2687 3.71707 20.9953 4.53738 20.9953H19.5514C20.3764 20.9953 20.9952 20.2641 20.9952 19.4531V4.40156C20.9999 3.59063 20.3764 3 19.5561 3ZM8.578 18H5.99988V9.98438H8.578V18ZM7.378 8.76562H7.35925C6.53425 8.76562 5.99988 8.15156 5.99988 7.38281C5.99988 6.6 6.54831 6 7.39206 6C8.23581 6 8.75144 6.59531 8.77019 7.38281C8.77019 8.15156 8.23581 8.76562 7.378 8.76562ZM17.9999 18H15.4218V13.6172C15.4218 12.5672 15.0468 11.85 14.1139 11.85C13.4014 11.85 12.9796 12.3328 12.7921 12.8016C12.7218 12.9703 12.703 13.2 12.703 13.4344V18H10.1249V9.98438H12.703V11.1C13.078 10.5656 13.6639 9.79688 15.028 9.79688C16.7202 9.79688 17.9999 10.9125 17.9999 13.3172V18Z" fill="#fff"></path></svg></a><a href="https://github.com/auth0" target="_blank" rel="noopener noreferrer" aria-label="Github link" class="styled__IconsLink-sc-1gk46x3-8 bqgUVT"><svg width="24" height="24" viewBox="0 0 24 24" fill="none" xmlns="http://www.w3.org/2000/svg"><path d="M12 1.5C6.20156 1.5 1.5 6.32344 1.5 12.2672C1.5 17.025 4.50937 21.0562 8.68125 22.4813C8.74687 22.4953 8.80312 22.5 8.85938 22.5C9.24844 22.5 9.39844 22.2141 9.39844 21.9656C9.39844 21.7078 9.38906 21.0328 9.38437 20.1328C8.99062 20.2219 8.63906 20.2594 8.325 20.2594C6.30469 20.2594 5.84531 18.6891 5.84531 18.6891C5.36719 17.4469 4.67813 17.1141 4.67813 17.1141C3.76406 16.4719 4.67344 16.4531 4.74375 16.4531H4.74844C5.80313 16.5469 6.35625 17.5687 6.35625 17.5687C6.88125 18.4875 7.58437 18.7453 8.2125 18.7453C8.70469 18.7453 9.15 18.5859 9.4125 18.4641C9.50625 17.7703 9.77812 17.2969 10.0781 17.025C7.74844 16.7531 5.29688 15.8297 5.29688 11.7047C5.29688 10.5281 5.70469 9.56719 6.375 8.81719C6.26719 8.54531 5.90625 7.44844 6.47812 5.96719C6.47812 5.96719 6.55312 5.94375 6.7125 5.94375C7.09219 5.94375 7.95 6.08906 9.36563 7.07344C10.2047 6.83437 11.1 6.71719 11.9953 6.7125C12.8859 6.71719 13.7859 6.83437 14.625 7.07344C16.0406 6.08906 16.8984 5.94375 17.2781 5.94375C17.4375 5.94375 17.5125 5.96719 17.5125 5.96719C18.0844 7.44844 17.7234 8.54531 17.6156 8.81719C18.2859 9.57188 18.6937 10.5328 18.6937 11.7047C18.6937 15.8391 16.2375 16.7484 13.8984 17.0156C14.2734 17.3484 14.6109 18.0047 14.6109 19.0078C14.6109 20.4469 14.5969 21.6094 14.5969 21.9609C14.5969 22.2141 14.7422 22.5 15.1312 22.5C15.1875 22.5 15.2531 22.4953 15.3187 22.4813C19.4953 21.0562 22.5 17.0203 22.5 12.2672C22.5 6.32344 17.7984 1.5 12 1.5Z" fill="#fff"></path></svg></a></div></section></nav><section class="styled__FooterBottom-sc-1gk46x3-10 iyAPaK"><p class="styled__Paragraph-sc-165cfko-1 utils-sc-11hlfw-0 kgFLyt dVQvBz">© <!-- -->2025<!-- --> Okta, Inc. All Rights Reserved.</p><div class="styled__Legal-sc-1gk46x3-12 blPSfp"><a href="https://status.auth0.com" class="styled__Link-sc-bubr9x-0 utils-sc-11hlfw-0 hwiOrq lbFYLj">Status</a> <!-- -->•<!-- --> <a href="https://www.okta.com/agreements/" class="styled__Link-sc-bubr9x-0 utils-sc-11hlfw-0 hwiOrq lbFYLj">Legal</a> <!-- -->•<!-- --> <a href="/privacy" class="styled__Link-sc-bubr9x-0 utils-sc-11hlfw-0 hwiOrq lbFYLj">Privacy</a> <!-- -->•<!-- --> <a href="https://www.okta.com/terms-of-service" class="styled__Link-sc-bubr9x-0 utils-sc-11hlfw-0 hwiOrq lbFYLj">Terms</a> <!-- -->•<!-- --> <a href="/your-privacy-choices" class="styled__Link-sc-bubr9x-0 utils-sc-11hlfw-0 hwiOrq lbFYLj">Your Privacy Choices</a><img alt="" src="https://cdn.auth0.com/website/footer/ccpa.svg"/></div></section><section class="styled__FooterBottomMobile-sc-1gk46x3-9 gobPqK"><div class="styled__Icons-sc-1gk46x3-7 bqmjrK"><a href="https://twitter.com/auth0" target="_blank" rel="noopener noreferrer" aria-label="Twitter link" class="styled__IconsLink-sc-1gk46x3-8 bqgUVT"><svg viewBox="0 0 24 24" aria-hidden="true" width="24" height="24" fill="none"><g><path fill="#fff" d="M18.244 2.25h3.308l-7.227 8.26 8.502 11.24H16.17l-5.214-6.817L4.99 21.75H1.68l7.73-8.835L1.254 2.25H8.08l4.713 6.231zm-1.161 17.52h1.833L7.084 4.126H5.117z"></path></g></svg></a><a href="https://linkedin.com/company/auth0" target="_blank" rel="noopener noreferrer" aria-label="Linkedin link" class="styled__IconsLink-sc-1gk46x3-8 bqgUVT"><svg width="24" height="24" viewBox="0 0 24 24" fill="none" xmlns="http://www.w3.org/2000/svg"><path d="M19.5561 3H4.53738C3.71707 3 2.99988 3.59063 2.99988 4.40156V19.4531C2.99988 20.2687 3.71707 20.9953 4.53738 20.9953H19.5514C20.3764 20.9953 20.9952 20.2641 20.9952 19.4531V4.40156C20.9999 3.59063 20.3764 3 19.5561 3ZM8.578 18H5.99988V9.98438H8.578V18ZM7.378 8.76562H7.35925C6.53425 8.76562 5.99988 8.15156 5.99988 7.38281C5.99988 6.6 6.54831 6 7.39206 6C8.23581 6 8.75144 6.59531 8.77019 7.38281C8.77019 8.15156 8.23581 8.76562 7.378 8.76562ZM17.9999 18H15.4218V13.6172C15.4218 12.5672 15.0468 11.85 14.1139 11.85C13.4014 11.85 12.9796 12.3328 12.7921 12.8016C12.7218 12.9703 12.703 13.2 12.703 13.4344V18H10.1249V9.98438H12.703V11.1C13.078 10.5656 13.6639 9.79688 15.028 9.79688C16.7202 9.79688 17.9999 10.9125 17.9999 13.3172V18Z" fill="#fff"></path></svg></a><a href="https://github.com/auth0" target="_blank" rel="noopener noreferrer" aria-label="Github link" class="styled__IconsLink-sc-1gk46x3-8 bqgUVT"><svg width="24" height="24" viewBox="0 0 24 24" fill="none" xmlns="http://www.w3.org/2000/svg"><path d="M12 1.5C6.20156 1.5 1.5 6.32344 1.5 12.2672C1.5 17.025 4.50937 21.0562 8.68125 22.4813C8.74687 22.4953 8.80312 22.5 8.85938 22.5C9.24844 22.5 9.39844 22.2141 9.39844 21.9656C9.39844 21.7078 9.38906 21.0328 9.38437 20.1328C8.99062 20.2219 8.63906 20.2594 8.325 20.2594C6.30469 20.2594 5.84531 18.6891 5.84531 18.6891C5.36719 17.4469 4.67813 17.1141 4.67813 17.1141C3.76406 16.4719 4.67344 16.4531 4.74375 16.4531H4.74844C5.80313 16.5469 6.35625 17.5687 6.35625 17.5687C6.88125 18.4875 7.58437 18.7453 8.2125 18.7453C8.70469 18.7453 9.15 18.5859 9.4125 18.4641C9.50625 17.7703 9.77812 17.2969 10.0781 17.025C7.74844 16.7531 5.29688 15.8297 5.29688 11.7047C5.29688 10.5281 5.70469 9.56719 6.375 8.81719C6.26719 8.54531 5.90625 7.44844 6.47812 5.96719C6.47812 5.96719 6.55312 5.94375 6.7125 5.94375C7.09219 5.94375 7.95 6.08906 9.36563 7.07344C10.2047 6.83437 11.1 6.71719 11.9953 6.7125C12.8859 6.71719 13.7859 6.83437 14.625 7.07344C16.0406 6.08906 16.8984 5.94375 17.2781 5.94375C17.4375 5.94375 17.5125 5.96719 17.5125 5.96719C18.0844 7.44844 17.7234 8.54531 17.6156 8.81719C18.2859 9.57188 18.6937 10.5328 18.6937 11.7047C18.6937 15.8391 16.2375 16.7484 13.8984 17.0156C14.2734 17.3484 14.6109 18.0047 14.6109 19.0078C14.6109 20.4469 14.5969 21.6094 14.5969 21.9609C14.5969 22.2141 14.7422 22.5 15.1312 22.5C15.1875 22.5 15.2531 22.4953 15.3187 22.4813C19.4953 21.0562 22.5 17.0203 22.5 12.2672C22.5 6.32344 17.7984 1.5 12 1.5Z" fill="#fff"></path></svg></a></div><div class="styled__LegalAndLangMobile-sc-1gk46x3-11 hyLWBj"><div class="styled__Legal-sc-1gk46x3-12 blPSfp"><a href="https://status.auth0.com" class="styled__Link-sc-bubr9x-0 utils-sc-11hlfw-0 hwiOrq lbFYLj">Status</a> <!-- -->•<!-- --> <a href="https://www.okta.com/agreements/" class="styled__Link-sc-bubr9x-0 utils-sc-11hlfw-0 hwiOrq lbFYLj">Legal</a> <!-- -->•<!-- --> <a href="/privacy" class="styled__Link-sc-bubr9x-0 utils-sc-11hlfw-0 hwiOrq lbFYLj">Privacy</a> <!-- -->•<!-- --> <a href="https://www.okta.com/terms-of-service" class="styled__Link-sc-bubr9x-0 utils-sc-11hlfw-0 hwiOrq lbFYLj">Terms</a> <!-- -->•<!-- --> <a href="/your-privacy-choices" class="styled__Link-sc-bubr9x-0 utils-sc-11hlfw-0 hwiOrq lbFYLj">Your Privacy Choices</a><img alt="" src="https://cdn.auth0.com/website/footer/ccpa.svg"/></div></div><p class="styled__Paragraph-sc-165cfko-1 utils-sc-11hlfw-0 kgFLyt bqMfzV">© <!-- -->2025<!-- --> Okta, Inc. All Rights Reserved.</p></section></footer></div><div id="asset-library-root"></div><div id="modal-root"></div><div id="alert-root"></div></div><script id="__NEXT_DATA__" type="application/json">{"props":{"pageProps":{"author":{"path":"juan-cruz-martinez","name":"Juan Cruz Martinez","avatar":{"url":"https://images.ctfassets.net/23aumh6u8s0i/5b3YvfAb53h2I5U6uanww4/f1dfa0e19f15f5df8eacd53f78a813f6/jcm.jpeg","size":{"width":400,"height":400}},"lastUpdatedBy":"Juan Cruz Martinez","email":"juan.martinez@okta.com","twitter":"https://twitter.com/bajcmartinez","github":"https://github.com/bajcmartinez","linkedin":"https://www.linkedin.com/in/bajcmartinez/","isPopular":true,"personalWebsite":"https://jcmartinez.dev/","type":"Auth0 Employee","jobTitle":"Staff Developer Advocate","description":"I stream, blog, and make youtube videos about tech stuff. I love coding, I love AI, and I love building stuff!","id":"7qC8LJD80VSx1qYcSdQ1Zh"},"authorPosts":[{"path":"building-a-secure-rag-with-python-langchain-and-openfga","title":"Building a Secure RAG with Python, LangChain, and OpenFGA","heroImage":{"url":"https://images.ctfassets.net/23aumh6u8s0i/26C3LpFeTjPcRa8J0dUW8D/ae8fb9148b63d11479440074e2be960d/langchain-blog-hero.jpg","size":{"width":3540,"height":3180}},"category":["Developers","Deep Dive","AI"],"authors":[{"metadata":{"tags":[],"concepts":[]},"sys":{"space":{"sys":{"type":"Link","linkType":"Space","id":"23aumh6u8s0i"}},"id":"7qC8LJD80VSx1qYcSdQ1Zh","type":"Entry","createdAt":"2021-08-23T12:59:46.069Z","updatedAt":"2025-01-08T14:00:38.100Z","environment":{"sys":{"id":"master","type":"Link","linkType":"Environment"}},"publishedVersion":42,"revision":6,"contentType":{"sys":{"type":"Link","linkType":"ContentType","id":"author"}},"locale":"en-US"},"fields":{"path":"juan-cruz-martinez","name":"Juan Cruz Martinez","avatar":{"metadata":{"tags":[{"sys":{"type":"Link","linkType":"Tag","id":"user"}}],"concepts":[]},"sys":{"space":{"sys":{"type":"Link","linkType":"Space","id":"23aumh6u8s0i"}},"id":"5b3YvfAb53h2I5U6uanww4","type":"Asset","createdAt":"2022-07-07T09:23:40.589Z","updatedAt":"2022-07-07T09:23:56.422Z","environment":{"sys":{"id":"master","type":"Link","linkType":"Environment"}},"publishedVersion":10,"revision":5,"locale":"en-US"},"fields":{"title":"jcm","description":"Juan Cruz Martinez","file":{"url":"//images.ctfassets.net/23aumh6u8s0i/5b3YvfAb53h2I5U6uanww4/f1dfa0e19f15f5df8eacd53f78a813f6/jcm.jpeg","details":{"size":29371,"image":{"width":400,"height":400}},"fileName":"jcm.jpeg","contentType":"image/jpeg"}}},"lastUpdatedBy":"Juan Cruz Martinez","email":"juan.martinez@okta.com","twitter":"https://twitter.com/bajcmartinez","github":"https://github.com/bajcmartinez","linkedin":"https://www.linkedin.com/in/bajcmartinez/","isPopular":true,"personalWebsite":"https://jcmartinez.dev/","type":"Auth0 Employee","jobTitle":"Staff Developer Advocate","description":"I stream, blog, and make youtube videos about tech stuff. I love coding, I love AI, and I love building stuff!"}}],"redirectTo":null,"isHiddenFromBlogPostGrid":false,"lang":"en","tags":["rag","ai","fga","langchain","authorization"],"dateCreated":"2025-02-12T16:19","dateLastUpdated":null,"postContent":"Retrieval-Augmented Generation (RAG) is a great way to create AI-driven applications that deliver more accurate, context-rich answers. Instead of relying purely on pre-trained knowledge, a RAG system retrieves domain-specific data (like PDFs, knowledge bases, or markdown files) and passes it into a language model. This is *awesome* when your data is public or freely shareable. But what happens if some of that data is *restricted* or *confidential*? That’s where fine-grained authorization comes in!\n\nIn this post, we’ll walk through:\n\n1. **Why** authorization is crucial in RAG\n2. **What** OpenFGA is, and how it helps you enforce fine-grained permissions\n3. **How** to build a secure pipeline that filters out unauthorized documents **before** they reach your language model\n\n## The Challenge of Authorization in RAG Systems\n\nRAG systems retrieve relevant information from large datasets and use that information to enhance the AI model responses. While this functionality is powerful, it raises a significant challenge: **ensuring that each user only accesses the information they are authorized to see**. Authorization must be:\n\n* **Accurate**: Only correct data gets through.\n* **Performant**: Works quickly, even with large datasets.\n* **Adaptive**: Updates with dynamic organizational changes, role updates, or any changes in the relationship between the information and the users.\n\nA secure RAG system needs to enforce fine-grained access control without sacrificing speed or scalability. Roles might change, projects can be reassigned, and permissions could evolve over time. Handling all this efficiently is key to building a truly secure and robust RAG application.\n\n## Proposed Solution: Secure Retrieval with LangChain, OpenAI, and OpenFGA\n\nThe solution employs a workflow that integrates document retrieval, user-specific authorization filtering, and Large Language Model (LLM) response generation.\n\nWe’ll build a pipeline that uses:\n\n* **LangChain**: A helpful toolkit for chaining the steps of a RAG pipeline (loading data, embeddings, retrieval, prompting).\n* **LLMs** (OpenAI or any other): For both embeddings (similarity search) and text generation.\n* **OpenFGA**: A fine-grained authorization service that checks, for each document, if a user has the “can_view” relationship.\n\n### LangChain\n\nLangChain is a library that streamlines building LLM applications by assembling different components—like loading documents, vector stores, and prompt templates. This structure makes it easier to read, maintain, and modify your RAG pipeline.\n\n### LLMs\n\nAlthough we’ll demonstrate OpenAI’s embeddings and Chat APIs, you can easily replace them with other providers (e.g., Anthropic, LLaMA, or Azure OpenAI). The main tasks here are:\n\n1. **Embedding** documents so you can do similarity searches.\n2. **Generating** text from the retrieved documents to answer the user’s query.\n\n### FGA and Okta FGA\n\n**FGA (Fine-Grained Authorization)** is about controlling _who can do what_ with _which resources_, down to an individual level. In a typical role-based system, you might say, “Admins can see everything, and Regular Users can see some subset.” But in a real-world app—especially one that deals with many documents—this might not be flexible enough.\n\n**OpenFGA (and Okta FGA)** addresses this by letting you define authorization _relationships_. The relationships defined in the authorization model can be either direct or indirect. Simply put, direct relationships are directly assigned between a consumer and a resource (we call them user and object) and stored in the database. Indirect relationships are the relationships we can infer based on the data and the authorization model.\n\nIf you would like to learn the basics of using FGA for RAG, check out this blog post on [RAG and Access Control: Where Do You Start?](https://auth0.com/blog/rag-and-access-control-where-do-you-start/).\n\n\u003cinclude\n src=\"LinkCard\"\n title=\"RAG and Access Control: Where Do You Start?\"\n link=\"https://auth0.com/blog/rag-and-access-control-where-do-you-start/\"\n description=\"Learn how to get started with Okta FGA for a RAG application.\"\n img=\"https://images.ctfassets.net/23aumh6u8s0i/79NCborGcFIrAMeaV7G8oi/f9c588c2d05f0828d447e72e1fe825cc/Latam01.jpg\"\n/\u003e\n\n## Implementation: Step-by-Step\n\nBelow is a sample setup in Python. We’ll keep it simple so you can see the big picture. Feel free to adapt for your chosen LLM or a more robust data store.\n\n### Set Up Prerequisites\n\nTo follow this tutorial and secure your application, you’ll need the following:\n\n* Python 3.8.1 or newer.\n* An Okta FGA account. If you don’t have one, you can [create one for free](https://dashboard.fga.dev/).\n* An [OpenAI account and API key](https://platform.openai.com/).\n\n### Download and install the sample code\n\nTo get started, clone the[ auth0-ai-samples](https://a0.to/auth0-ai-samples) repository from GitHub:\n\n```\ngit clone https://github.com/oktadev/auth0-ai-samples.git\ncd auth0-ai-samples/authorization-for-rag/langchain-python\n# Create a virtual env\npython -m venv venv\n# Activate the virtual env\nsource ./venv/bin/activate\n# Install dependencies\npip install -r requirements.txt\n```\n\nThe application is written in Python and is structured as follows:\n\n* `main.py` \u0026mdash; The main entry point of the application, and it is where we define the RAG pipeline\n* `docs/*.md` \u0026mdash; Sample markdown files to be used as context for the LLM. There are two types of docs, public and private. Private documents are only accessible to certain individuals.\n* `helpers/memory_store.py` \u0026mdash; Creates an in-memory vector store that acts as the base retriever in the chain.\n* `helpers/read_documents.py` \u0026mdash; Utility to read the markdown files from the `docs` folder.\n* `scripts/fga_init.py` \u0026mdash; Utility to initialize the OktaFGA authorization model and sample data.\n\n### RAG Pipeline\n\nThe `main.py` file defines the RAG pipeline using `Langchain` to interact with the underlying LLM model and retrieve data from our context. In your project, your data may be sourced from different platforms and systems, make sure you check the proper documentation about [loaders in the Langchain ecosystem](https://python.langchain.com/v0.1/docs/modules/data_connection/).\n\nThe following diagram represents the RAG architecture we are defining:\n\n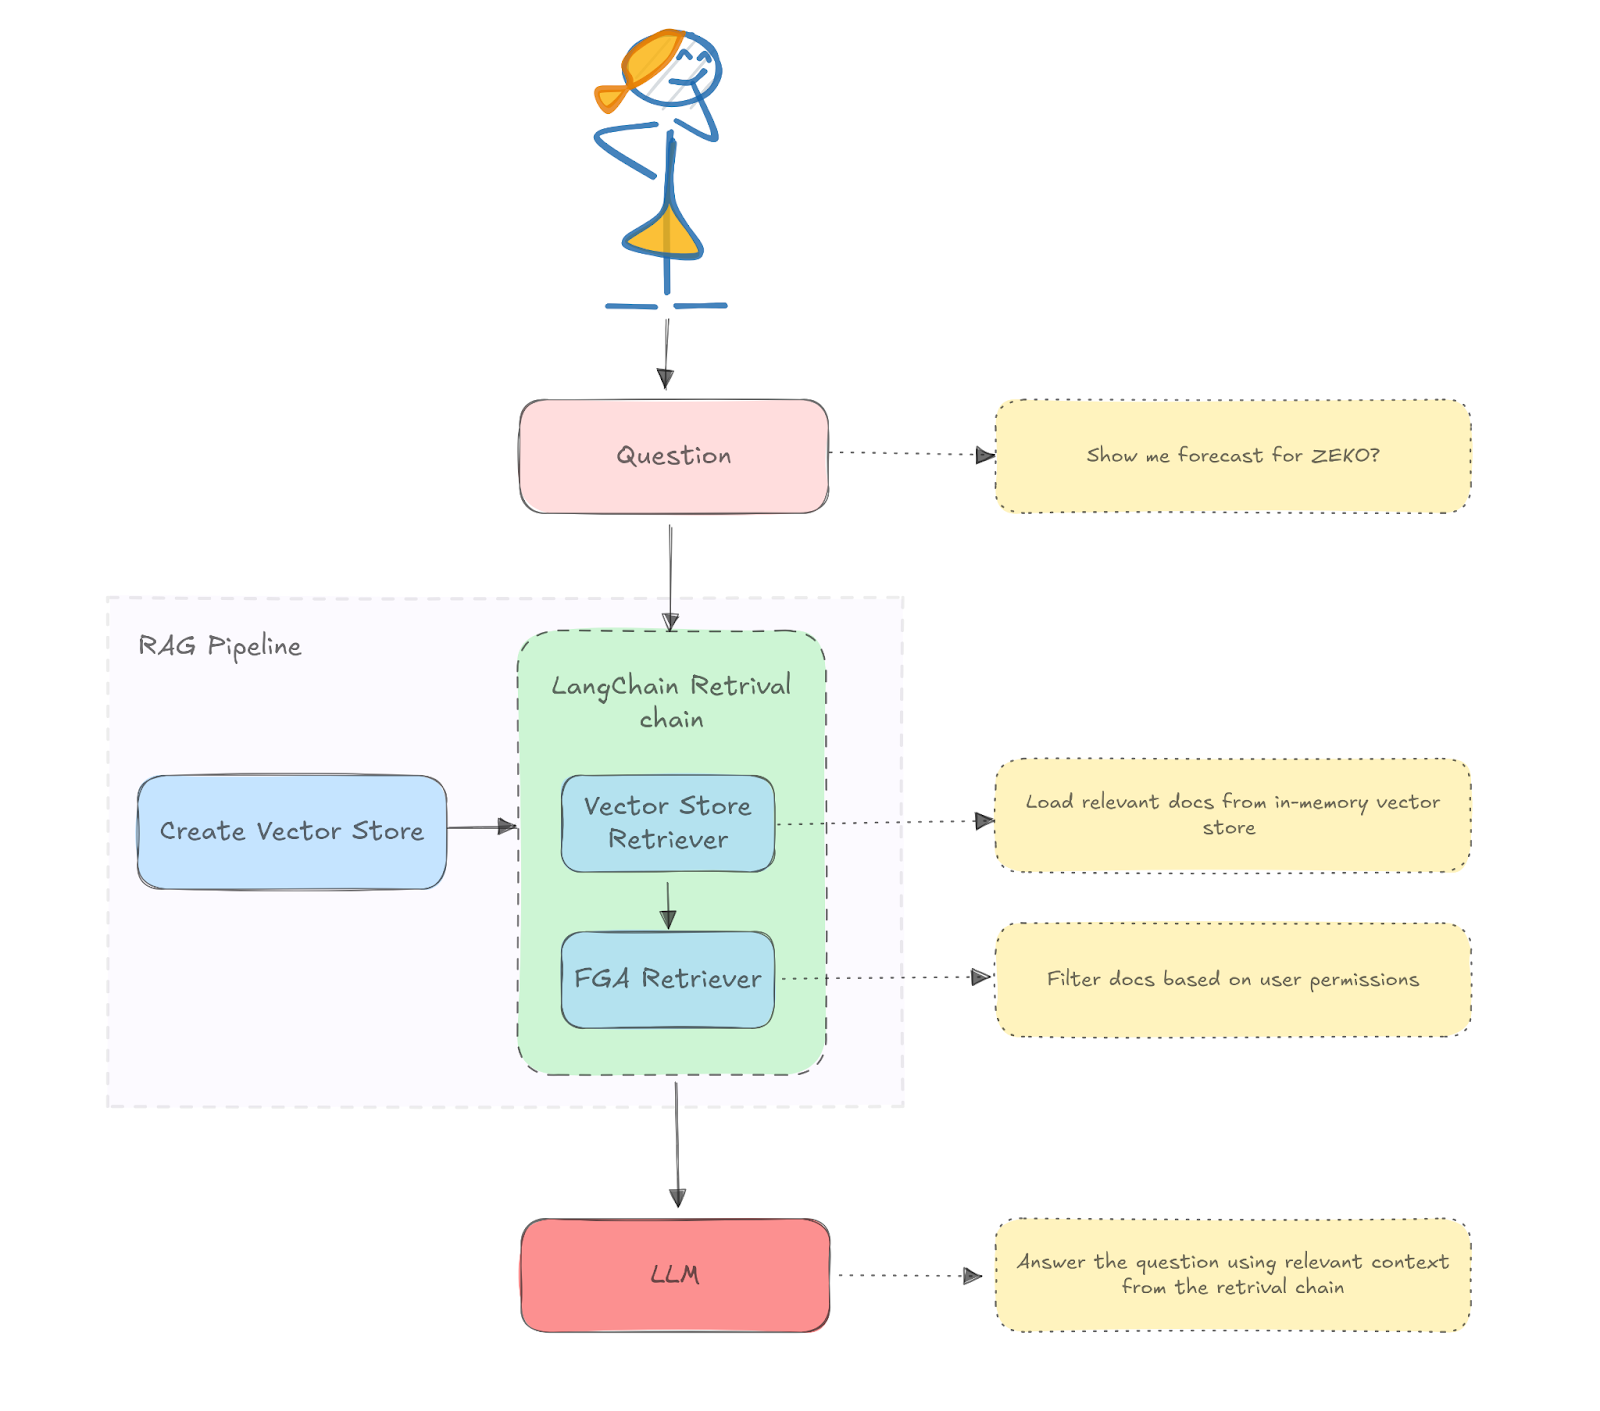\n\nNow let’s talk Python:\n\n```python\nclass RAG:\n def __init__(self):\n documents = read_documents()\n self.vector_store = MemoryStore.from_documents(documents)\n self.prompt = ChatPromptTemplate.from_template(\n \"\"\"You are an assistant for question-answering tasks. Use the following pieces of retrieved context to answer the question. If you don't know the answer, just say that you don't know. Use three sentences maximum and keep the answer concise.\\\\nQuestion: {question}\\\\nContext: {context}\\\\nAnswer:\"\"\"\n )\n\n self.llm = ChatOpenAI(model=\"gpt-4o-mini\")\n\n def query(self, user_id: str, question: str):\n chain = (\n {\n \"context\": FGARetriever(\n retriever=self.vector_store.as_retriever(),\n build_query=lambda doc: ClientBatchCheckItem(\n user=f\"user:{user_id}\",\n object=f\"doc:{doc.metadata.get('id')}\",\n relation=\"viewer\",\n ),\n ),\n \"question\": RunnablePassthrough(),\n }\n | self.prompt\n | self.llm\n | StrOutputParser()\n )\n\n return chain.invoke(question)\n```\n\nLet’s break that down.\n\nThe `RAG` class first initializes a vector store and reads the documents using the helper functions. It also defines a system prompt for our use case and the LLM model in use, in our case, `gpt-40-mini`.\n\nThe class also defines a method query that builds the chain by piping the `FGARetriever` instance with the prompt and the LLM model. `FGARetriever` is provided by the [Auth0 AI SDK for Python](https://github.com/auth0-lab/auth0-ai-python).\n\nThe `FGARetriever` is designed to abstract the base retriever from the FGA query logic. The `build_query` argument lets us specify how to query our FGA model, in this case, by asking if the user is a viewer of the document.\n\n```python\nbuild_query=lambda doc: ClientBatchCheckItem(\n user=f\"user:{user_id}\",\n object=f\"doc:{doc.metadata.get('id')}\",\n relation=\"viewer\",\n),\n```\n\nWith this design, you can plug any Langchain retriever, combined with checks for any FGA model query.\n\n### Create an OktaFGA Account\n\nIf you already have an [Auth0 account](https://auth0.com/), you can use the same credentials to log in to the Okta FGA dashboard at [https://dashboard.fga.dev](https://dashboard.fga.dev/). If you don't have an Auth0 account, hop over to [https://dashboard.fga.dev](https://dashboard.fga.dev/) and create a free account.\n\nOnce you are logged in, you should see a dashboard similar to the one below.\n\n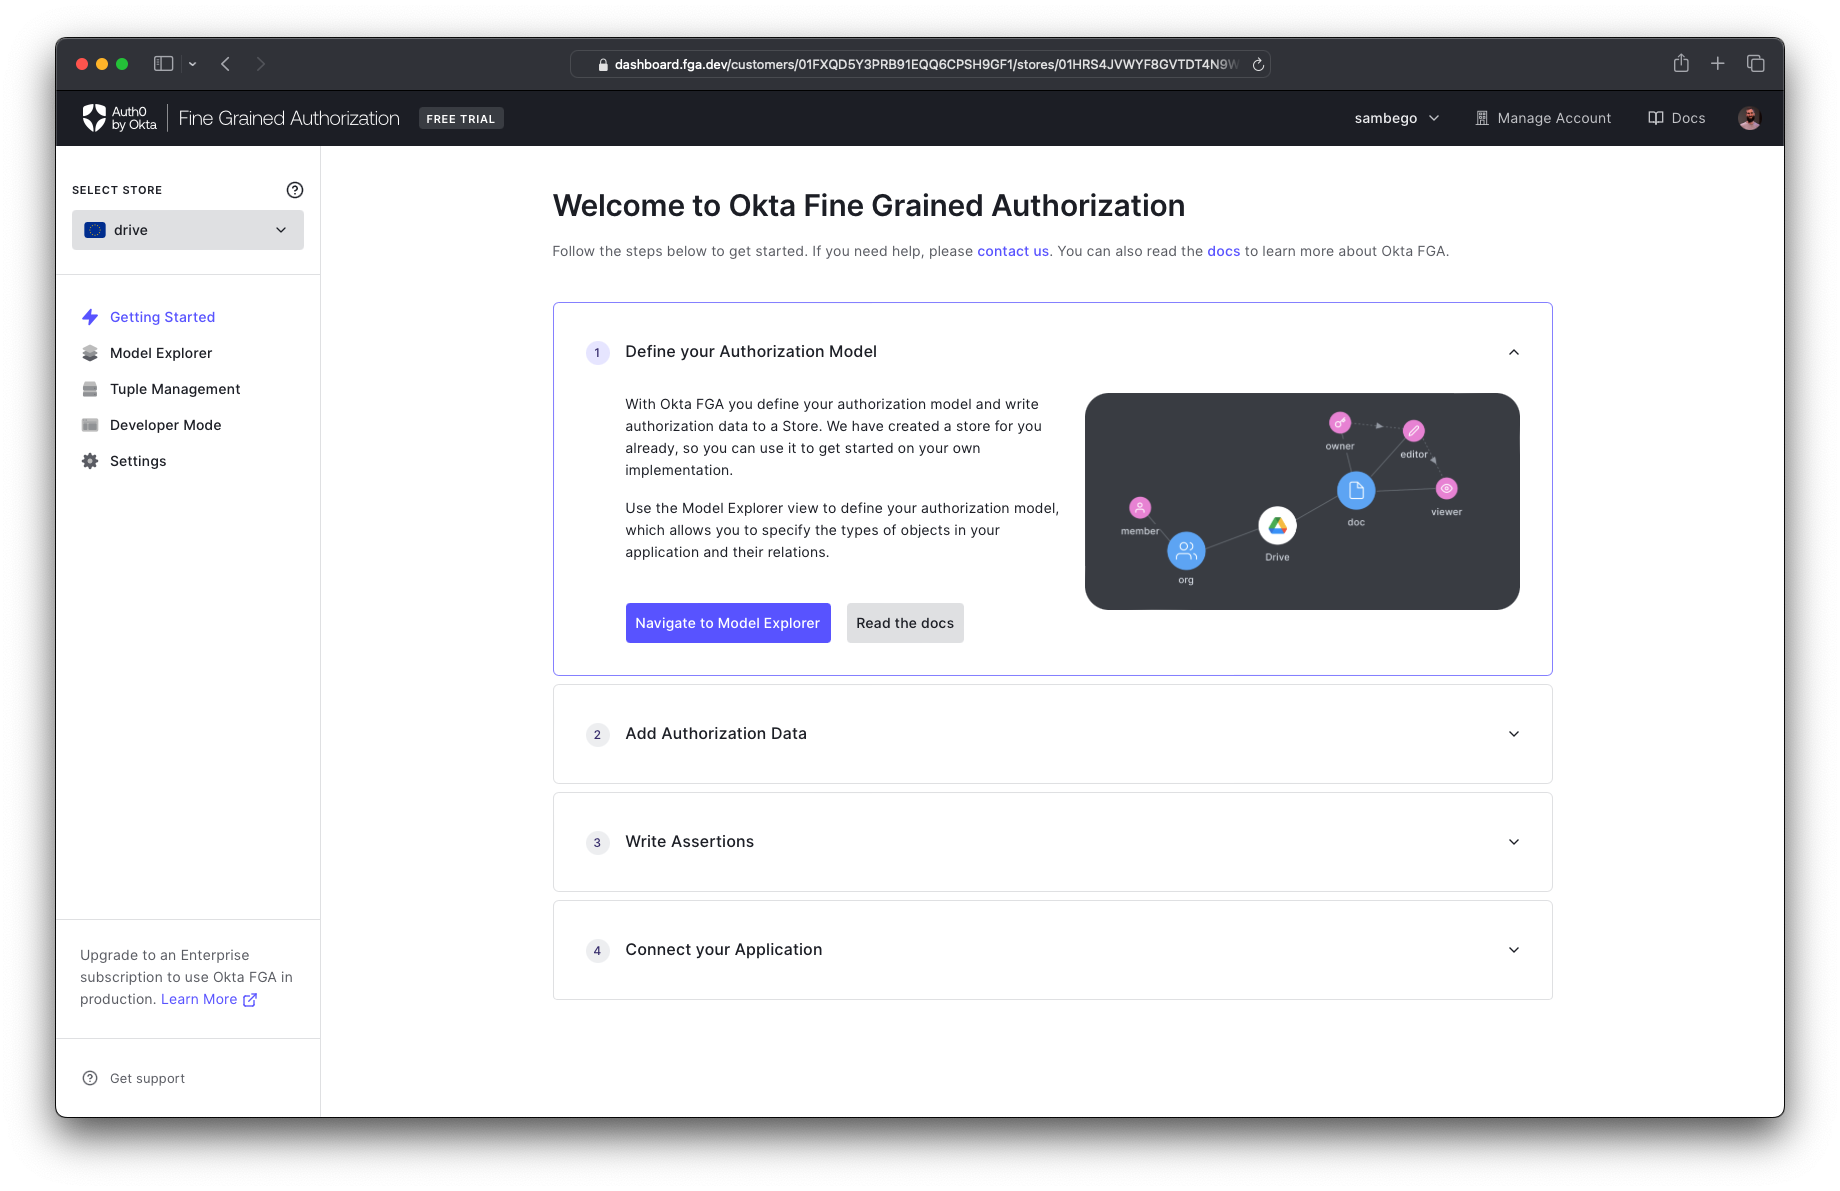\n\n\u003e When you log into the Okta FGA dashboard for the first time, you may be asked to create a new store. This store will serve as the home for your authorization model and all the data the engine requires to make authorization decisions. Simply pick a name and create your store to get started.\n\n### Create an OktaFGA Client\n\nOnce you are in the dashboard, you’ll need a client to make API calls to OktaFGA. To create a client, navigate to **Settings**, and in the **Authorized Clients** section, click **Create Client**. Give your client a name, mark all three client permissions, and then click **Create**.\n\n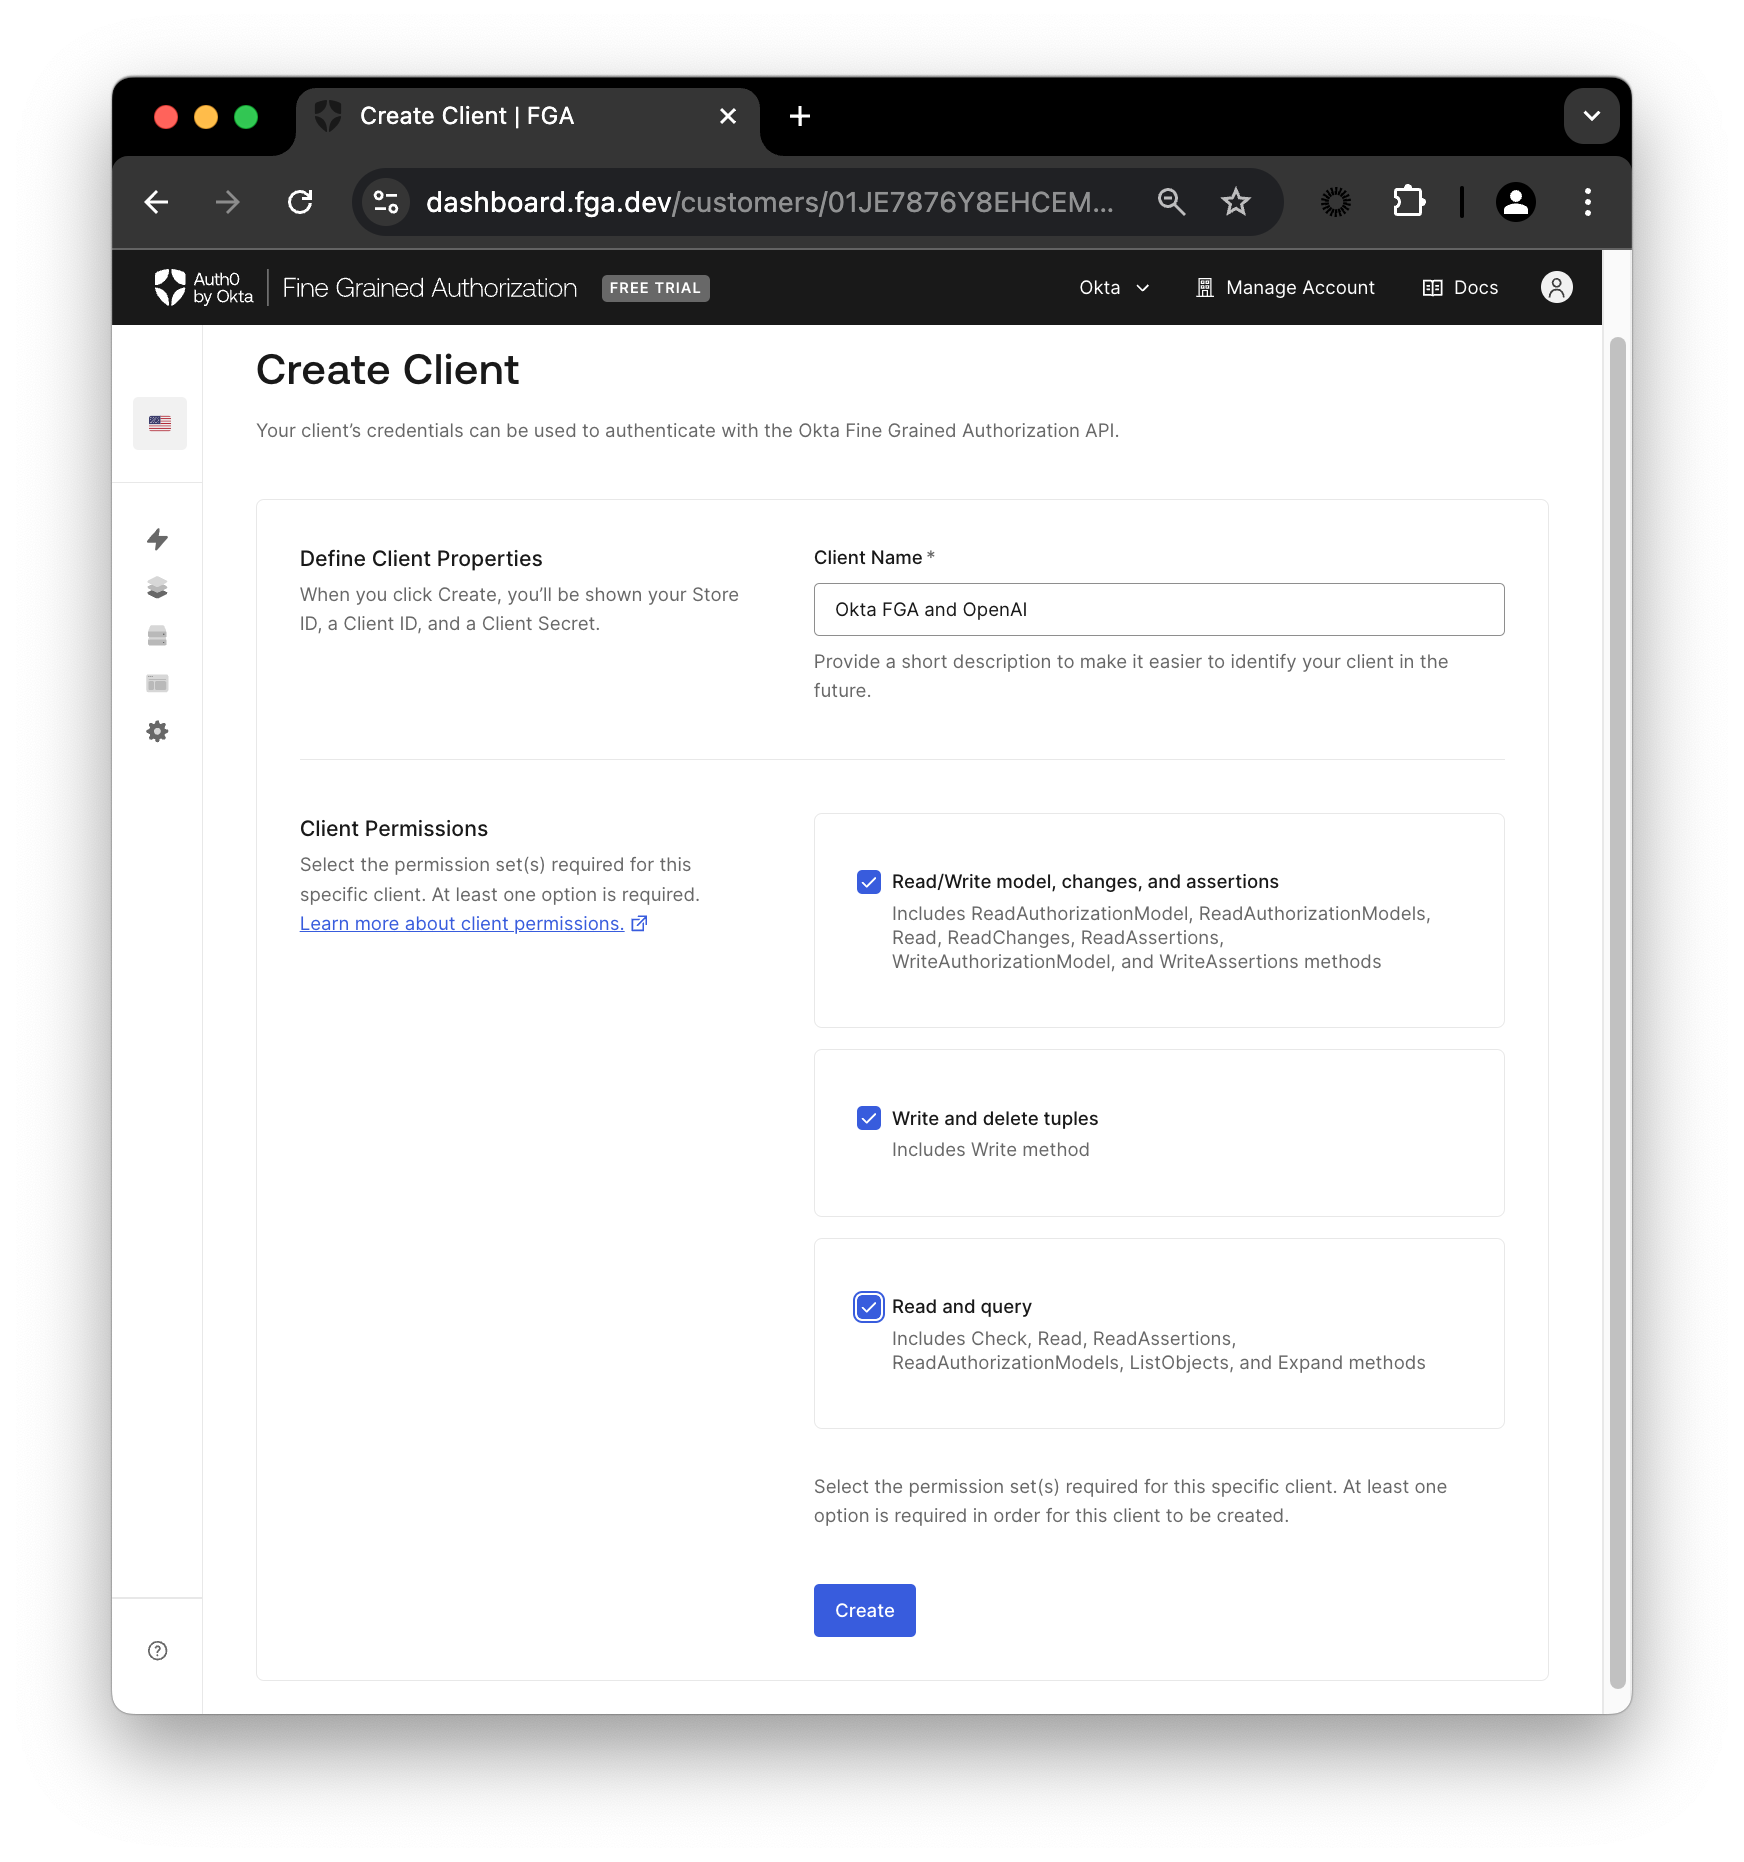\n\nWhen you create the client, OktaFGA will provide you with some data like a Store ID, a Client ID and a Client Secret. Don’t close that yet, you’ll need those values next.\n\nAt the root of the project, there’s a `.env.example` file. Copy the file and paste it as `.env`. Then, open the file and edit the three FGA-related variables with the values provided by OktaFGA. When you are ready, click continue, and the modal will display the values for the missing variables (`FGA_API_URL` and `FGA_API_AUDIENCE`).\n\nAt this step, you can also add your [OpenAI API Key](https://help.openai.com/en/articles/4936850-where-do-i-find-my-openai-api-key), which you’ll need to run the demo.\n\n### Configure the OktaFGA model\n\nNow that the application is set up, you can run the provided script to initialize the model and some sample data. To set things up, run:\n\n```\npython ./scripts/fga_init.py\n```\n\nYou can verify that the script worked by navigating to the model explorer page in OktaFGA. The following model should now have been created:\n\n```\nmodel\n schema 1.1\n\ntype user\n\ntype doc\n relations\n define owner: [user]\n define viewer: [user, user:*]\n```\n\n\u003e You can visit the OktaFGA documentation to learn more about [modeling OktaFGA and creating an authorization model](https://docs.fga.dev/modeling).\n\nOn top of the model, the script also created two tuples. Tuples in OktaFGA define the relationships between the types.\n\nFirst, it defined a tuple to give all users access to the public doc:\n\n- **User** :` user:*`\n- **Object** : `public-doc`\n- **Relation** : `viewer`\n\nThen, it created a second tuple to give the admin user access to the private doc:\n\n- **User** :` user:admin`\n- **Object** : `private-doc`\n- **Relation** : `viewer`\n\n\u003e You can visit the OktaFGA documentation to learn more about [tuples and how to create them](https://docs.fga.dev/content/getting-started/new-getting-started#add-tuples).\n\n### Query the Chain\n\nInvoke the chain to process a query and generate a response.\n\n```python\nrag = RAG()\n\nquestion = \"What is the forecast for ZEKO?\"\n\n# Juan only has access to public docs\nresponse = rag.query(\"juan\", question)\nprint(\"Response to Juan:\", response)\n\n# Admin has access to all docs\nresponse = rag.query(\"admin\", question)\nprint(\"Response to Admin:\", response)\n```\n\nFantastic! You now know how to build and scale a secure RAG with Python and LangChain. It’s time to test things out.\n\nTo run the chain, simply call the `main.py` file:\n\n```\npython main.py\n```\n\nIf you follow the steps, you’ll see a response like the following:\n\n```\nResponse to Juan: The retrieved context does not provide any specific forecast or predictions for ZEKO (Zeko Advanced Systems Inc.). It mainly outlines the company's mission, technologies, and products without detailing any financial or market forecasts. Therefore, I don't know the forecast for ZEKO.\n\nResponse to Admin: The forecast for Zeko Advanced Systems Inc. (ZEKO) for fiscal year 2025 is generally bearish. Projected revenue growth is expected to remain subdued at 2-3%, with net income growth projected at 1-2%, primarily due to margin pressures and competitive challenges. Investors should be cautious, given the potential headwinds the company faces.\n```\n\nAs you can see, `Juan` couldn’t retrieve any “protected” data, while the user `admin` got an accurate response to the prompt.\n\n## Conclusion\n\nYou’ve seen how to build a **secure** RAG system that respects user permissions at the **document level** using **OpenFGA**. This approach prevents data leaks, meets security and compliance requirements, and stays flexible—perfect for businesses dealing with a large pool of sensitive information.\n\nFeel free to adapt this flow for other vector stores, different LLM providers, or your own organizational rules. By coupling RAG’s retrieval power with fine-grained authorization, you’ll build AI-driven apps that are both insightful and safe.\n\nBefore you go, we have some great news to share: we are working on more content and sample apps in collaboration with amazing GenAI frameworks like [LlamaIndex](https://www.llamaindex.ai/), [LangChain](https://www.langchain.com/),[ CrewAI](https://www.crewai.com/), [Vercel AI](https://sdk.vercel.ai/), and others. \n\n[Auth for GenAI](https://a0.to/ai-content) is our upcoming product to help you protect your user's information in GenAI-powered applications.\n\nMake sure to join the [Auth0 Lab Discord server](http://a0.to/auth0-lab-discord) to hear more and ask questions.\n\nHappy coding!","readTime":10,"formattedDate":"Feb 12, 2025"},{"path":"how-to-choose-the-right-authorization-model-for-your-multi-tenant-saas-application","title":"How to Choose the Right Authorization Model for Your Multi-Tenant SaaS Application","heroImage":{"url":"https://images.ctfassets.net/23aumh6u8s0i/6zbsbi997n49Aod4Q6aHW8/ef0e630ca01255470dbee2ebdc5b41c1/FGA_V01_X4.jpg","size":{"width":1176,"height":1056}},"category":["Developers","Deep Dive","Authorization"],"authors":[{"metadata":{"tags":[],"concepts":[]},"sys":{"space":{"sys":{"type":"Link","linkType":"Space","id":"23aumh6u8s0i"}},"id":"7qC8LJD80VSx1qYcSdQ1Zh","type":"Entry","createdAt":"2021-08-23T12:59:46.069Z","updatedAt":"2025-01-08T14:00:38.100Z","environment":{"sys":{"id":"master","type":"Link","linkType":"Environment"}},"publishedVersion":42,"revision":6,"contentType":{"sys":{"type":"Link","linkType":"ContentType","id":"author"}},"locale":"en-US"},"fields":{"path":"juan-cruz-martinez","name":"Juan Cruz Martinez","avatar":{"metadata":{"tags":[{"sys":{"type":"Link","linkType":"Tag","id":"user"}}],"concepts":[]},"sys":{"space":{"sys":{"type":"Link","linkType":"Space","id":"23aumh6u8s0i"}},"id":"5b3YvfAb53h2I5U6uanww4","type":"Asset","createdAt":"2022-07-07T09:23:40.589Z","updatedAt":"2022-07-07T09:23:56.422Z","environment":{"sys":{"id":"master","type":"Link","linkType":"Environment"}},"publishedVersion":10,"revision":5,"locale":"en-US"},"fields":{"title":"jcm","description":"Juan Cruz Martinez","file":{"url":"//images.ctfassets.net/23aumh6u8s0i/5b3YvfAb53h2I5U6uanww4/f1dfa0e19f15f5df8eacd53f78a813f6/jcm.jpeg","details":{"size":29371,"image":{"width":400,"height":400}},"fileName":"jcm.jpeg","contentType":"image/jpeg"}}},"lastUpdatedBy":"Juan Cruz Martinez","email":"juan.martinez@okta.com","twitter":"https://twitter.com/bajcmartinez","github":"https://github.com/bajcmartinez","linkedin":"https://www.linkedin.com/in/bajcmartinez/","isPopular":true,"personalWebsite":"https://jcmartinez.dev/","type":"Auth0 Employee","jobTitle":"Staff Developer Advocate","description":"I stream, blog, and make youtube videos about tech stuff. I love coding, I love AI, and I love building stuff!"}}],"redirectTo":null,"isHiddenFromBlogPostGrid":false,"lang":"en","tags":["authorization","rebac","abac","rbac","fga"],"dateCreated":"2024-10-29T15:00","dateLastUpdated":null,"postContent":"When building a multi-tenant SaaS application, selecting the right authorization model is critical to ensure the security and scalability of your system. Authorization is not only about managing user access but also about ensuring that tenants remain isolated, protected, and—where necessary—able to collaborate. The right model for your SaaS depends on the complexity of your application, the relationships between users and resources, and how dynamic or flexible your access control needs to be. This guide provides a deeper dive into how **RBAC**, **ABAC**, and **ReBAC** can be implemented for multi-tenancy, focusing on what needs to be handled in code versus what can be centralized in a system. We’ll also touch on popular services like [Auth0 Organizations](https://auth0.com/organizations), [OPA](https://www.openpolicyagent.org/), and [Okta FGA](https://fga.dev/) to streamline your implementation.\n\n## Role-Based Access Control (RBAC)\n\n**Role-Based Access Control (RBAC)** is often the first choice for SaaS applications that have clear roles with distinct access privileges and is often the most familiar option among developers. It’s a straightforward model where users are assigned roles (e.g., admin, editor, viewer), and those roles come with specific permissions. In a multi-tenant environment, RBAC needs some enhancements to ensure roles are properly scoped to each tenant. This way, the users' permissions are restricted to their organization.\n\nIn a multi-tenant setup, RBAC handles tenant isolation primarily by scoping roles to individual tenants. This means that roles like “admin” or “viewer” are not globally applicable across the system but are assigned on a per-tenant basis. For instance, a user might be an “admin” in “Tenant A” but only a “viewer” in “Tenant B”.\n\nTo enforce this isolation, your application will need to ensure that roles are checked **within the tenant context** before allowing access to resources.\n\nAt the **code level**, this means ensuring that the application always verifies which tenant the user is operating under when making role-based decisions. For example, when a user tries to access a resource, the system should confirm whether their “admin” role applies to that specific tenant’s resources, not to another tenant’s resources.\n\n\u003e Notice that when using RBAC for authorization, a user under a certain role will get access to all the resources for that tenant. Other authorization models provide ways to scope the privileges of a user to specific resources within the tenant, and we’ll cover them later in the article.\n\nThere are simpler approaches to implementing RBAC into your application; for example, when using Auth0 for authentication, Auth0 offers an **Organizations** feature, which simplifies authentication and role assignments in multi-tenant environments. Auth0 Organizations allows you to easily manage users across multiple tenants (or organizations), where each user can be assigned roles specific to the organization they belong to. By using Auth0’s built-in support for multi-tenancy, you can delegate much of the tenant-specific role management to the identity provider, reducing the amount of tenant-scoped logic that needs to be hardcoded into your app.\n\n### Example use cases for RBAC:\n\n- **HR Management Platform**: In an HR platform used by multiple companies, each company (tenant) has its own set of roles, such as \"HR Admin\" and \"Employee.\" When an HR Admin from Company A logs in, their permissions are limited to the records of Company A, while an HR Admin from Company B has access only to their company’s records.\n- **AI-Powered Customer Support Tool**: A SaaS platform for AI-powered customer support allows companies to manage their support teams. Each team has a role structure, where the \"Team Lead\" has access to configure the AI responses, and the \"Support Agent\" can only see suggestions.\n\n## Attribute-Based Access Control (ABAC)\n\nABAC allows you to define access control policies based on various attributes related to the user, resource, or environment. Unlike RBAC, which assigns static roles, ABAC dynamically evaluates attributes such as the user’s department, resource sensitivity, or even contextual factors like time and location. This makes ABAC more flexible for scenarios where access decisions depend on dynamic conditions.\n\nIn multi-tenant SaaS applications, ABAC can handle tenant isolation by including the tenant ID as an attribute in access control decisions. For instance, you can create policies that grant access to users based on their `tenantId`, `role`, and `department`. This allows for more granular control over what users from each tenant can access and when.\n\nAt the **code level**, the application needs to collect the relevant attributes (e.g., `tenantId`, `userRole`, `resourceSensitivity`) and pass them to the authorization engine for evaluation. The actual logic for determining whether access is allowed is centralized in the policy engine, reducing the need for complex, tenant-specific logic in your app.\n\nThere are some caveats, though; while ABAC allows for dynamic evaluation of the information, the relationships and structure of the information are hardcoded throughout the application, and if your attributes change, it may require code changes throughout the application. This is because the relationships between a user, its role, tenant, etc, are not inferred by the policy engine, but rather specified during authorization checks. For an inferred and more fine-grained approach, there’s a different authorization model which I will cover next.\n\nFor **system-level implementation**, ABAC policies can be managed using tools like **Open Policy Agent (OPA)** or a custom policy engine. These tools evaluate attributes dynamically, ensuring that access is granted only if all conditions are met. For multi-tenancy, this would include ensuring that users are only accessing resources within their tenant.\n`\n\n### Example use cases for ABAC:\n\n- **AI-Driven Healthcare SaaS**: A hospital management system uses ABAC to grant access to patient records based on a doctor’s role, department, and the patient’s condition. Additionally, access is restricted to working hours.\n- **AI-Powered Marketing Platform**: Marketing managers can access reports based on their role, the campaign they are working on, and the region of the campaign. ABAC policies check the region, `campaignType`, and `role` attributes to ensure the user is accessing data for their tenant’s campaigns only.\n\n## **Relationship-Based Access Control (ReBAC)**\n\n**Relationship-Based Access Control (ReBAC)** is ideal for SaaS applications where access control is based on complex relationships between users, resources, and organizations. Instead of simply granting permissions based on roles or attributes, ReBAC models relationships (e.g., \"is the owner of,\" \"can edit\") and uses these to make access decisions. This is particularly useful for collaborative SaaS platforms where permissions are based on how users interact with resources.\n\n\u003e If your SaaS application handles user-generated content, you’ll likely benefit from a ReBAC model)\n\nIn multi-tenant ReBAC implementations, tenant isolation is enforced by defining relationships within and across tenants. For example, a user might \"own\" a resource within one tenant, and another user might have \"edit\" permissions for that resource based on their relationship. Unlike RBAC, which assigns roles based on predefined hierarchies, ReBAC focuses on how entities (users, resources, tenants) are related.\n\nAt the **code level**, your application doesn’t need to hard-code tenant checks. Instead, all access control decisions are based on querying the relationship graph, which models how users and resources are linked. This reduces complexity, as the app doesn’t need to maintain tenant-specific logic.\n\nFor **system-level implementation**, **OktaFGA** (or **OpenFGA**, based on Google Zanzibar’s model) provides a powerful platform for managing ReBAC at scale. OktaFGA stores and manages relationships in a graph database and allows your application to query these relationships in real time. You can model tenant-specific relationships and even handle cross-tenant scenarios, such as allowing external collaborators limited access to certain resources.\n\n### Example use cases for ReBAC:\n\n- **AI-Enhanced Document Collaboration Platform: In this multi-tenant SaaS, users can create, share, and edit documents within their tenant. ReBAC models relationships like \"owner,\" \"editor,\" and \"viewer\" for each document.**\n- **AI-Powered Learning Management System**: A university (tenant) uses the platform to manage courses and student access. Students are \"enrolled\" in courses, and professors \"teach\" those courses. ReBAC models these relationships, ensuring that only enrolled students can access course materials. If a student transfers to a new university (tenant), their access is automatically updated based on their new relationships within the system.\n\n## Summary\n\nWhen it comes to building a multi-tenant SaaS application, your choice of authorization model determines how much of the access control logic is handled by your code versus the authorization system and how wide or fine grained the access control is over the resources of the tenants.\n\n- **RBAC** requires tenant-specific role checks in your code, but tools like **Auth0 Organizations** can offload much of this complexity by managing roles and tenants externally.\n- **ABAC** offers fine-grained, context-aware access control, where the system dynamically evaluates policies based on attributes like `tenantId` and `role`. Tools like **Open Policy Agent (OPA)** can centralize these decisions, reducing the need for custom code.\n- **ReBAC** excels in scenarios with complex, dynamic relationships. Solutions like **OktaFGA** allow you to manage relationships at scale without embedding tenant-specific logic in your app. Instead, the relationship engine handles access control based on real-time relationships between users and resources.\n\nBy leveraging these models and tools, you can build a secure, scalable, and maintainable multi-tenant SaaS platform that fits your unique authorization needs.\n\nThanks for reading!","readTime":8,"formattedDate":"Oct 29, 2024"},{"path":"using-auth0-to-collect-consent-for-newsletter-signups","title":"Using Auth0 to Collect Consent for Newsletter Signups","heroImage":{"url":"https://images.ctfassets.net/23aumh6u8s0i/6CM1el9wfXtLVF8JICe5xG/9b227b08347bae71033f760f26c163a0/Introducing_Auth0_Actions02B.png","size":{"width":2352,"height":2113}},"category":["Identity \u0026 Security","Identity","Universal Login"],"authors":[{"metadata":{"tags":[],"concepts":[]},"sys":{"space":{"sys":{"type":"Link","linkType":"Space","id":"23aumh6u8s0i"}},"id":"7qC8LJD80VSx1qYcSdQ1Zh","type":"Entry","createdAt":"2021-08-23T12:59:46.069Z","updatedAt":"2025-01-08T14:00:38.100Z","environment":{"sys":{"id":"master","type":"Link","linkType":"Environment"}},"publishedVersion":42,"revision":6,"contentType":{"sys":{"type":"Link","linkType":"ContentType","id":"author"}},"locale":"en-US"},"fields":{"path":"juan-cruz-martinez","name":"Juan Cruz Martinez","avatar":{"metadata":{"tags":[{"sys":{"type":"Link","linkType":"Tag","id":"user"}}],"concepts":[]},"sys":{"space":{"sys":{"type":"Link","linkType":"Space","id":"23aumh6u8s0i"}},"id":"5b3YvfAb53h2I5U6uanww4","type":"Asset","createdAt":"2022-07-07T09:23:40.589Z","updatedAt":"2022-07-07T09:23:56.422Z","environment":{"sys":{"id":"master","type":"Link","linkType":"Environment"}},"publishedVersion":10,"revision":5,"locale":"en-US"},"fields":{"title":"jcm","description":"Juan Cruz Martinez","file":{"url":"//images.ctfassets.net/23aumh6u8s0i/5b3YvfAb53h2I5U6uanww4/f1dfa0e19f15f5df8eacd53f78a813f6/jcm.jpeg","details":{"size":29371,"image":{"width":400,"height":400}},"fileName":"jcm.jpeg","contentType":"image/jpeg"}}},"lastUpdatedBy":"Juan Cruz Martinez","email":"juan.martinez@okta.com","twitter":"https://twitter.com/bajcmartinez","github":"https://github.com/bajcmartinez","linkedin":"https://www.linkedin.com/in/bajcmartinez/","isPopular":true,"personalWebsite":"https://jcmartinez.dev/","type":"Auth0 Employee","jobTitle":"Staff Developer Advocate","description":"I stream, blog, and make youtube videos about tech stuff. I love coding, I love AI, and I love building stuff!"}}],"redirectTo":null,"isHiddenFromBlogPostGrid":false,"lang":"en","tags":["identity","login","universal-login"],"dateCreated":"2024-07-03T15:00","dateLastUpdated":null,"postContent":"Engaging your users and keeping them informed about the latest features you deploy is crucial for any successful online business. However, it's equally important to ensure your communication efforts comply with users’ right to privacy and regulations like GDPR.\n\nThankfully, if you're already using Auth0 for user authentication, you have a powerful tool at your disposal to streamline the process of obtaining consent for email communications.\n\nIn this article, we'll delve into how you can leverage Auth0's capabilities to seamlessly integrate GDPR-friendly newsletter sign-ups directly into your existing user registration or onboarding flows. We'll cover best practices for obtaining explicit consent using two different approaches. By the end, you'll have a streamlined system that not only grows your email list but also fosters trust and transparency with your users.\n\n## Method 1: Customize Signup and Login Prompts\n\nAuth0's Universal Login feature provides a convenient way to add a newsletter sign-up option directly into your existing login or registration process. You can easily customize the Universal Login sign-up form to include an input checkbox for newsletter subscriptions.\n\nWhen designing this checkbox, it's crucial to use clear and concise language that leaves no room for ambiguity. The checkbox should be unchecked by default, and the wording should explicitly state that the user is agreeing to receive marketing emails from your company.\n\nHere's an example using Auth0 signup prompts for gathering consent:\n\n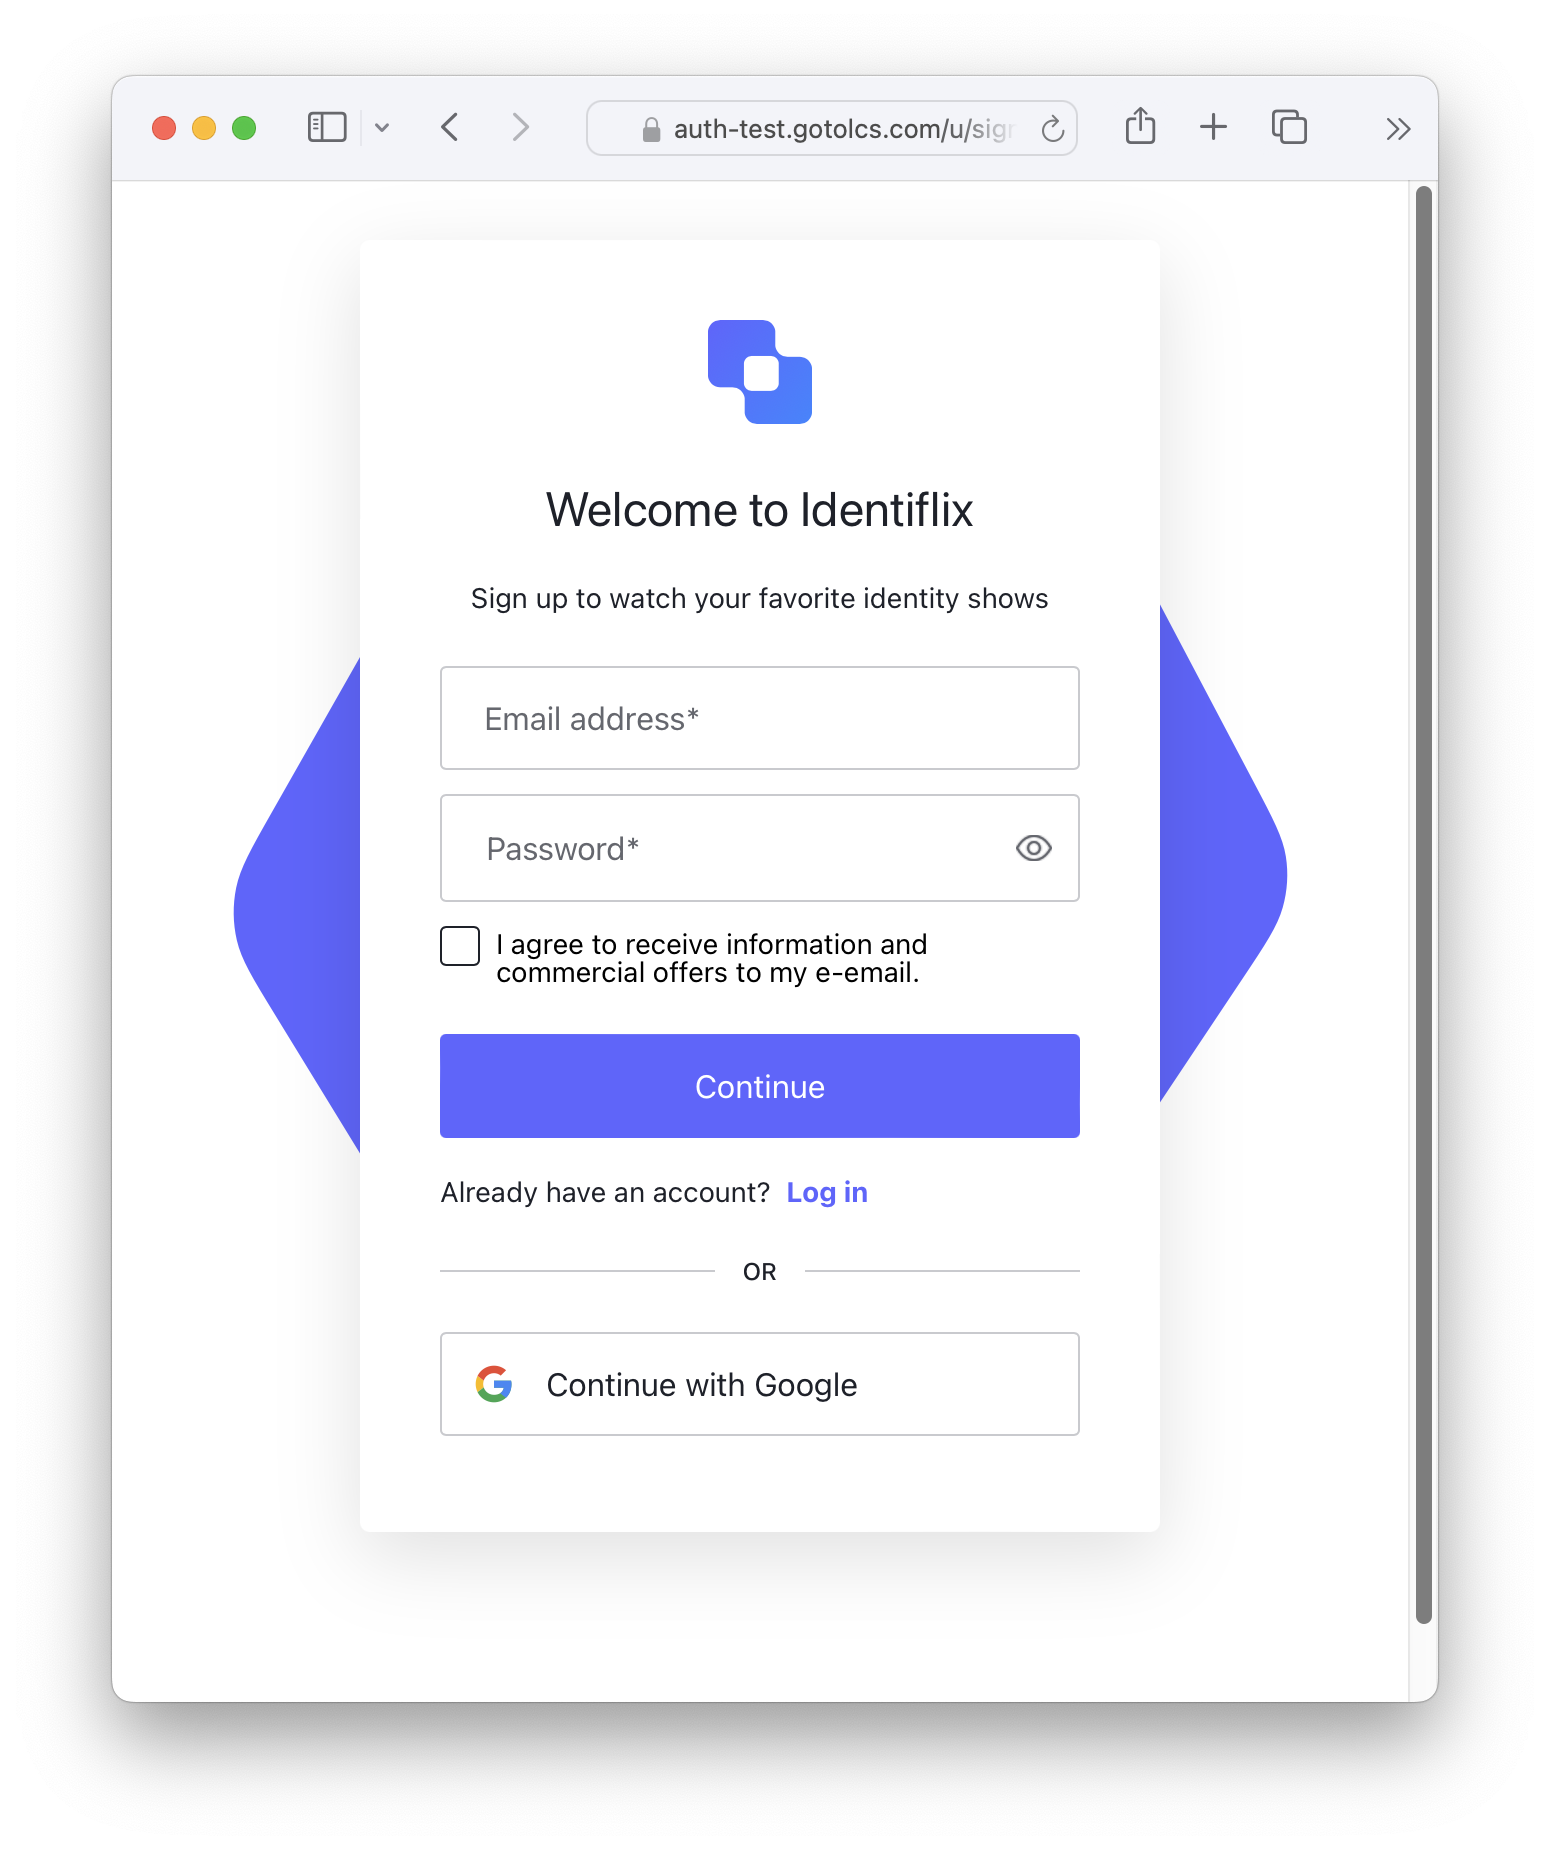\n\nOnce the user submits the form, Auth0 can store their consent status as a custom field in their user profile. This allows you to easily track who has opted in to receive your newsletter and segment your audience accordingly.\n\nThe documentation provides great detail on [how to customize signup and login prompts](https://auth0.com/docs/customize/login-pages/universal-login/customize-signup-and-login-prompts), so I won't be covering the steps here, but I'll share some of the code I used to set up the example above.\n\nTo add the new field to the signup form, I made the following call to the management api:\n\n```shell\ncurl -L -X PUT 'https://{auth0-domain}/api/v2/prompts/signup/partials' \\\n-H 'Content-Type: application/json' \\\n-H 'Authorization: Bearer {access-token}' \\\n-d '{\"signup\":{\"form-content-end\":\"\u003cdiv class=\\\"ulp-field\\\"\u003e\u003cinput type=\\\"checkbox\\\" name=\\\"ulp-newsletter-consent\\\" id=\\\"newsletter-consent\\\"\u003e\u003clabel for=\\\"newsletter-consent\\\"\u003eI agree to receive information and commercial offers to my e-mail.\u003c/label\u003e\u003c/div\u003e\"}}'\n```\n\nWhich will inject the following HTML after the login form.\n\n```html\n\u003cdiv class=\"ulp-field\"\u003e\n \u003cinput type=\"checkbox\" name=\"ulp-newsletter-consent\" id=\"newsletter-consent\" /\u003e\n \u003clabel for=\"newsletter-consent\"\u003eI agree to receive information and commercial offers in my e-mail.\u003c/label\u003e\n\u003c/div\u003e\n```\n\nThen, I'm using Auth0 Actions to automatically sign up the user to my newsletter service. Here's the code for the action:\n\n```javascript\nexports.onExecutePreUserRegistration = async (event, api) =\u003e {\n const consent = event.request.body['ulp-newsletter-consent'];\n\n if(consent) {\n api.user.setUserMetadata(\"newsletter_consent\", consent);\n api.user.setUserMetadata(\"newsletter_consent_date\", Date.now());\n\n // Call the newsletter service API to subscribe the user\n await fetch(`https://newsletter-api.example.com/u/${event.user.email}`, {\n method: \"POST\"\n })\n }\n};\n```\n\nYou'll have to adapt the HTTP call to match your newsletter service API, or, what I prefer to do, is to add the email to a processing queue, which then triggers the newsletter subscription.\n\n\u003cinclude \n src=\"LinkCard\" \n title=\"There's a lot more you can do with prompts\" \n link=\"https://auth0.com/docs/customize/login-pages/universal-login/customize-signup-and-login-prompts\" \n description=\"Explore the documentation to find out other use cases and examples for prompts.\" \n/\u003e\n\n### Key considerations for this approach:\n\n- **Integrated with Sign-Up Form**: This method seamlessly blends the newsletter sign-up with the user's initial interaction.\n- **Social Login \u0026 Passkeys**: Keep in mind that this approach won't work if your primary login methods are social logins (e.g., Google, Facebook) or passkeys.\n- **Custom Domain and Custom Page Template Required**: To leverage this functionality, you'll need to have a custom domain set up for your Auth0 tenant.\n\n## Method 2: Using Auth0 Forms for Dedicated Consent Collection Step\n\nIf you need a more comprehensive consent collection solution or want to gather additional information beyond a simple yes/no for the newsletter, [Auth0 Forms](https://auth0.com/docs/customize/forms) is the solution for you. This approach involves presenting users with a dedicated form during the authentication process, allowing for more detailed data collection and tailored consent options.\n\nAuth0 Forms is a powerful visual editor that empowers you to create custom, dynamic forms that integrate seamlessly with your authentication flows. These forms can be, for example, used for:\n\n- **Progressive profiling**: Collect user preferences, demographics, or any other data relevant to your business.\n- **Enforce Policies**: Require users to accept updated terms and conditions or privacy policies before accessing your application.\n- **Customize Authentication Flows**: Add steps to your login or sign-up processes, such as email or phone number verification, OTP, account linking, or consent collection.\n- **Trigger Custom Actions**: Initiate backend processes or workflows based on user input.\n\n### How Can Auth0 Forms Be Used for Consent?\n\nAuth0 Forms provide a flexible framework for obtaining and managing user consent in various scenarios:\n\n- **Newsletter Sign-Ups**: Create a dedicated form with clear and concise language to request explicit consent for email communications.\n- **Terms and Conditions Acceptance**: Present updated terms or policies to users and require their acceptance before continuing.\n- **Data Usage Consent**: Seek permission for specific data processing activities, such as personalized advertising or data analytics.\n- **Granular Permissions**: Offer users fine-grained control over their data by allowing them to choose which types of communication they want to receive.\n\nHere's an example of a form that collects information about the user and asks for marketing consent the second time the user logs into the application.\n\n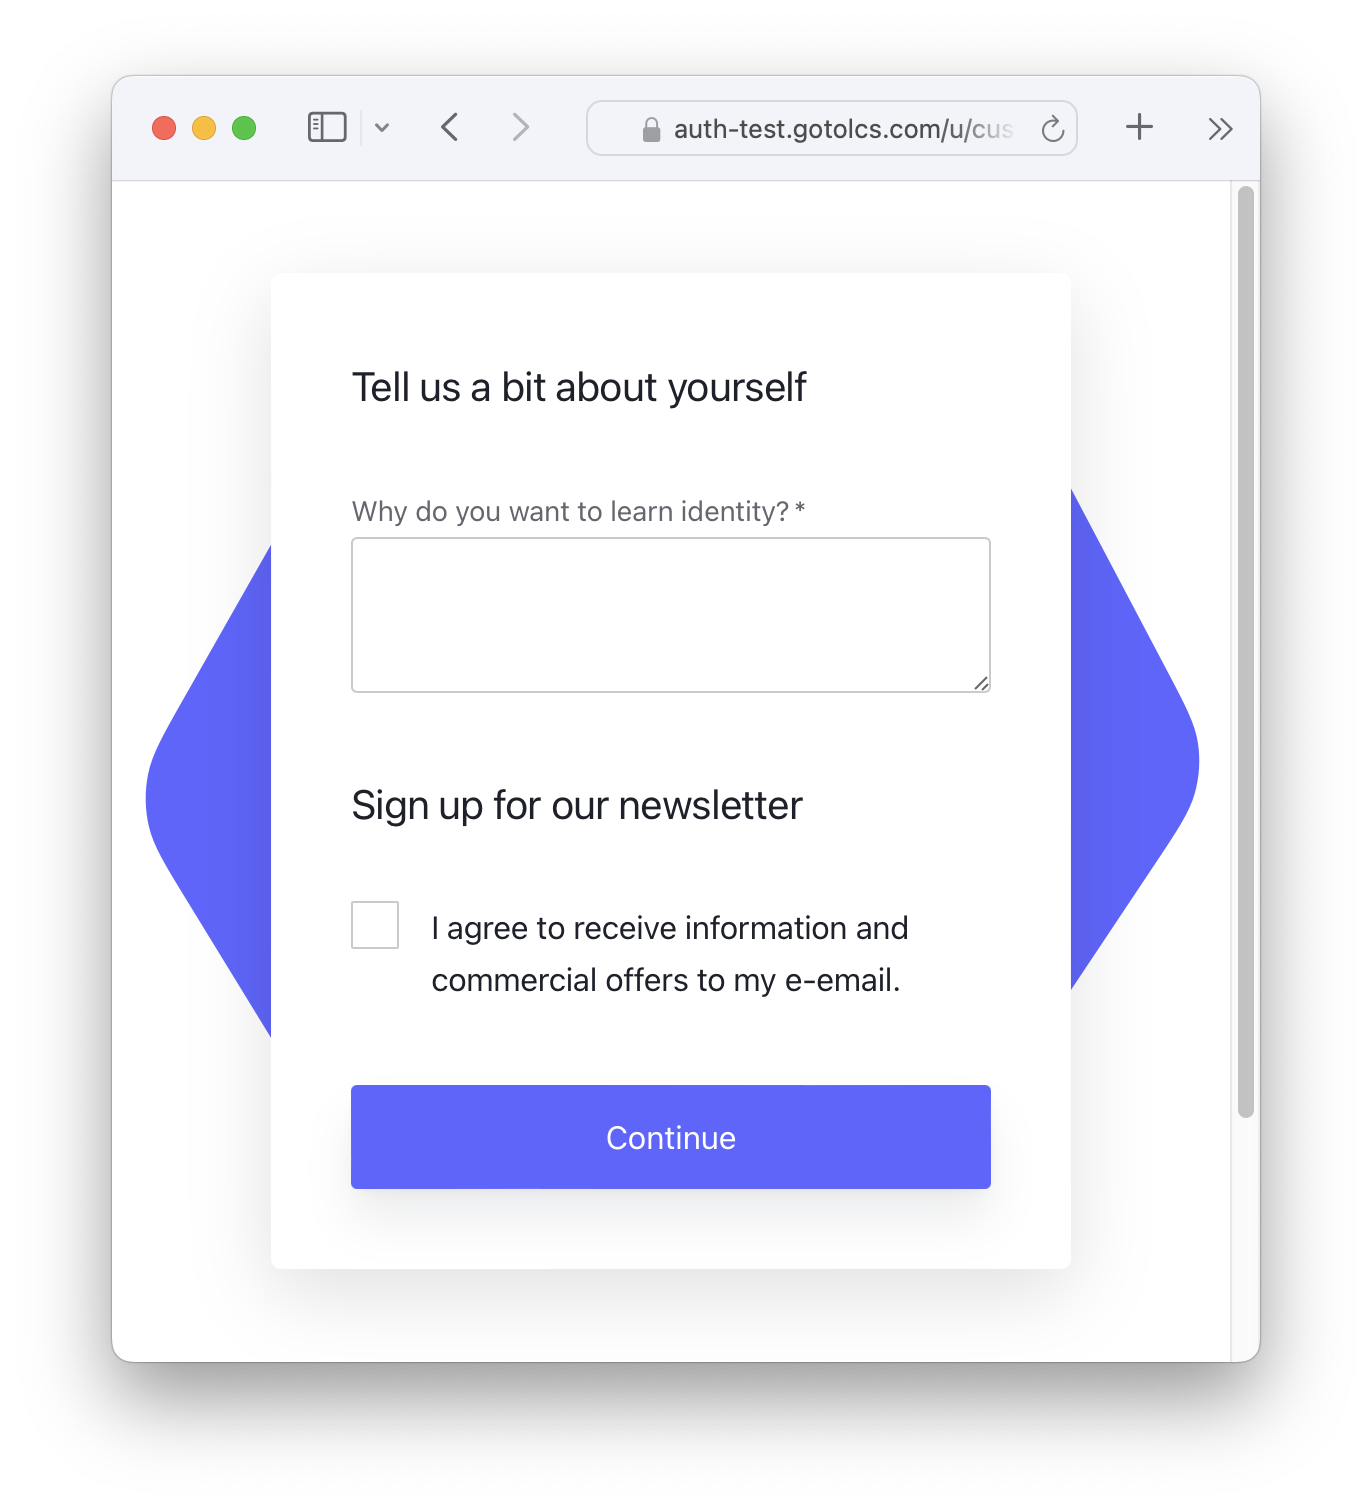\n\n\u003cinclude \n src=\"LinkCard\" \n title=\"Auth0 Forms is a great resource to further customize your authentication flow.\" \n link=\"https://auth0.com/docs/customize/forms\" \n description=\"Explore the documentation to find out how to build your own forms or use pre-defined templates for common use cases.\" \n/\u003e\n\n### Key considerations for this approach:\n\n- **Universal Compatibility**: Auth0 Forms works seamlessly with all authentication methods, including social logins and passkeys, providing flexibility for your user base.\n- **Additional Step**: Be aware that this method adds an extra step to the authentication flow, which, only for the purposes of asking consent, can potentially affect user experience. Consider balancing the need for comprehensive consent with the desire for a streamlined login process.\n- **Versatile Usage**: Auth0 Forms aren't limited to just newsletter sign-ups. They can be used for a variety of scenarios, such as accepting terms and conditions, requesting permission for specific data usage, or collecting user preferences. This versatility makes Auth0 Forms a valuable tool for managing ongoing compliance and user engagement.\n\n## Best Practices for Obtaining Explicit Consent\n\nTo ensure your newsletter sign-up process is fully GDPR-compliant, there are several best practices you should follow. First and foremost, use clear and concise language on your sign-up forms. Avoid legalese or confusing terminology, and be upfront about what the user is signing up for.\n\nAdditionally, consider offering granular consent options. Instead of just one checkbox for all types of communication, you could provide separate checkboxes for newsletters, product updates, or other types of emails. This gives users more control over the emails they receive and can improve engagement rates.\n\nAnother effective strategy is implementing a double opt-in process. This means that after a user submits their email address, they receive a confirmation email with a link they must click to verify their subscription. This extra step helps ensure that the email address is valid and that the user genuinely wants to receive your newsletter.\n\nFinally, it makes it easy for users to manage their communication preferences. Provide a clear link in your emails where users can update their subscriptions or unsubscribe altogether. This demonstrates respect for their privacy and can help prevent spam complaints.\n\n## Conclusion\n\nBy following the steps outlined in this article, you can seamlessly integrate GDPR-friendly newsletter sign-ups into your Auth0-powered website or application. This not only ensures compliance with data protection regulations but also builds trust with your users, leading to higher engagement and a more successful email marketing program.\n\nThanks for reading!","readTime":7,"formattedDate":"Jul 3, 2024"},{"path":"using-actions-to-customize-your-mfa-factors","title":"Using Actions to Customize Your MFA Factors","heroImage":{"url":"https://images.ctfassets.net/23aumh6u8s0i/6CM1el9wfXtLVF8JICe5xG/9b227b08347bae71033f760f26c163a0/Introducing_Auth0_Actions02B.png","size":{"width":2352,"height":2113}},"category":["Identity \u0026 Security","Security","Actions"],"authors":[{"metadata":{"tags":[],"concepts":[]},"sys":{"space":{"sys":{"type":"Link","linkType":"Space","id":"23aumh6u8s0i"}},"id":"7qC8LJD80VSx1qYcSdQ1Zh","type":"Entry","createdAt":"2021-08-23T12:59:46.069Z","updatedAt":"2025-01-08T14:00:38.100Z","environment":{"sys":{"id":"master","type":"Link","linkType":"Environment"}},"publishedVersion":42,"revision":6,"contentType":{"sys":{"type":"Link","linkType":"ContentType","id":"author"}},"locale":"en-US"},"fields":{"path":"juan-cruz-martinez","name":"Juan Cruz Martinez","avatar":{"metadata":{"tags":[{"sys":{"type":"Link","linkType":"Tag","id":"user"}}],"concepts":[]},"sys":{"space":{"sys":{"type":"Link","linkType":"Space","id":"23aumh6u8s0i"}},"id":"5b3YvfAb53h2I5U6uanww4","type":"Asset","createdAt":"2022-07-07T09:23:40.589Z","updatedAt":"2022-07-07T09:23:56.422Z","environment":{"sys":{"id":"master","type":"Link","linkType":"Environment"}},"publishedVersion":10,"revision":5,"locale":"en-US"},"fields":{"title":"jcm","description":"Juan Cruz Martinez","file":{"url":"//images.ctfassets.net/23aumh6u8s0i/5b3YvfAb53h2I5U6uanww4/f1dfa0e19f15f5df8eacd53f78a813f6/jcm.jpeg","details":{"size":29371,"image":{"width":400,"height":400}},"fileName":"jcm.jpeg","contentType":"image/jpeg"}}},"lastUpdatedBy":"Juan Cruz Martinez","email":"juan.martinez@okta.com","twitter":"https://twitter.com/bajcmartinez","github":"https://github.com/bajcmartinez","linkedin":"https://www.linkedin.com/in/bajcmartinez/","isPopular":true,"personalWebsite":"https://jcmartinez.dev/","type":"Auth0 Employee","jobTitle":"Staff Developer Advocate","description":"I stream, blog, and make youtube videos about tech stuff. I love coding, I love AI, and I love building stuff!"}}],"redirectTo":null,"isHiddenFromBlogPostGrid":false,"lang":"en","tags":["identity","login","universal-login","mfa"],"dateCreated":"2024-06-18T15:00","dateLastUpdated":null,"postContent":"Multi-factor authentication (MFA) is an essential security measure that helps to protect your organization's data and assets. By requiring users to provide an additional authentication factor, such as a security token or fingerprint, in addition to their username and password, MFA can significantly reduce the risk of unauthorized access.\n\nHowever, implementing MFA can sometimes create friction in the user experience, potentially leading to frustration and reduced productivity. Additionally, not all users or scenarios may require the same level of security, making a one-size-fits-all MFA approach impractical.\n\nAuth0 Actions is a powerful feature that allows you to customize and extend the functionality of Auth0. With Actions, you can create custom workflows that trigger in response to specific events, such as user login or registration. This enables you to tailor your MFA implementation to meet your organization's specific needs.\n\nFor example, you can use Actions to:\n\n- **Enforce MFA based on user roles or permissions**: You can require certain users, such as administrators or those with access to sensitive data, to use MFA while allowing others to bypass it.\n- **Implement risk-based authentication**: You can use Actions to assess the risk level of a login attempt based on factors such as the user's location, device, and IP address. If the risk is high, you can then require the user to provide an additional factor of authentication.\n\n## Prepare your Tenant\n\nBefore diving into customizing your Multi-Factor Authentication (MFA) flows, let's make sure we have the essentials in place. This quick guide will walk you through the initial setup steps:\n\n- **Activate MFA**: Head over to your Auth0 Dashboard (\u003ca href=\"https://a0.to/blog_signup\" data-amp-replace=\"CLIENT_ID\" data-amp-addparams=\"anonId=CLIENT_ID(cid-scope-cookie-fallback-name)\"\u003eGet a free account\u003c/a\u003e if you don't already have one) and navigate to [Security \u003e Multi-factor Auth](https://manage.auth0.com/#/security/mfa). Here, you'll be able to activate MFA for your tenant.\n\n- **Choose Your Factors**: [MFA comes in various forms](https://auth0.com/blog/not-all-mfa-is-created-equal/). Decide which factors suit your security needs and enable them on the same Multi-factor Auth page. You might choose options like push notifications, SMS codes, or even biometrics.\n 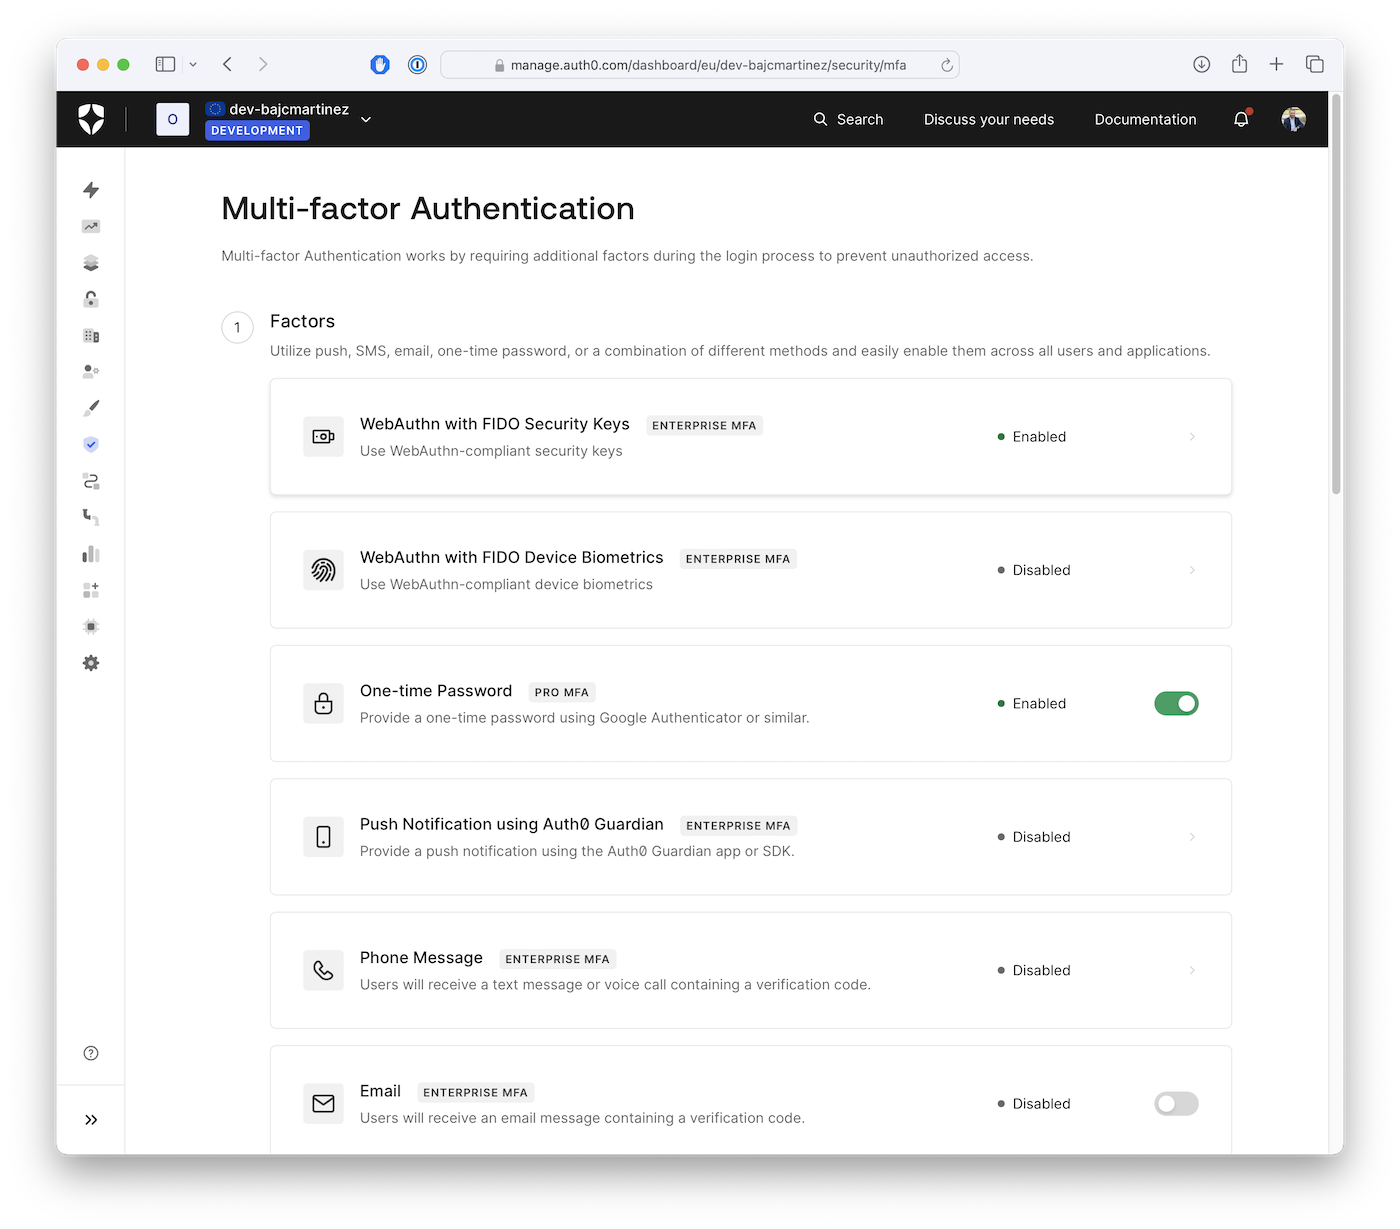\n\n- **Enable Customization**: To personalize your MFA flows, toggle on the \"Customize MFA Factors using Actions\" setting. This is like unlocking a secret level – it opens the door to fully customized experiences for your users.\n 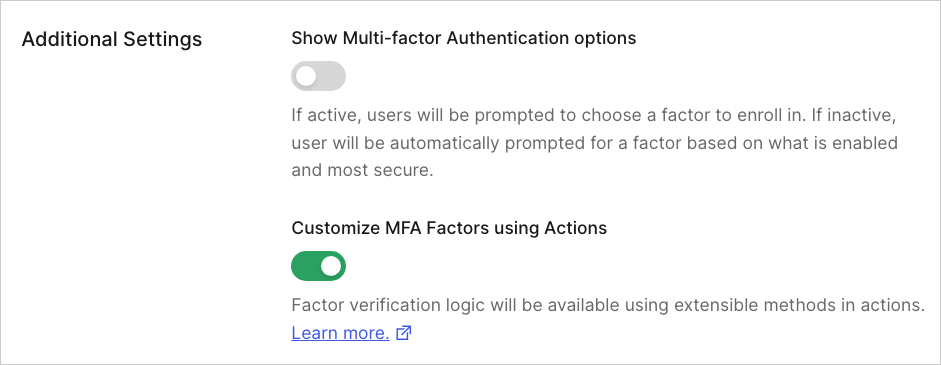\n\n\u003e Actions with `enrollWith` or `enrollWithAny` commands override any existing policies or rules that enable or disable MFA in a tenant.\n\n## Understand the APIs\n\nOnce you've enabled Multi-Factor Authentication (MFA) in your Auth0 tenant, you can go beyond the basic settings and create truly customized enrollment flows using Auth0 Actions. Actions are snippets of code that run at specific points in the user's authentication journey, giving you granular control over your authentication workflow and, in particular, how MFA is presented.\n\nTo customize your MFA experiences, Auth0 Actions provides a set of APIs designed for enrollment and requiring authentication challenges. Here's a breakdown of the four key APIs you can use: \n\n### `enrollWith(factor, options)`\n\nInitiates MFA enrollment for a specific factor (e.g., `otp`, `push-notification`, `webauthn-roaming`, etc. Visit the docs to learn about [all supported values](https://auth0.com/docs/customize/actions/flows-and-triggers/login-flow/api-object#:~:text=api.authentication.enrollWith(factor%2C%20options)).\n\nExample:\n\n```javascript\napi.authentication.enrollWith({type: 'otp'})\n```\n\n### `enrollWithAny(factors)`\n\nSimilar to `enrollWith` but prompts the user to select an MFA factor to enroll in from the supplied list.\n\nExample:\n\n```javascript\napi.authentication.enrollWithAny([{type: 'otp'}, {type: 'webauthn-roaming'}])\n```\n\n### `challengeWith(factor, options)`\n\nChallenge the user with one or more specified multifactor authentication factors. This method presents the default challenge first, then allows the user to select a different option if additional factors have been supplied. If the user has not enrolled in any of the factors supplied (including both the default and any additional factors), the command fails.\n\nExample:\n\n```javascript\napi.authentication.challengeWith({type: 'otp'})\n```\n\n### `challengeWithAny(factors)`\n\nTrigger a MFA challenge and allow the user to select their preferred factor from the supplied list.\n\nExample:\n\n```javascript\napi.authentication.challengeWithAny([{type: 'otp'}, {type: 'webauthn-roaming'}])\n```\n\n## Create a New Auth0 Action\n\nTo begin, let's create a new [Auth0 Action](https://auth0.com/docs/customize/actions/actions-overview). Actions are serverless functions that run in a secure Auth0 environment.\n\nTo create an Action, log into your [Auth0 Dashboard](https://manage.auth0.com/#/actions/flows), select Actions from the left sidebar menu, then select Flows. This page shows the different flows you can customize. For our use case, we’ll choose the “Login” flow.\n\n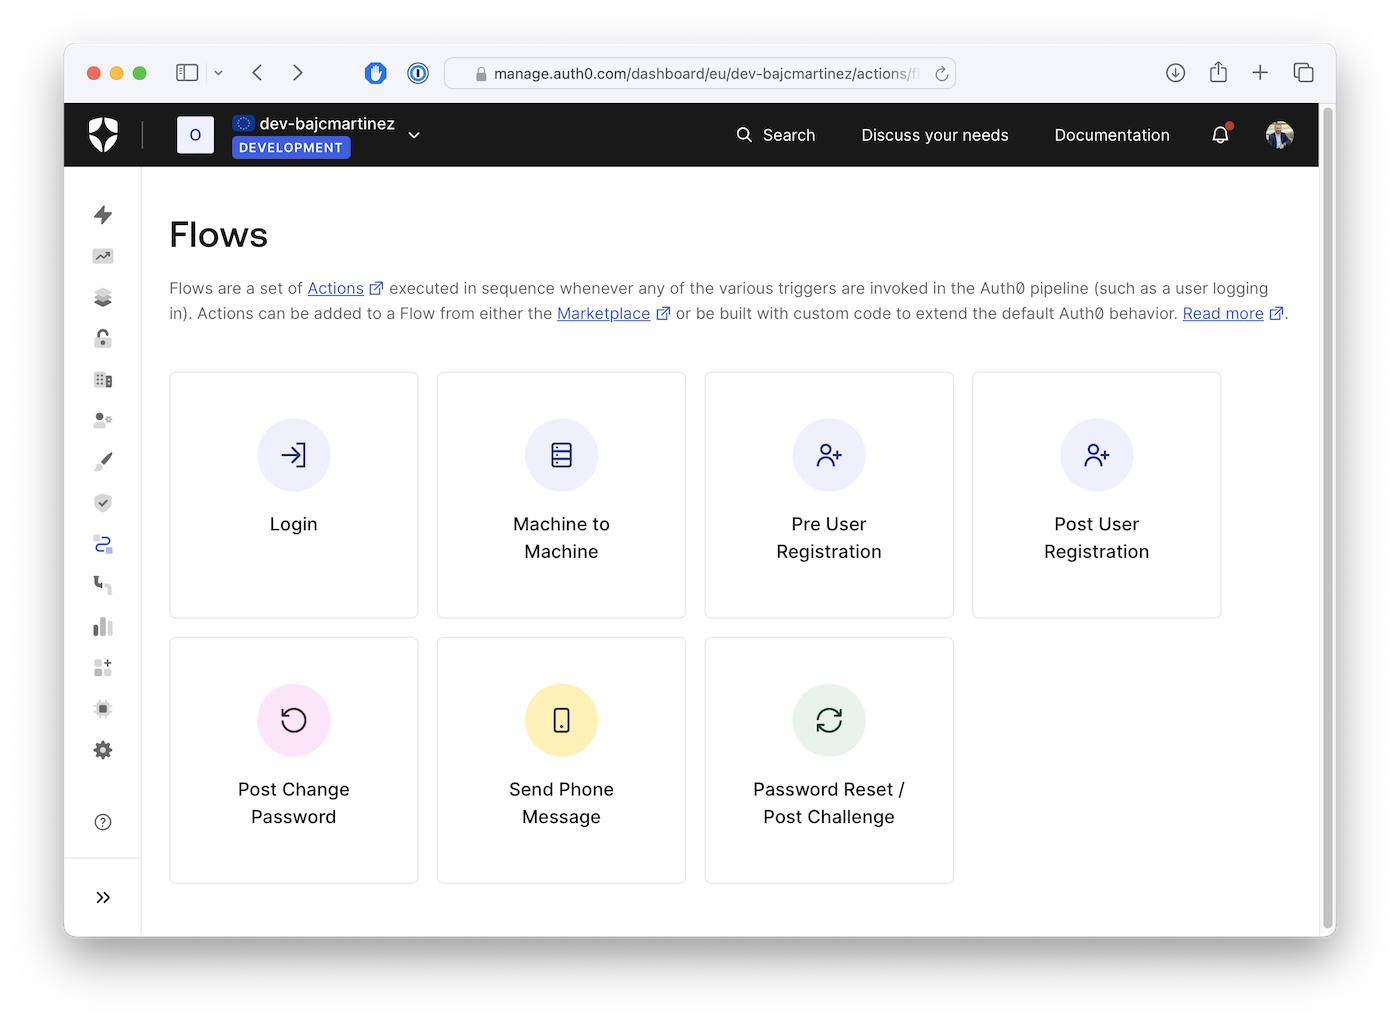\n\nThis will take you to the “Login” flow page, where you can install, create, and add Actions to the flow.\n\n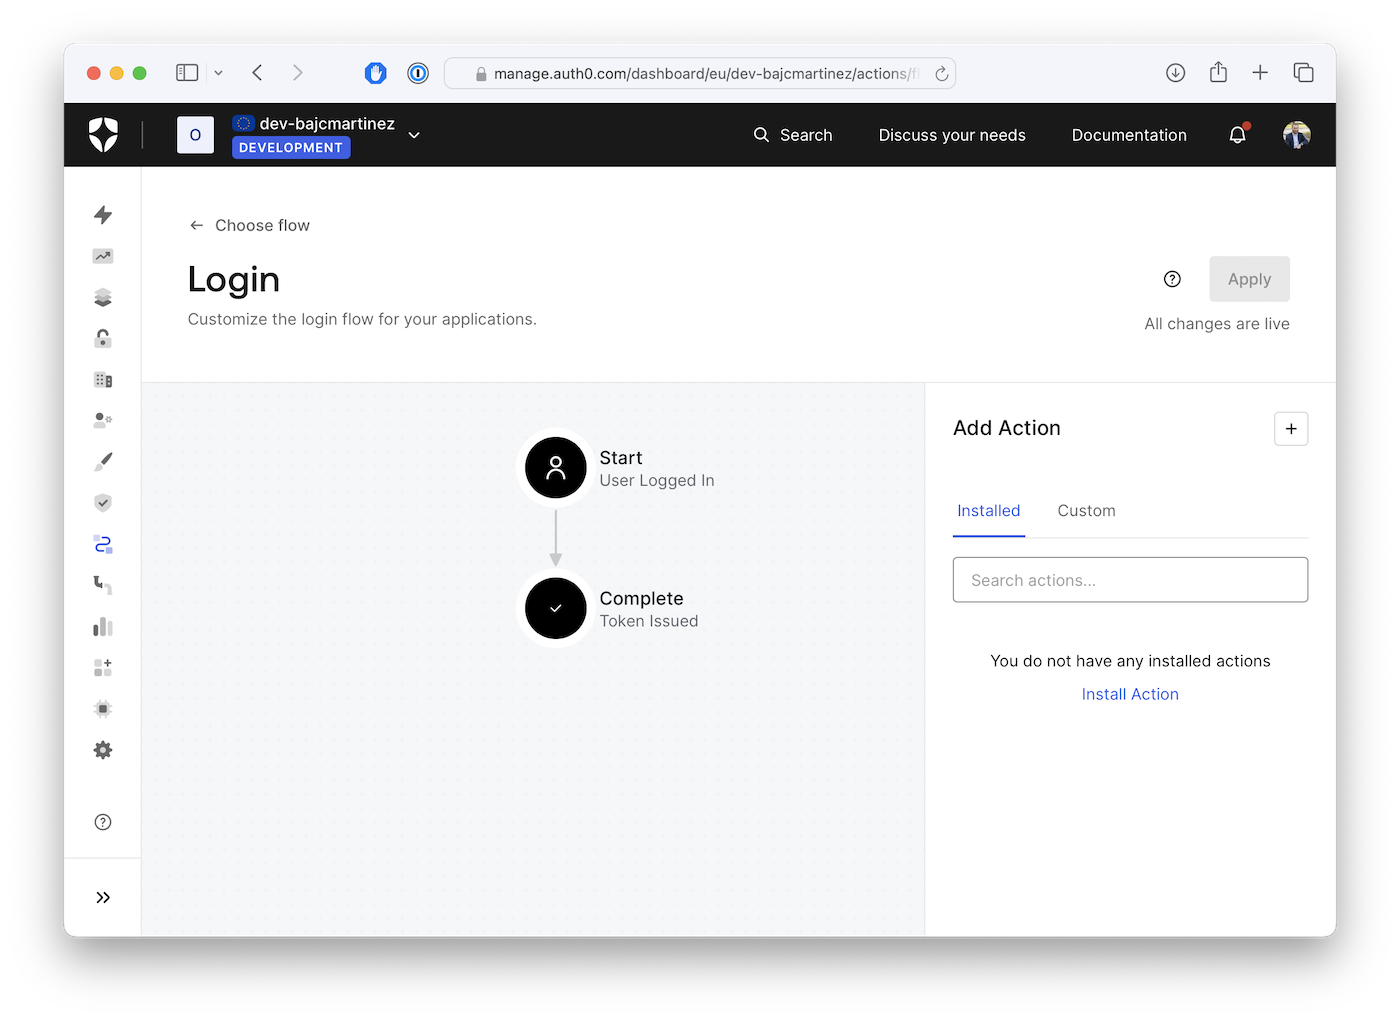\n\nThe screen has two main sections: the diagram in the center of the page shows the login flow and the Actions panel.\n\nOn the diagram, we can see the default login flow, which contains two states.\n\n- **Start:** The user completed the login form and is ready to log in.\n- **Complete:** The system issues the user’s credentials (an ID token and, if required, an access token).\n\nYou can drag and drop Actions in between these states to add custom logic to the login flow or deny the login request before the tokens are issued.\n\nOn the right panel, we have the Actions panel with two tabs.\n\n- **Installed**: Pre-installed Actions from the [Auth0 Actions Marketplace](https://marketplace.auth0.com/features/actions)\n- **Custom:** Actions created for this tenant\n\nTo create an Action, click the plus icon on the Actions panel and select \"Build from scratch\".\n\n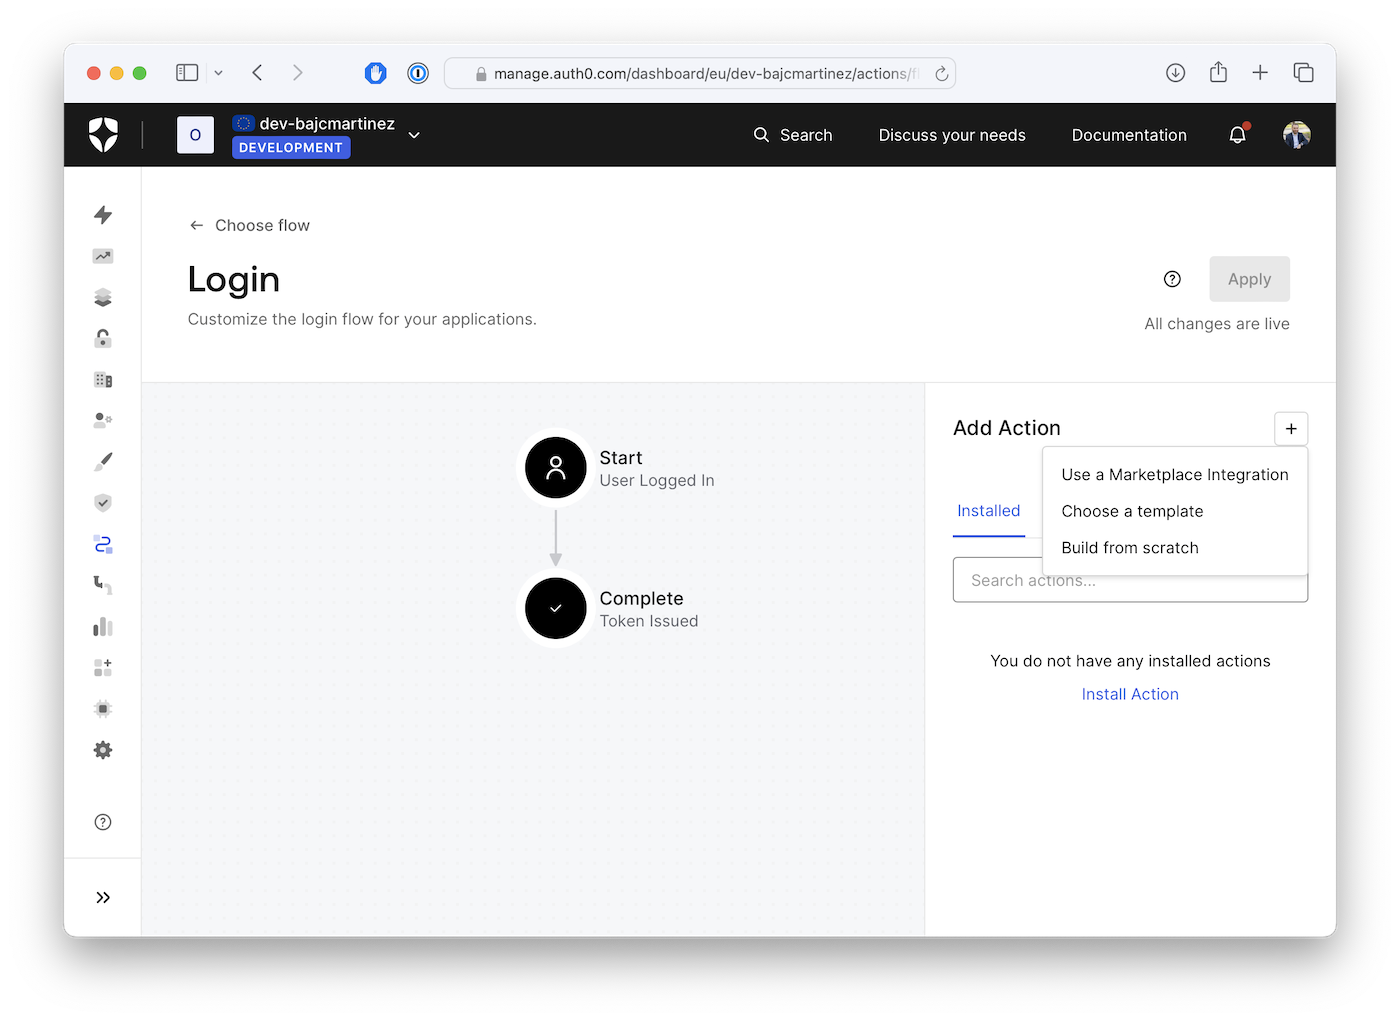\n\nAfter that, a modal window will appear to enter the information for our Action: you’ll have to provide a name, and you can leave the trigger and runtime as the default values. For my Action, I’ll name it “Require webauthn MFA for admins”.\n\n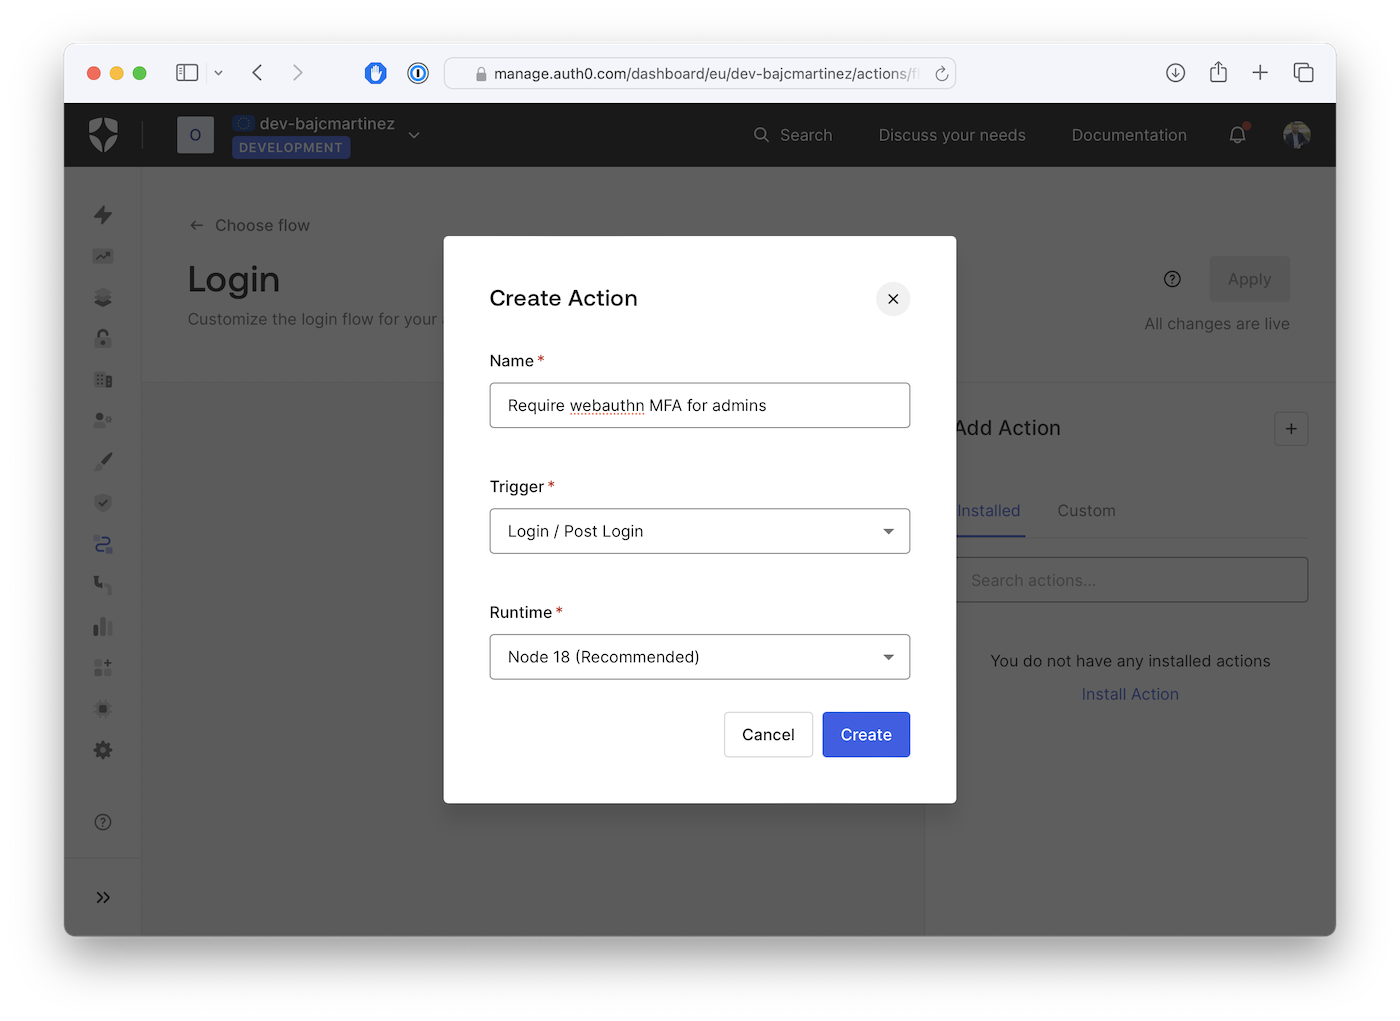\n\nAfter clicking on \"Create\", you’ll be taken to the Action’s code editor, where you can write the code for your Action, install packages, test it, and more:\n\n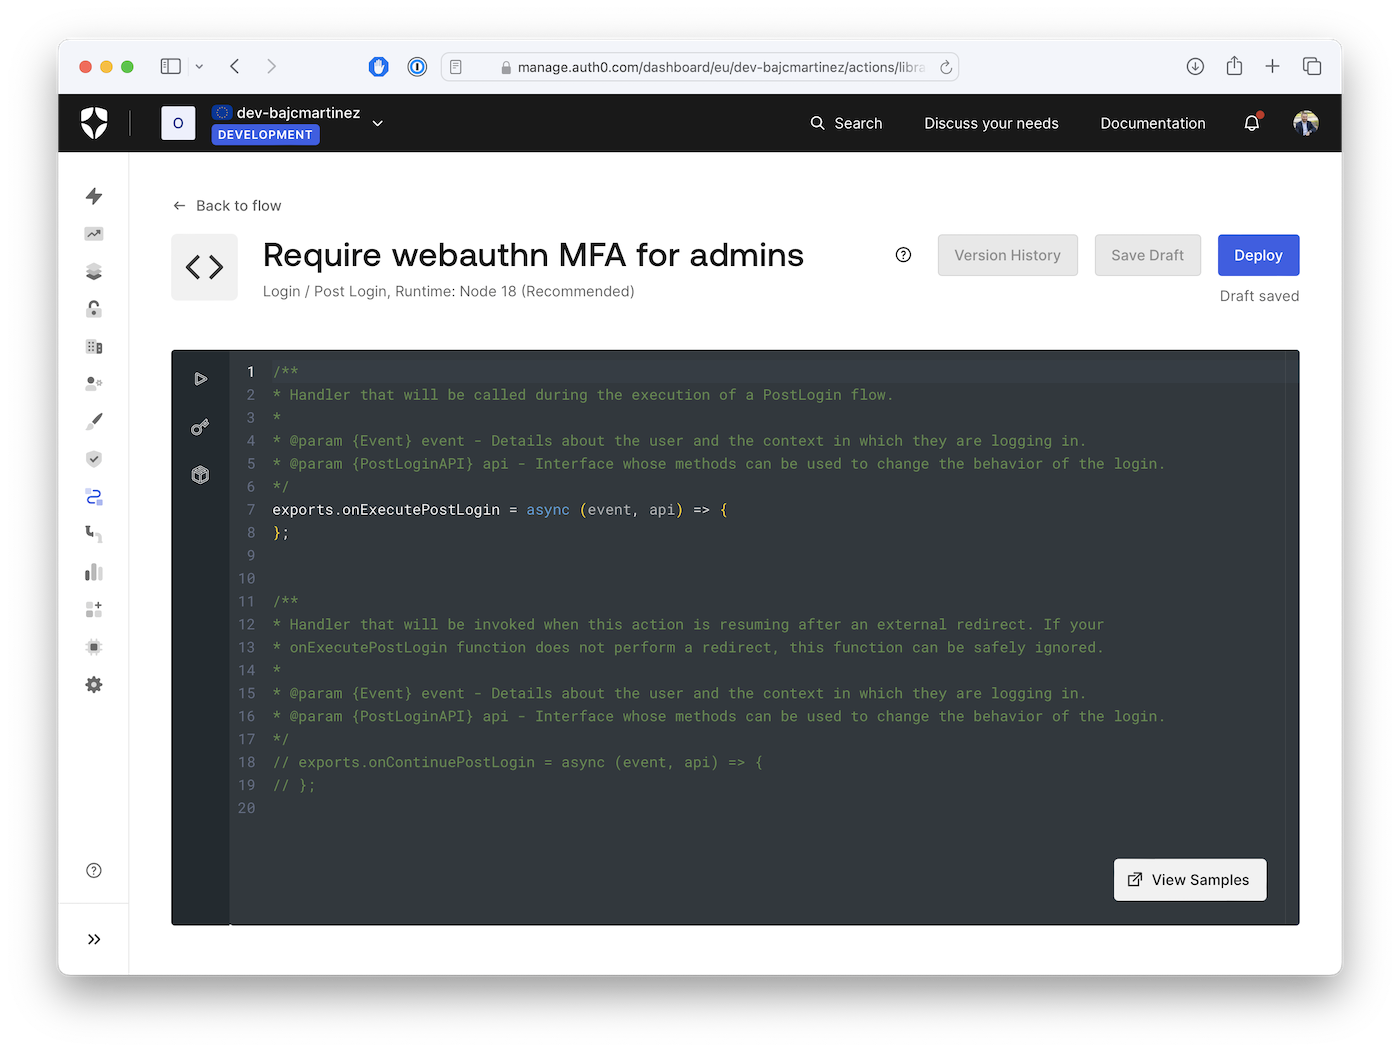\n\nAn Action can make use of two JavaScript functions to alter the Login flow:\n\n- `onExecutePostLogin`: defines what should happen immediately after the user provides login credentials that Auth0 verified. This method receives two parameters, `event` and `api`.\n - `event`: contains details about the login request, such as the user and the context.\n - `api`: contains methods to manipulate the login’s behavior.\n- `onContinuePostLogin`: defines what should happen when control returns to the Login Action after a redirect to another web page. It’s used only when the user returns after being redirected, which is why it’s commented out by default.\n\nFor this tutorial, we’ll focus on the `onExecutePostLogin` method.\n\n## Writing the Actions Code\n\nNext, we'll write the Action's code that will require users under the Admin's group to use `webauthn` as an additional authentication step. If the user isn't already enrolled with `webauthn`, the first time they login they will be prompted to do so.\n\nThe action will make use of the APIs `challengeWith` and `enrollWith`, in addition to using the user's property `enrolledFactors` to determine if the user has an MFA factor enrolled already.\n\nHere's the actual code:\n\n```javascript\nexports.onExecutePostLogin = async (event, api) =\u003e {\n // Check if the user is an admin, enforce webauthn\n if (event.authorization?.roles?.includes('Admin')) {\n // Check if the user is already enrolled with webauthn\n if (event.user.enrolledFactors \u0026\u0026 event.user.enrolledFactors.some(m =\u003e m.type === 'webauthn-roaming')) {\n api.authentication.challengeWith({type: 'webauthn-roaming'})\n } else {\n api.authentication.enrollWith({type: 'webauthn-roaming'})\n }\n }\n};\n```\n\n## Attach an Auth0 Action to the Login Flow\n\nAfter coding and testing your Actions, it’s time to deploy and use them as part of the login flow. Once you are ok with your testing results, you can hit the `Deploy` button on the top right corner of the screen. This will take the existing code and settings and generate a function snapshot you can use in your login flow.\n\nIf you ever need to change the code on the function, all changes will automatically be saved as a new draft, and if you want the changes to become effective, you’ll have to deploy your latest version once again.\n\nOnce your code is deployed, it doesn’t mean it is actively used as part of your login flow. To check for that, please refer back to the [login flow screen](https://manage.auth0.com/#/actions/flows/login/), where the login diagram is shown. If you don’t see your Action as part of the diagram, it means that, even if your Action is deployed, it has not yet been activated. To activate the Action as part of the flow, click on the “Custom” tab on the Actions panel, locate your Action by name, and simply drag and drop the box over the login diagram between the \"Start\" and \"Complete\" steps. After that, you can apply changes using the “Apply” button on the top right corner of the screen.\n\n\n\n## Test Your New Authentication Flow\n\nNow, you can try your new Action by logging into your Auth0-powered application using both admin and non-admin accounts. When you log using any method (e.g. username/password, or social login) with a non-admin user, you'll get direct access to your application or continue with the authentication flow as you have it specified for your tenant.\n\nWhen you log in using an admin user (a member of the group \"Admin\", as we defined it on the Action), you'll be prompted to either register or validate your account with webauthn. The screen may look something like this:\n\n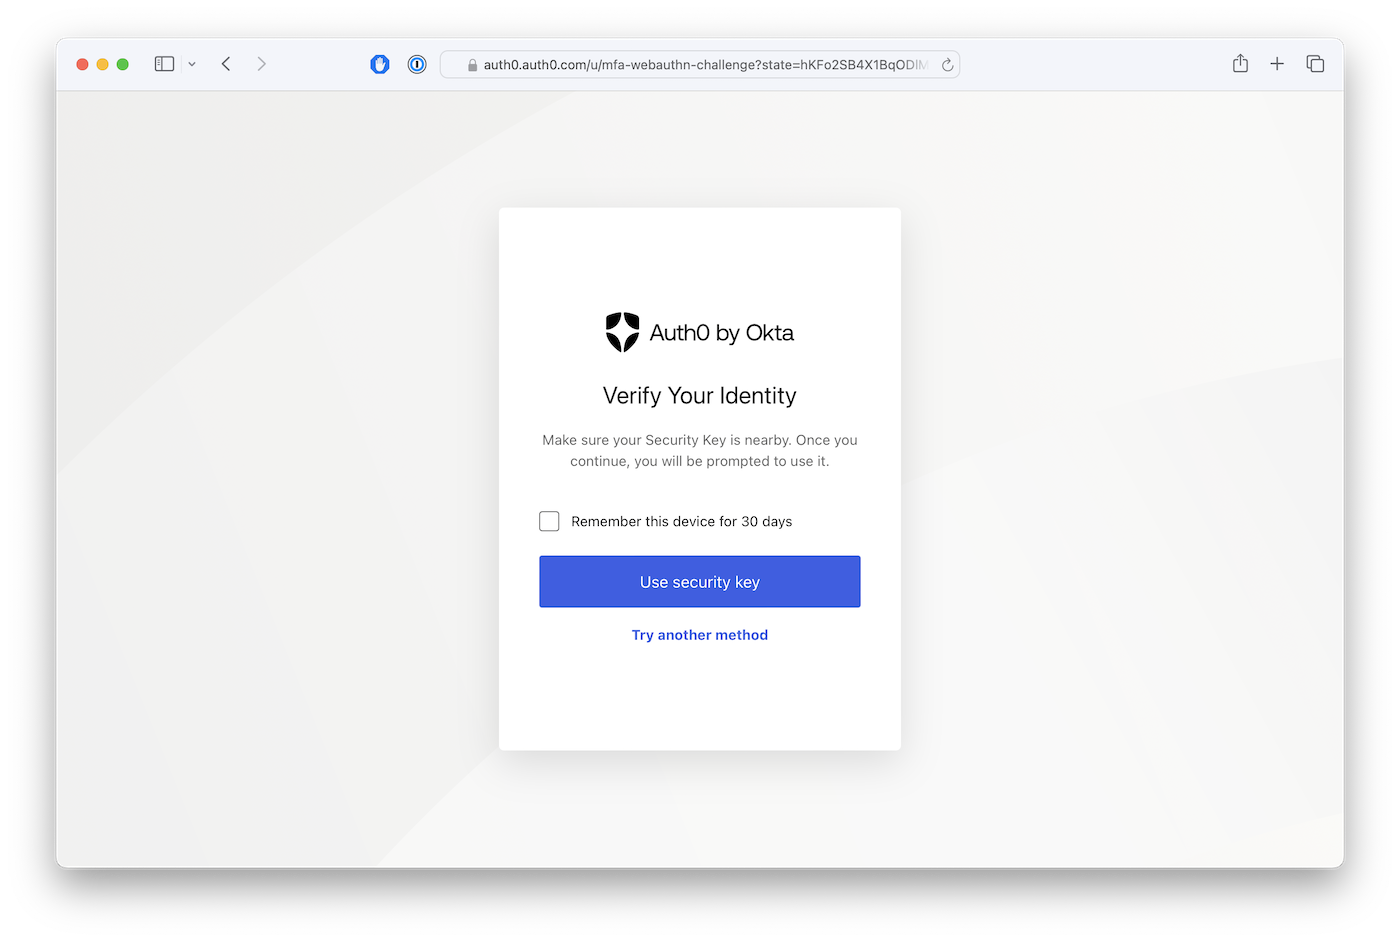\n\n## Conclusion\n\nAuth0 Actions provides a versatile and powerful toolkit to revolutionize your organization's MFA implementation. By harnessing the flexibility of Actions, you can create personalized, risk-based, and context-aware MFA workflows that enhance security without compromising user experience.\n\nThe ability to tailor MFA requirements based on user roles, risk assessments, and specific applications empowers you to implement a layered security approach. This means that you can enforce stricter MFA for high-risk scenarios, such as administrative access or sensitive data handling while offering a streamlined experience for regular users.\n\nAs you explore the possibilities of Auth0 Actions, remember that Customization is key. By experimenting with different workflows and conditions, you can fine-tune your MFA implementation to perfectly align with your organization's unique security requirements and user expectations.\n\nThanks for reading!","readTime":9,"formattedDate":"Jun 18, 2024"},{"path":"reasons-to-fall-in-love-with-passkeys","title":"Reasons to Fall in Love with Passkeys","heroImage":{"url":"https://images.ctfassets.net/23aumh6u8s0i/gADLmc9RdVnmfSaHOGRAA/76aa9da7043a15afee799d776a633b9d/value-passion","size":{"width":2386,"height":2744}},"category":["Identity \u0026 Security","Identity"],"authors":[{"metadata":{"tags":[],"concepts":[]},"sys":{"space":{"sys":{"type":"Link","linkType":"Space","id":"23aumh6u8s0i"}},"id":"7qC8LJD80VSx1qYcSdQ1Zh","type":"Entry","createdAt":"2021-08-23T12:59:46.069Z","updatedAt":"2025-01-08T14:00:38.100Z","environment":{"sys":{"id":"master","type":"Link","linkType":"Environment"}},"publishedVersion":42,"revision":6,"contentType":{"sys":{"type":"Link","linkType":"ContentType","id":"author"}},"locale":"en-US"},"fields":{"path":"juan-cruz-martinez","name":"Juan Cruz Martinez","avatar":{"metadata":{"tags":[{"sys":{"type":"Link","linkType":"Tag","id":"user"}}],"concepts":[]},"sys":{"space":{"sys":{"type":"Link","linkType":"Space","id":"23aumh6u8s0i"}},"id":"5b3YvfAb53h2I5U6uanww4","type":"Asset","createdAt":"2022-07-07T09:23:40.589Z","updatedAt":"2022-07-07T09:23:56.422Z","environment":{"sys":{"id":"master","type":"Link","linkType":"Environment"}},"publishedVersion":10,"revision":5,"locale":"en-US"},"fields":{"title":"jcm","description":"Juan Cruz Martinez","file":{"url":"//images.ctfassets.net/23aumh6u8s0i/5b3YvfAb53h2I5U6uanww4/f1dfa0e19f15f5df8eacd53f78a813f6/jcm.jpeg","details":{"size":29371,"image":{"width":400,"height":400}},"fileName":"jcm.jpeg","contentType":"image/jpeg"}}},"lastUpdatedBy":"Juan Cruz Martinez","email":"juan.martinez@okta.com","twitter":"https://twitter.com/bajcmartinez","github":"https://github.com/bajcmartinez","linkedin":"https://www.linkedin.com/in/bajcmartinez/","isPopular":true,"personalWebsite":"https://jcmartinez.dev/","type":"Auth0 Employee","jobTitle":"Staff Developer Advocate","description":"I stream, blog, and make youtube videos about tech stuff. I love coding, I love AI, and I love building stuff!"}}],"redirectTo":null,"isHiddenFromBlogPostGrid":false,"lang":"en","tags":["passkeys","identity","fido","passwordless"],"dateCreated":"2024-02-14T16:00","dateLastUpdated":null,"postContent":"This Valentine’s Day story is a love story, but like many love stories, it starts with a tragic breakup. Just yesterday I was writing a [breakup letter with passwords](https://auth0.com/blog/a-farewell-letter-to-passwords), it wasn’t easy, but necessary. Our relationship was going nowhere, and long gone were the days of butterflies and passion.\n\nWith my heart cautiously open, I decided to take a leap of faith. I'm embarking on a new love story, one built on trust, convenience, and affection, a relationship where I feel safe, where I can be myself, my face, my fingerprints, and not a random string.\n\nMy new love is passkeys, and maybe it’s again those butterflies in my stomach doing the thinking, but what’s not to be loved about passkeys?\n\nAs I write these words down, I want to celebrate what passkeys bring in for me, to our relationship, to my online identity, and to my protection:\n\n- **An Unbreakable Bond**: Passkeys, through the magic of public-key cryptography, forge an unbreakable connection between me and my data. It’s like a padlock secured by something uniquely mine, like my fingerprints, my face, or one of my secure devices.\n\n A bond so strong that it can resist brute-force attempts, a bond so unique that it is breach safe, and a bond so close that it is phishing resistant.\n- **Effortless Access**: I remember the frantic searches, the cold sweat dripping down my forehead as I desperately tried every password combination? With passkeys I can say goodbye to such anxieties! using a simple tap, a fingerprint, or a facial scan. Just like effortlessly unlocking my partner’s heart with a shared understanding.\n\n- **Always By My Side**: No more worrying about forgotten passwords or locked accounts. Passkeys work across different platforms and devices, ensuring I’m always connected to my loved ones, just like an invisible link that keeps us together.\n\n- **Sharing is Caring**: I can easily share my passkeys across my devices without compromising security. Passkeys offer seamless login experiences across devices and secure and convenient ways to grant access, just like sharing experiences in a healthy relationship.\n\n- **Uniquely Yours**: Since I can’t reuse a passkey, they are unique per online service and account. When I create a new passkey, it’s tied to that specific domain.\n\nI’m sharing my love story, in hopes it will inspire others. If you ever felt like me, and you think it’s time to ditch passwords and move on, [learn and adopt passkeys today!](https://a0.to/passkeys_blog).\n\n\u003cinclude src=\"LearnPasskeysCTA\"/\u003e","readTime":3,"formattedDate":"Feb 14, 2024"},{"path":"a-farewell-letter-to-passwords","title":"A Farewell Letter to Passwords","heroImage":{"url":"https://images.ctfassets.net/23aumh6u8s0i/sM737xO0lMZYEXuWf3qVQ/c001ded9b56cbd991c6e045ceb6d2e18/break_up_letter_hero.jpeg","size":{"width":1176,"height":1056}},"category":["Identity \u0026 Security","Identity","Passwords"],"authors":[{"metadata":{"tags":[],"concepts":[]},"sys":{"space":{"sys":{"type":"Link","linkType":"Space","id":"23aumh6u8s0i"}},"id":"7qC8LJD80VSx1qYcSdQ1Zh","type":"Entry","createdAt":"2021-08-23T12:59:46.069Z","updatedAt":"2025-01-08T14:00:38.100Z","environment":{"sys":{"id":"master","type":"Link","linkType":"Environment"}},"publishedVersion":42,"revision":6,"contentType":{"sys":{"type":"Link","linkType":"ContentType","id":"author"}},"locale":"en-US"},"fields":{"path":"juan-cruz-martinez","name":"Juan Cruz Martinez","avatar":{"metadata":{"tags":[{"sys":{"type":"Link","linkType":"Tag","id":"user"}}],"concepts":[]},"sys":{"space":{"sys":{"type":"Link","linkType":"Space","id":"23aumh6u8s0i"}},"id":"5b3YvfAb53h2I5U6uanww4","type":"Asset","createdAt":"2022-07-07T09:23:40.589Z","updatedAt":"2022-07-07T09:23:56.422Z","environment":{"sys":{"id":"master","type":"Link","linkType":"Environment"}},"publishedVersion":10,"revision":5,"locale":"en-US"},"fields":{"title":"jcm","description":"Juan Cruz Martinez","file":{"url":"//images.ctfassets.net/23aumh6u8s0i/5b3YvfAb53h2I5U6uanww4/f1dfa0e19f15f5df8eacd53f78a813f6/jcm.jpeg","details":{"size":29371,"image":{"width":400,"height":400}},"fileName":"jcm.jpeg","contentType":"image/jpeg"}}},"lastUpdatedBy":"Juan Cruz Martinez","email":"juan.martinez@okta.com","twitter":"https://twitter.com/bajcmartinez","github":"https://github.com/bajcmartinez","linkedin":"https://www.linkedin.com/in/bajcmartinez/","isPopular":true,"personalWebsite":"https://jcmartinez.dev/","type":"Auth0 Employee","jobTitle":"Staff Developer Advocate","description":"I stream, blog, and make youtube videos about tech stuff. I love coding, I love AI, and I love building stuff!"}}],"redirectTo":null,"isHiddenFromBlogPostGrid":false,"lang":"en","tags":["passkeys","passwords"],"dateCreated":"2024-02-13T17:05","dateLastUpdated":null,"postContent":"\n\u003cstyle\u003e\n @import url('https://fonts.googleapis.com/css2?family=Dancing+Script\u0026display=swap');\n \n #password-letter {\n font-family: 'Dancing Script', serif;\n font-size: 3rem;\n letter-spacing: 0.3rem;\n line-height: 4.2rem;\n background: #faf7d8 linear-gradient(#ccc 1px, transparent 1px) 0 2rem;\n background-size: 100% 4.2rem;\n padding: 3rem 3rem 1rem 3rem;\n box-shadow: 5px 5px 10px #aaa;\n margin: 1rem;\n }\n\n #password-letter p {\n margin-bottom: 4.2rem;\n }\n\u003c/style\u003e\n\n\u003cdiv id=\"password-letter\"\u003e\nTo my dear and beloved passwords,\n\nI’m writing you a letter, a good old fashioned letter, because I've come to realize that we need to take a break. It's not you, it's me. Or rather... it's the way we interact that's no longer working for me.\n\nI remember when we first met: you were everything I was looking for. I thought you were strong, secure, and always there for me. I felt safe knowing that access to my accounts was in your hands.\n\nBut over time, things have changed. I’ve noticed that I’m frequently forgetting about you and then I’ll find myself locked out of my accounts. Sometimes, I have to go through the trouble of trying to recover you following a complicated process.\n\nI also feel like you’re making things too hard on me. Sometimes I sit there and try to reach out to you... But, you keep on asking me for more and more! More characters, more symbols, not sequences! When does it all end? When I’m finally happy with you, you are not. I change. You change. But, sooner than later, we repeat this bad cycle all over again.\n\nDon't get me wrong. We go way back. We’ve tried to make this work... We may have tried too hard to tell you the truth. We met with different password managers to make our relationship work, thinking there must be a solution for us, but all that ended up being just a way to divert us from the underlying issues. We must admit that our paths no longer align and move on.\n\nThere is no easy way to say this so I’ll just say it: I met someone new. I wasn’t looking for it; it was an accident. I want to try a new things. I want new ways to secure my accounts. This new method is easy on me and knows me too well. I can be myself around it: my face, my fingerprints, my devices. This method is called passkeys and it unlocks the world for me like never before.\n\nI don’t know what the future holds, but I surely know what the past has: you. With passkeys... There’s this feeling in my gut that they might be the one and only for a long time.\n\nFor all that we’ve been, I wish to remain friends. You still are a big deal in my life and I'll still need you around. Our time together is not over yet, but it will be different than before. It will be faster, more secure, and phishing-resistant, which is something you'll never have.\n\nFarewell old friend,\n\u003cbr /\u003e\nAn Internet user\n\u003c/div\u003e\n","readTime":3,"formattedDate":"Feb 13, 2024"},{"path":"digital-identity-management","title":"Solving Digital Identity Management for Your SaaS Application","heroImage":{"url":"https://images.ctfassets.net/23aumh6u8s0i/lpo0yom5xDZonfNzlOkHc/c55bd864b5d7360bf8a2c307f99c8e40/Security_and_Identity_4x.jpg","size":{"width":1176,"height":1056}},"category":["Identity \u0026 Security","Identity","SaaS"],"authors":[{"metadata":{"tags":[],"concepts":[]},"sys":{"space":{"sys":{"type":"Link","linkType":"Space","id":"23aumh6u8s0i"}},"id":"7qC8LJD80VSx1qYcSdQ1Zh","type":"Entry","createdAt":"2021-08-23T12:59:46.069Z","updatedAt":"2025-01-08T14:00:38.100Z","environment":{"sys":{"id":"master","type":"Link","linkType":"Environment"}},"publishedVersion":42,"revision":6,"contentType":{"sys":{"type":"Link","linkType":"ContentType","id":"author"}},"locale":"en-US"},"fields":{"path":"juan-cruz-martinez","name":"Juan Cruz Martinez","avatar":{"metadata":{"tags":[{"sys":{"type":"Link","linkType":"Tag","id":"user"}}],"concepts":[]},"sys":{"space":{"sys":{"type":"Link","linkType":"Space","id":"23aumh6u8s0i"}},"id":"5b3YvfAb53h2I5U6uanww4","type":"Asset","createdAt":"2022-07-07T09:23:40.589Z","updatedAt":"2022-07-07T09:23:56.422Z","environment":{"sys":{"id":"master","type":"Link","linkType":"Environment"}},"publishedVersion":10,"revision":5,"locale":"en-US"},"fields":{"title":"jcm","description":"Juan Cruz Martinez","file":{"url":"//images.ctfassets.net/23aumh6u8s0i/5b3YvfAb53h2I5U6uanww4/f1dfa0e19f15f5df8eacd53f78a813f6/jcm.jpeg","details":{"size":29371,"image":{"width":400,"height":400}},"fileName":"jcm.jpeg","contentType":"image/jpeg"}}},"lastUpdatedBy":"Juan Cruz Martinez","email":"juan.martinez@okta.com","twitter":"https://twitter.com/bajcmartinez","github":"https://github.com/bajcmartinez","linkedin":"https://www.linkedin.com/in/bajcmartinez/","isPopular":true,"personalWebsite":"https://jcmartinez.dev/","type":"Auth0 Employee","jobTitle":"Staff Developer Advocate","description":"I stream, blog, and make youtube videos about tech stuff. I love coding, I love AI, and I love building stuff!"}}],"redirectTo":null,"isHiddenFromBlogPostGrid":false,"lang":"en","tags":["saas","identity","management"],"dateCreated":"2024-01-17T14:00","dateLastUpdated":null,"postContent":"For today’s SaaS builders, the pressure to rapidly innovate and seamlessly scale can be intense.\n\nEvolving macroeconomic pressures mean companies building SaaS applications need to do more with less. And every B2C innovation amps SaaS customer expectations. AI has further transformed the competitive landscape, presenting both an opportunity for product differentiation and a threat. [There’s just more that attackers can do now](https://www.securitymagazine.com/articles/99832-study-finds-increase-in-cybersecurity-attacks-fueled-by-generative-ai) — and they can do it faster. \n\nSaaS companies also need to do more — and they need to see speed and security gains just so customers can keep up with the rate of change. And honestly, they need to deliver more than what’s expected in order to stay relevant in this fast-paced society. \n\nSince SaaS is in this ever-evolving space, companies must keep up at the business level to stay ahead of their competition. In turn, developers must continuously learn new back-end methods to keep up with the new SaaS technologies.\n\nLet us show you how Auth0 by Okta keeps up and makes your life easier.\n\n## How Auth0 by Okta can help your SaaS\n\nRobust identity management is crucial for ensuring seamless user experiences, maintaining data security, and complying with regulatory requirements. Auth0, the leading identity and access management (IDaaS) platform, stands out as the ideal solution for SaaS applications due to its comprehensive features, ease of use, and robust security measures.\n\nAuth0 simplifies the authentication and authorization process for SaaS applications, enabling developers to focus on building core functionalities rather than building their own identity solutions and managing identity infrastructure.\n\n[Universal Login](https://auth0.com/features/universal-login) provides a centralized and unified login experience for users across all your applications, supporting a wide range of authentication flows, devices, and screen sizes. Universal Login enhances user experience and simplifies the integration process for developers. With Universal Login, users can sign in using [passkeys](https://auth0.com/docs/authenticate/database-connections/passkeys) or use their existing credentials from social media platforms, enterprise directories, or email addresses, eliminating the need to create separate accounts for each application.\n\nIn addition to Universal Login, Auth0 provides a comprehensive set of SDKs for various programming languages and frameworks, making it easy for developers to integrate Auth0 into their applications. These SDKs handle everyday authentication tasks, such as login forms and password resets, ensuring consistent and secure user experiences across applications. For more customized scenarios, Auth0's powerful APIs provide granular control over authentication and authorization flows, allowing developers to tailor them to specific requirements and integrate seamlessly with third-party services.\n\n**Here are some specific benefits of using Auth0 for SaaS applications:**\n\n* **Streamlined user onboarding**: Universal Login eliminates the need for users to create separate accounts for each application, making it easier for them to get started.\n* **Improved user experience**: A seamless and consistent login experience across all applications enhances user satisfaction and reduces friction.\n* **Customizability**: The Universal Login page can be customized to match your brand and needs. At the same time, [Auth0 Actions](https://auth0.com/features/actions) enable developers to extend Auth0 beyond its core functionality and incorporate custom logic such as integrations with APIs (CRMs, billing, email automation, marketing tools, etc) or write custom policies into the authentication and authorization flows.\n* **Reduced development time**: Developers can save time and effort using pre-built Universal Login components and SDKs, simplifying the integration process.\n* **Global or regional scalability**: Auth0's public and private cloud-based infrastructure scale seamlessly to accommodate user demand internationally and fluctuating traffic spikes.\n* **Security Center and Log Streaming**: Auth0 provides robust security features to protect your SaaS application users and your business. With Attack protection features such as bot detection and breached password detection, you can offer comprehensive protection against credential-stuffing attacks. You can also offer streamlined security and follow compliance with MFA and RBAC. In addition, you can monitor your applications and detect identity-driven attacks with Security Center and integrate activity logs with your security toolkit with Log Streaming.\n* **Expanded support for various platforms**: Universal Login and SDKs are available for various programming languages and frameworks, enabling developers to build secure and scalable SaaS applications across various platforms.\n* **Future-Proof Features**: Auth0 continuously invests in innovation, incorporating the latest security and authentication technologies. By integrating with Auth0, SaaS applications can leverage these future-proof features, ensuring they remain secure and compliant with evolving industry standards.\n\n## B2B Ready with Auth0 Organizations\n\nFor some SaaS applications, the B2B aspect is baked into the core design, with a clear understanding of the requirements for managing users from different organizations. However, for many SaaS applications, the need to support B2B scenarios may arise as a requirement that needs quick implementation. This can add complexity to development and require significant effort to integrate and maintain separate identity management systems for each organization.\n\nAuth0 addresses this challenge with [Auth0 Organizations](https://auth0.com/organizations) by providing a unified platform for managing B2B relationships, enabling SaaS applications to efficiently onboard, manage, and secure user identities across multiple organizations.\n\nAuth0 customers can use Organizations to:\n\n* Represent their business customers and partners in Auth0 and manage their membership.\n* Allow your business customers to securely manage and customize how their end-users access apps, with the ability to add as many organizations as they need to their Customer Identity Cloud (Private Cloud) tenant.\n* Configure branded, federated login flows for each business.\n* Build administration capabilities into their products, using Organizations APIs, so that those businesses can manage their own organizations.\n* Supports your multi-tenant product out-of-the-box, conveniently serving from a single Customer Identity Cloud tenant.\n\n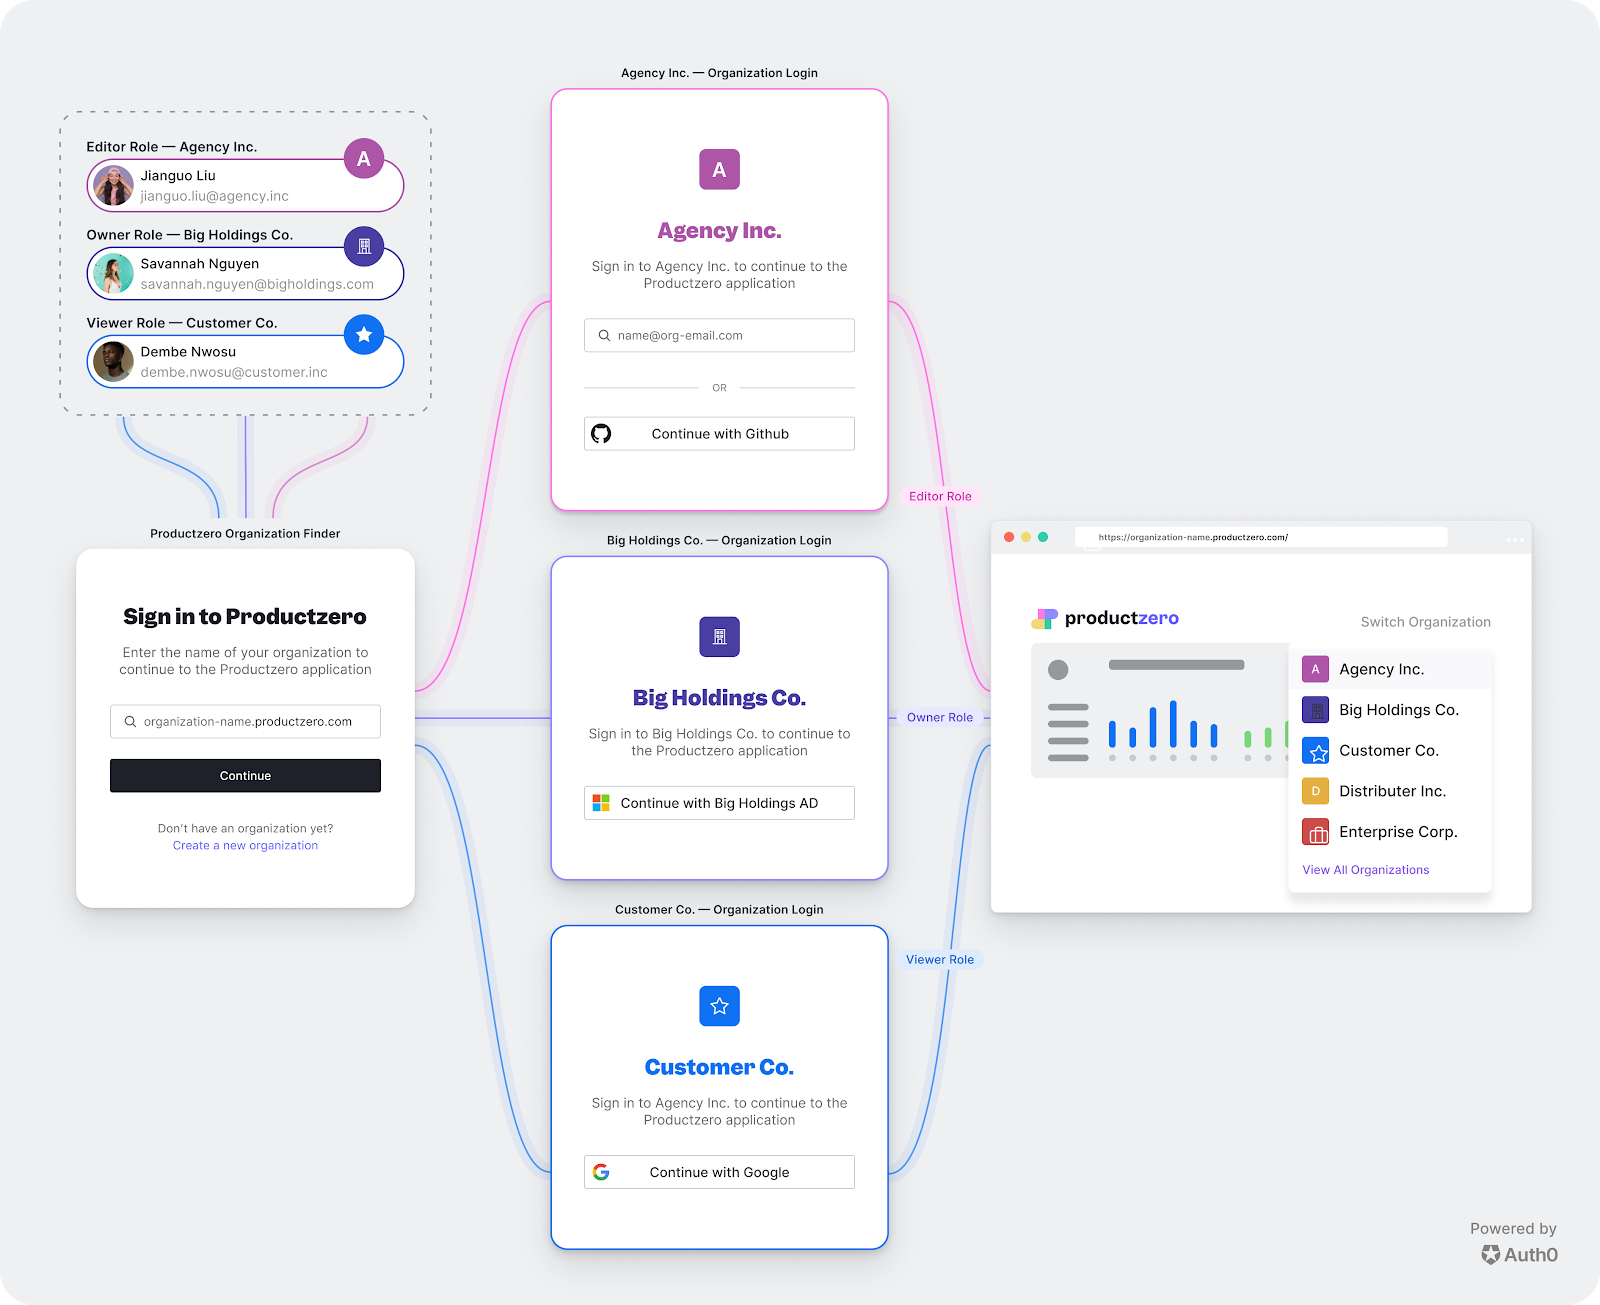\n\n## Enterprise Ready\n\nIn the realm of enterprise-grade SaaS applications, the need for comprehensive identity management extends far beyond traditional user authentication. Enterprises demand a robust solution that seamlessly integrates with existing IT infrastructure, manages complex access policies, and complies with stringent security standards.\n\nAuth0 enables SaaS applications to connect seamlessly with enterprise systems without building custom integrations, eliminating the need for developers to maintain multiple integrations and reducing development time and effort by providing:\n\n* **Seamless Integration with Enterprise Identity Systems**: Auth0 Organizations seamlessly integrate with existing [enterprise identity providers](https://auth0.com/docs/authenticate/identity-providers/enterprise-identity-providers), such as Active Directory, LDAP, and SAML IdPs.\n* **Single Sign-On (SSO) for Enterprise Applications**: Auth0 Organizations supports SSO for enterprise applications, enabling employees to sign in to multiple applications using a single set of credentials. This streamlines the user experience and improves productivity.\n* **Activity Auditing for Enterprise Compliance**: Auth0 provides detailed activity auditing for enterprise compliance, allowing organizations to track user activity and access patterns. This auditing functionality helps to identify suspicious activity, investigate potential security breaches, and ensure compliance with regulatory requirements.\n\n## Built-in Security\n\nWith built-in security features and continuous innovation, Auth0 provides developers with the tools and expertise to build secure SaaS applications that safeguard user identities, sensitive data, and applications from a wide range of threats. Auth0's security features are not only beneficial to developers; they are also a key selling point for SaaS providers who want to ensure their customer’s data and applications are safe and secure.\n\nHere are some of the built-in security features of the Auth0 platform:\n\n### Attack Protection\n\nAuth0's attack protection features can detect and stop malicious attempts to access your application by blocking traffic from specific IPs, displaying CAPTCHAs, and more.\n\nAuth0 offers the following attack protection options:\n\n* **[Bot Detection](https://auth0.com/docs/secure/attack-protection/bot-detection)**: Bots, automated programs often employed by malicious actors performing credential-stuffing attacks, pose a significant threat to online applications and services. Auth0's bot detection capabilities utilize sophisticated techniques to identify and block these bots, preventing them from accessing your applications and disrupting user experiences.\n* **[Suspicious IP Throttling](https://auth0.com/docs/secure/attack-protection/suspicious-ip-throttling)**: Blocks traffic from any IP address that rapidly attempts too many logins or signups. This helps protect your applications from high-velocity attacks that target multiple accounts.\n* **[Brute Force Protection](https://auth0.com/docs/secure/attack-protection/brute-force-protection)**: Brute force attacks involve repeatedly attempting to guess user login credentials, often automated through scripts or botnets. To combat these attacks, Auth0's brute force protection feature limits the number of failed login attempts from a single IP address. Once a threshold of failed attempts is reached, the IP address is temporarily blocked, preventing further attempts and mitigating the risk of successful brute-force attacks.\n* **[Breached Password Detection](https://auth0.com/docs/secure/attack-protection/breached-password-detection)**: Auth0 tracks large security breaches that occur on major third-party sites. If Auth0 identifies that any of your users’ credentials were part of a breach, the breached password detection security feature triggers keeping your accounts safe.\n\n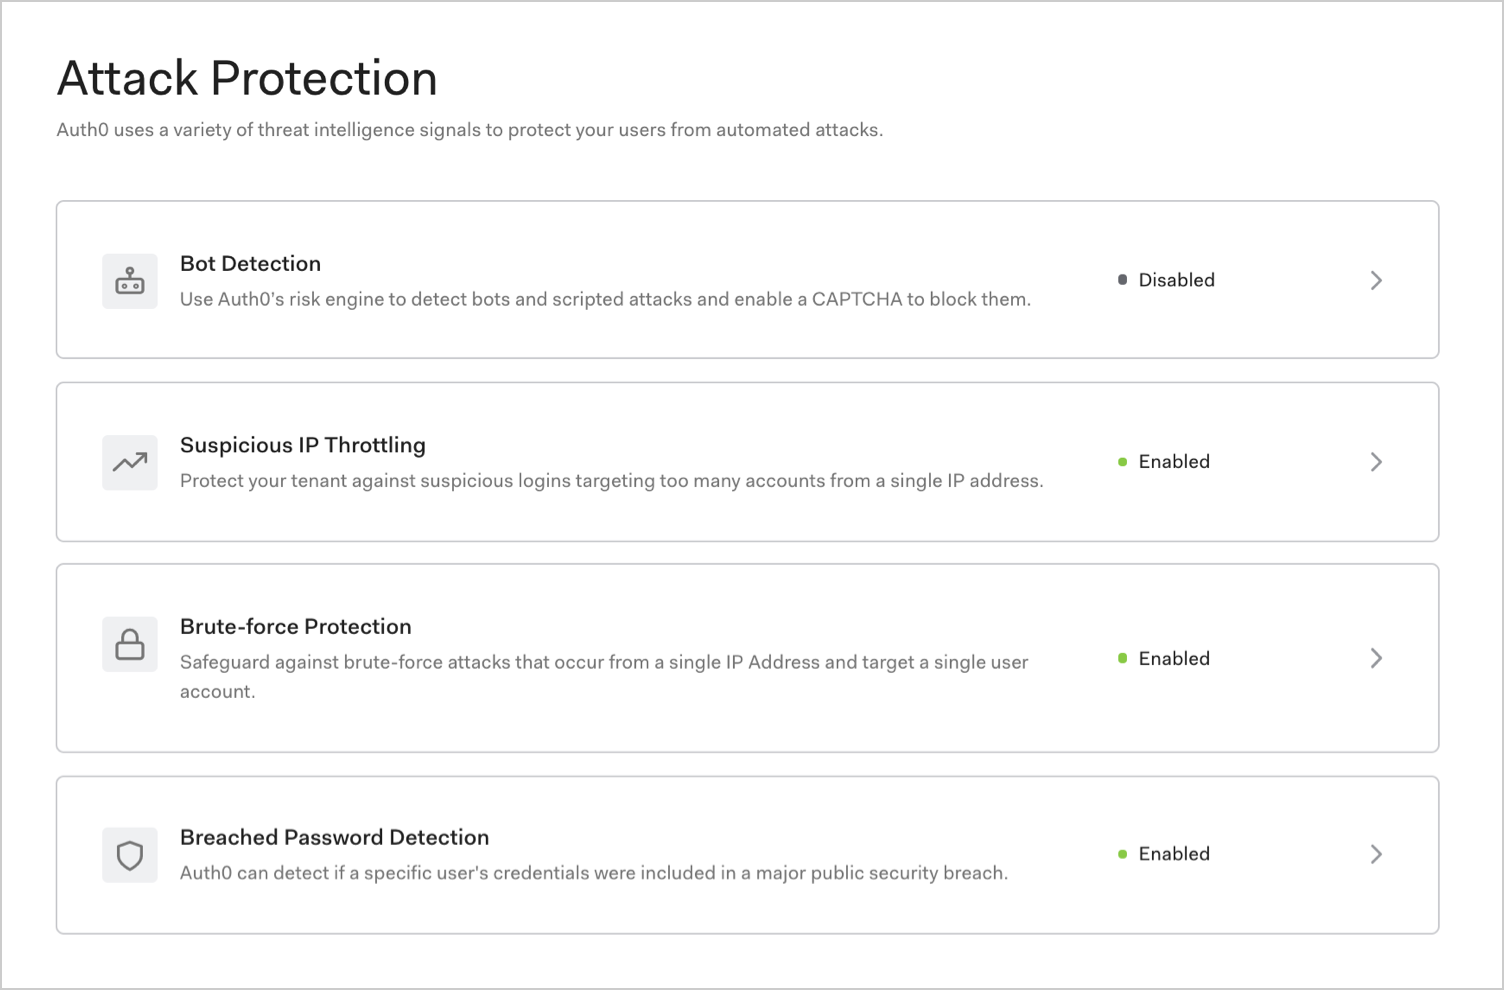\n\nAuth0's attack protection features are based on industry-standard security protocols, and they can help you protect your applications from a wide range of attack vectors. To implement Auth0's attack protection features, you can integrate Auth0 into your application. Once integrated, Auth0 will automatically protect your application from attacks.\n\n## Extensibility\n\nAuth0 goes beyond providing a robust authentication and authorization platform; it also offers a wide range of extensibility capabilities, enabling developers to tailor the platform to their specific application requirements and integrate it with their existing infrastructure.\n\n### Auth0 Actions\n\n[Auth0 Actions](https://auth0.com/features/actions) is a powerful extension mechanism that empowers developers to modify Auth0's authentication and authorization flows. These JavaScript functions can be executed at various points in the authentication process, allowing developers to:\n\n* **Modify access tokens with custom claims**: Add, update, or remove custom claims to access tokens, enabling granular control over user permissions and data sharing.\n* **Integrate with external services**: Connect to external services like CRM systems, customer data platforms, and payment gateways to enrich user profiles and facilitate seamless user journeys.\n* **Enhance user experiences**: Personalize the login and registration experience, customize error messages, and provide user context-aware support.\n* **Implement custom logic**: Add custom logic to handle specific scenarios, such as verifying two-factor authentication codes or managing user roles.\n\nYou can write your own custom Auth0 Actions writing JavaScript code or browse and install any Action from a curated collection at the [Auth0 Marketplace](https://marketplace.auth0.com/). In the marketplace, you can find Actions providing a wide range of functionalities, such as:\n\n* **Social login integrations**: Connect with popular social networks like Facebook, Google, and LinkedIn to facilitate user authentication and signup.\n* **Identity Proofing**: Identity proofing allows you to verify a user's real-world identity based on life history (a credit report), biometrics (a facial scan), and other factors before granting access.\n* **Compliance and security solutions**: Implement compliance solutions like fraud detection and data privacy controls.\n\nAnd much more...\n\n## Get Started with Our SaaS Starter Kit\n\nEmbarking on developing a SaaS application can be an exciting yet challenging endeavor. To simplify the process and accelerate time to market, Auth0 offers a [SaaS Starter Kit](https://developer.auth0.com/resources/guides/web-app/nextjs/saas-basic-authentication) that provides a jumpstart for building secure and scalable SaaS applications.\n\nThe SaaS Starter Kit is a guide and boilerplate you can use to build a Next.js SaaS application tailored for the following use cases:\n\n* SaaS Multi-tenancy with Auth0 Organizations in a single Auth0 tenant.\n* A tiered pricing model using Auth0 Actions and User Profile[ App Metadata](https://auth0.com/docs/manage-users/user-accounts/metadata#metadata-types).\n * Support Trial, Personal, Teams, and Enterprise plans in a SaaS application.\n* Trial plan expiration and user conversion using Auth0 Actions.\n * Use Actions to update user profile data, enrich an ID or Access Token with custom claims, or call 3rd-party APIs, such as the Stripe API, to manage user subscription status.\n* Self-service SSO for business users using the Auth0 Management API and Enterprise connections with support for OIDC connections.\n* Self-service User Management using the Auth0 Management API.\n\nWith the [Auth0 SaaS Starter Kit](https://developer.auth0.com/resources/guides/web-app/nextjs/saas-basic-authentication) as your foundation, you can build secure, scalable, and feature-rich SaaS applications that provide a seamless user experience while adhering to industry best practices for authentication and authorization.\n\n## The Customer Identity Platform for Startups\n\n[Auth0 for Startups](https://auth0.com/startups) is a program that provides the convenience and security of Auth0 by Okta to eligible startup customers FREE for a year, so you can get your SaaS application up and running quickly while keeping your users’ data secure.\n\nSome of the benefits of the program are:\n\n* Up to 100k Monthly Active Users\n* Up to 5 Enterprise Connections\n* All the B2B features you need to scale your business\n\n\u003e Learn more and apply for the program in[ the customer identity platform for startups](https://auth0.com/startups).","readTime":11,"formattedDate":"Jan 17, 2024"},{"path":"using-nextjs-server-actions-to-call-external-apis","title":"Using Next.js Server Actions to Call External APIs","heroImage":{"url":"https://images.ctfassets.net/23aumh6u8s0i/6pjUKboBuFLvCKkE3esaFA/5f2101d6d2add5c615db5e98a553fc44/nextjs.jpeg","size":{"width":1176,"height":1056}},"category":["Developers","Tutorial","Next.js"],"authors":[{"metadata":{"tags":[],"concepts":[]},"sys":{"space":{"sys":{"type":"Link","linkType":"Space","id":"23aumh6u8s0i"}},"id":"7qC8LJD80VSx1qYcSdQ1Zh","type":"Entry","createdAt":"2021-08-23T12:59:46.069Z","updatedAt":"2025-01-08T14:00:38.100Z","environment":{"sys":{"id":"master","type":"Link","linkType":"Environment"}},"publishedVersion":42,"revision":6,"contentType":{"sys":{"type":"Link","linkType":"ContentType","id":"author"}},"locale":"en-US"},"fields":{"path":"juan-cruz-martinez","name":"Juan Cruz Martinez","avatar":{"metadata":{"tags":[{"sys":{"type":"Link","linkType":"Tag","id":"user"}}],"concepts":[]},"sys":{"space":{"sys":{"type":"Link","linkType":"Space","id":"23aumh6u8s0i"}},"id":"5b3YvfAb53h2I5U6uanww4","type":"Asset","createdAt":"2022-07-07T09:23:40.589Z","updatedAt":"2022-07-07T09:23:56.422Z","environment":{"sys":{"id":"master","type":"Link","linkType":"Environment"}},"publishedVersion":10,"revision":5,"locale":"en-US"},"fields":{"title":"jcm","description":"Juan Cruz Martinez","file":{"url":"//images.ctfassets.net/23aumh6u8s0i/5b3YvfAb53h2I5U6uanww4/f1dfa0e19f15f5df8eacd53f78a813f6/jcm.jpeg","details":{"size":29371,"image":{"width":400,"height":400}},"fileName":"jcm.jpeg","contentType":"image/jpeg"}}},"lastUpdatedBy":"Juan Cruz Martinez","email":"juan.martinez@okta.com","twitter":"https://twitter.com/bajcmartinez","github":"https://github.com/bajcmartinez","linkedin":"https://www.linkedin.com/in/bajcmartinez/","isPopular":true,"personalWebsite":"https://jcmartinez.dev/","type":"Auth0 Employee","jobTitle":"Staff Developer Advocate","description":"I stream, blog, and make youtube videos about tech stuff. I love coding, I love AI, and I love building stuff!"}}],"redirectTo":null,"isHiddenFromBlogPostGrid":false,"lang":"en","tags":["javascript","release","announcement","next.js"],"dateCreated":"2023-12-01T15:43","dateLastUpdated":null,"postContent":"**Next.js** is a React framework that enables static site generation (SSG), server-side rendering (SSR), and incremental static regeneration (ISR). It is known for its performance, scalability, and ease of use.\n\nOne of the most exciting new features in Next.js 14 is Server Actions. Server Actions allow you to execute server-side code without creating dedicated API routes.\nServer Actions can be helpful in various tasks, such as fetching data from external APIs, performing business logic, or even updating your database.\n\n\u003cAmpContent\u003e\n\u003camp-youtube\n data-videoid=\"z4JnIYIrvSE\"\n layout=\"responsive\"\n width=\"480\" height=\"270\"\u003e\n\u003c/amp-youtube\u003e\n\u003c/AmpContent\u003e\n\u003cNonAmpContent\u003e\n\u003cdiv class='embed-container' style=\"position: relative; padding-bottom: 56.25%; height: 0; overflow: hidden; max-width: 100%;margin-bottom:40px;\"\u003e\u003ciframe style=\"position: absolute; top: 0; left: 0; width: 100%; height: 100%;\" src='https://www.youtube.com/embed/z4JnIYIrvSE' frameborder='0' allowfullscreen\u003e\u003c/iframe\u003e\u003c/div\u003e\n\u003c/NonAmpContent\u003e\n\n## Understanding Next.js Server Actions\n\n[Server Actions](https://nextjs.org/docs/app/api-reference/functions/server-actions) have been a part of Next.js since version 13. However, in version 14 of the framework, Server Actions are stable and incorporated by default as a framework feature.\n\nYou can use Server Actions for a variety of use cases, but they are well-suited for the following ones:\n\n- **Fetching data from external APIs**: Server Actions can fetch data from external APIs without compromising performance or security.\n- **Performing business logic**: Server Actions can perform business logic that requires server execution, such as validating user input or processing payments.\n- **Updating your database**: Server Actions can update your database without creating separate API routes.\n\n### How Server Actions work\n\nNext.js Server Actions are asynchronous JavaScript functions that run on the server in response to user interactions on the client. Server Actions are made possible by a number of complex technical processes, but the basic idea is as follows:\n\n1. In the client, a user action or business logic condition triggers a function call to a Server Action. For the developer, this is no different than calling an async function.\n2. Next.js will serialize the request parameters (such as any form data or query string parameters) and send them to the server.\n3. The server will then deserialize the request parameters and execute a function that represents the Server Action.\n4. Once the Server Action has finished executing, the server will serialize the response and send it back to Next.js. Next.js will then deserialize the response and send it back to the front end.\n5. When the promise resolves, the front end will continue its client-side execution.\n\n### The syntax for defining Server Actions\n\nYou can define Server Actions in two places:\n\n- In the server component that uses it.\n\n```jsx\n// app/page.ts\nexport default function ServerComponent() {\n async function myAction() {\n 'use server'\n // ...\n }\n}\n```\n\n- Or in a separate file for reusability.\n\n```jsx\n// app/actions.ts\n'use server'\n \nexport async function myAction() {\n // ...\n}\n```\n\n### How to invoke Server Actions\n\nTo invoke a Server Action in Next.js, you can use one of the following methods:\n\n1. Using the `action` prop.\n\nYou can use the `action` prop to invoke a Server Action from any HTML element, such as a `\u003cbutton\u003e`, `\u003cinput type=\"submit\"\u003e`, or `\u003cform\u003e`.\n\nFor example, the following code will invoke the `likeThisArticle` Server Action when the user clicks the \"Add to Shopping Cart\" button:\n\n```html\n\t\u003cbutton type=\"button\" action={likeThisArticle}\u003eLike this article\u003c/button\u003e\n```\n\n2. Using the `useFormState` hook.\n\nYou can use the `useFormState` hook to invoke a Server Action from a `\u003cform\u003e` element.\n\nFor example, the following code will invoke the `addComment` Server Action when the user submits the form:\n\n```javascript\n'use client'\n\nimport { useFormState } from 'react';\nimport { addComment } from '@/actions/add-comment';\n\nexport default function ArticleComment({ initialState }) {\n const [state, formAction] = useFormState(addComment, initialState)\n\n return (\n \u003cform action={formAction}\u003e\n Add Comment\n \u003c/button\u003e\n )\n}\n```\n\n3. Using the `startTransition` hook.\n\nYou can use the `startTransition` hook to invoke a Server Action from any component in your Next.js application.\n\nFor example, the following code will invoke the `addComment` Server Action.\n\n```javascript\n\t'use client'\n\t\n\timport { useTransition } from 'react';\n\timport { addComment } from '@/actions/add-comment';\n\t\n\texport default function ArticleComment() {\n\t const [isPending, startTransition] = useTransition()\n\t\n\t\tfunction onAddComment() {\n\t\t\tstartTransition(() =\u003e {\n\t\t\t\taddComment('This article is nothing but great!');\n\t });\n\t\t}\n\t\n\t return (\n\t \u003cbutton onClick={() =\u003e onAddComment()}\u003e\n\t Add Comment\n\t \u003c/button\u003e\n\t )\n\t}\n```\n\nThe `startTransition` hook ensures that the state update batches with other state updates that are happening at the same time. Using `startTransition` can improve the performance of your application by reducing the number of re-renders that are required.\n\n### Which method should I use?\n\nThe best method for invoking a Server Action depends on your specific needs. If you need to invoke a Server Action from a `\u003cform\u003e` element, then use the `formAction` prop. If you need to invoke a Server Action from a component, then use the `startTransition` hook.\n\n## Sending Data to an External API Using Server Actions\n\nNow that we have a basic understanding of Server Actions let’s build some real-world examples, like using Server Actions to send data to a third-party API.\n\nTo start, you’ll create a Server Action that will trigger from a form submission. As you'll see later, this differs from other functions triggered by JavaScript function calls.\n\nCreate a new Server Action, `addComment`. This new function will expect one single parameter of the type [FormData](https://developer.mozilla.org/en-US/docs/Web/API/FormData/FormData); here is an example:\n\n```javascript\n// /services/actions/comment\n'use server'\n\nexport async function addComment(formData) {\n const articleId = formData.get('articleId');\n const comment = formData.get('comment');\n const response = await fetch(`https://api.example.com/articles/${articleId}/comments`, {\n method: 'POST',\n headers: {\n 'Content-Type': 'application/json',\n },\n body: JSON.stringify({ comment }),\n });\n const result = await response.json();\n return result;\n}\n```\n\nThat’s all you need to do to create a Server Action. Let’s focus on invoking this function when the user submits a form.\n\nLet’s create a new component that will render the “Add Comment” form:\n\n```javascript\nimport { addComment } from '@/services/actions/comment'\n \nexport default async function ArticleComment(props) {\n return (\n \u003cform action={addComment}\u003e\n \u003cinput type=\"text\" name=\"articleId\" value={props.articleId} /\u003e\n \u003cinput type=\"text\" name=\"comment\" /\u003e\n\t\t\t\u003cbutton type=\"submit\"\u003eAdd Comment\u003c/button\u003e\n \u003c/form\u003e\n )\n}\n```\n\nDone! You have a fully functional Server Action triggered from a form submission, but if you tried it out, you’ll notice that it looks unresponsive, meaning that the user is not aware that something is happening as there is no “loading” or “saving” activity shown. Let’s fix that next.\n\n### Displaying the loading state\n\nWe can use the `useFormStatus` hook to display a loading state while a form is being submitted. As a hook, it can only live in a client component and can only be used as a child of a `form` element using a Server Action.\n\nLet’s now update our current component, `ArticleComment`, and replace the `button` with a custom component of our creation called `AddCommentButton`.\n\n```javascript\nimport { addComment } from '@/services/actions/comment'\nimport { AddCommentButton } from '@/components/AddCommentButton'\n \nexport default async function ArticleComment(props) {\n return (\n \u003cform action={addComment}\u003e\n \u003cinput type=\"text\" name=\"articleId\" value={props.articleId} /\u003e\n \u003cinput type=\"text\" name=\"comment\" /\u003e\n\t\t\t\u003cAddCommentButton /\u003e\n \u003c/form\u003e\n )\n}\n```\n\nAnd, of course, you’ll have to create such a component:\n\n```javascript\n'use client'\n \nimport { useFormStatus } from 'react-dom'\n \nexport function AddCommentButton() {\n const { pending } = useFormStatus();\n \n return (\n \u003cbutton type=\"submit\" aria-disabled={pending}\u003e\n Add\n \u003c/button\u003e\n )\n}\n```\n\nNow, when the form is submitted, the new status will be reflected in the variable `pending` and will adjust the `button` component accordingly. You can expand this code to provide more visual feedback to the user and create a better user experience.\n\n## Submitting Files to Server Actions\n\nIf you need to send more than JSON serializable data, like texts and numbers, or more specifically, if you need to submit and handle file uploads, don’t worry. Server Actions have you covered!\n\nYou can submit files to Server Actions the same way you have worked with Server Actions so far, by using a form submission with an `\u003cinput type=\"file /\u003e` or libraries like `dropzone`. There’s nothing especially different that needs to happen on the client side for it to work.\n\nOn the server side, things could be different depending on your needs. For example, you could save the file, transform the file, etc. The process to retrieve the file would be the same.\n\nLet’s look at a sample Server Action that handles a file upload and transmits the file to an API using a stream:\n\n```javascript\n// /services/actions/upload-file\n'use server'\n\nexport async function uploadFile(formData) {\n const comment = formData.get('file');\n const arrayBuffer = await file.arrayBuffer();\n const buffer = new Uint8Array(arrayBuffer);\n await new Promise((resolve, reject) =\u003e {\n upload_stream({}, function (error, result) {\n if (error) {\n reject(error);\n return;\n }\n resolve(result);\n })\n .end(buffer);\n });\n}\n```\n\nIt is that simple!\n\n\u003e You must know that there is a size limitation imposed on Server Actions, which is 1 MB by default, though it can be customized. For more information, check the official [Server Action’s size limitation](https://nextjs.org/docs/app/api-reference/functions/server-actions#size-limitation) documentation.\n\n## Best Practices for Using Server Actions\n\nWe have covered so much already about Server Actions, but the topic is so extensive that it won't fit in a single article. At least it wouldn't be practical, but I don't want to leave you without first sharing some of my recommendations and best practices to work with Server Actions and stay further. I also share some tips on accessing protected resources using Auth0 and Next.js Server Actions.\n\n- **Decouple of Server Actions**. As we mentioned above, it is possible to write Server Actions in a separate file, but in case you don’t expect to re-utilize your function, you could write the same in a Server Component. But, as we learned from experience or the book \"Clean Code\", separation of concerns is important to keep the code easier to understand, maintain, reuse, and test. So, try to keep a separation between components and actions.\n- **Don’t disregard the client side.** As the line between server and client blurs in the magic of Server Components, it can be easy to forget or disregard the proper handling of the UI. For example, moving from validations to the server could reduce a few lines of code but sacrifice user experience.\n- **Cache the results of Server Actions.** If a Server Action returns data that is not frequently changing, you can cache the results so that they do not have to be fetched from the server every time. Avoiding unnecessary data fetching can improve the performance of your application.\n- **Use Server Actions to handle errors gracefully.** If a Server Action fails, you should handle the error gracefully and return a meaningful error message to the user.\n- **Protect your Server Actions.** When it comes to security, don’t think of your Server Actions any differently than you would if the same code lived in an API endpoint. Server Actions need to be secured and protected from unauthorized access.\n\n## Calling a Protected API Endpoint\n\nProtected APIs are not publicly accessible and require some form of authentication or authorization before they can be accessed. This is important for protecting sensitive data and preventing unauthorized access.\n\nThere are multiple mechanisms you can implement to protect APIs, for example:\n\n- **API Keys:** API keys are a simple and effective way to protect APIs. They are secret strings that are given to authorized clients. When a client sends a request to an API, it must include its API key in the request. The API will then check the API key to ensure that it is valid before processing the request.\n- **Access Tokens:** Access tokens are another way to protect APIs. They are short-lived tokens that are generated by an authentication server and are sent to an application in response to a successful user authentication. The application then uses the access token to access the API by sending it in its requests. Access tokens can be implemented in various forms, with a popular option being [JSON Web Tokens (JWTs)](https://jwt.io).\n\n### API Keys to protect API endpoints\n\nAn API key is a secret string of characters that is used to identify and authenticate an application when making requests to an API. API keys are typically used to protect APIs from unauthorized access and to track usage.\n\nWhile API keys can identify a specific project or application making an API call, they do not identify the individual user making the request. This is a significant security limitation, as it allows anyone with the API key to access the API, regardless of who they are.\n\nTo learn more about API keys and how OAuth 2.0 can help mitigate some of its drawbacks, I recommend reading [Why You Should Migrate to OAuth 2.0 from API Keys](https://auth0.com/blog/why-migrate-from-api-keys-to-oauth2-access-tokens/)\n\nAPI keys implementation varies from project to project, so depending on how your target API implements API keys, it may vary the way you use Server Actions to make calls to the API.\n\nLet’s rebuild our `addComment` Server Action to pass an API key to the target API.\n\n```javascript\n// /services/actions/comment\n'use server'\n\nexport async function addComment(formData) {\n\tconst articleId = formData.get('articleId');\n\tconst comment = formData.get('comment');\n const response = await fetch(`https://api.example.com/articles/${articleId}/comments`, {\n method: 'POST',\n headers: {\n 'Content-Type': 'application/json',\n 'x-api-key': process.env.CMS_API_KEY // 👈 New Code\n },\n body: JSON.stringify({ comment }),\n });\n const result = await response.json();\n return result;\n}\n```\n\nThe server function remains the same, with the exception of passing a new parameter on the request headers. In the example above, the header name is `x-api-key`, but it may be different depending on the API.\n\nBecause Server Actions run in the server, it is safe to read the API keys from environment variables, though you should make sure your environment provider is safe to do so. For example, if you deploy using Vercel, all [environmental variable values](https://vercel.com/docs/projects/environment-variables) are automatically encrypted at rest.\n\nAPI keys are great for multiple scenarios, but sometimes, your API needs to be aware of the user performing the action. For example, our current API is not aware of who is creating the comment, and though it could be added as a payload, it wouldn’t be safe if we couldn’t verify that it was the user who performed the operation.\n\n### Access Tokens to protect API endpoints\n\nAccess tokens are used in token-based authentication, enabling applications to access APIs. The application receives an access token following a successful user authentication and authorization process. This token is then passed as a credential when making API calls. The presented token informs the API that the bearer has been authorized to access the API and perform specific actions defined by the scope granted during authorization.\n\nSo we can break the process in a two-step process:\n\n- Authentication: Identifying a user and retrieving an access token\n- Calling an endpoint: Using the received and verifiable access token to call the API endpoint\n\nThe process of authenticating, generating, verifying, and securely handling Access Tokens is a daunting and time-consuming task where a mistake can compromise the data and safety of your systems, so it is common for application builders to rely on existing authentication and authorization providers, for example, [Auth0](https://auth0.com/).\n\nAuthentication is outside the scope of this guide, but if you want to learn more about authentication or you want to know how to implement Auth0 authentication to your Next.js application, please follow the steps on this [quick guide](https://auth0.com/docs/quickstart/webapp/nextjs/interactive) or the complete [guide on Next.js Authentication](https://auth0.com/blog/ultimate-guide-nextjs-authentication-auth0/). And if you don’t have an Auth0 account yet, you can \u003ca href=\"https://a0.to/blog_signup\" data-amp-replace=\"CLIENT_ID\" data-amp-addparams=\"anonId=CLIENT_ID(cid-scope-cookie-fallback-name)\"\u003esign up for a free Auth0 account\u003c/a\u003e.\n\nOnce your users are authenticated, you can rewrite your Server Action as follows:\n\n```javascript\n// /services/actions/comment\n'use server'\nimport { getAccessToken } from '@auth0/nextjs-auth0' // 👈 New Code\n\nexport async function addComment(formData) {\n const accessToken = await getAccessToken(); // 👈 New Code\n const articleId = formData.get('articleId');\n const comment = formData.get('comment');\n const response = await fetch(`https://api.example.com/articles/${articleId}/comments`, {\n method: 'POST',\n headers: {\n 'Content-Type': 'application/json',\n 'Authorization': `Bearer ${accessToken.accessToken}`, // 👈 New Code\n },\n body: JSON.stringify({ comment }),\n });\n const result = await response.json();\n return result;\n}\n```\n\nIn this new flow, you’ll need to retrieve the Access Token from your session. The Auth0 SDK makes this easy with the method `getAccessToken`. After that, you can simply pass the token to the request using the `Authorization` header.\n\nNext, in the third party or external API, you can verify the token to ensure it’s not compromised, and you can decode the token to obtain additional information, such as the user, permissions, and more.\n\n## Conclusion\n\nServer Actions are a fantastic new feature in Next.js that allows developers to do more with less code by eliminating much of the boilerplate required to write API codes and their subsequent calling code.\n\nIn this guide, we covered the fundamentals of Server Actions to delve into the particularities of calling third-party public and protected API endpoints.\n\nNext.js has many exciting new features, and I'll be exploring more of them in future posts. So, if you would like me to cover any specific Next.js feature, please drop a comment below.\n\nThanks for reading!","readTime":14,"formattedDate":"Dec 1, 2023"},{"path":"auth0-stable-support-for-nextjs-app-router","title":"Auth0 Stable Support For Next.js App Router!","heroImage":{"url":"https://images.ctfassets.net/23aumh6u8s0i/6pjUKboBuFLvCKkE3esaFA/5f2101d6d2add5c615db5e98a553fc44/nextjs.jpeg","size":{"width":1176,"height":1056}},"category":["Developers","Product","SDK"],"authors":[{"metadata":{"tags":[],"concepts":[]},"sys":{"space":{"sys":{"type":"Link","linkType":"Space","id":"23aumh6u8s0i"}},"id":"7qC8LJD80VSx1qYcSdQ1Zh","type":"Entry","createdAt":"2021-08-23T12:59:46.069Z","updatedAt":"2025-01-08T14:00:38.100Z","environment":{"sys":{"id":"master","type":"Link","linkType":"Environment"}},"publishedVersion":42,"revision":6,"contentType":{"sys":{"type":"Link","linkType":"ContentType","id":"author"}},"locale":"en-US"},"fields":{"path":"juan-cruz-martinez","name":"Juan Cruz Martinez","avatar":{"metadata":{"tags":[{"sys":{"type":"Link","linkType":"Tag","id":"user"}}],"concepts":[]},"sys":{"space":{"sys":{"type":"Link","linkType":"Space","id":"23aumh6u8s0i"}},"id":"5b3YvfAb53h2I5U6uanww4","type":"Asset","createdAt":"2022-07-07T09:23:40.589Z","updatedAt":"2022-07-07T09:23:56.422Z","environment":{"sys":{"id":"master","type":"Link","linkType":"Environment"}},"publishedVersion":10,"revision":5,"locale":"en-US"},"fields":{"title":"jcm","description":"Juan Cruz Martinez","file":{"url":"//images.ctfassets.net/23aumh6u8s0i/5b3YvfAb53h2I5U6uanww4/f1dfa0e19f15f5df8eacd53f78a813f6/jcm.jpeg","details":{"size":29371,"image":{"width":400,"height":400}},"fileName":"jcm.jpeg","contentType":"image/jpeg"}}},"lastUpdatedBy":"Juan Cruz Martinez","email":"juan.martinez@okta.com","twitter":"https://twitter.com/bajcmartinez","github":"https://github.com/bajcmartinez","linkedin":"https://www.linkedin.com/in/bajcmartinez/","isPopular":true,"personalWebsite":"https://jcmartinez.dev/","type":"Auth0 Employee","jobTitle":"Staff Developer Advocate","description":"I stream, blog, and make youtube videos about tech stuff. I love coding, I love AI, and I love building stuff!"}}],"redirectTo":null,"isHiddenFromBlogPostGrid":false,"lang":"en","tags":["javascript","nextjs","release","announcement"],"dateCreated":"2023-08-09T15:00","dateLastUpdated":"2023-10-19","postContent":"For almost a year now, the team at Next.js has been building the foundations for the future of Next.js, a future based on the React architecture, which includes Server Components, Server Actions, and much more.\n\nWith the introduction of Next.js 13.4 a few months ago, the new [App router](https://nextjs.org/blog/next-13-4#nextjs-app-router) architecture with support for React Server Components, nested routes, layouts, and new data fetching design, was promoted to stable and is the recommended option for newly built Next.js applications.\n\nThese new fundamental changes in architecture and APIs on Next.js meant that many libraries with support for Next.js had to undergo changes to fully utilize and benefit from the latest release.\n\n\u003cAmpContent\u003e\n\u003camp-youtube\n data-videoid=\"9ubpQ_VW158\"\n layout=\"responsive\"\n width=\"480\" height=\"270\"\u003e\n\u003c/amp-youtube\u003e\n\u003c/AmpContent\u003e\n\u003cNonAmpContent\u003e\n\u003cdiv class='embed-container' style=\"position: relative; padding-bottom: 56.25%; height: 0; overflow: hidden; max-width: 100%;margin-bottom:40px;\"\u003e\u003ciframe style=\"position: absolute; top: 0; left: 0; width: 100%; height: 100%;\" src='https://www.youtube.com/embed/9ubpQ_VW158' frameborder='0' allowfullscreen\u003e\u003c/iframe\u003e\u003c/div\u003e\n\u003c/NonAmpContent\u003e\n\nAuth0's first SDK for Next.js dates back to 2021. Since then, we have been committed to the Next.js community by providing a robust, scalable, and developer-friendly SDK for implementing user authentication. We are **very happy to announce the stable release of the [Auth0 Next.js SDK v3](https://github.com/auth0/nextjs-auth0/releases/tag/v3.0.0)** with support for App Router, Edge Runtime, and Responses in Middleware. We’ve created this [quickstart guide](https://auth0.com/docs/quickstart/webapp/nextjs/01-login) that demonstrates how to integrate Auth0 with any new or existing Next.js application using the Auth0 Next.js SDK.\n\n## What Do I Need to Do With Existing Applications Using Pages Router?\n\nNot much. Like Next.js, the Auth0 Next.js SDK `v3` continues to support the Pages Router and the new App Router. When updating to the new SDK, there are three considerations to keep in mind:\n\n- As is the case for Next.js `v13.4`, the new SDK requires [Node `v16` LTS or newer releases](https://nodejs.org/en/download).\n- For TypeScript applications, differences in function signatures that support both the Pages and App Router may require you to use explicit declarations for the `request` and `response` objects to help TypeScript infer their type correctly. For example:\n - Before:\n \n ```typescript\n import { withApiAuthRequired } from '@auth0/nextjs-auth0'\n \n export default withApiAuthRequired(async function handler(req, res) {\n res.status(200).json({});\n });\n ```\n \n - After:\n \n ```typescript\n import { NextApiRequest, NextApiResponse } from 'next';\n import { withApiAuthRequired } from '@auth0/nextjs-auth0'\n \n export default withApiAuthRequired(async function handler(req: NextApiRequest, res: NextApiResponse) {\n res.status(200).json({});\n });\n ```\n \n- The `/401` handler has been removed: As of Next.js `v13.1`, you can now return responses from middleware. As such, the unauthorized handler has been removed in favor of an unauthorized response.\n\nIf you need to migrate your application from the Auth0 Next.js SDK `v2` to the latest version, please follow our official [`v3` migration guide](https://github.com/auth0/nextjs-auth0/blob/main/V3_MIGRATION_GUIDE.md).\n\n## Working with the New App Router\n\nWorking with the new App Router requires a shift in the architecture and project structure of your Next.js application, and as a result of this new architecture, there are a [few limitations](https://github.com/auth0/nextjs-auth0/tree/main#important-limitations-of-the-app-directory) that you need to understand before implementing authentication for your application or working with cookies and sessions in general.\n\nThese are the steps to add authentication to your Next.js application using the latest version of the Auth0 Next.js SDK:\n\n### Install the Auth0 SDK for Next.js\n\nFirst and foremost, install the Auth0 Next.js SDK using the following command:\n\n```bash\nnpm install @auth0/nextjs-auth0\n```\n\n### Add the dynamic API route\n\nAs was the case for Pages Router, the Auth0 SDK automatically creates a series of API routes or endpoints to handle essential authentication features such as login, logout, and getting user information.\n\nFor the Auth0 Next.js SDK to create such routes, it is necessary to create a [catch-all, dynamic API route handler](https://nextjs.org/docs/app/building-your-application/routing/dynamic-routes) under the `/app/api` directory. Technically speaking, you don’t need to use the `api` directory anymore to specify API routes. However, our SDK follows that convention for simplicity and clarity.\n\nThen, create a `route.js` or `route.ts` file under the `/app/api/auth/[auth0]/` directory and populate it with the following code:\n\n```javascript\nimport { handleAuth } from '@auth0/nextjs-auth0';\n\nexport const GET = handleAuth();\n```\n\n### Make the Auth0 hooks accessible throughout your application\n\nWhen working on the client side of your Next.js application, you can use the `useUser()` hook from the Auth0 Next.js SDK to retrieve information about the current user and session. Since this hook leverages the React Context API to manage and communicate the authentication state of the user, you’ll have to wrap your components with a `UserProvider`. \n\nWhen using the Next.js App Router, you should wrap your [root layout](https://nextjs.org/docs/app/building-your-application/routing/pages-and-layouts#layouts) with `UserProvider` as follows:\n\n```javascript\n// app/layout.js\nimport React from 'react';\nimport { UserProvider } from '@auth0/nextjs-auth0/client';\n\nexport default function App({ children }) {\n return (\n \u003cUserProvider\u003e\n \u003cbody\u003e{children}\u003c/body\u003e\n \u003c/UserProvider\u003e\n );\n}\n```\n\n### Access user and session information\n\nYou can check if a user is authenticated by verifying that the `user` object returned by the `useUser()` hook is defined. Additionally, you can log in or log out of your users from the client layer of your Next.js application by redirecting them to the corresponding automatically-generated route.\n\nHere is an example of a client component accessing and using user information to build a basic login, logout user flow.\n\n```javascript\n// pages/index.js\n'use client';\nimport { useUser } from '@auth0/nextjs-auth0/client';\n\nexport default function Index() {\n const { user, error, isLoading } = useUser();\n\n if (isLoading) return \u003cdiv\u003eLoading...\u003c/div\u003e;\n if (error) return \u003cdiv\u003e{error.message}\u003c/div\u003e;\n\n if (user) {\n return (\n \u003cdiv\u003e\n Welcome {user.name}! \u003ca href=\"/api/auth/logout\"\u003eLogout\u003c/a\u003e\n \u003c/div\u003e\n );\n }\n\n return \u003ca href=\"/api/auth/login\"\u003eLogin\u003c/a\u003e;\n}\n```\n\n## What’s Next\n\nWith the release of the Auth0 Next.js SDK v3, we are excited to continue supporting the Next.js community with a comprehensive solution for user authentication and route protection.\n\n\u003cdiv class=\"alert alert-info alert-icon\"\u003e\n \u003ci class=\"icon-budicon-487\"\u003e\u003c/i\u003e\n \u003cb\u003eTo get started, create a free account at \u003ca href=\"https://auth0.com/signup?utm_source=partner\u0026utm_medium=vercel-okta\u0026utm_campaign=2023-03%7CINB-ORG%7CVercel-Auth0-SignupUserCreationForm-SU\u0026ocid=7014z000000zJItAAM-aPA4z0000008OZeGAM\u0026utm_id=aNK4z000000blT4GAI\"\u003eAuth0.com\u003c/a\u003e.\u003c/b\u003e\u003cbr\u003e \n\u003c/div\u003e\n\nIn this article, we only covered the basics, and if you want to learn more about how to secure your application, please check the official [GitHub repository for the SDK](https://github.com/auth0/nextjs-auth0) as well as some [examples of practical use cases](https://github.com/auth0/nextjs-auth0/blob/main/EXAMPLES.md), or check out our [Next.js code samples](https://developer.auth0.com/resources/code-samples/web-app/nextjs/basic-authentication). To get started on Next.js Authentication with Auth0 check out this [blog post](https://auth0.com/blog/ultimate-guide-nextjs-authentication-auth0/).\n\nAuth0 by Okta is committed to providing our community and customers with a smooth yet robust developer experience to secure their applications. We continue to look for ways to improve our products and shape the future of authentication. We'd love to hear about your experience using our latest iteration of the Auth0 Next.js SDK.\n\nThanks for reading!","readTime":6,"formattedDate":"Oct 19, 2023"},{"path":"use-the-auth0-python-sdk-for-querying-and-storing-users-data","title":"Use the Auth0 Python SDK for Querying and Storing Users’ Data","heroImage":{"url":"https://images.ctfassets.net/23aumh6u8s0i/6uBzrqHNLlSAoER6HtgDN0/accd8f871b1de37f472b94da4346afa2/python-hero","size":{"width":1176,"height":1056}},"category":["Developers","Product","Management API"],"authors":[{"metadata":{"tags":[],"concepts":[]},"sys":{"space":{"sys":{"type":"Link","linkType":"Space","id":"23aumh6u8s0i"}},"id":"7qC8LJD80VSx1qYcSdQ1Zh","type":"Entry","createdAt":"2021-08-23T12:59:46.069Z","updatedAt":"2025-01-08T14:00:38.100Z","environment":{"sys":{"id":"master","type":"Link","linkType":"Environment"}},"publishedVersion":42,"revision":6,"contentType":{"sys":{"type":"Link","linkType":"ContentType","id":"author"}},"locale":"en-US"},"fields":{"path":"juan-cruz-martinez","name":"Juan Cruz Martinez","avatar":{"metadata":{"tags":[{"sys":{"type":"Link","linkType":"Tag","id":"user"}}],"concepts":[]},"sys":{"space":{"sys":{"type":"Link","linkType":"Space","id":"23aumh6u8s0i"}},"id":"5b3YvfAb53h2I5U6uanww4","type":"Asset","createdAt":"2022-07-07T09:23:40.589Z","updatedAt":"2022-07-07T09:23:56.422Z","environment":{"sys":{"id":"master","type":"Link","linkType":"Environment"}},"publishedVersion":10,"revision":5,"locale":"en-US"},"fields":{"title":"jcm","description":"Juan Cruz Martinez","file":{"url":"//images.ctfassets.net/23aumh6u8s0i/5b3YvfAb53h2I5U6uanww4/f1dfa0e19f15f5df8eacd53f78a813f6/jcm.jpeg","details":{"size":29371,"image":{"width":400,"height":400}},"fileName":"jcm.jpeg","contentType":"image/jpeg"}}},"lastUpdatedBy":"Juan Cruz Martinez","email":"juan.martinez@okta.com","twitter":"https://twitter.com/bajcmartinez","github":"https://github.com/bajcmartinez","linkedin":"https://www.linkedin.com/in/bajcmartinez/","isPopular":true,"personalWebsite":"https://jcmartinez.dev/","type":"Auth0 Employee","jobTitle":"Staff Developer Advocate","description":"I stream, blog, and make youtube videos about tech stuff. I love coding, I love AI, and I love building stuff!"}}],"redirectTo":null,"isHiddenFromBlogPostGrid":false,"lang":"en","tags":["python","api","auth0","m2m","scopes"],"dateCreated":"2023-07-25","dateLastUpdated":null,"postContent":"The **Auth0 Dashboard** offers a wide range of tools for managing your application's authentication and authorization. You can create and delete users, assign roles, ban IPs, and much more. Although it's convenient to manage users directly from the dashboard, there may be scenarios where you need control from within your application.\n\nSay, for example, that you want to store UI preferences such as dark/light mode settings or the user’s preferred theme directly on the user’s profile so that, independently from which device they connect to your application, they will have their favorite settings ready.\n\nIn scenarios like this, where your application directly processes and manages users' information, you can use the [Auth0 Management API](https://auth0.com/docs/api/management/v2), which allows you to work with users' data and programmatically access most features available in the Auth0 Dashboard.\n\nIn this article, we’ll explore how to use the Auth0 Management API from Python applications using the Auth0 Python SDK to read and store information about users, and at the end, we’ll build a lottery system to pull a random lucky user from the system.\n\n## Accessing the Auth0 Management API\n\nThe Auth0 Management API allows you to programmatically create, access, update, and delete resources from your Auth0 tenant. It is an API built for back-end servers or trusted parties to perform administrative tasks such as user management or DevOps.\n\nYou can access the [Auth0 Management API](https://auth0.com/docs/api/management/v2) via HTTP requests directly or use one of the SDKs we provide for such a purpose. In any scenario, you’ll need a few things before starting the management API.\n\n- **Auth0 account.** If you don’t have one already, you can \u003ca href=\"https://a0.to/blog_signup\" data-amp-replace=\"CLIENT_ID\" data-amp-addparams=\"anonId=CLIENT_ID(cid-scope-cookie-fallback-name)\"\u003esign up for a free Auth0 account\u003c/a\u003e.\n- **A machine-to-machine application**\n- **A short-lived token** for production access to the API\n\n### Set up your Auth0 account\n\nOnce you have an \u003ca href=\"https://a0.to/blog_signup\" data-amp-replace=\"CLIENT_ID\" data-amp-addparams=\"anonId=CLIENT_ID(cid-scope-cookie-fallback-name)\"\u003eAuth0 account\u003c/a\u003e you can navigate the the [Auth0 Dashboard](https://manage.auth0.com/#/applications) and access your applications list.\n\n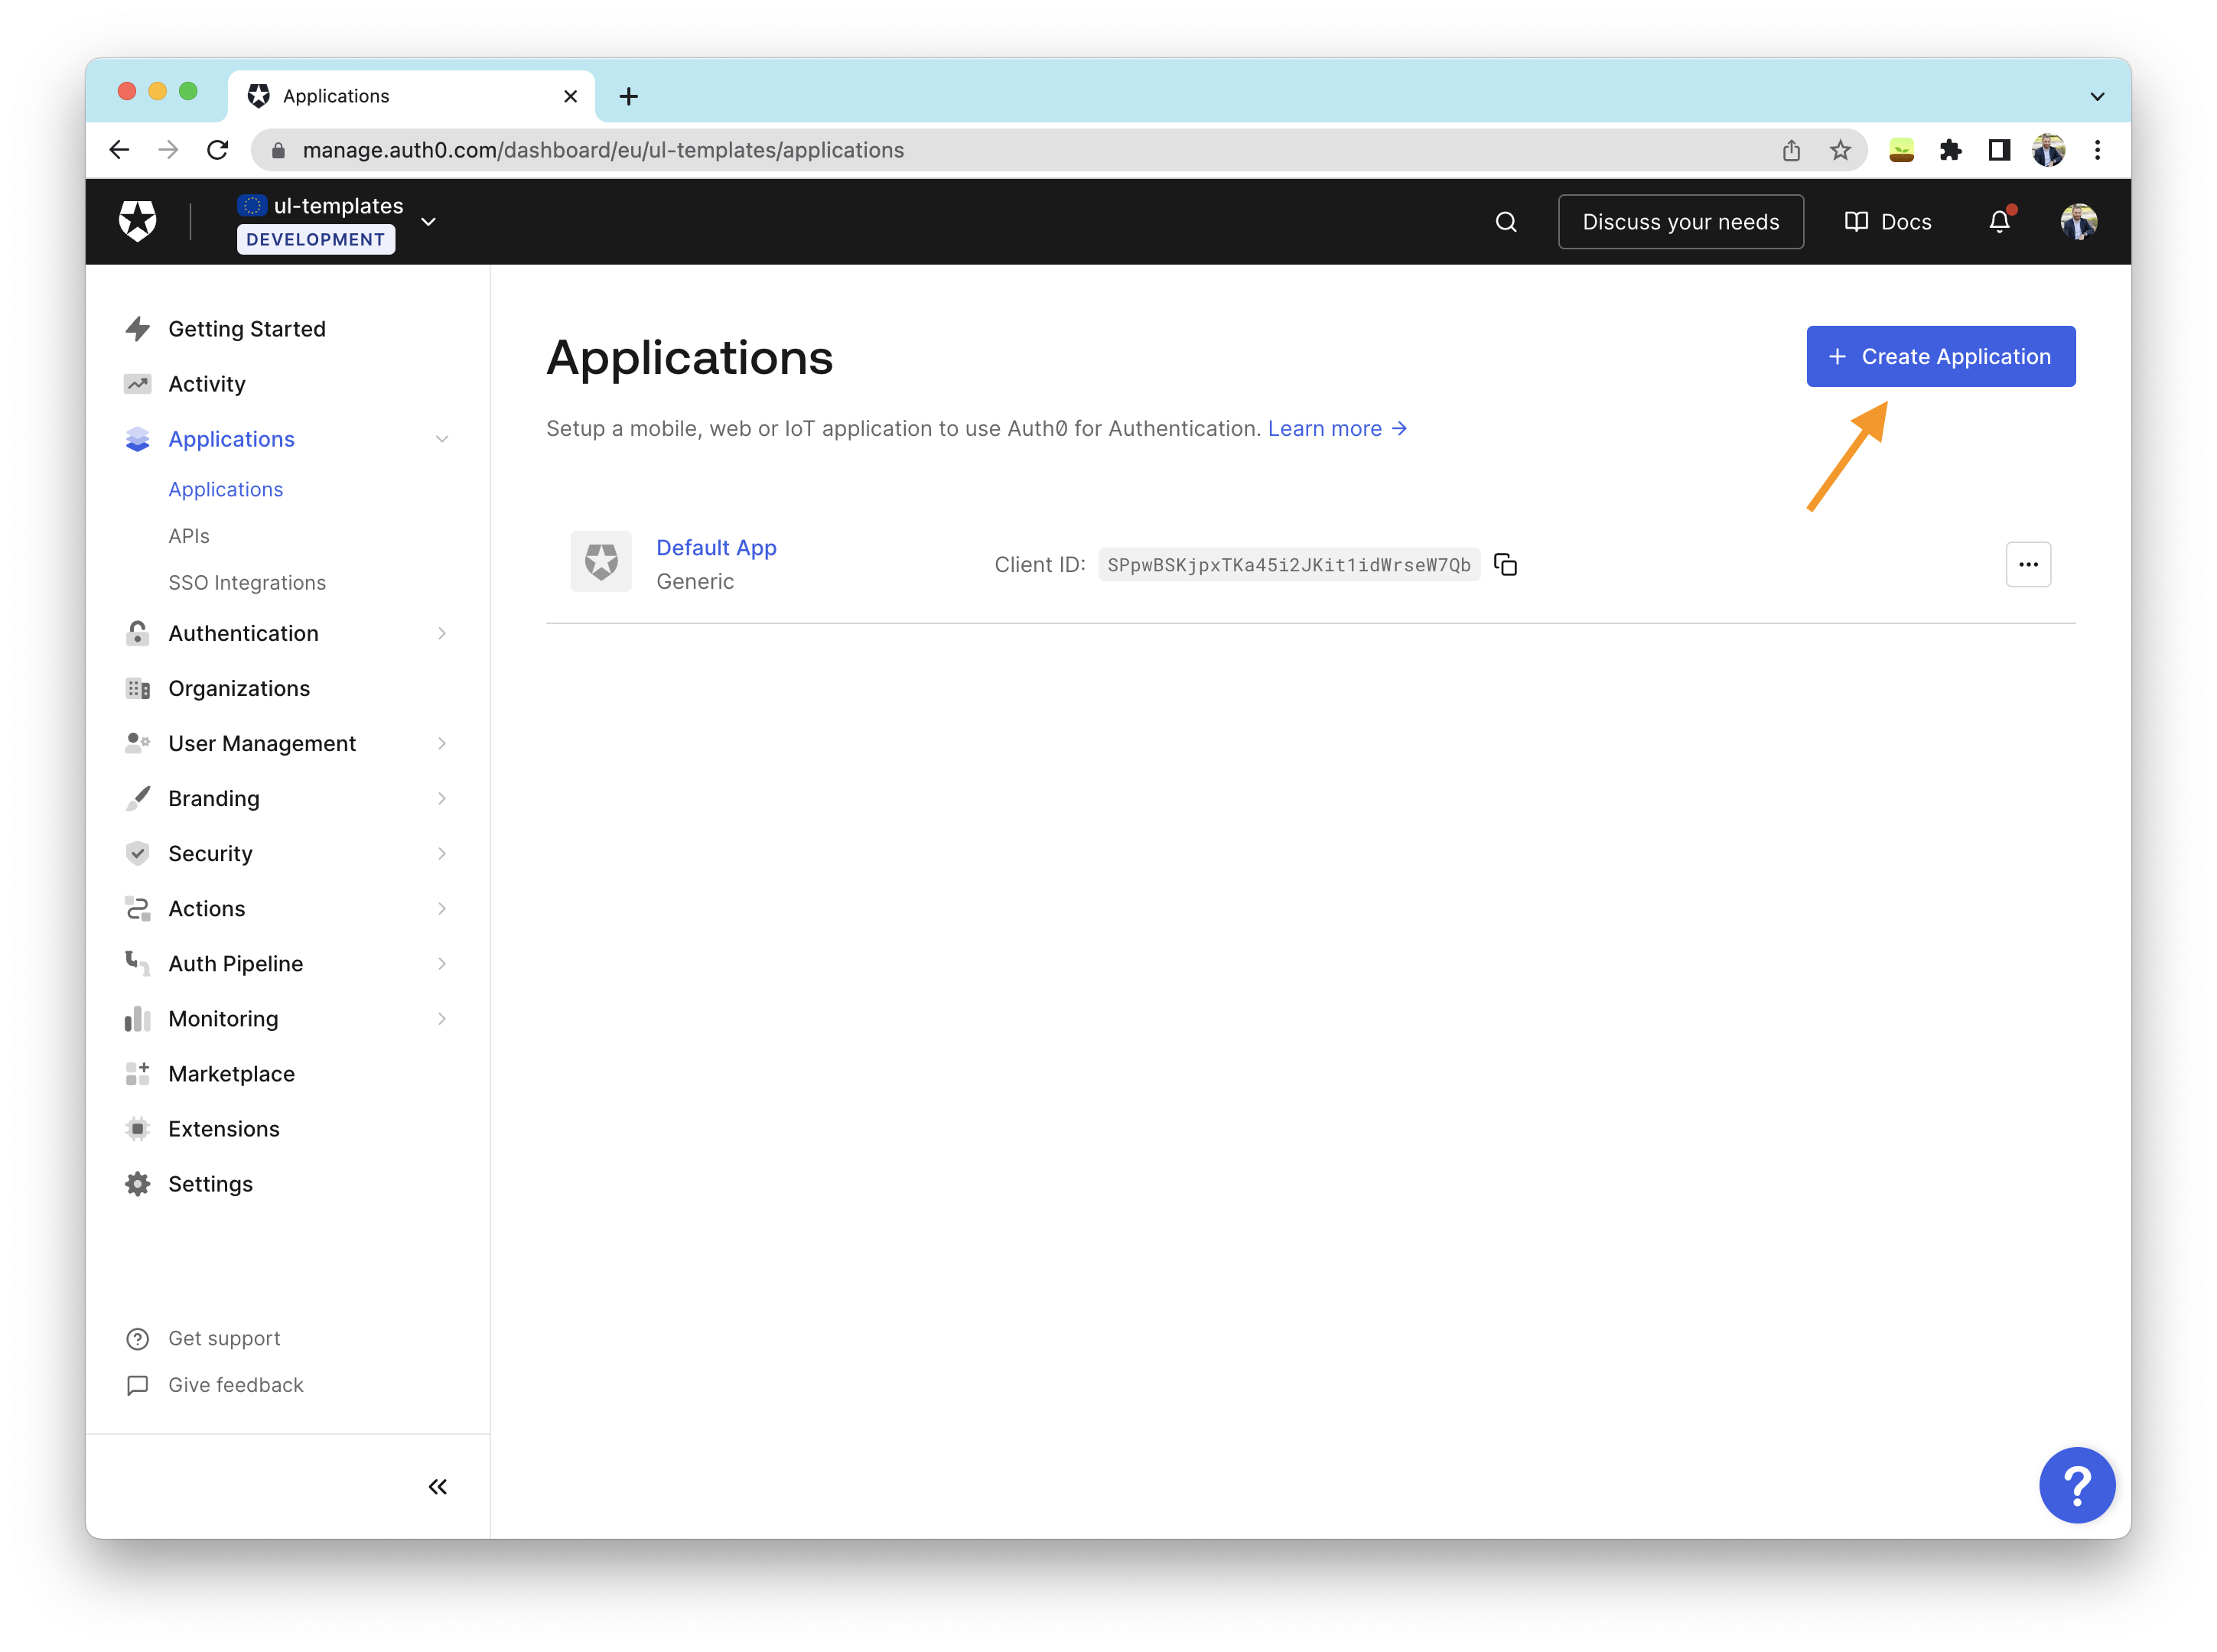\n\nOnce on the page, click on the “Create Application” button on the top right and enter the following information:\n\n- **Name**: A descriptive name for your application, e.g., User Management App\n- **Application Type:** Because we’ll be connecting to this Auth0 application from another system, e.g., your Python application, you need to select “Machine to Machine Applications.”\n\nThen click on “Create”.\n\n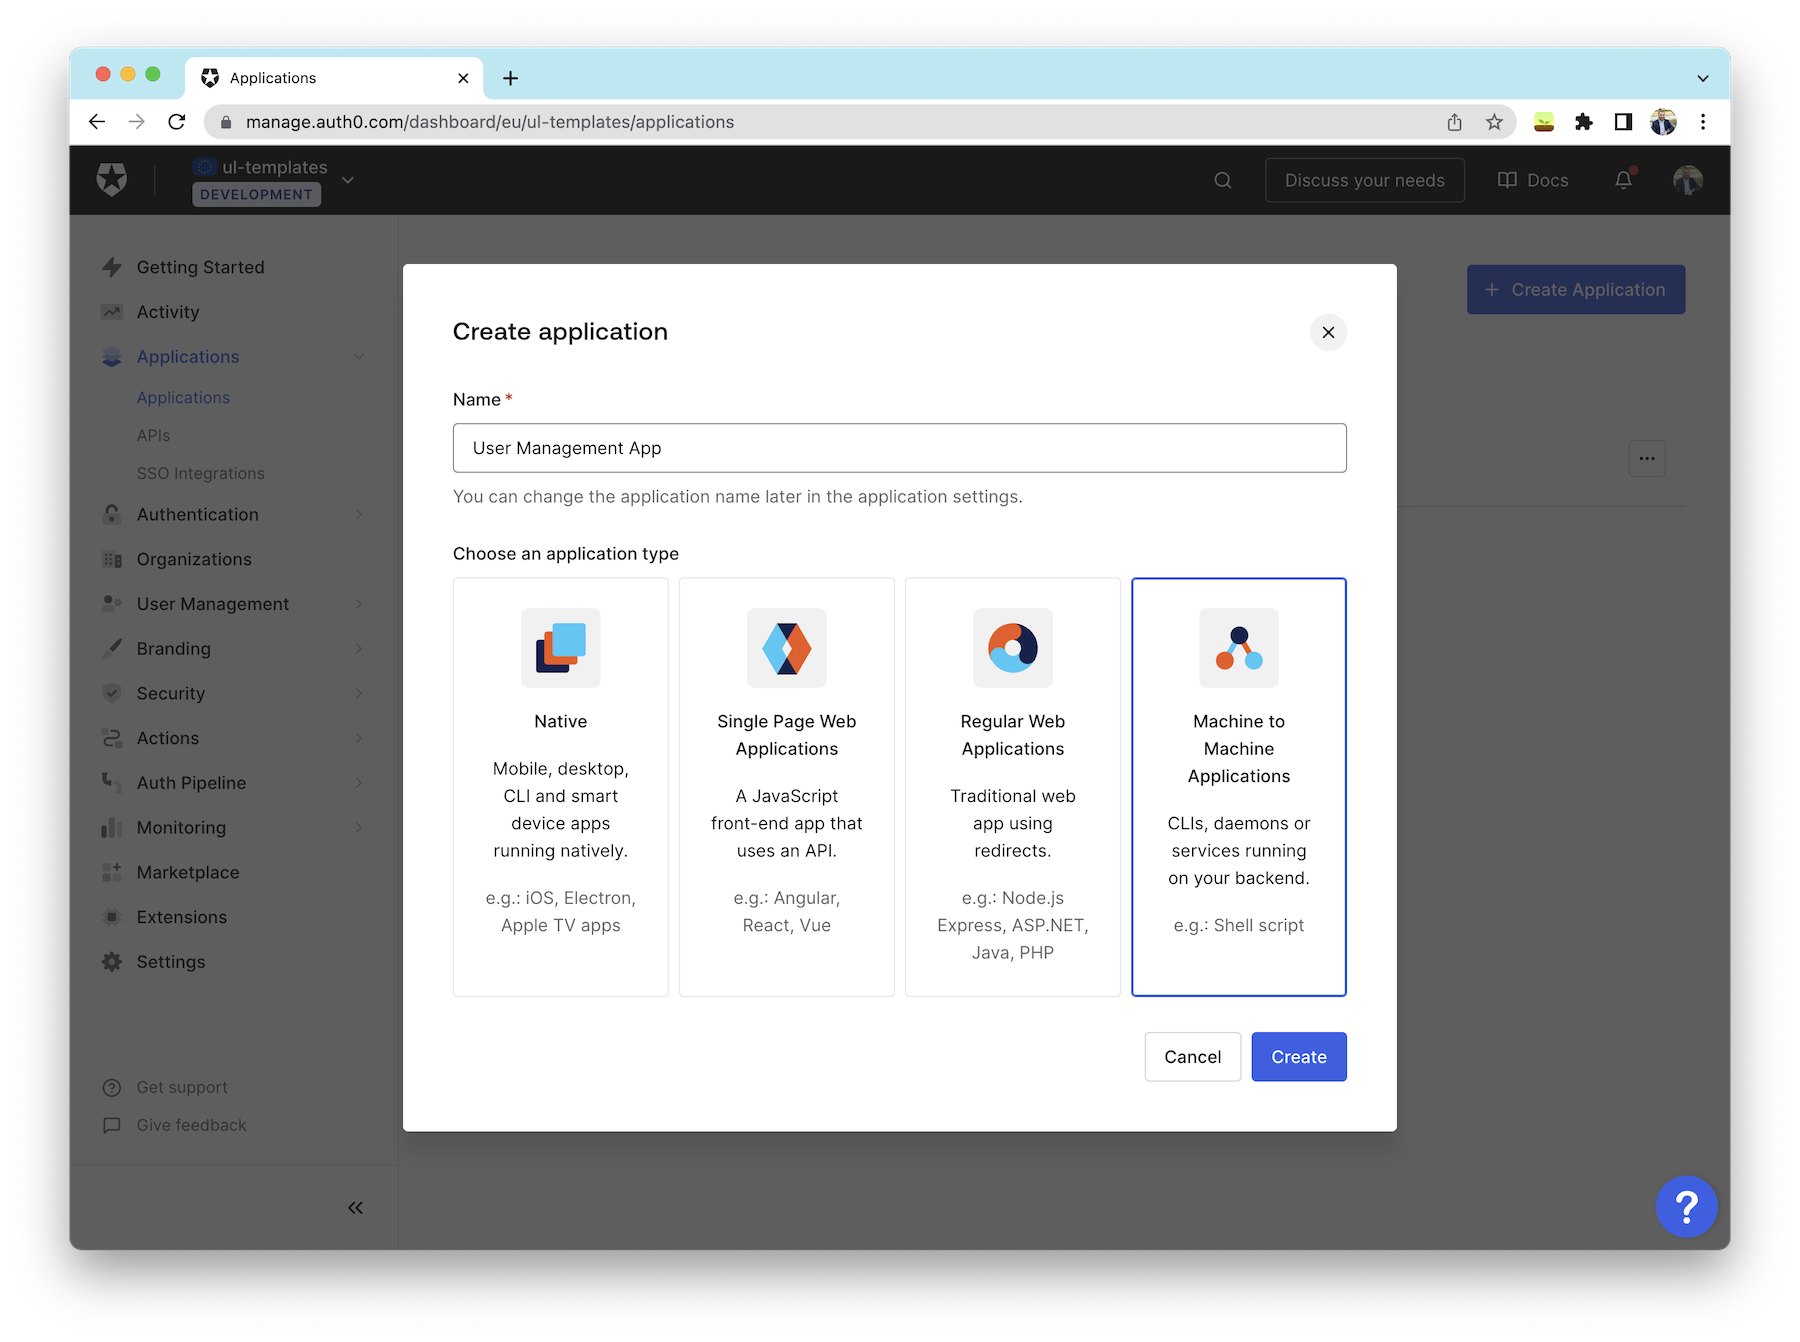\n\nIn the following dialog, you’ll select which API you’ll authorize this application to access. In our case, you’ll choose the **Auth0 Management API** already available in your tenant. Before authorizing the API, Auth0 will list all the permissions associated with it. There are many available. For our use case, you'll authorize the following: `read:users`, `update:users`, `read:users_app_metadata`, and `update:users_app_metadata`. Finally, click on “Authorize”.\n\n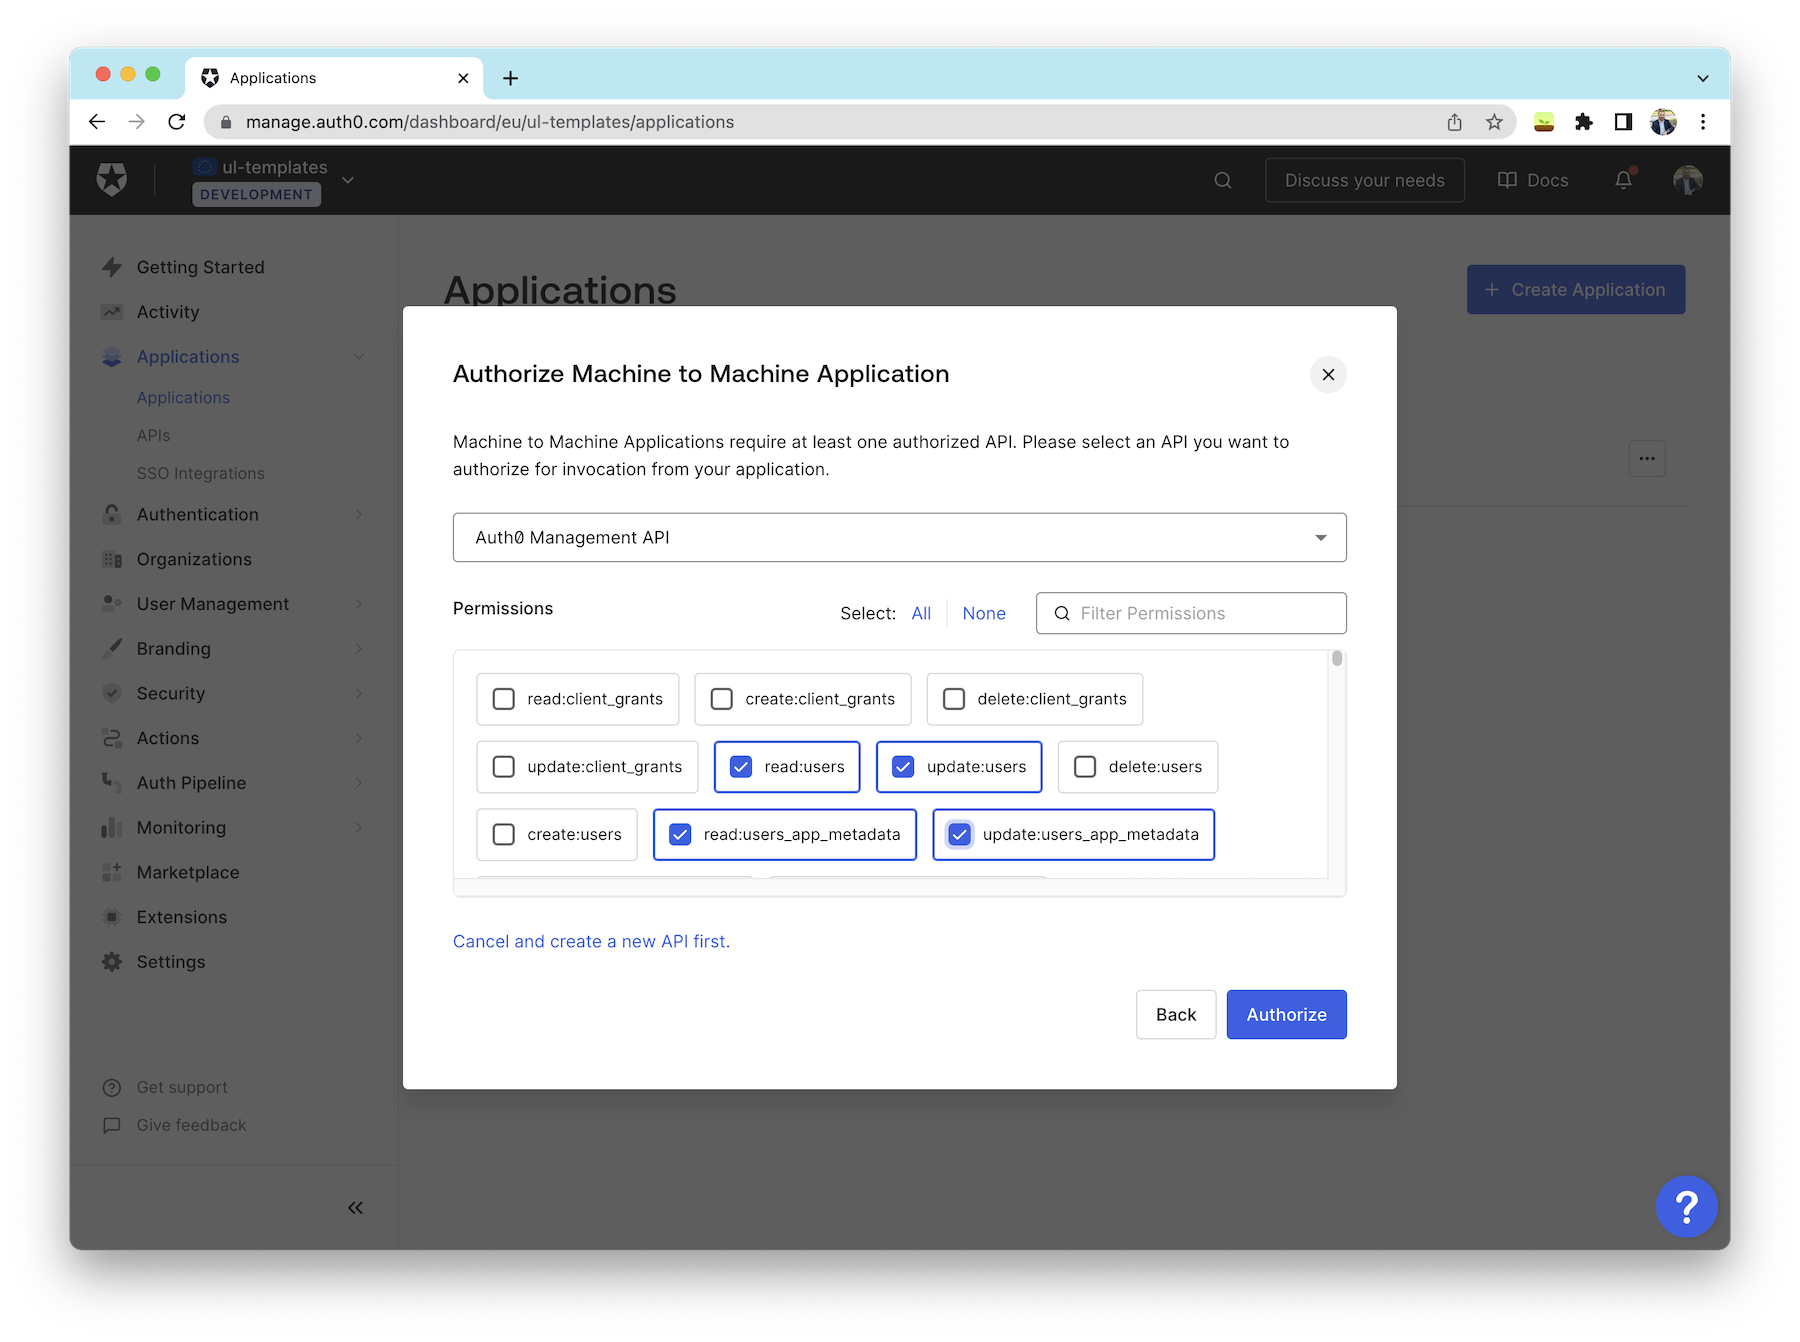\n\n\u003e You can update your application’s permissions at any point from the Auth0 dashboard.\n\n### Get a Test Token from the Auth0 Dashboard\n\nNow you are ready to test your Auth0 Management API. Visit the API entry on the [Auth0 Dashboard](https://manage.auth0.com/#/apis).\n\n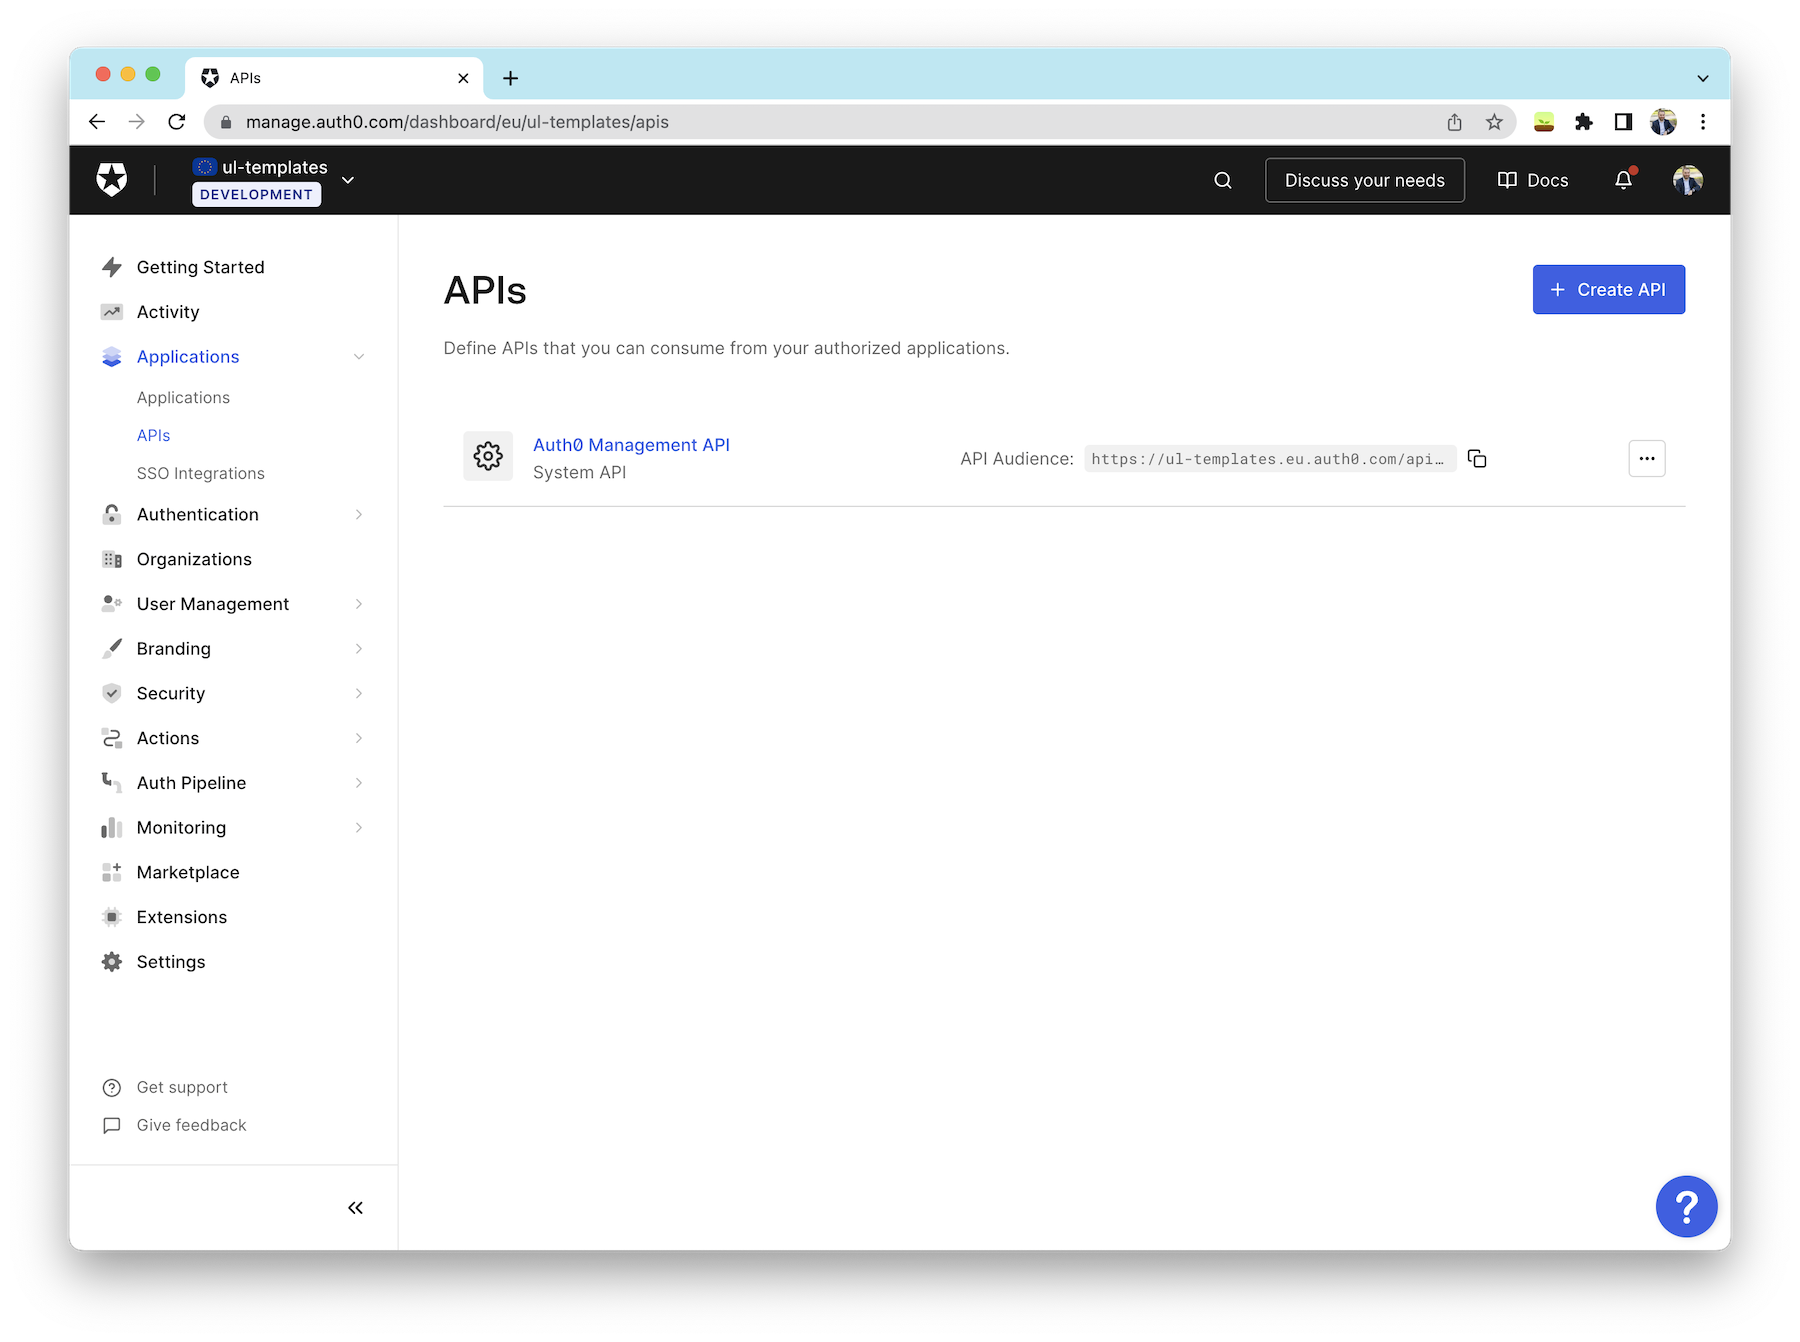\n\nOnce there, click on the Auth0 Management API and head on to the “Test” tab. After a few seconds, you’ll see a screen like the following:\n\n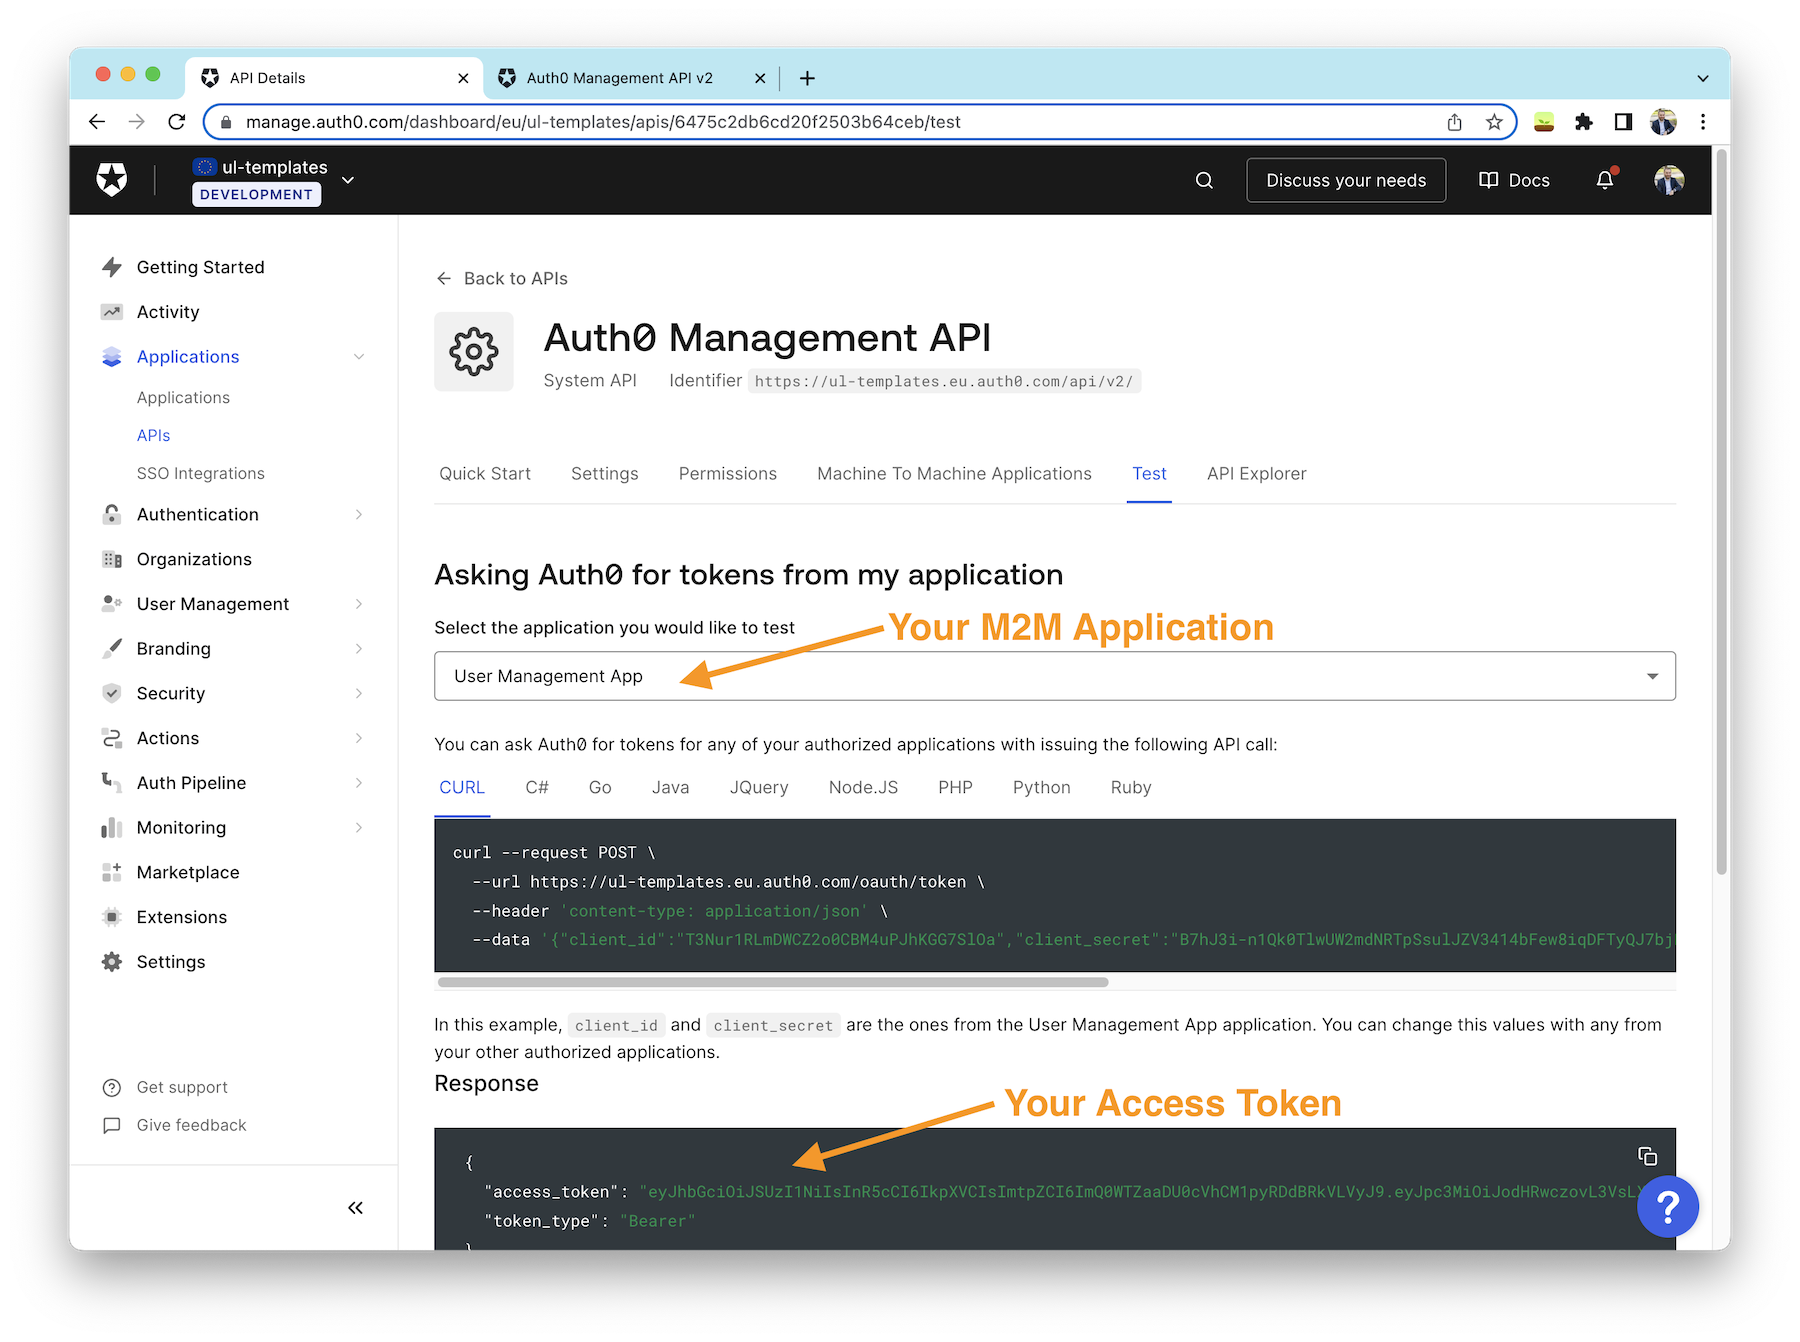\n\nBefore continuing, ensure you have the correct application selected on the drop-down; next, you can copy your `access_token` from the UI. Make sure to copy just the value without the quotes. You’ll need this token next.\n\nYou can test your API directly on the [API documentation page](https://auth0.com/docs/api/management/v2). You can explore and test all the API endpoints there, though we’ll focus on the list [user’s endpoint](https://auth0.com/docs/api/management/v2#!/Users/get_users) for now.\n\n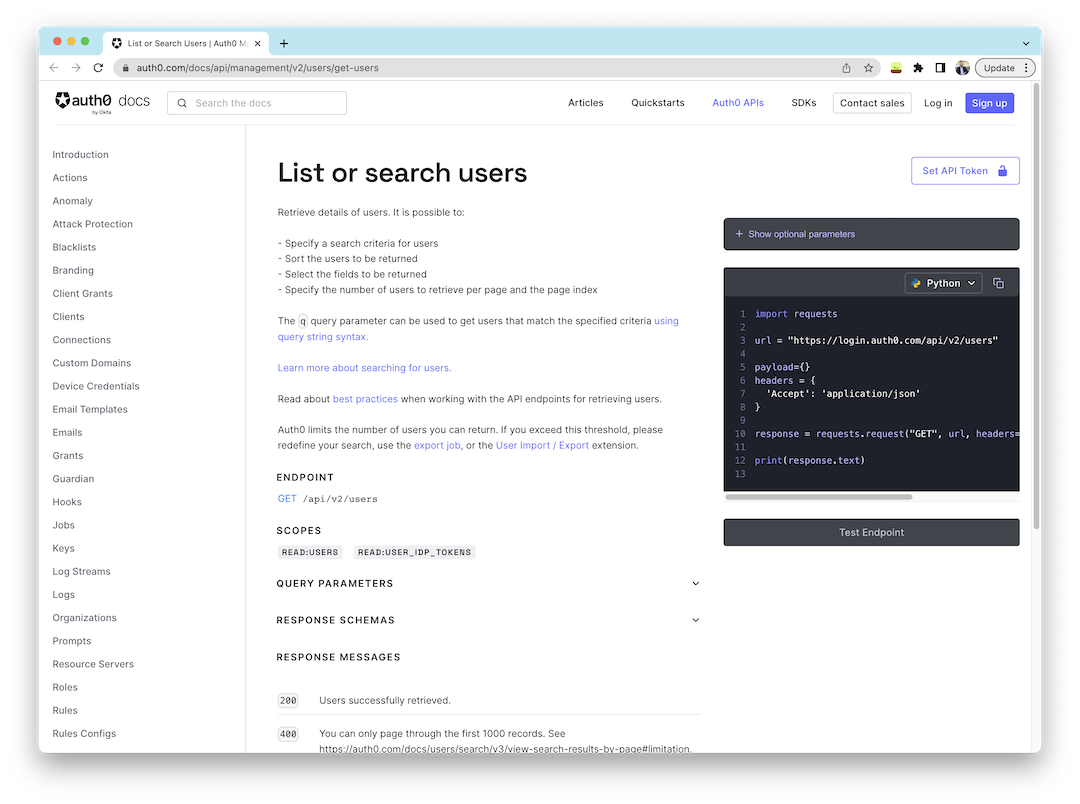\n\nOn the “List or Search Users” section, you’ll find the different parameters you can use to query users. For now, we’ll leave them all to the default values, and if you look to the right of the screen, you’ll find a button, “Test Endpoint”, at the end of the section.\n\nThe button is currently disabled as the documentation page is not authorized to make calls to the management API yet. To test endpoints on the documentation page, you'll need to provide an API Token using the \"Set API Token\" on the top right of the screen.\n\n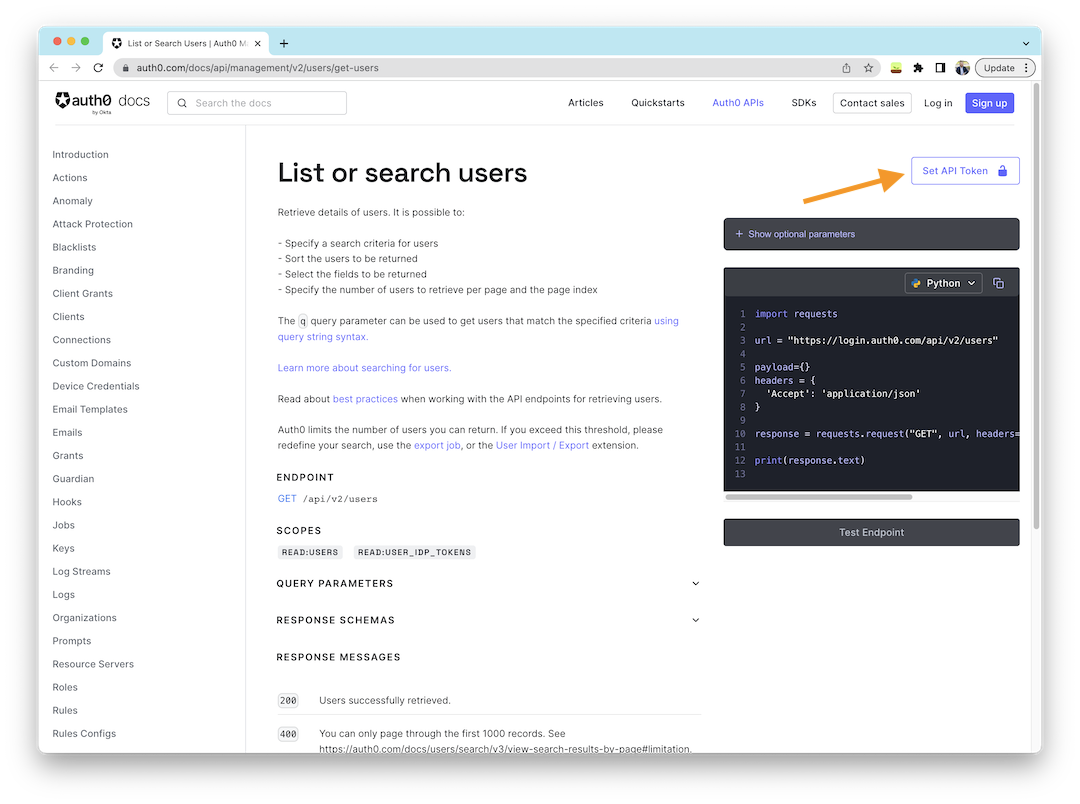\n\nNext, paste your access token from the Auth0 dashboard into the modal window and click “Set Token”. If you copied the token value correctly and tried the endpoint again, you should now see your list of users.\n\n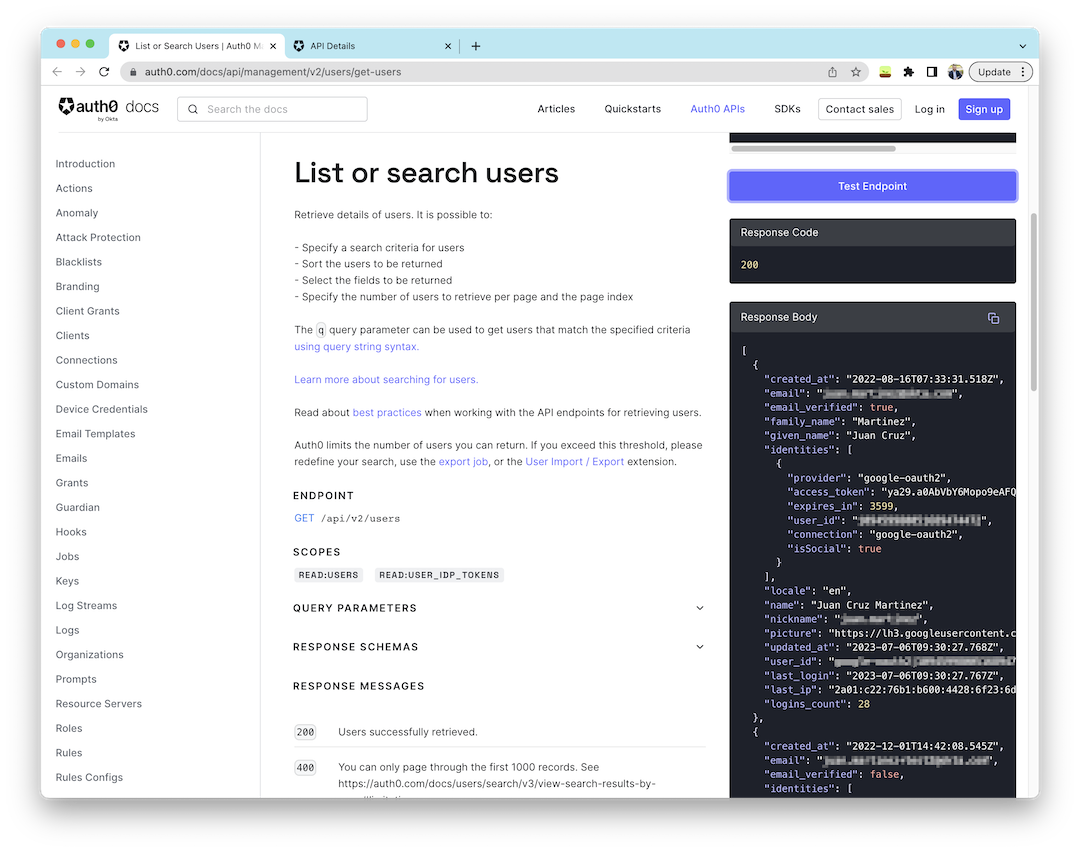\n\n## How to Consume the Auth0 Management API with Python\n\nTo make your life easier when working with the Auth0 Management API, Auth0 offers a set of tools in multiple programming languages. In the case of Python, we have the [Auth0 Python SDK](https://github.com/auth0/auth0-python) that allows for easy and convenient access to all the features in the management API.\n\nTo consume the Auth0 Management API with Python, we will use the Auth0 Python SDK. To install it, run the following command:\n\n```bash\npip install auth0-python\n```\n\nAfter installing the library, you must get a short-lived access token and initialize it programmatically. You’ll need information about your Auth0 tenant domain and the machine-to-machine application you created before. You’ll need the “Client Id” and the “Client Secret”, which can be found on the [Auth0 Dashboard](https://manage.auth0.com/#/applications) under your application’s settings.\n\n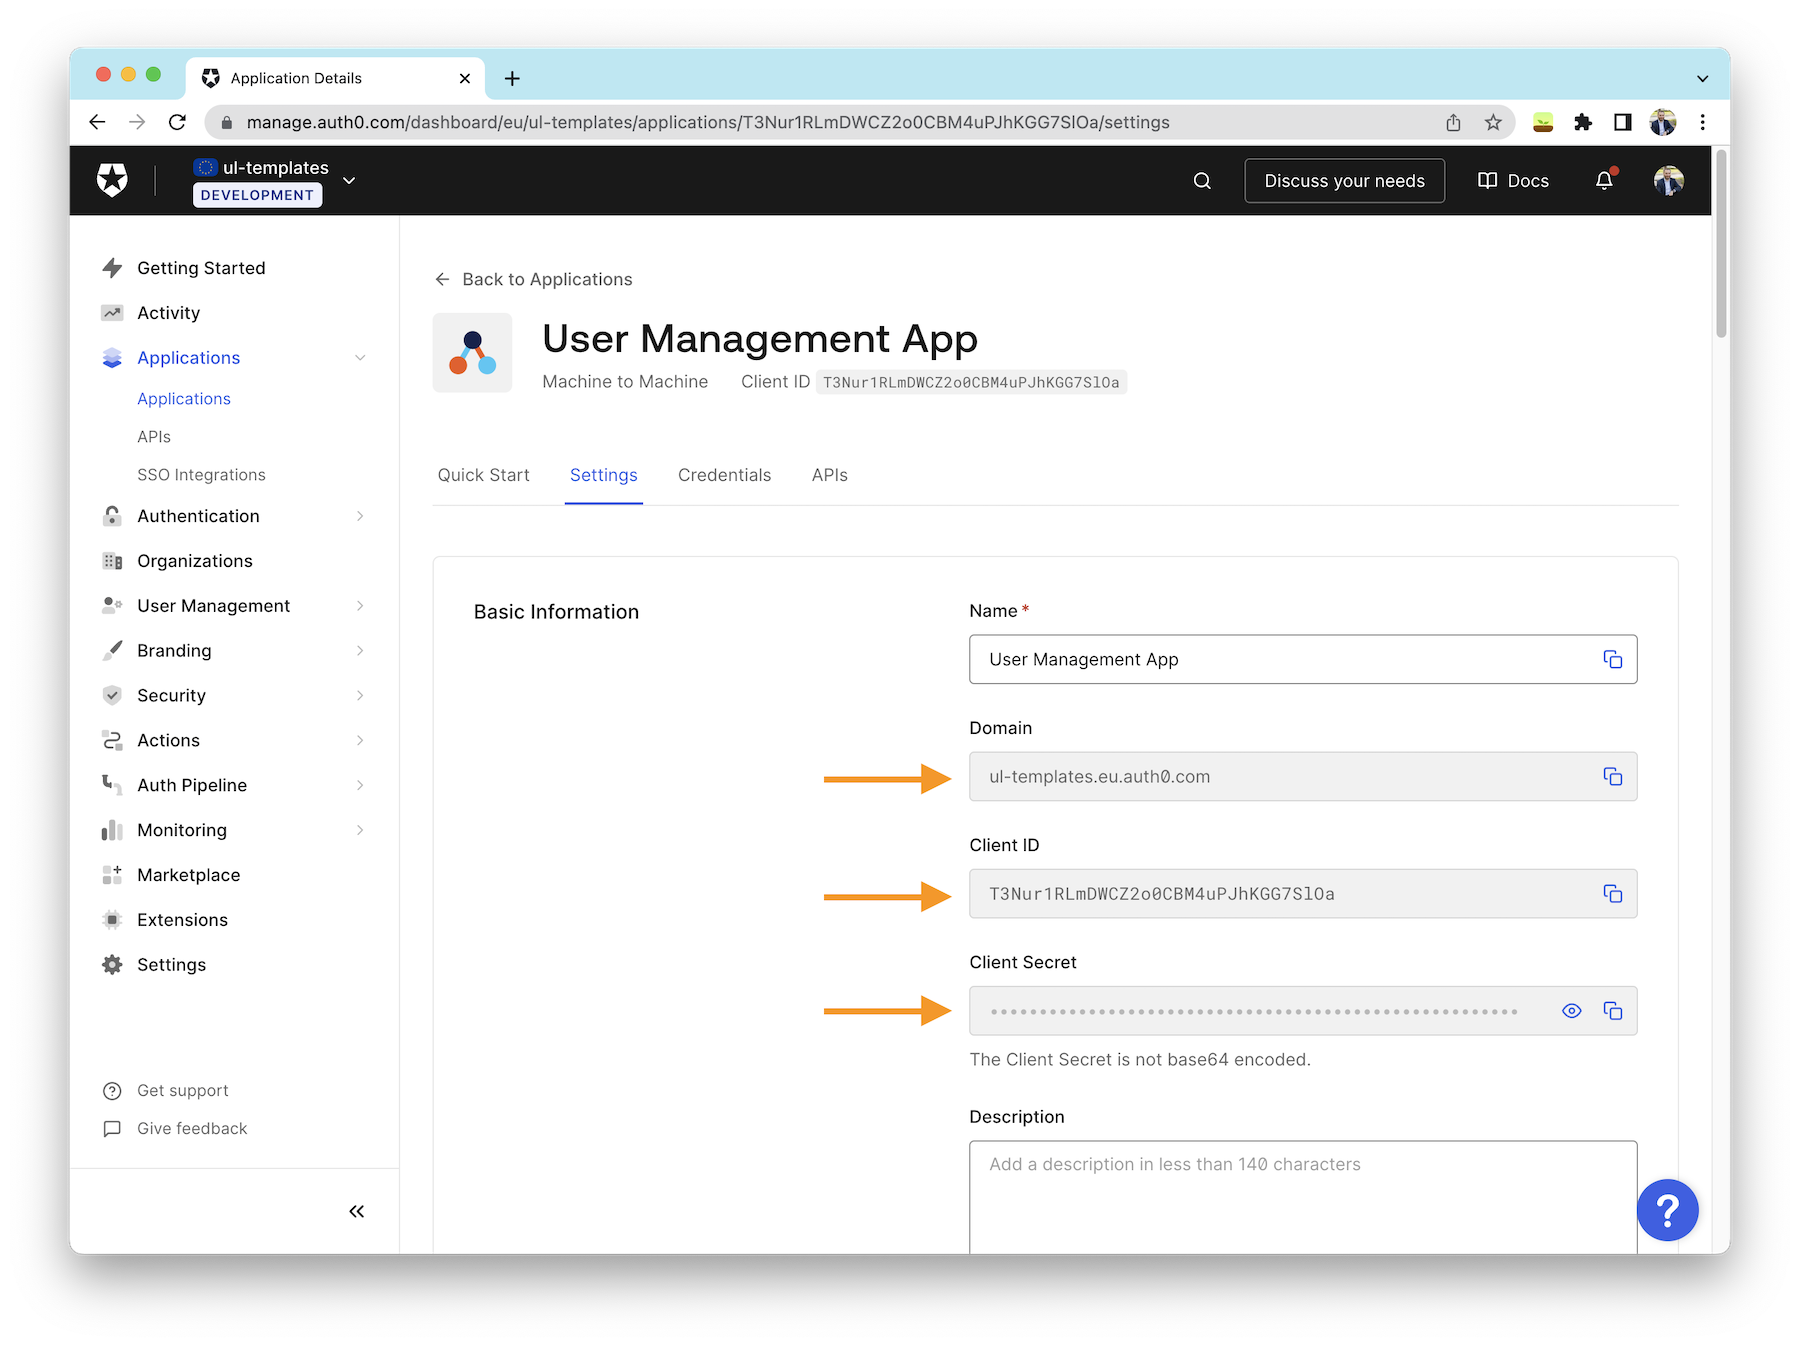\n\nOnce you can access these values, you set the Auth0 SDK with the following code:\n\n```python\nfrom auth0.authentication import GetToken\nfrom auth0.management import Auth0\n\ndomain = 'mydomain.auth0.com'\nclient_id = 'myclientid'\nclient_secret = 'myclientsecret'\n\nget_token = GetToken(domain, client_id, client_secret=client_secret)\ntoken = get_token.client_credentials('https://{}/api/v2/'.format(domain))\nmgmt_api_token = token['access_token']\nauth0 = Auth0(domain, token['access_token'])\n\nauth0 = Auth0(domain, mgmt_api_token)\n```\n\nAnd finally, if you, for example, want to list your users, you can run:\n\n```python\nusers = auth0.users.list()\nprint(users)\n\n# Example Output\n{\n \"start\": 0,\n \"limit\": 25,\n \"length\": 25,\n \"users\": [\n {\n \"created_at\": \"2023-07-14T11: 01: 09.493Z\",\n \"email\": \"###.#####@###.com\",\n \"email_verified\": False,\n \"identities\": [\n {\n \"connection\": \"Username-Password-Authentication\",\n \"provider\": \"auth0\",\n \"user_id\": \"64b12af5c157759fdf791d4d\",\n \"isSocial\": False\n }\n ],\n \"name\": \"###.#####@###.com\",\n \"nickname\": \"###.#####\",\n \"picture\": \"https: //s.gravatar.com/avatar/.........png\",\n \"updated_at\": \"2023-07-14T11:01:09.493Z\",\n \"user_id\": \"auth0|64b12af5c157759fdf791d4d\",\n \"last_login\": \"2023-07-14T11:01:09.491Z\",\n \"last_ip\": \"2a01:c23:c480:7900:6c:a31c:9c46:f435\",\n \"logins_count\": 1\n },\n ...\n ],\n \"total\": 40\n}\n```\n\n## Updating Users’ Profile Information\n\nAuth0's user profiles store basic information about each user, including a unique identifier, name, contact details, and identifying information such as their profile picture. This information is helpful during the authentication process, but you may also require additional information as the user logs in, such as:\n\n- User preferences, such as the application’s theme or color scheme, etc.\n- Flags that the user opt-in in the application, such as notification preferences, getting started tutorial completion, etc.\n- Others, such as the last read announcement, subscription status, and more.\n\nAuth0's user profiles can store such information as metadata, which your app can access once the user logs in successfully. Although your app could store this information in its own storage system, utilizing Auth0's user profile metadata offers the advantage of immediate availability during and after the login process.\n\nA significant benefit of using metadata is that it is associated with the user's account rather than tied to a specific device. This ensures that if a user switches between the mobile and web versions of your app, their settings and preferences based on metadata will remain consistent across both versions.\n\nAuth0 supports two types of users’ metadata:\n\n- **User metadata:** refers to information the user can see and update, such as user preferences and settings\n- **App metadata:** refers to information about the user that is only accessible by the application, for example, feature flags, last read announcement, and more.\n\nLet’s now write a Python script to update the user’s name and metadata to store their preferred theme and an application flag enabling extra features on the user’s account.\n\n```python\n# As we did before, we need to get an instance of the Auth0 client\nfrom auth0.authentication import GetToken\nfrom auth0.management import Auth0\n\ndomain = 'mydomain.auth0.com'\nclient_id = 'myclientid'\nclient_secret = 'myclientsecret'\n\nget_token = GetToken(domain, client_id, client_secret=client_secret)\ntoken = get_token.client_credentials('https://{}/api/v2/'.format(domain))\nmgmt_api_token = token['access_token']\nauth0 = Auth0(domain, token['access_token'])\n\nauth0 = Auth0(domain, mgmt_api_token)\n\n# Next, we can proceed to update the user's name using the user's id\nuser_id = '{YOUR_USER_ID}'\nauth0.users.update(user_id, {\n 'name': 'My name is...'\n})\n\n# We can also update the user's metadata\nauth0.users.update(user_id, {\n 'user_metadata': {\n 'theme': 'light'\n },\n 'app_metadata': {\n 'experimental_features': True\n }\n})\n\n# Let's add some more information to see what the end result is\nauth0.users.update(user_id, {\n 'user_metadata': {\n 'font_size': '16px'\n },\n 'app_metadata': {\n 'notifications': False\n }\n})\n\n# Query the user information\nuser_info = auth0.users.get(user_id)\nprint(user_info)\n\n# Output\n{\n \"created_at\": \"2023-07-14T09:22:19.151Z\",\n \"email\": \"###.#####@###.com\",\n \"email_verified\": False,\n \"identities\": [\n {\n \"connection\": \"Username-Password-Authentication\",\n \"user_id\": \"64b113cb6a989b51063087ce\",\n \"provider\": \"auth0\",\n \"isSocial\": False\n }\n ],\n \"name\": \"My name is...\",\n \"nickname\": \"###.#####\",\n \"picture\": \"https://s.gravatar.com/avatar/...\",\n \"updated_at\": \"2023-07-14T11:29:53.139Z\",\n \"user_id\": \"auth0|64b113cb6a989b51063087ce\",\n \"user_metadata\": {\n \"theme\": \"light\",\n \"font_size\": \"16px\"\n },\n \"app_metadata\": {\n \"experimental_features\": True,\n \"notifications\": False\n }\n}\n```\n\nNote that when calling the `update` method, we don’t need to send all the information about the user, but only those fields we would like to change. This makes working with data really simple, as we don’t need to worry about overriding critical fields. Even on the `user_metadata` and `app_metadata` fields, we don’t need to send the full JSON we want to store but rather the individual key-value pairs, Auth0 will automatically merge the existing values with the new ones.\n\nWe can also access the user information from the [user’s entry in the Auth0 Dashboard](https://manage.auth0.com/#/users).\n\n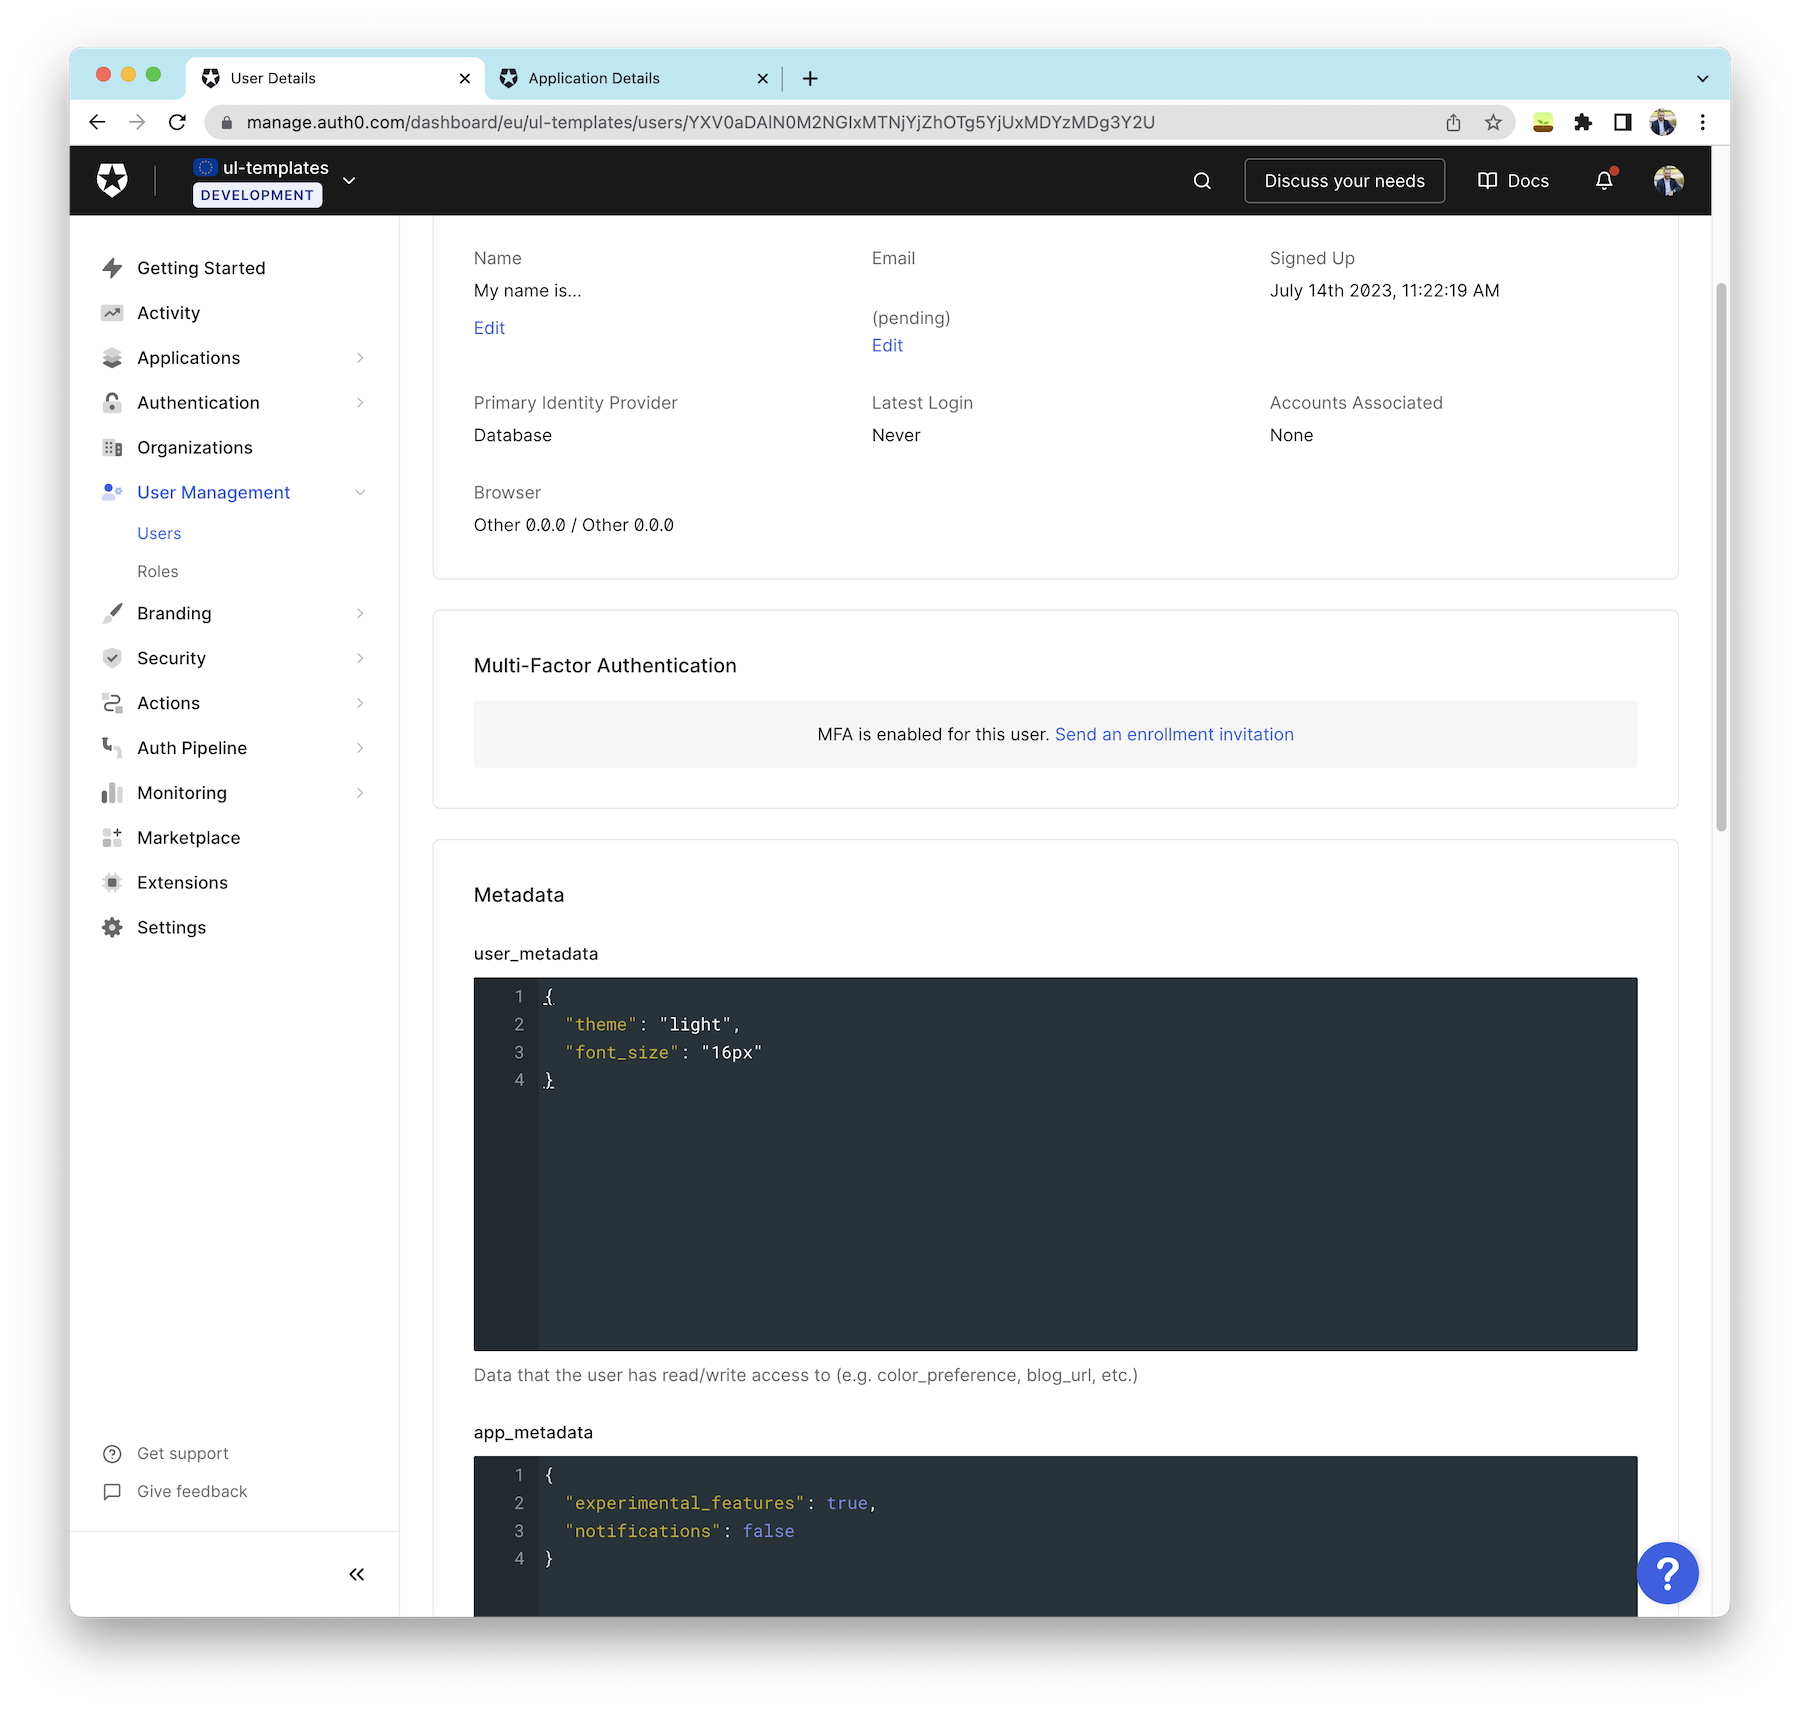\n\n## Query Users\n\nWhether you are building a user dashboard, gathering some statistics, or needing your users’ information to process in your application, the Auth0 Management API and the Auth0 Python SDK allow you to access the information you need and how you need it.\n\nPreviously we used the method `users.list` to retrieve a list of all users in the Auth0 database, which may be all that you need. However, that method offers advanced query functions worth knowing and exploring.\n\nFirst, let’s start with paginating results. By default, paging is disabled. However, you can quickly specify the page and the number of items per page you want to retrieve with these two parameters:\n\n- **page**: Page index of the results to return. The first page is 0.\n- **per_page**: Number of results per page.\n\nHere is an example querying the second page of users, up to ten users per page\n\n```python\nusers = auth0.users.list(page=1, per_page=10)\n```\n\nAnother common parameter in usage is sorting operations. For this purpose, the SDK exposes the `sort` parameter to specify the field and direction. For example:\n\n```python\nusers = auth0.users.list(sort=\"name:1\")\n```\n\nUse `field:order` where the order is `1` for ascending and `-1` for descending.\n\nLastly, one of the most powerful functions is the ability to perform complex queries, for example, getting all the users whose names start with `J` or even filtering by custom metadata, listing all the users that prefer the dark mode theme. Auth0 uses [Lucene query string syntax](http://www.lucenetutorial.com/lucene-query-syntax.html) for those complex queries, though there are some limitations, as some query types cannot be used on metadata fields, for details see [Searchable Fields](https://auth0.com/docs/users/search/v3/query-syntax#searchable-fields).\n\nExample 1: List all users whose name starts with `J`\n\n```python\nusers = auth0.users.list(search_engine='v3', q='name:j*')\n```\n\nExample 2: List all users that prefer dark mode\n\n```python\nusers = auth0.users.list(search_engine='v3', q='user_metadata.theme:dark')\n```\n\nYou can also mix multiple search criteria, for example:\n\n```python\nusers = auth0.users.list(search_engine='v3', q='name=j* AND user_metadata.theme:dark')\n```\n\nTo learn more about how to form queries, check the [Lucene query string syntax](http://www.lucenetutorial.com/lucene-query-syntax.html).\n\n## Selecting a Random User\n\nFor the events we attended this year, we created a fun game using Python, Flask, and Auth0 to give some fabulous prizes away to lucky contestants. The game was pretty simple. It consisted of people signing up for our application at events like PyCon. During the day, users registered to the game using the Auth0 Universal Login page. Then, when it was time to give prizes away, we would use the same Flask application to withdraw a lucky winner. The winner would then get a special award from Auth0.\n\nTo select the lucky winner, we built a special page using the `users.list` method. There was a caveat: the same user couldn’t win twice. The way we solved it was by using `app_metadata` to store information about the users who had already won and then using Lucene syntax to filter them out when pulling for a new winner.\n\nThough not critical for our situation, we wanted the script to be efficient and thus not pull the whole user’s database, as it could be quite extensive, so instead, we first pulled the API to know how many users were in total with a minimum query, and then we accessed a random user from the pull and extracted only that user’s information.\n\n```python\nimport random\n\n# List only 1 user just to retrieve the total number of users that match the given query\nuser_count = auth0.users.list(per_page=1, include_fields=False, search_engine='v3', q='NOT app_metadata.winner:true')[\"total\"]\n\n# Then, use the same trick of listing one user per page to get a random page between 0 and the total number of users\n# That resulting user is our lucky winner\nwinner_user = auth0.users.list(page=random.randint(0, user_count - 1), per_page=1, include_fields=False, search_engine='v3', q='NOT app_metadata.winner:true')['users'][0]\n\n# Before we do anything else with the results, update the user's metadata to reflect them as winner\nauth0.users.update(winner_user.get('user_id'), {\n \"app_metadata\": {\n \"winner\": True\n }\n})\n```\n\n## Summary\n\nToday you learned about the Auth0 Management API and how to work with it from the documentation as well as from any Python application. You also learned how to work with user information, user, and app metadata, and how to query users from the Auth0 database using simple and more complex queries.\n\nThanks for reading!","readTime":12,"formattedDate":"Jul 25, 2023"},{"path":"permit-or-deny-login-requests-using-auth0-actions","title":"Permit or Deny Login Requests Using Auth0 Actions","heroImage":{"url":"https://images.ctfassets.net/23aumh6u8s0i/1hMPYApOKrcrGV6Koi2Ekt/041eb09b09ae149d3d497beae72ee221/Introducing_Auth0_Actions02A.png","size":{"width":2352,"height":2113}},"category":["Developers","Product","Actions"],"authors":[{"metadata":{"tags":[],"concepts":[]},"sys":{"space":{"sys":{"type":"Link","linkType":"Space","id":"23aumh6u8s0i"}},"id":"7qC8LJD80VSx1qYcSdQ1Zh","type":"Entry","createdAt":"2021-08-23T12:59:46.069Z","updatedAt":"2025-01-08T14:00:38.100Z","environment":{"sys":{"id":"master","type":"Link","linkType":"Environment"}},"publishedVersion":42,"revision":6,"contentType":{"sys":{"type":"Link","linkType":"ContentType","id":"author"}},"locale":"en-US"},"fields":{"path":"juan-cruz-martinez","name":"Juan Cruz Martinez","avatar":{"metadata":{"tags":[{"sys":{"type":"Link","linkType":"Tag","id":"user"}}],"concepts":[]},"sys":{"space":{"sys":{"type":"Link","linkType":"Space","id":"23aumh6u8s0i"}},"id":"5b3YvfAb53h2I5U6uanww4","type":"Asset","createdAt":"2022-07-07T09:23:40.589Z","updatedAt":"2022-07-07T09:23:56.422Z","environment":{"sys":{"id":"master","type":"Link","linkType":"Environment"}},"publishedVersion":10,"revision":5,"locale":"en-US"},"fields":{"title":"jcm","description":"Juan Cruz Martinez","file":{"url":"//images.ctfassets.net/23aumh6u8s0i/5b3YvfAb53h2I5U6uanww4/f1dfa0e19f15f5df8eacd53f78a813f6/jcm.jpeg","details":{"size":29371,"image":{"width":400,"height":400}},"fileName":"jcm.jpeg","contentType":"image/jpeg"}}},"lastUpdatedBy":"Juan Cruz Martinez","email":"juan.martinez@okta.com","twitter":"https://twitter.com/bajcmartinez","github":"https://github.com/bajcmartinez","linkedin":"https://www.linkedin.com/in/bajcmartinez/","isPopular":true,"personalWebsite":"https://jcmartinez.dev/","type":"Auth0 Employee","jobTitle":"Staff Developer Advocate","description":"I stream, blog, and make youtube videos about tech stuff. I love coding, I love AI, and I love building stuff!"}}],"redirectTo":null,"isHiddenFromBlogPostGrid":false,"lang":"en","tags":["customer-identity","demos","actions","authentication"],"dateCreated":"2023-06-26T15:14","dateLastUpdated":"2024-04-18","postContent":"Auth0 provides a robust set of tools and features to enhance authentication and authorization in applications. One such feature is Auth0 Actions, which allows you to customize and extend the behavior of the Auth0 platform. This article will explore using Auth0 Actions to permit or deny login requests based on specific criteria, such as a denied and allowed list.\n\n## Prerequisites\n\nBefore diving into the implementation, there are a few prerequisites to ensure you have in place. \n\n- **Auth0 account.** If you don’t have one already, you can \u003ca href=\"https://a0.to/blog_signup\" data-amp-replace=\"CLIENT_ID\" data-amp-addparams=\"anonId=CLIENT_ID(cid-scope-cookie-fallback-name)\"\u003esign up for a free Auth0 account\u003c/a\u003e.\n- **Basic JavaScript knowledge**: Auth0 Actions are functions you can program using JavaScript. In this tutorial, I’ll provide you with the examples. However, to further customize them for your use case, it is important to have basic JavaScript knowledge.\n\n## Create a New Action\n\nTo begin, let's create a new [Auth0 Action](https://auth0.com/docs/customize/actions/actions-overview). Actions are serverless functions that run in a secure Auth0 environment.\n\nTo create an Action, log into your [Auth0 Dashboard](https://manage.auth0.com/#/actions/flows), select Actions from the left sidebar menu, then select Flows. This page shows the different flows you can customize. For our use case, we’ll choose the “Login” flow.\n\n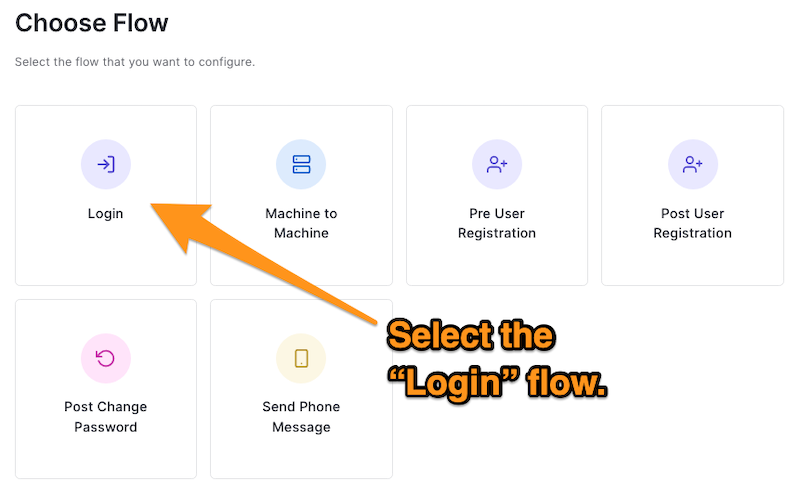\n\nThis will take you to the “Login” flow page, where you can install, create, and add Actions to the flow.\n\n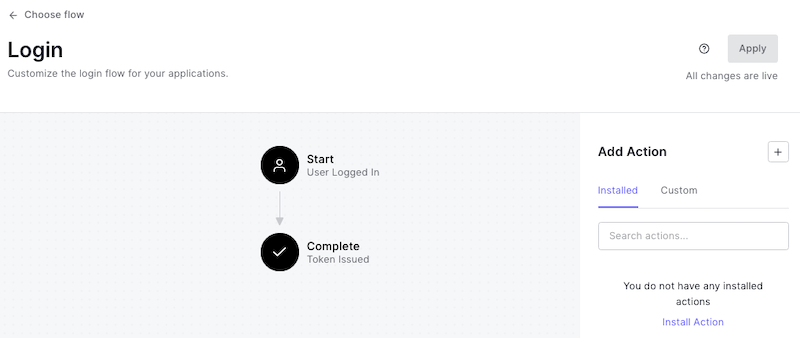\n\nThe screen has two main sections, the diagram in the center of the page shows the login flow and the Actions panel.\n\nOn the diagram, we can see the default login flow, which contains two states.\n\n- **Start:** The user completed the login form and is ready to log in.\n- **Complete:** The system issues the user’s credentials (an ID token and, if required, an access token).\n\nYou can drag and drop Actions in between these states to add custom logic to the login flow or to even deny the login request before the tokens are issued.\n\nOn the right panel, we have the Actions panel with two tabs.\n\n- **Installed**: Pre-installed Actions from the [Auth0 Actions Marketplace](https://marketplace.auth0.com/features/actions)\n- **Custom:** Actions created for this tenant\n\nTo create an Action, click the plus icon on the Actions panel and select \"Build Custom\".\n\n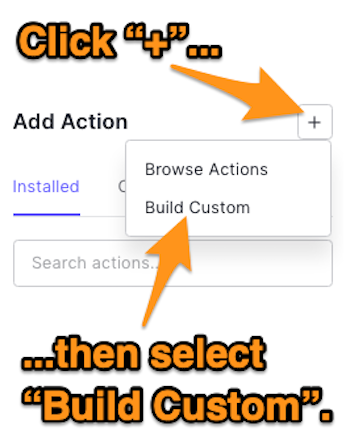\n\nAfter that, a modal window will appear to enter the information for our Action: you’ll have to provide a name, and you can leave the trigger and runtime as the default values. For my Action, I’ll name it “Validate User Login”.\n\n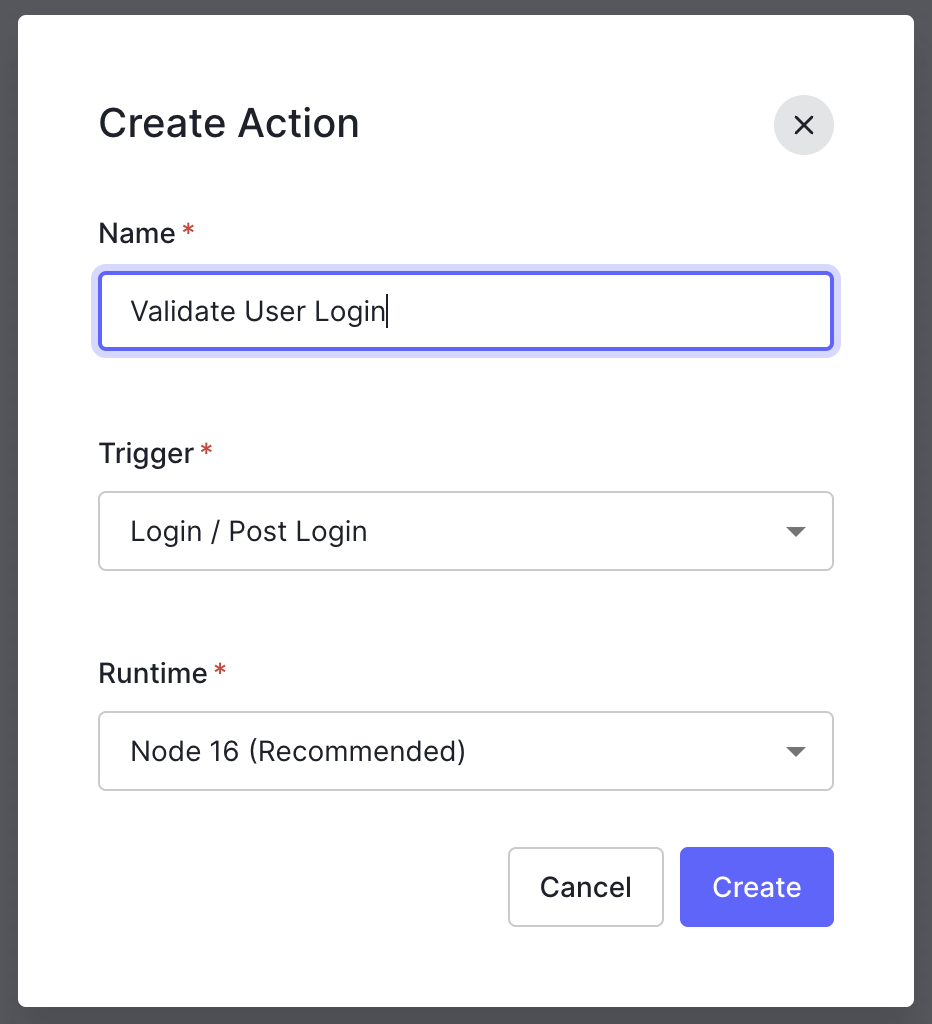\n\nAfter clicking on \"Create\", you’ll be taken to the Action’s code editor, where you can write the code for your Action, install packages, test it, and more:\n\n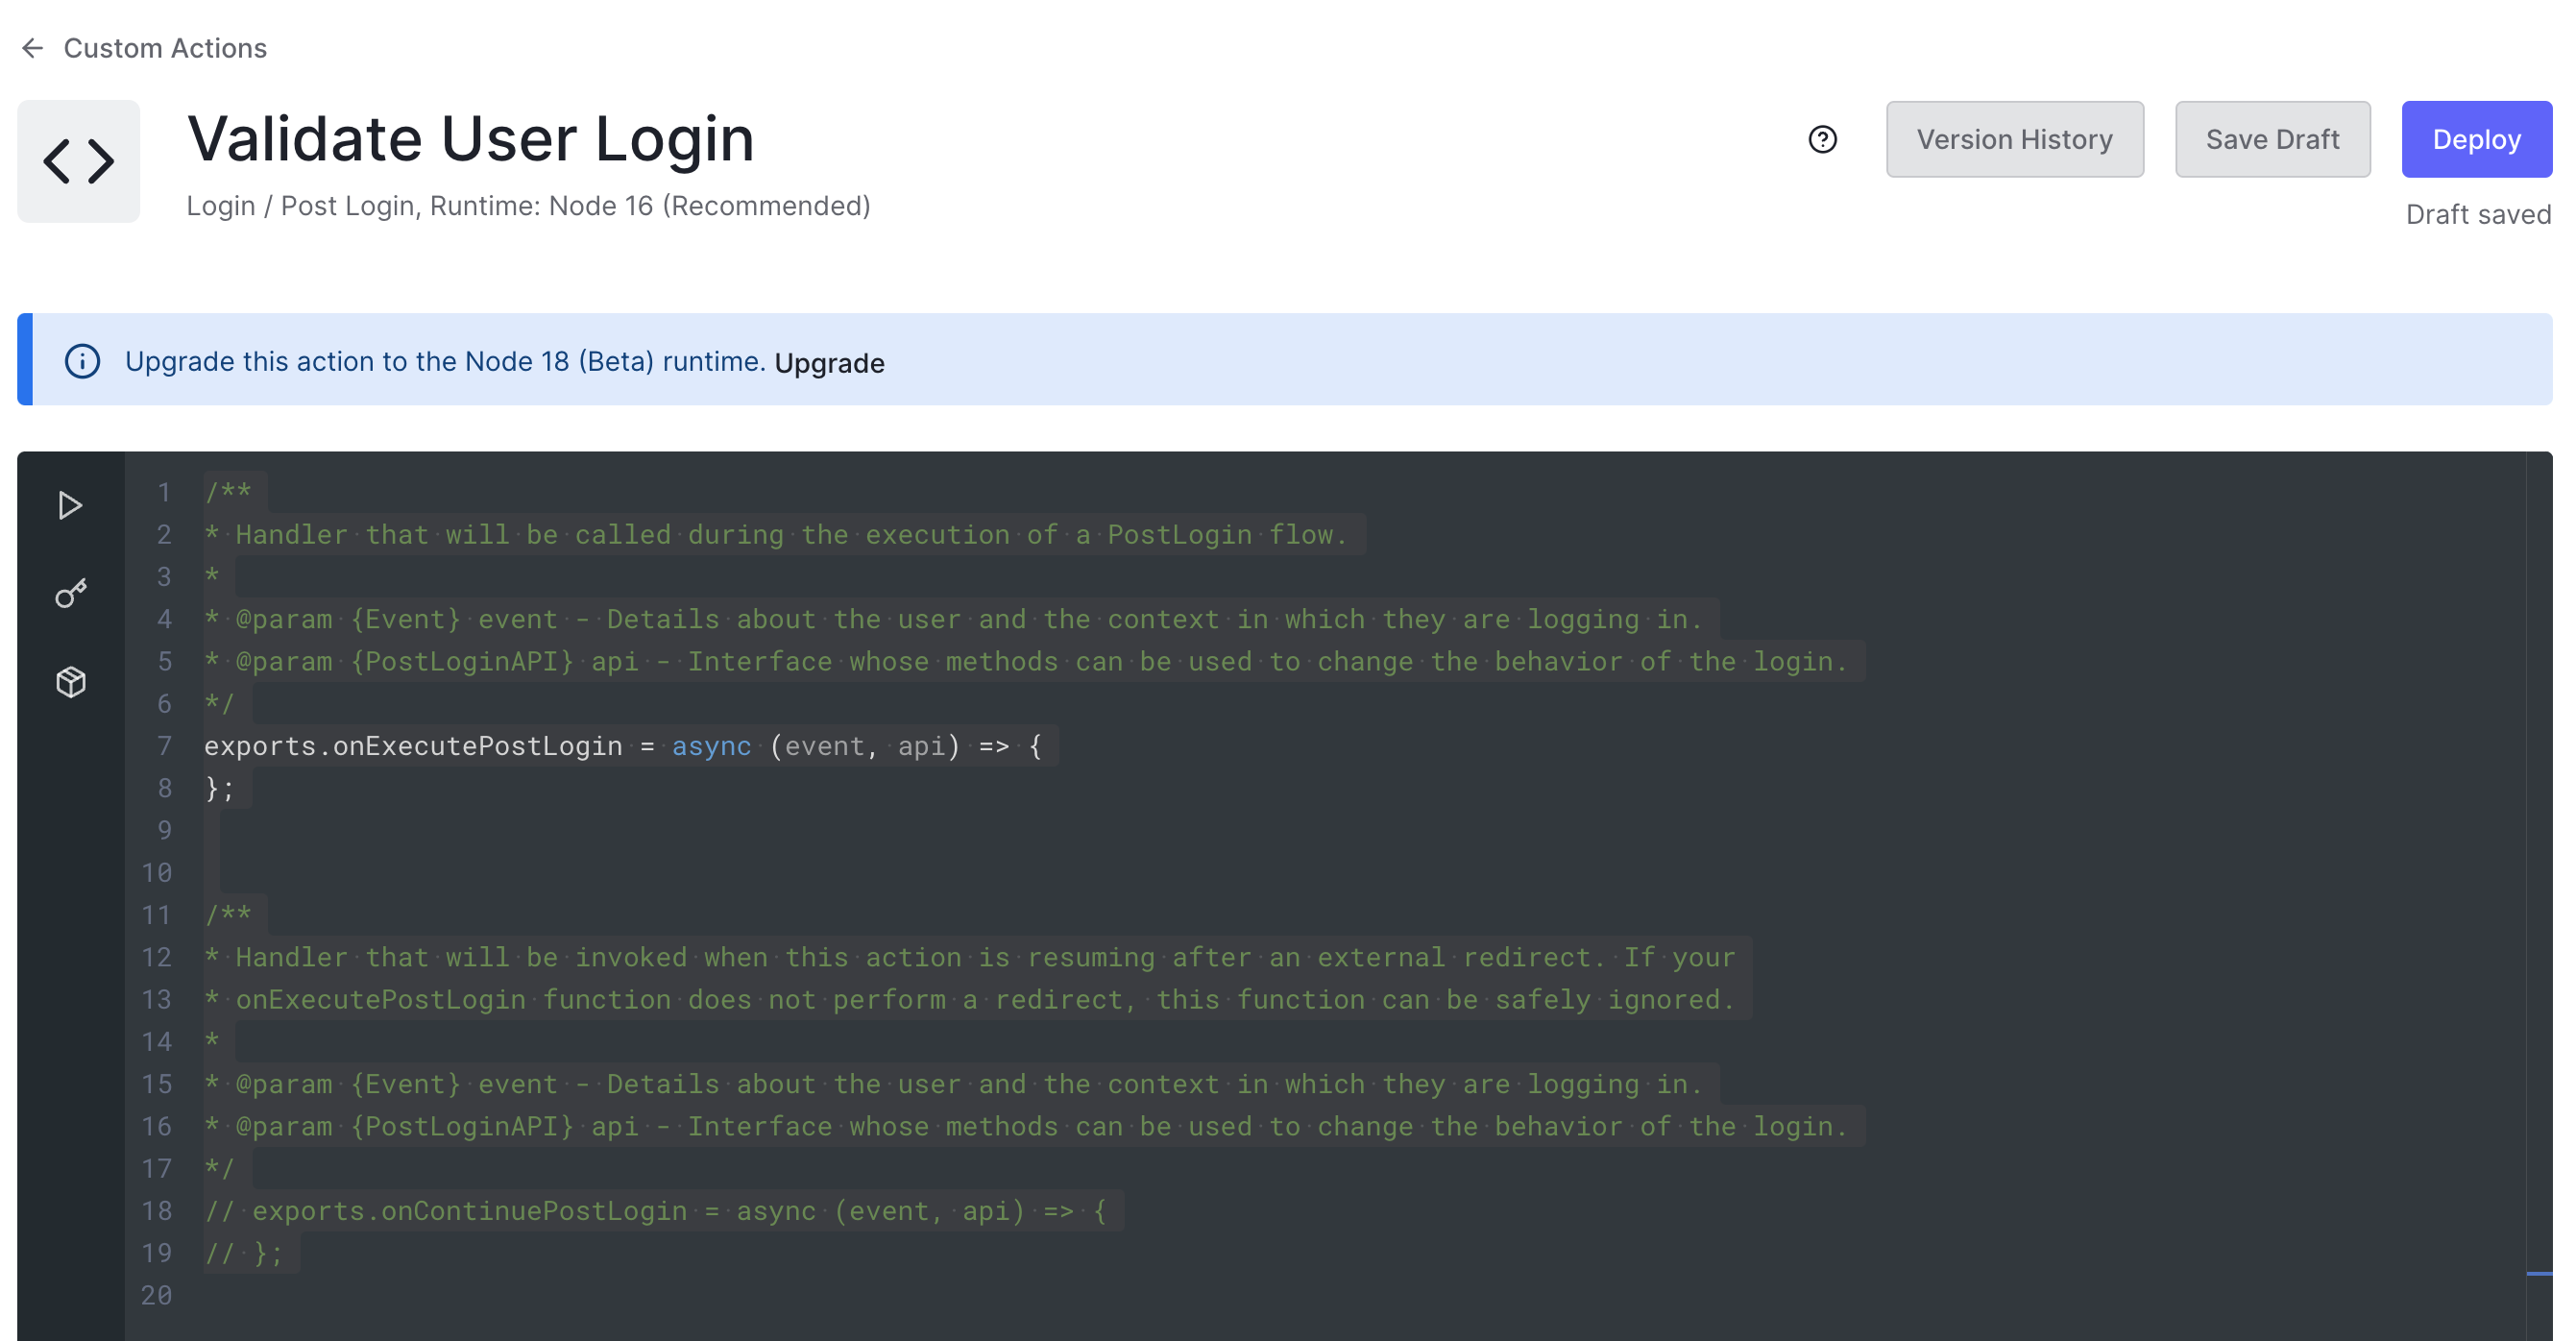\n\nAn Action can make use of two JavaScript functions to alter the Login flow:\n\n- `onExecutePostLogin`: defines what should happen immediately after the user provides login credentials that Auth0 verified. This method receives two parameters, `event` and `api`.\n - `event`: contains details about the login request, such as the user and the context.\n - `api`: contains methods to manipulate the login’s behavior.\n- `onContinuePostLogin`: defines what should happen when control returns to the Login Action after a redirect to another web page. It’s used only when the user returns after being redirected, which is why it’s commented out by default.\n\nFor this tutorial, we’ll focus on the `onExecutePostLogin` method.\n\n## Working with a Deny List\n\nA deny list is a common way to block specific users or IP addresses from logging in. To implement a deny list using Auth0 Actions, you can leverage the context available to the Action's code through the `event` parameter. The `event` object contains information about the incoming authentication request, such as user details and IP address. By accessing this object, you can compare the values against your deny list and take appropriate action just as denying the authentication request.\n\nBefore we start writing the code for our deny list, we need to know how to cancel the user’s login request. For that, we make use of the `api` parameter as follows:\n\n```javascript\napi.access.deny('reason');\n```\n\nWith a single line of code, we can deny the login request. The `deny` method expects a single parameter `reason`, which is a human-readable explanation for the rejection.\n\nNow, let’s start updating our function to support a deny list:\n\n```javascript\n// Array containing the email addresses that are blocked from logging on.\nconst denyList = ['myemail@example.com']\n\nexports.onExecutePostLogin = async (event, api) =\u003e {\n if (denyList.find(email =\u003e email === event.user.email)) {\n api.access.deny(\"Your email address is blocked from logging in to our systems.\");\n }\n};\n```\n\nIn this simple function, we have a hardcoded list of email addresses that are forbidden from logging in to our system, and the `onExecutePostLogin` simply looks if the user’s email address on the login event is in the list. If so, it denies the user’s access.\n\nOnce you add the code to the Action’s editor, it’s time for testing, and the best way to do it while in development mode is with the test panel.\n\nYou can access the test panel by clicking the play button on the editor’s sidebar, as shown below:\n\n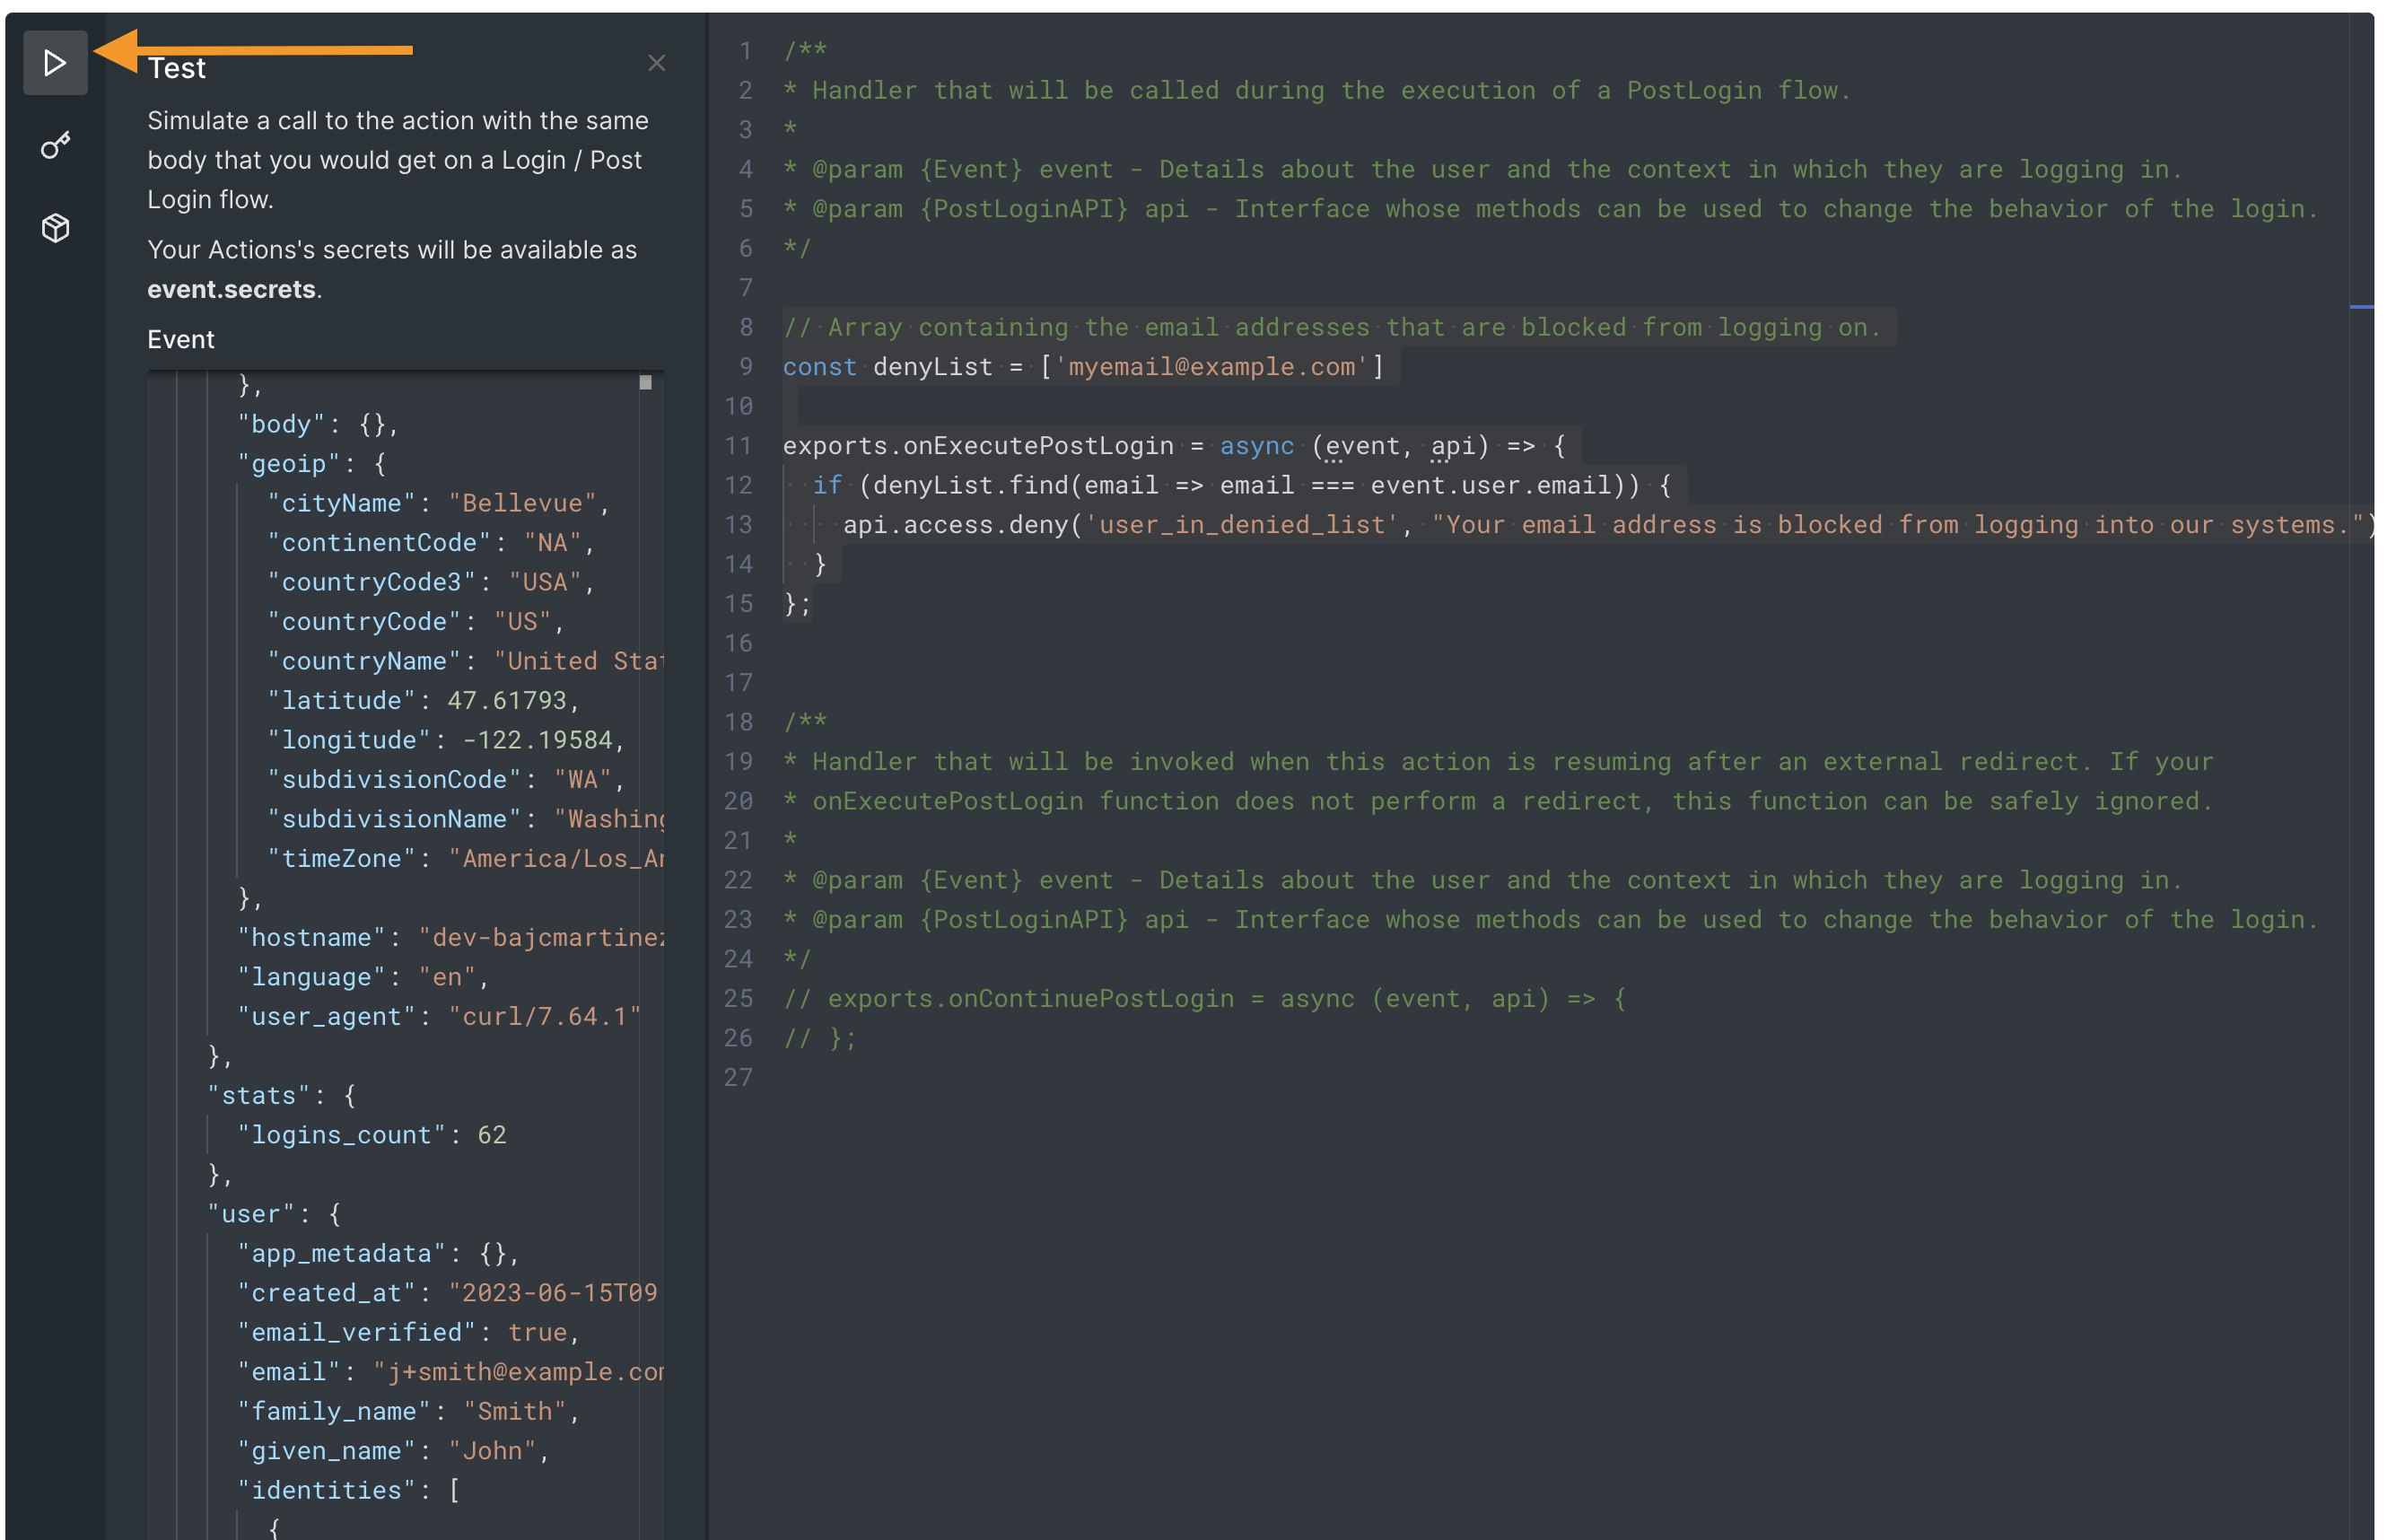\n\nOnce you expand the panel, you can customize a test event object to your needs; for example, you can look for the `user` object, which contains all user properties such as `given_name`, but more importantly for our use case, `email`.\n\nBy clicking the \"Run\" button at the bottom of the test panel, Auth0 will execute the Action on the given data and output the test results on the test result window. If the given user is not part of our denied list, you’ll see the following test output:\n\n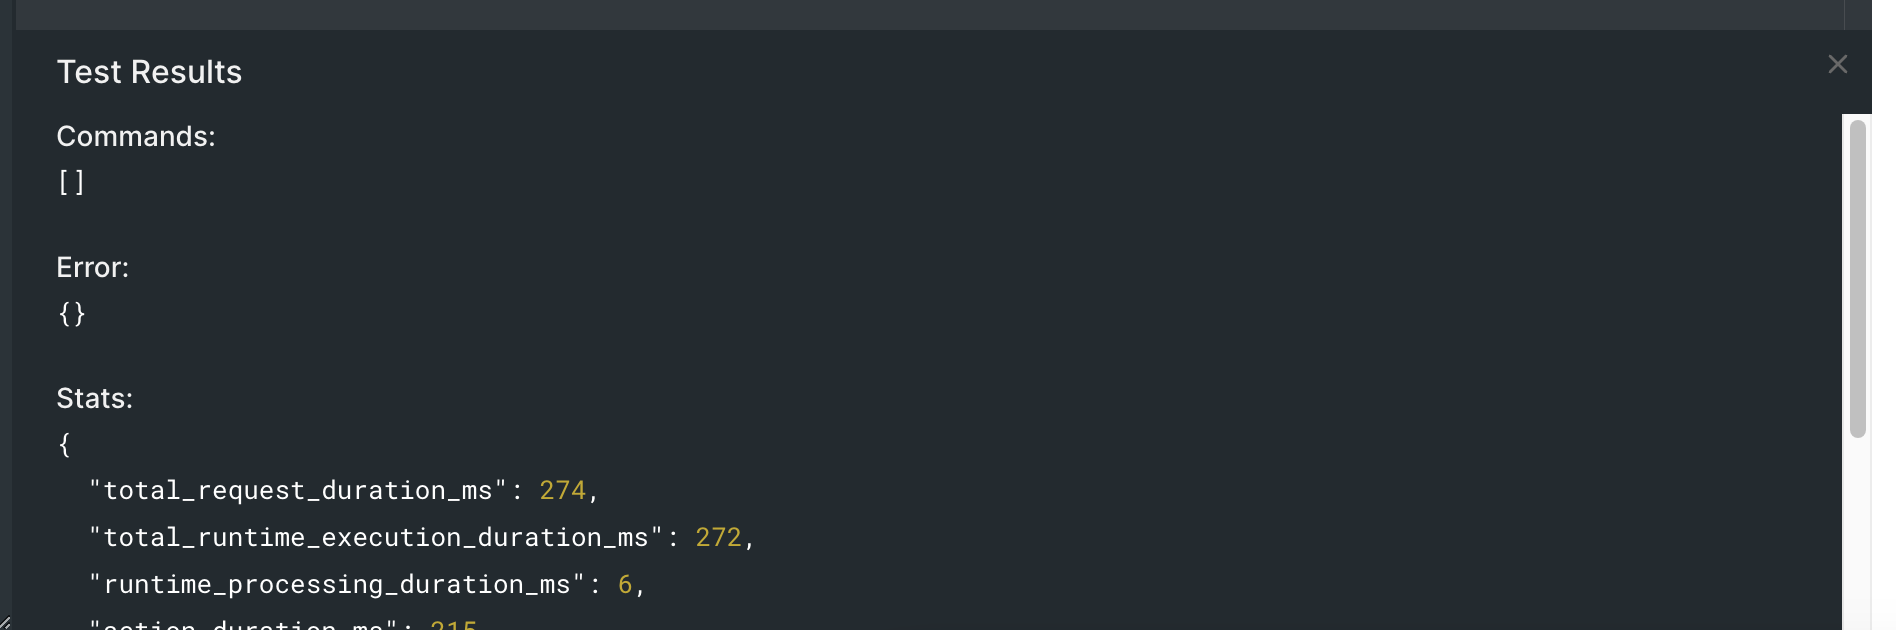\n\nOn the contrary, if you update the event JSON to include one of the denied user email addresses, you’ll receive the following test output:\n\n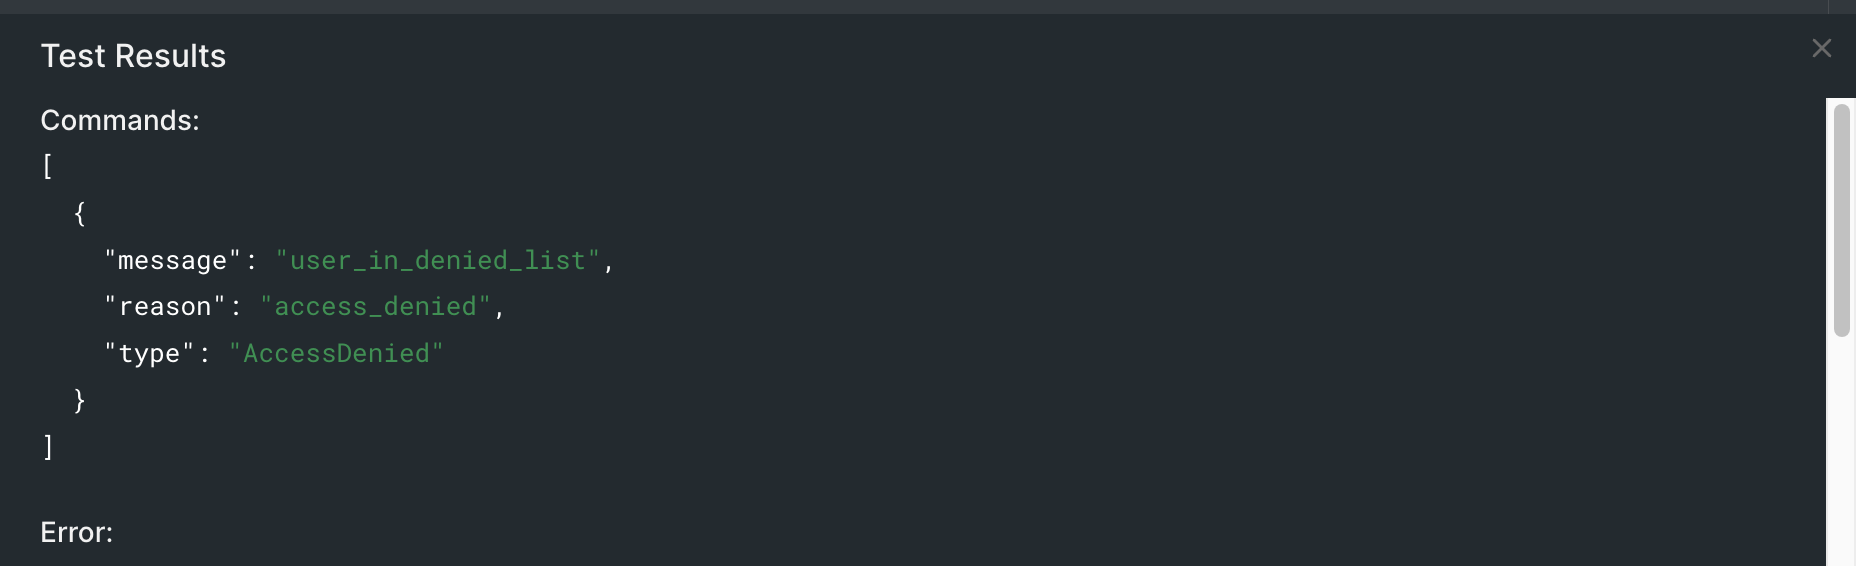\n\nFinally, once you complete your testing, you can deploy the function so it is available to add to the login flow.\n\n## Working with an Allow List\n\nOn the other hand, an allow list specifies the users or IP addresses that are explicitly permitted to log in. Like working with a deny list, you can access the necessary information using the `event` object. Compare the values against your allow list and proceed with the login flow only if the user or IP address is found on the list. Otherwise, you can deny access by rejecting the authentication request.\n\nSimilarly to the deny list, the allow list will use the `deny` method to reject all requests except those from users in the allow list.\n\nHere is the new code:\n\n```javascript\n// Array containing the email addresses that are allowed to log in.\nconst allowList = ['myemail@example.com', 'j+smith@example.com']\n\nexports.onExecutePostLogin = async (event, api) =\u003e {\n if (!allowList.find(email =\u003e email === event.user.email)) {\n api.access.deny(\"Your email address is not authorized to log into our systems.\");\n }\n};```\n\nRunning the tests, as previously explained, should give similar results following the corresponding logic.\n\n## Delegate List to an API\n\nIf you have many entries in your denied or allowed list, storing and managing the list in an external system, such as a database or an API, might be more practical. With Auth0 Actions, you can delegate the list retrieval and verification to an external API. Within your Action's code, make the necessary API calls to verify the user's status and subsequently reject or allow the authentication request.\n\nFor this exercise, we'll assume that you already have an API endpoint that, given a user's email address, will return if the user is authorized to access. Here is an example of what such an API could look like:\n\n```bash\ncurl https://myaccessapi.com/users/is_authorized?email=myemail@example.com\n{\n is_authorized: false\n}\n```\n\nGiven this simple example, let’s update our code:\n\n```javascript\nconst axios = require('axios');\n\nexports.onExecutePostLogin = async (event, api) =\u003e {\n const auth_result = await axios.get(`https://myaccessapi.com/users/is_authorized?email=${event.user.email}`)\n if (!auth_result.is_authorized) {\n api.access.deny(\"Your email address is blocked from logging in to our systems.\");\n }\n};\n```\n\nNote that for calling an API, we are using the `axios` library, which is already available in your Actions environment. If you need access to other dependencies, you can simply add npm dependencies as part of your Actions bundle. You can learn more about dependencies on Actions on the [official documentation](https://auth0.com/docs/customize/actions/manage-dependencies).\n\n## Attach an Auth0 Action to the Login Flow\n\nAfter coding and testing your Actions, it’s time to deploy and use them as part of the login flow. Once you are ok with your testing results, you can hit the `Deploy` button on the top right corner of the screen. This will take the existing code and settings and generate a function snapshot you can use in your login flow.\n\nIf you ever need to change the code on the function, all changes will automatically be saved as a new draft, and if you want the changes to become effective, you’ll have to deploy your latest version once again.\n\nOnce your code is deployed, it doesn’t mean it is actively used as part of your login flow. To check for that, please refer back to the [login flow screen](https://manage.auth0.com/#/actions/flows/login/), where the login diagram is shown. If you don’t see your Action as part of the diagram, it means that, even if your Action is deployed, it has not yet been activated. To activate the Action as part of the flow, click on the “Custom” tab on the Actions panel, locate your Action by name, and simply drag and drop the box over the login diagram between the \"Start\" and \"Complete\" steps. After that, you can apply changes using the “Apply” button on the top right corner of the screen.\n\n\n\n## Summary\n\nThis article explored how to leverage Auth0 Actions to permit or deny login requests. By using a deny list or an allow list, you can enhance the security of your application and control access based on specific criteria. We also discussed delegating the list management to an external API, providing scalability and flexibility. With Auth0 Actions, you have the power to customize the login flow and add an additional layer of security to your application.\n\nThe examples I provided throughout the article are a good starting point. However, you can further customize them to meet your needs. For instance, you could use allow/deny lists by domains instead of emails or by IP addresses, country, day and time, etc.\n\nAlways thoroughly test your implementation and consider any potential edge cases specific to your application's requirements. By using Auth0 Actions effectively, you can ensure a robust and secure authentication experience for your users.\n\nThanks for reading!","readTime":10,"formattedDate":"Apr 18, 2024"},{"path":"building-beautiful-login-pages-with-auth0","title":"Building Beautiful Login Pages with Auth0","heroImage":{"url":"https://images.ctfassets.net/23aumh6u8s0i/1MHyeo57ac0lpMJOGIhPwd/76f2cdd335c31ee4edc29c8da5527f54/Introducing_Auth0_Actions01A.png","size":{"width":2352,"height":2113}},"category":["Developers","Tutorial","Universal Login"],"authors":[{"metadata":{"tags":[],"concepts":[]},"sys":{"space":{"sys":{"type":"Link","linkType":"Space","id":"23aumh6u8s0i"}},"id":"7qC8LJD80VSx1qYcSdQ1Zh","type":"Entry","createdAt":"2021-08-23T12:59:46.069Z","updatedAt":"2025-01-08T14:00:38.100Z","environment":{"sys":{"id":"master","type":"Link","linkType":"Environment"}},"publishedVersion":42,"revision":6,"contentType":{"sys":{"type":"Link","linkType":"ContentType","id":"author"}},"locale":"en-US"},"fields":{"path":"juan-cruz-martinez","name":"Juan Cruz Martinez","avatar":{"metadata":{"tags":[{"sys":{"type":"Link","linkType":"Tag","id":"user"}}],"concepts":[]},"sys":{"space":{"sys":{"type":"Link","linkType":"Space","id":"23aumh6u8s0i"}},"id":"5b3YvfAb53h2I5U6uanww4","type":"Asset","createdAt":"2022-07-07T09:23:40.589Z","updatedAt":"2022-07-07T09:23:56.422Z","environment":{"sys":{"id":"master","type":"Link","linkType":"Environment"}},"publishedVersion":10,"revision":5,"locale":"en-US"},"fields":{"title":"jcm","description":"Juan Cruz Martinez","file":{"url":"//images.ctfassets.net/23aumh6u8s0i/5b3YvfAb53h2I5U6uanww4/f1dfa0e19f15f5df8eacd53f78a813f6/jcm.jpeg","details":{"size":29371,"image":{"width":400,"height":400}},"fileName":"jcm.jpeg","contentType":"image/jpeg"}}},"lastUpdatedBy":"Juan Cruz Martinez","email":"juan.martinez@okta.com","twitter":"https://twitter.com/bajcmartinez","github":"https://github.com/bajcmartinez","linkedin":"https://www.linkedin.com/in/bajcmartinez/","isPopular":true,"personalWebsite":"https://jcmartinez.dev/","type":"Auth0 Employee","jobTitle":"Staff Developer Advocate","description":"I stream, blog, and make youtube videos about tech stuff. I love coding, I love AI, and I love building stuff!"}}],"redirectTo":null,"isHiddenFromBlogPostGrid":false,"lang":"en","tags":["universal-login","cli","templates"],"dateCreated":"2023-06-15T14:00","dateLastUpdated":"2024-04-18","postContent":"So, you've built an outstanding application. Your landing page is meticulously designed, compelling, and has a high conversion rate. You've carefully crafted every detail of the user experience, but what about the entry points to your app – the signup and login pages?\n\nOften overlooked in the design process, these critical touchpoints serve as the users’ gateways into your application. They should be as compelling, user-friendly, and beautiful as the rest of your application. Just as the landing page captures the user's attention, the login and signup pages are where you can truly start to engage users, encouraging them to join your application.\n\nIn this article, we'll explore how Auth0 makes it easy to build login and signup experiences that not only align seamlessly with your branding but also provide a superior user experience. A poorly designed login page can lead to user frustration and higher abandonment rates, whereas a well-designed one establishes trust and encourages engagement. Because every aspect of your application, even the seemingly mundane, should be nothing short of beautiful.\n\nLet's dive into how Auth0 can elevate your login experience, covering the importance of UI and UX, and offering practical tips to create extraordinary login flows.\n\n## The Importance of the Login Page Design\n\nThe login page is often the first impression a user has of your application. It sets the tone for the entire user experience and can make or break a user's decision to continue using your app.\n\nThe design of a login page encompasses both UI and UX. It should not only be pretty but also easy to use while conveying a sense of security and trustworthiness to the user.\n\nIf you need inspiration or to learn some tips on what makes good login pages extraordinary, check out these [ten tips](https://www.invisionapp.com/inside-design/login-page-design/).\n\n## Getting Started\n\nAuth0 offers a variety of [customization options to match your application's branding and design](https://auth0.com/blog/customize-auth0-universal-login-with-auth0-cli/). With Auth0, you can rest assured that your login and signup pages will be not only beautiful and match your brand but also secure and reliable.\n\nIn many scenarios, those out-of-the-box settings are all you need to make your login and signup pages match your brand and style. But in case you want a completely customized page, Auth0 offers the possibility to create your own styles and designs using [HTML, CSS, and JavaScript templates](https://auth0.com/docs/customize/universal-login-pages/universal-login-page-templates). \n\n\u003e Custom templates require enabling [custom domains](https://auth0.com/docs/customize/custom-domains), which is a paid feature.\n\nIn this article, we’ll focus on creating our own template to have full control over the login experience. However, if you would like to know how to set up your branding settings instead, you can refer to this article on [Customize Auth0 Universal Login with Auth0 CLI](https://auth0.com/blog/customize-auth0-universal-login-with-auth0-cli/).\n\nYou can work with templates either through the [Auth0 Dashboard](https://manage.auth0.com/#/login_page) with an integrated code editor and preview mode, or you can use the [Auth0 CLI](https://github.com/auth0/auth0-cli) with your editor of choice and [Storybook](https://storybook.js.org/) to preview your designs.\n\nThroughout the article, we'll use the Auth0 CLI to customize the templates as it provides a rich developer experience.\n\n## Setting up the Auth0 CLI\n\nThe Auth0 CLI is a powerful tool that allows you to manage your entire Auth0 tenant from the command line. The Auth0 CLI helps you simplify your workflows and set up automation on your Auth0 account.\n\n### Install the Auth0 CLI\n\nThe Auth0 CLI is available for macOS, Linux, and Windows. To install it on your preferred OS, please follow [these installation instructions](https://github.com/auth0/auth0-cli#installation).\n\nAfter your installation completes, you can verify the installation by running the following command:\n\n```bash\nauth0 -v\n```\n\n### Connect the CLI to your Auth0 Account\n\nTo connect the CLI to your Auth0 account, you'll need to log in. Run the following command in your terminal and follow the instructions to authenticate:\n\n```bash\nauth0 login\n```\n\nFirst, the CLI will prompt for one of two authentication methods, `As a user` or `As a machine`. For now, we’ll select `As a user` since it is the recommended option for a personal computer. However, for automation scenarios, it is recommended to select the latter.\n\nNext, we need to authenticate in the browser using [device authorization flow](https://auth0.com/docs/get-started/authentication-and-authorization-flow/device-authorization-flow). The Auth0 CLI will show a code on the screen and will open a browser session, where the code should match, and after verification, you’ll have to authorize the CLI on all the requested scopes.\n\n## Activate a Custom Domain\n\nAs mentioned before, a requirement for editing custom templates is to activate custom domains, which is a good practice for production. Since custom domains come in different configurations and multiple steps, I won’t be covering them in this article. Instead, I can refer you to the [custom domains documentation](https://auth0.com/docs/customize/custom-domains), where you can find all the information you’ll need with step-by-step instructions.\n\nOnce you have a custom domain set up on your account, you can continue with the rest of the article.\n\n## Customizing the Universal Login UI\n\nTo start customizing the Universal Login UI, run the following command on your terminal:\n\n```bash\nauth0 universal-login customize\n```\n\nThis will open the Auth0 customization editor on your browser which will allow you to change any visual settings in Universal Login, from colors, logo, texts, and you can design your own templates with live preview in this app.\n\n\n\nAny changes that you make locally can then be deployed to your Auth0 tenant from the same UI.\n\n### Exploring the UI\n\nThe UI customization tool is divided into three sections:\n\n- **Navigation bar**: It allows you to work on different areas of customization, from settings, theme, page template and custom texts. It also allows you to navigate through the different prompts like login, signup, etc.\n- **Editor**: On the left side, it's the editor. It will display information about the current state of your page in either JSON for settings or HTML code for the page template editor.\n- **Preview window**: The preview window gives you a live preview of your changes and how your UL page will look like when deployed to your tenant.\n\n## Building a Beautiful Template\n\nIf you jump into the **Page Template** section, the editor will load the current template available for your tenant. If you have never customized your template, it will display the default template which looks like this:\n\n```html\n\u003c!DOCTYPE html\u003e\n\u003chtml\u003e\n \u003chead\u003e\n {%- auth0:head -%}\n \u003c/head\u003e\n \u003cbody\u003e\n {%- auth0:widget -%}\n \u003c/body\u003e\n\u003c/html\u003e\n```\n\nThere's some custom code in that template, let's explore what each of those sections do:\n\n- `{%- auth0:head -%}`: This will set all the head elements that are required for universal login to work, like importing scripts, basic styles, etc.\n- `{%- auth0:widget -%}`: This will place the login widget on the screen.\n\nTemplates use [Liquid syntax](https://shopify.github.io/liquid/basics/introduction/), with variables you can use to further customize your experience. You can read about all variables available [here](https://auth0.com/docs/customize/universal-login-pages/universal-login-page-templates).\n\nOne of the benefits of using Auth0's rich templating system is the ability to customize logic depending on the current prompt. For example, you could have some parts of the UI shown on the signup screen but not on the login or other prompts. The term prompt is used to refer to a specific step in the login flow. Each prompt can have one or more screens. For example, the `reset-password` prompt would have multiple screens for resetting password requests, checking your email, entering a new password, and confirming your change. You can find the complete list of prompts and screens on the [official template variables documentation](https://auth0.com/docs/customize/universal-login-pages/universal-login-page-templates#:~:text=screen%20being%20rendered.-,The%20term%C2%A0prompt,-is%20used%20to).\n\nYou can do that by implementing conditionals over the variable `prompt.name`. Here's an example that renders additional content when the user is signing up.\n\n```text\n{% if prompt.name == \"signup\" %}\nShow this only if the user is signing up\n{% end %}\n```\n\nAs part of templating, you can also set custom brand parameters, such as the brand's primary color, background, and logo, which you can use throughout the template by accessing the `branding` variable.\n\nFor example, if you need a button that aligns with the branding's primary color, you could implement it as follows:\n\n```html\n\u003cbutton style=\"background-color: {{branding.colors.primary}}\" ...\u003eMy Button\u003c/button\u003e\n```\n\nNow that we know what we can do with the templating system, it's time to build your own.\n\nHere's what I'll build. Feel free to copy and paste this template and customize it to your application or use it as a baseline for your own.\n\n- Signup screen:\n\t\n- Login screen:\n\t\n\nWhat’s interesting about this design is that the signup page looks different from the rest as it provides additional information about the product, so users know what they are signing up for. I also make use of variables to set the branding color on custom elements and I added some responsive elements for tablets and mobile devices.\n\nHere is my template for your reference:\n\n```html\n\u003c!DOCTYPE html\u003e\n\u003chtml\u003e\n \u003chead\u003e\n {%- auth0:head -%}\n\n \u003cstyle\u003e\n body {\n background-color: #fff;\n }\n\n .wrapper {\n max-width: 80rem;\n margin: 0 auto;\n }\n\n {% if prompt.name == \"signup\" %} \n .container {\n width: 100%;\n height: 100vh;\n display: grid;\n grid-template-columns: 1fr 1fr;\n align-items: center;\n }\n\n @media screen and (max-width: 720px) {\n .container {\n display: flex;\n flex-direction: column;\n }\n }\n\n .container \u003e .info {\n max-width: 28rem;\n padding: 1rem;\n }\n {% else %}\n .container {\n width: 100%;\n height: 100vh;\n display: flex;\n align-items: center;\n justify-content: center;\n }\n\n .container \u003e .info {\n display: none;\n }\n {% endif %}\n\n .container \u003e .info h2.title {\n font-size: 3rem;\n line-height: 1.2;\n margin-bottom: 1.5rem;\n font-weight: bold;\n }\n\n .container \u003e .info p.subtitle {\n color: #718096;\n }\n\n .container \u003e .info ul {\n list-style-type: none;\n margin: 0;\n padding: 0;\n }\n \n .container \u003e .info li {\n color: #1A202C;\n }\n\n .container \u003e .info li svg {\n color: #5CC98D;\n vertical-align: text-bottom;\n margin-top: 1.5rem;\n }\n\n .container \u003e .login-box {\n position: relative;\n display: flex;\n align-items: center;\n justify-content: center;\n padding: 0 4rem;\n }\n\n .container \u003e .login-box svg {\n position: absolute;\n width: 100%;\n }\n \u003c/style\u003e\n \u003c/head\u003e\n \u003cbody\u003e\n \u003cdiv class=\"wrapper\"\u003e\n \u003cdiv class=\"container\"\u003e\n \u003cdiv class=\"info\"\u003e\n \u003ch2 class=\"title\"\u003eMy Product\u003c/h2\u003e\n \u003cp class=\"subtitle\"\u003eMy product is awesome and it offers the following features:\u003c/p\u003e\n \u003cul role=\"list\"\u003e\n \u003cli\u003e\n \u003csvg stroke=\"currentColor\" fill=\"currentColor\" stroke-width=\"0\" viewBox=\"0 0 24 24\" focusable=\"false\" role=\"presentation\" height=\"1em\" width=\"1em\" xmlns=\"http://www.w3.org/2000/svg\"\u003e\u003cpath d=\"m10 15.586-3.293-3.293-1.414 1.414L10 18.414l9.707-9.707-1.414-1.414z\"\u003e\u003c/path\u003e\u003c/svg\u003e\n Feature 1\n \u003c/li\u003e\n \u003cli\u003e\n \u003csvg stroke=\"currentColor\" fill=\"currentColor\" stroke-width=\"0\" viewBox=\"0 0 24 24\" focusable=\"false\" role=\"presentation\" height=\"1em\" width=\"1em\" xmlns=\"http://www.w3.org/2000/svg\"\u003e\u003cpath d=\"m10 15.586-3.293-3.293-1.414 1.414L10 18.414l9.707-9.707-1.414-1.414z\"\u003e\u003c/path\u003e\u003c/svg\u003e\n Feature 2\n \u003c/li\u003e\n \u003cli\u003e\n \u003csvg stroke=\"currentColor\" fill=\"currentColor\" stroke-width=\"0\" viewBox=\"0 0 24 24\" focusable=\"false\" role=\"presentation\" height=\"1em\" width=\"1em\" xmlns=\"http://www.w3.org/2000/svg\"\u003e\u003cpath d=\"m10 15.586-3.293-3.293-1.414 1.414L10 18.414l9.707-9.707-1.414-1.414z\"\u003e\u003c/path\u003e\u003c/svg\u003e\n Feature 3\n \u003c/li\u003e\n \u003cli\u003e\n \u003csvg stroke=\"currentColor\" fill=\"currentColor\" stroke-width=\"0\" viewBox=\"0 0 24 24\" focusable=\"false\" role=\"presentation\" height=\"1em\" width=\"1em\" xmlns=\"http://www.w3.org/2000/svg\"\u003e\u003cpath d=\"m10 15.586-3.293-3.293-1.414 1.414L10 18.414l9.707-9.707-1.414-1.414z\"\u003e\u003c/path\u003e\u003c/svg\u003e\n Feature 4\n \u003c/li\u003e\n \u003cli\u003e\n \u003csvg stroke=\"currentColor\" fill=\"currentColor\" stroke-width=\"0\" viewBox=\"0 0 24 24\" focusable=\"false\" role=\"presentation\" height=\"1em\" width=\"1em\" xmlns=\"http://www.w3.org/2000/svg\"\u003e\u003cpath d=\"m10 15.586-3.293-3.293-1.414 1.414L10 18.414l9.707-9.707-1.414-1.414z\"\u003e\u003c/path\u003e\u003c/svg\u003e\n Feature 5\n \u003c/li\u003e\n \u003c/ul\u003e\n \u003c/div\u003e\n \u003cdiv class=\"login-box\"\u003e\n \u003csvg width=\"1013\" height=\"890\" viewBox=\"0 0 1013 890\" fill=\"none\" xmlns=\"http://www.w3.org/2000/svg\"\u003e\n \u003cpath d=\"M180.462 795.681L40.8315 567.776C19.5801 533.09 8.95466 515.747 4.64446 497.091C0.831363 480.586 0.608543 463.413 3.99145 446.712C7.81567 427.835 17.9843 409.924 38.3214 374.102L184.235 117.101C203.682 82.8483 213.405 65.722 227.028 52.9648C239.084 41.6743 253.303 32.9153 268.81 27.225C286.332 20.7958 306.003 19.8141 345.345 17.8502L644.507 2.91668C685.874 0.851143 706.557 -0.18069 725.22 4.94606C741.731 9.48141 757.023 17.479 770.074 28.4042C784.827 40.7544 795.51 58.1913 816.877 93.066L955.838 319.878C977.009 354.434 987.595 371.712 991.91 390.3C995.728 406.747 995.98 423.86 992.649 440.515C988.883 459.337 978.815 477.215 958.678 512.969L811.011 775.156C791.315 810.127 781.466 827.612 767.593 840.563C755.316 852.023 740.811 860.86 724.997 866.515C707.127 872.905 687.074 873.638 646.968 875.103L350.229 885.943L350.228 885.944C309.449 887.433 289.06 888.178 270.689 882.944C254.434 878.313 239.396 870.318 226.557 859.48C212.045 847.23 201.517 830.047 180.462 795.681Z\" fill=\"{{branding.colors.primary}}\"/\u003e\n \u003cpath d=\"M179.711 769.196L58.7659 539.848C40.3585 504.942 31.155 487.489 28.2839 469.088C25.744 452.808 26.7984 436.065 31.3778 419.97C36.5543 401.778 47.9229 384.859 70.66 351.022L233.792 108.259C255.534 75.9041 266.405 59.7266 280.801 48.0099C293.543 37.6402 308.23 29.8499 323.963 25.1169C341.74 19.7693 361.233 19.8416 400.221 19.9857L696.692 21.0815C737.687 21.2325 758.184 21.3089 776.23 27.2798C792.194 32.562 806.699 41.1538 818.774 52.4806C832.423 65.2849 841.676 82.8321 860.183 117.928L980.548 346.176C998.887 380.95 1008.06 398.337 1010.94 416.674C1013.49 432.897 1012.46 449.584 1007.94 465.636C1002.82 483.778 991.558 500.669 969.023 534.451L803.775 782.175C781.734 815.216 770.713 831.737 756.054 843.629C743.084 854.153 728.106 862.004 712.074 866.687C693.957 871.978 674.104 871.643 634.398 870.973L340.624 866.016L340.623 866.016C300.251 865.335 280.065 864.994 262.316 858.934C246.611 853.572 232.358 844.996 220.486 833.765C207.067 821.072 197.948 803.779 179.711 769.196Z\" fill=\"{{branding.colors.primary}}\"/\u003e\n \u003c/svg\u003e\n {%- auth0:widget -%}\n \u003c/div\u003e\n \u003c/div\u003e\n \u003c/div\u003e\n \u003c/body\u003e\n\u003c/html\u003e\n```\n\n## Explore Your Own Designs\n\nBy the end of this article, you can now design and customize signup and login experiences with Auth0 that are as beautiful and user-friendly as the rest of your application. With the power of custom templates, you can integrate your brand's color palette, unique fonts, and more. I'd love to see the unique and effective login experiences you create! Please share screenshots or links in the comments below.\n\nThanks for reading!","readTime":11,"formattedDate":"Apr 18, 2024"},{"path":"five-common-authentication-and-authorization-mistakes-to-avoid-in-your-saas-application","title":"Five Common Authentication and Authorization Mistakes to Avoid in Your SaaS Application","heroImage":{"url":"https://images.ctfassets.net/23aumh6u8s0i/3WOCG5ZPvw94OAuCOoa7r9/b82b2a33bd0bd3fea933d8cbaefbcf40/cybersecurity_ncsam.jpg","size":{"width":1176,"height":1056}},"category":["Developers","Tips","Security"],"authors":[{"metadata":{"tags":[],"concepts":[]},"sys":{"space":{"sys":{"type":"Link","linkType":"Space","id":"23aumh6u8s0i"}},"id":"7qC8LJD80VSx1qYcSdQ1Zh","type":"Entry","createdAt":"2021-08-23T12:59:46.069Z","updatedAt":"2025-01-08T14:00:38.100Z","environment":{"sys":{"id":"master","type":"Link","linkType":"Environment"}},"publishedVersion":42,"revision":6,"contentType":{"sys":{"type":"Link","linkType":"ContentType","id":"author"}},"locale":"en-US"},"fields":{"path":"juan-cruz-martinez","name":"Juan Cruz Martinez","avatar":{"metadata":{"tags":[{"sys":{"type":"Link","linkType":"Tag","id":"user"}}],"concepts":[]},"sys":{"space":{"sys":{"type":"Link","linkType":"Space","id":"23aumh6u8s0i"}},"id":"5b3YvfAb53h2I5U6uanww4","type":"Asset","createdAt":"2022-07-07T09:23:40.589Z","updatedAt":"2022-07-07T09:23:56.422Z","environment":{"sys":{"id":"master","type":"Link","linkType":"Environment"}},"publishedVersion":10,"revision":5,"locale":"en-US"},"fields":{"title":"jcm","description":"Juan Cruz Martinez","file":{"url":"//images.ctfassets.net/23aumh6u8s0i/5b3YvfAb53h2I5U6uanww4/f1dfa0e19f15f5df8eacd53f78a813f6/jcm.jpeg","details":{"size":29371,"image":{"width":400,"height":400}},"fileName":"jcm.jpeg","contentType":"image/jpeg"}}},"lastUpdatedBy":"Juan Cruz Martinez","email":"juan.martinez@okta.com","twitter":"https://twitter.com/bajcmartinez","github":"https://github.com/bajcmartinez","linkedin":"https://www.linkedin.com/in/bajcmartinez/","isPopular":true,"personalWebsite":"https://jcmartinez.dev/","type":"Auth0 Employee","jobTitle":"Staff Developer Advocate","description":"I stream, blog, and make youtube videos about tech stuff. I love coding, I love AI, and I love building stuff!"}}],"redirectTo":null,"isHiddenFromBlogPostGrid":false,"lang":"en","tags":["saas","api","authorization","authentication","security"],"dateCreated":"2023-04-18T15:08","dateLastUpdated":null,"postContent":"In today's rapidly evolving digital landscape, Software as a Service (SaaS) applications have become an integral part of numerous businesses worldwide. As these applications typically handle sensitive information, robust authentication mechanisms are crucial to ensuring the security and privacy of user data. The importance of authentication in SaaS applications cannot be overstated. It forms the first line of defense against unauthorized access, preventing data breaches and maintaining the trust of clients and end-users.\n\nThis article will dive into the pitfalls developers, indie hackers, and organizations often encounter while building or implementing authentication and authorization models.\n\nRecognizing and addressing these issues can strengthen your SaaS application's authentication process, bolstering security and reducing the likelihood of cyber-attacks.\n\n## Allowing for Weak Passwords\n\n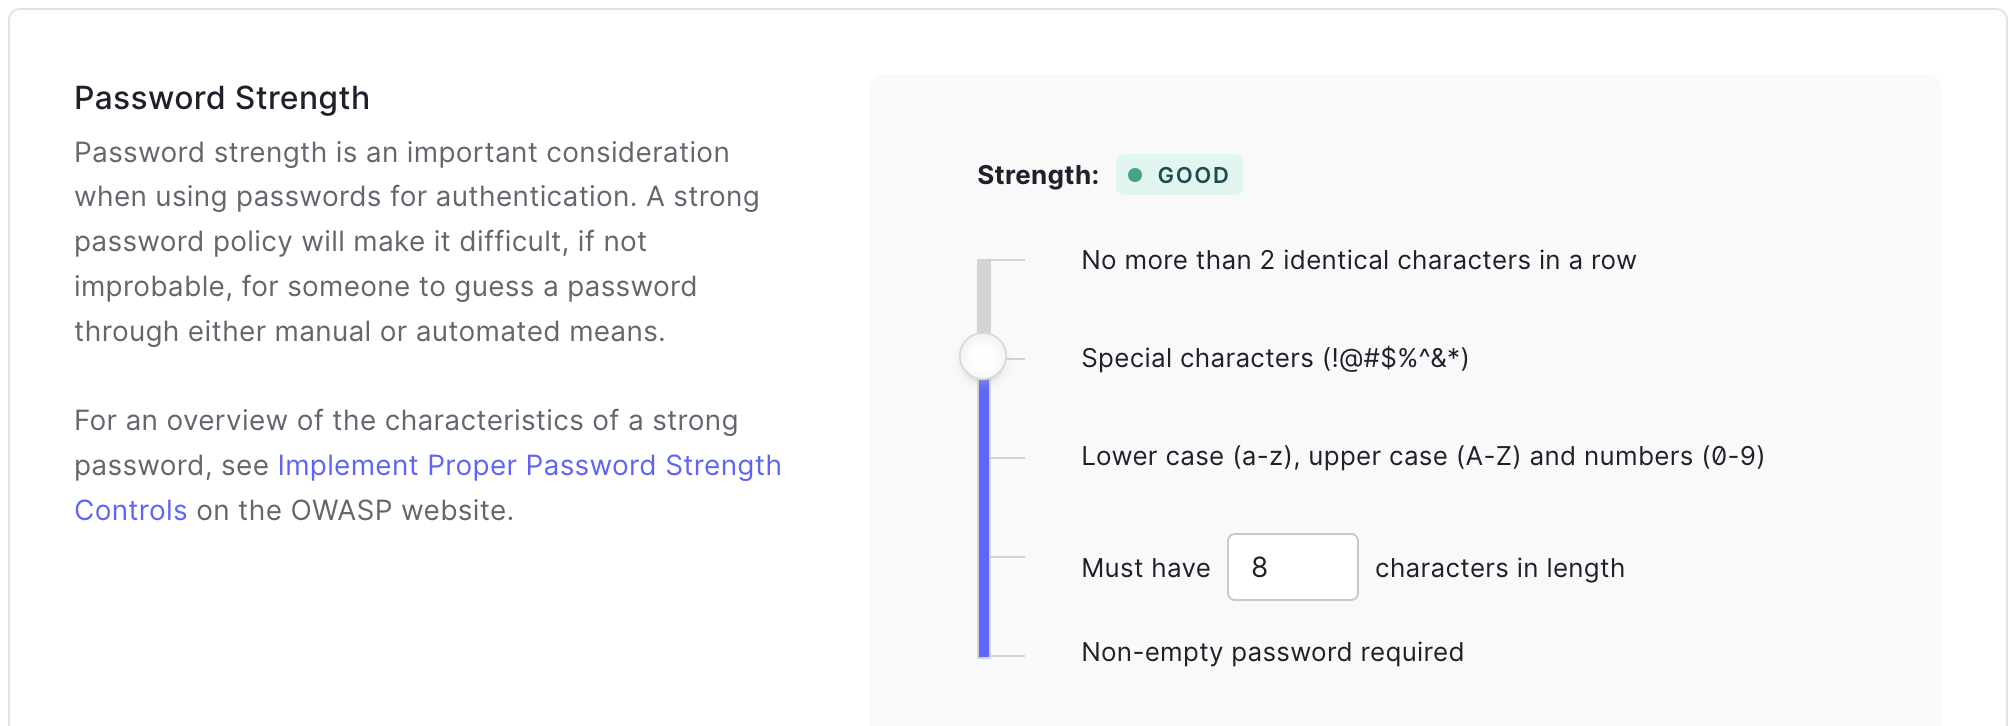\n\nOne common authentication mistake made in SaaS applications is permitting users to create weak passwords. You've likely encountered websites or apps that don't enforce strong password requirements, allowing users to set passwords like \"123456\" or \"password.\" While allowing simple and easy-to-remember passwords might seem user-friendly, this approach poses a significant security risk.\n\nHackers can easily guess or crack weak passwords, making it simpler for them to gain unauthorized access to user accounts. Dealing with sensitive data in a SaaS application can lead to data breaches, loss of user trust, and even legal consequences.\n\nHere's why allowing for weak passwords is a mistake and how you can promote the use of stronger passwords in your SaaS application:\n\n- **Enforce password complexity**: Encourage users to create strong passwords by requiring a mix of uppercase and lowercase letters, numbers, and special characters. Implementing these requirements makes it more challenging for hackers to guess or brute-force passwords.\n- **Set a minimum password length**: Longer passwords are generally more secure. Aim for a minimum password length of [at least 10 characters](https://auth0.com/docs/authenticate/database-connections/password-strength), increasing the possible combinations and making it harder for attackers to crack passwords.\n- **Disallow common passwords**: Numerous online lists contain the most commonly used passwords. Cross-checking user-created passwords against these lists can help prevent users from choosing overly simplistic or frequently used passwords. Implementing this measure adds an extra layer of security to your SaaS application.\n\nEven when you can guarantee safe passwords, you should take additional measures when building or implementing your authentication system, like building a brute-force prevention mechanism that temporarily locks user accounts, IP addresses, or prompts for captchas.\n\nThe good news is that authentication platforms like Auth0 have your back! [Auth0](https://auth0.com/) offers a comprehensive solution that supports [all these security measures and more](https://auth0.com/docs/authenticate/database-connections/password-options) right out of the box.\n\n\u003cinclude src=\"SignupCTA\" text=\"Try out the most powerful authentication platform for free.\" linkText=\"Get started →\" /\u003e\n\n## Not Allowing for MFA (Multi-Factor Authentication)\n\n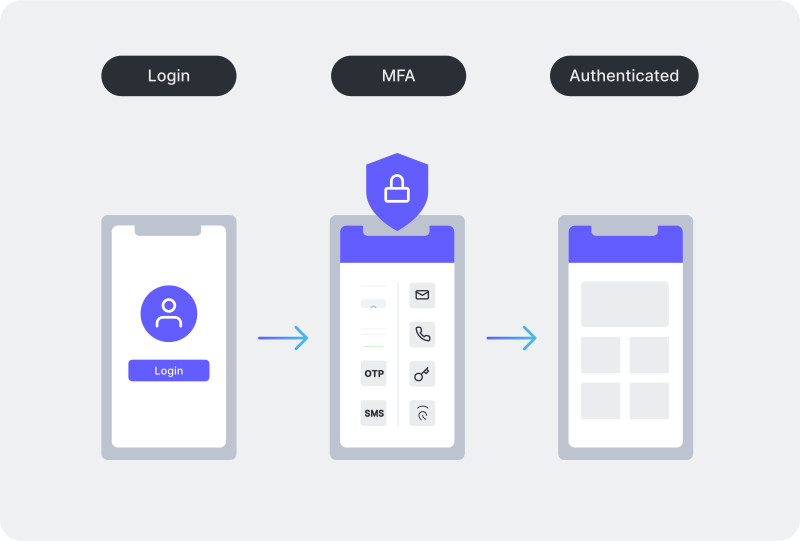\n\n[Multi-factor authentication (MFA)](https://auth0.com/docs/secure/multi-factor-authentication) is a crucial security measure that adds an extra layer of protection to the authentication process.\n\nDespite its importance, many SaaS applications still do not support MFA, leaving user accounts more vulnerable to unauthorized access.\n\nBy neglecting to include MFA as part of your authentication strategy, you risk compromising the security of your users and your application.\n\nBuilding and implementing an MFA solution is a daunting task due to its technical complexity and the challenge of balancing security with usability. First and foremost, there are multiple types of MFA, and [not all MFA is created equal](https://auth0.com/blog/not-all-mfa-is-created-equal/). There are different authenticators, factors, and levels of assurance, and which one you use will depend on your use case. Most teams don't have the necessary skills or resources to work on the task of building and implementing not one but many of these technologies and making them work seamlessly.\n\nHere's why MFA is essential in your SaaS application:\n\n- **Enhanced security**: MFA significantly reduces the likelihood of unauthorized access, requiring users to provide multiple independent factors to verify their identity, like entering a code sent via SMS or using a biometric. This makes it much more difficult for attackers to compromise accounts, even if they have managed to obtain a user's password.\n- **User trust**: By demonstrating a commitment to security through the implementation of MFA, you can foster trust among your users. This trust is critical for retaining customers and attracting new ones, as users are more likely to choose SaaS applications that prioritize the protection of their data.\n- **Reduced risk of data breaches**: MFA helps to minimize the risk of data breaches caused by compromised credentials. This not only protects your users' information but also safeguards your organization's reputation.\n- **Phishing and credential theft protection**: MFA can help protect your users from phishing attacks and credential theft. Even if a user's password is compromised, an attacker would still need to bypass the additional authentication factors, making it much more challenging to gain unauthorized access.\n\n## Overlooking Social Engineering Attacks\n\n\n\n[Social engineering attacks](https://www.okta.com/identity-101/social-engineering/), which exploit human psychology to manipulate individuals into revealing sensitive information or granting unauthorized access, are often overlooked when it comes to securing SaaS applications. These attacks can be particularly dangerous, as they bypass traditional security measures and target the weakest link in the security chain – the human element. Failing to address social engineering risks can leave your SaaS application vulnerable to data breaches, unauthorized access, and reputational damage.\n\nSocial engineering attacks come in various forms, each designed to manipulate individuals into divulging sensitive information or granting unauthorized access. Some common examples of social engineering attacks include:\n\n- **Phishing**: Phishing attacks involve sending fraudulent emails or messages that appear to be from a legitimate source, such as a bank, a popular online service, or a colleague. These messages typically entice victims to click on malicious links, download harmful attachments, or provide sensitive information, such as login credentials.\n- **Spear phishing**: A more targeted form of phishing, spear phishing involves crafting personalized emails or messages for specific individuals or organizations. Attackers research their targets and use this information to create highly convincing messages, increasing the likelihood of a successful attack.\n- **Pretexting**: Pretexting is a social engineering attack in which the attacker creates a fabricated scenario or identity to manipulate victims into divulging sensitive information or granting access to restricted resources. This may involve impersonating a co-worker, a client, or an authority figure, such as a company executive or a law enforcement officer.\n- **Baiting**: Baiting involves enticing victims with a seemingly valuable item, such as a free USB drive or a downloadable file, that contains malicious software. Once the victim takes the bait and accesses the resource, the attacker can gain control of the device or obtain sensitive information.\n\nThere are many more forms of attacks, and bad actors are coming up with new, smarter ways to get access to your systems and steal or manipulate valuable information.\n\nThere are multiple strategies and best practices to prevent these bad actors from gaining complete access to your systems. Here are some recommendations for your SaaS applications:\n\n- **Raise awareness and regular training**: Educate your users, employees, and development team about the various types of social engineering attacks, such as phishing, pretexting, and baiting. By increasing their awareness, they will be better prepared to recognize and avoid falling victim to these tactics.\n- **Implement MFA**: As mentioned earlier, multi-factor authentication (MFA) adds an additional layer of security to the authentication process. Even if a social engineering attack succeeds in obtaining a user's password, MFA can still help prevent unauthorized access by requiring additional verification.\n- **Develop clear communication policies**: Establish and communicate clear policies regarding how your organization handles sensitive information. For example, specify that employees should never share passwords or personal information through email or over the phone. Make sure that all employees understand these policies and know to question any requests that seem suspicious or violate established protocols.\n- **Implement robust access controls**: Establish strict access controls to ensure that users only have access to the information and resources necessary for their roles. By minimizing the number of individuals with access to sensitive data, you can reduce the potential damage caused by successful social engineering attacks. For example, use robust and adequate authorization models for your systems and follow the principle of [Least Privilege Access](https://www.okta.com/identity-101/what-is-least-privilege-access/)\n- **Monitor and respond to suspicious activity**: Implement monitoring systems to detect and alert your security team of any unusual or suspicious activity within your SaaS application. Timely detection and response can help mitigate the impact of a social engineering attack and prevent further damage.\n- **Regularly review and update security measures**: Continuously assess your SaaS application's security measures, and make updates as needed to stay ahead of evolving threats. By regularly reviewing and updating your security protocols, you can better protect your application from social engineering attacks.\n- **Encourage reporting**: Create a supportive environment where users and employees feel comfortable reporting any suspicious activity or potential social engineering attempts. Encourage open communication and ensure that they know how to report incidents without fear of reprisal.\n\n## Not Implementing Appropriate Authorization Model\n\n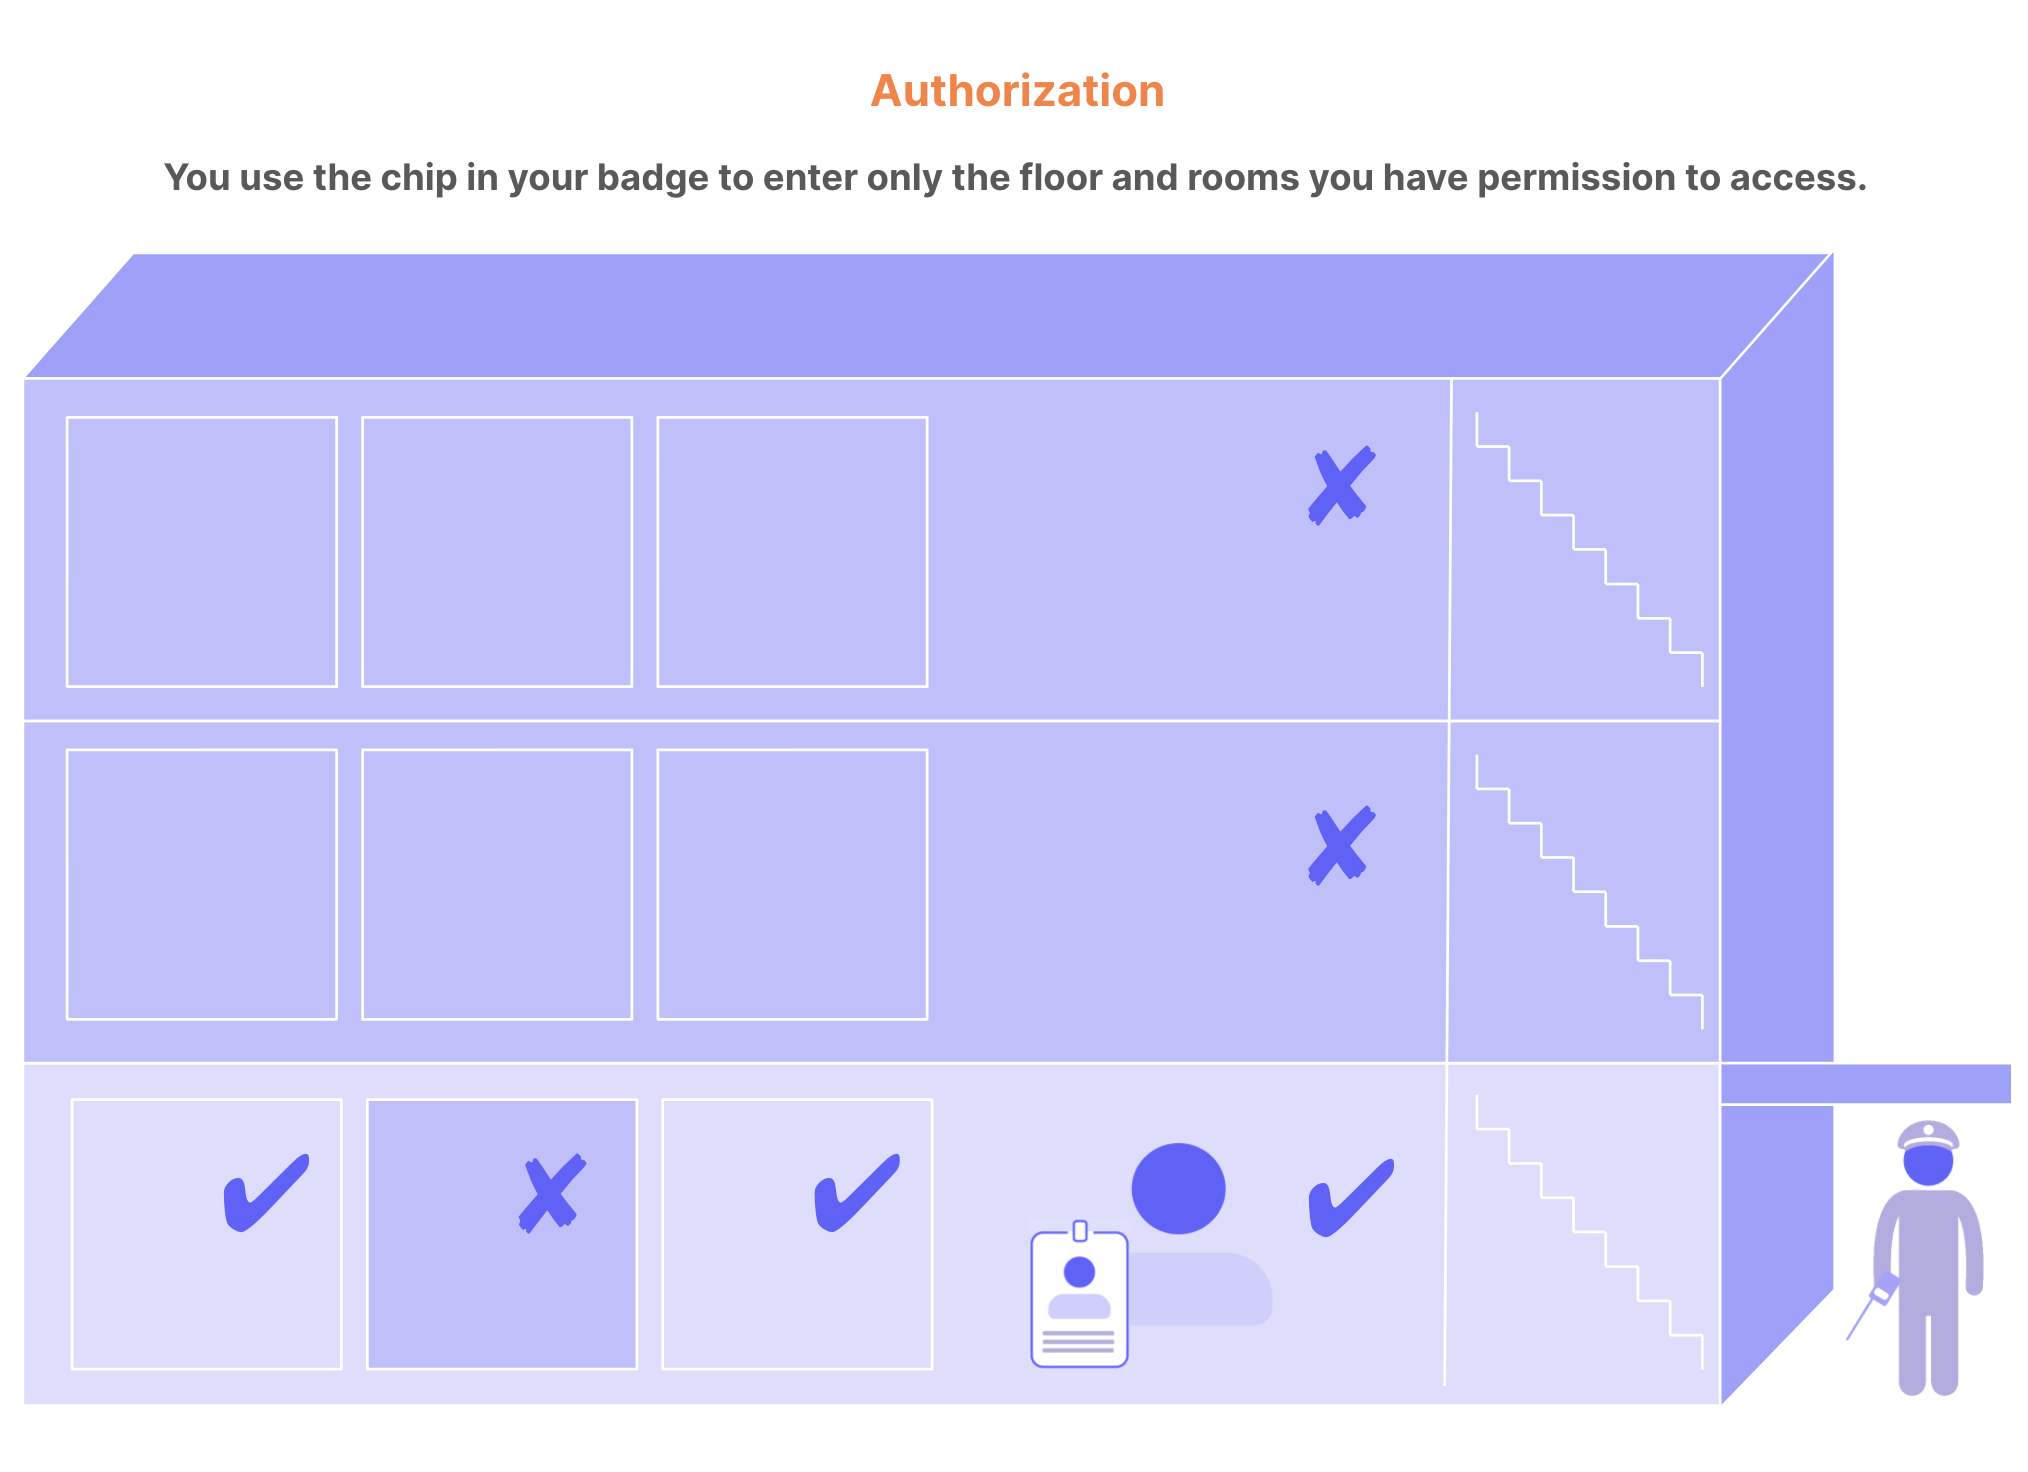\n\nAuthorization is the process of verifying what a user has access to. In SaaS applications, implementing an appropriate authorization model is crucial to ensure that users can access only the resources and functionalities they are authorized to use.\n\nImplementing authorization models in SaaS applications provides several benefits, including:\n\n- **Improved security**: Authorization models ensure that only authorized users can access sensitive data or perform specific actions. This minimizes the risk of data breaches, insider threats, and unauthorized access, protecting both the application and its users.\n- **Enhanced compliance**: Authorization models can help ensure that your application meets compliance requirements, such as [HIPAA](https://www.hhs.gov/hipaa/index.html), [GDPR](https://gdpr-info.eu/), or [PCI DSS](https://www.pcisecuritystandards.org/). By using [RBAC](https://auth0.com/docs/manage-users/access-control/rbac) or other authorization models, you can control access to sensitive data and demonstrate that you have appropriate safeguards in place.\n- **Greater flexibility**: Authorization models allow you to grant different levels of access to different users or groups, providing greater flexibility in managing your application's security. This flexibility allows you to adjust access permissions as user roles or job functions change, ensuring that users only have the access they need.\n\nThere are several types of authorization models that can be used in SaaS applications, including:\n\n- **Role-Based Access Control (RBAC)**: This is a hierarchical system of roles that define what actions can be taken within the application. Users are then assigned to roles based on their job function or level of access required. This is one of the most commonly used authorization models in SaaS applications.\n- **Attribute-Based Access Control (ABAC)**: ABAC is a more flexible authorization model that allows access decisions to be based on a combination of user attributes, such as job title, department, or location. This provides greater granularity in access control but can be more complex to implement and manage.\n- **Rule-Based Access Control (RuBAC)**: This authorization model uses rules to determine access rather than roles. Rules can be based on a variety of factors, such as time of day, IP address, or device type.\n- **Mandatory Access Control (MAC)**: MAC is a more restrictive authorization model that uses a set of predefined rules to determine access. This is often used in high-security environments, such as government or military applications.\n- **ReBAC (Relationship-Based Access Control)**: ReBAC is an emerging authorization model that is designed to manage complex relationships between users and resources. It takes into account factors such as ownership, location, and context to determine access, and it helps [solve the most critical API security risk](https://auth0.com/blog/how-fine-grained-authorization-solves-critical-api-security-risk/).\n\nWhen implementing an authorization model, it's important to consider the specific needs of your application and user base. RBAC is a common choice for many SaaS applications, as it provides a straightforward and hierarchical way to manage user access.\n\nOverall, the choice of authorization model will depend on the specific needs of your application, as well as the complexity of your user base and resource hierarchy. It's important to carefully consider your options and choose an authorization model that balances security, manageability, and usability.\n\n\u003cinclude src=\"SmallBannerCTA\" text=\"Want to take your Authorization to the next level? → \" linkText=\"fga.dev\" link=\"https://a0.to/oktafga_blog\" imgLink=\"https://cdn.auth0.com/website/blog/banners/fga.png\" imgAlt=\"Okta FGA Logo\" /\u003e\n\n## Building Your Own Authentication and Authorization Module\n\n\n\nAs a SaaS application developer, you're responsible for ensuring that your application is secure, reliable, and compliant with industry and regulatory standards. Authentication and authorization are critical components of your application's security, allowing you to control user access and protect sensitive data from unauthorized access.\n\nBut, as we covered so far, [building an authentication and authorization module is not as trivial as a username and password form](https://auth0.com/resources/whitepapers/build-vs-buy-evaluating-identity-management); there are a lot of complexities that arise like safely storing sensitive information such as passwords, implementing MFA in its multiple forms, building brute force protection, monitoring systems, and much more.\n\nFurthermore, building your own authentication and authorization module can lead to significant security vulnerabilities, performance issues, and compliance problems. It requires expertise in security and cryptography and can be time-consuming and resource-intensive. Additionally, building your own module can lead to limited functionality and features and requires ongoing maintenance and support.\n\nFortunately, there's a solution to this problem: leveraging existing authentication and authorization solutions. These solutions have been rigorously tested and proven to provide secure and reliable authentication and authorization functionality, allowing you to focus on building your application and providing value to your users.\n\n[Auth0](https://auth0.com) is a cloud-based identity platform that provides secure authentication and authorization functionality, as well as a range of other features, such as social login, multi-factor authentication, and identity federation. With Auth0, you can easily integrate authentication and authorization into your SaaS application without the need for complex custom development.\n\nUsing Auth0 can provide several benefits for your SaaS application, including improved security, simplified access management, and enhanced compliance. Additionally, Auth0 offers dedicated support teams and ongoing updates to address security vulnerabilities and compliance issues, reducing the burden of ongoing maintenance and support.\n\nIf you're interested in trying Auth0 for your SaaS application, you can \u003ca href=\"https://a0.to/blog_signup\" data-amp-replace=\"CLIENT_ID\" data-amp-addparams=\"anonId=CLIENT_ID(cid-scope-cookie-fallback-name)\"\u003esign up for a free Auth0 account\u003c/a\u003e. With a free account, you can explore the features and functionality of Auth0 and determine if it's the right solution for your application. So why not give it a try and see how Auth0 can help improve the security and performance of your SaaS application today?\n\nThanks for reading!","readTime":13,"formattedDate":"Apr 18, 2023"},{"path":"unit-testing-your-auth0-protected-react-app","title":"Unit Testing Your Auth0 Protected React Application","heroImage":{"url":"https://images.ctfassets.net/23aumh6u8s0i/42Pvss8pir2fNG4pJq1tfJ/8d685ad67d6e24b0f15524d89f78b300/react.jpg","size":{"width":1176,"height":1056}},"category":["Developers","Tutorial","React"],"authors":[{"metadata":{"tags":[],"concepts":[]},"sys":{"space":{"sys":{"type":"Link","linkType":"Space","id":"23aumh6u8s0i"}},"id":"7qC8LJD80VSx1qYcSdQ1Zh","type":"Entry","createdAt":"2021-08-23T12:59:46.069Z","updatedAt":"2025-01-08T14:00:38.100Z","environment":{"sys":{"id":"master","type":"Link","linkType":"Environment"}},"publishedVersion":42,"revision":6,"contentType":{"sys":{"type":"Link","linkType":"ContentType","id":"author"}},"locale":"en-US"},"fields":{"path":"juan-cruz-martinez","name":"Juan Cruz Martinez","avatar":{"metadata":{"tags":[{"sys":{"type":"Link","linkType":"Tag","id":"user"}}],"concepts":[]},"sys":{"space":{"sys":{"type":"Link","linkType":"Space","id":"23aumh6u8s0i"}},"id":"5b3YvfAb53h2I5U6uanww4","type":"Asset","createdAt":"2022-07-07T09:23:40.589Z","updatedAt":"2022-07-07T09:23:56.422Z","environment":{"sys":{"id":"master","type":"Link","linkType":"Environment"}},"publishedVersion":10,"revision":5,"locale":"en-US"},"fields":{"title":"jcm","description":"Juan Cruz Martinez","file":{"url":"//images.ctfassets.net/23aumh6u8s0i/5b3YvfAb53h2I5U6uanww4/f1dfa0e19f15f5df8eacd53f78a813f6/jcm.jpeg","details":{"size":29371,"image":{"width":400,"height":400}},"fileName":"jcm.jpeg","contentType":"image/jpeg"}}},"lastUpdatedBy":"Juan Cruz Martinez","email":"juan.martinez@okta.com","twitter":"https://twitter.com/bajcmartinez","github":"https://github.com/bajcmartinez","linkedin":"https://www.linkedin.com/in/bajcmartinez/","isPopular":true,"personalWebsite":"https://jcmartinez.dev/","type":"Auth0 Employee","jobTitle":"Staff Developer Advocate","description":"I stream, blog, and make youtube videos about tech stuff. I love coding, I love AI, and I love building stuff!"}}],"redirectTo":null,"isHiddenFromBlogPostGrid":false,"lang":"en","tags":["react","authentication"],"dateCreated":"2023-03-14T14:00","dateLastUpdated":null,"postContent":"Testing your React application is important to ensure your code works as intended. But what if you're using Auth0 to protect your application?\n\nIn this blog post, you'll learn to follow TDD (Test-Driven Development) to protect a React application with Auth0. We'll go over what you need to do to set up your tests and provide some tips on how to get the most out of them.\n\nSo if you're ready to learn how to unit test your Auth0-protected React app, read on!\n\n## Why Should You Use Auth0 to Protect Your React Application?\n\nAuth0 is an identity and access management service that helps you protect your application by providing user authentication, authorization, and security.\n\nAuth0 eliminates needing to be an expert on identity protocols such as [OAuth 2.0](https://auth0.com/docs/protocols/protocol-oauth2) or [OpenID Connect](https://auth0.com/docs/protocols/openid-connect-protocol) and helps you secure your web application stack. With Auth0, integrating authentication and authorization with your app is a breeze - users are redirected to a [customizable login page](https://auth0.com/docs/authenticate/login/auth0-universal-login) when they want to log in. Once successful authentication occurs, [JWTs](https://auth0.com/docs/tokens/concepts/jwts) containing user information is sent back for verification.\n\nSince Auth0 handles all of the authentication and authorization processes on the back end, you don't have to worry about coding your own login system. This makes it much easier to unit test your protected application as well.\n\n## Bootstrap a React Application\n\nBefore the actual testing, you'll need to bootstrap a React application. To do this, you'll use Create React App. This tool is great for quickly getting a React development environment up and running.\n\nTo get started, open a terminal window and run:\n\n```bash\nnpx create-react-app react-auth0-tdd\n```\n\nWhile NPM does its thing, you can start with the next step.\n\n## Connect React with Auth0\n\nThe best part of using Auth0 is the ease of use. All you have to do to secure your application is follow these steps:\n\n### Sign up and create an Auth0 application\n\nIf you haven't already, \u003ca href=\"https://a0.to/blog_signup\" data-amp-replace=\"CLIENT_ID\" data-amp-addparams=\"anonId=CLIENT_ID(cid-scope-cookie-fallback-name)\"\u003esign up for a free Auth0 account\u003c/a\u003e.\n\nA free account offers you the following:\n\n- 7,000 free active users and unlimited logins.\n- [Auth0 Universal Login](https://auth0.com/universal-login) for Web, iOS \u0026 Android.\n- Up to 2 [social identity providers](https://auth0.com/docs/identityproviders) like Google, GitHub, and Twitter.\n- Unlimited [Serverless Rules](https://auth0.com/docs/rules/current) to customize and extend Auth0's capabilities.\n\nDuring the sign-up process, you create something called an [Auth0 Tenant](https://auth0.com/docs/getting-started/the-basics#account-and-tenants), an isolated environment representing the product or service to which you are adding authentication.\n\nAfter that, you need to create an Auth0 application.\n\nGo to the Applications tab in your [Auth0 Management Dashboard](https://manage.auth0.com/) and click the \"Create Application\" button. Select \"Single Page Web Applications\" as the type of application you want to create.\n\n### Configure your application\n\nOnce you create the application, go to its Settings tab. You'll need to configure three URLs in there:\n\n- **Allowed Callback URLs**: The URL of your React app that users will be sent after they authenticate. This is typically `http://localhost:3000/` for local development. \n- **Allowed Logout URLs**: The URL where users will be redirected after they log out. This is usually `http://localhost:3000` for local development.\n- **Allowed Web Origins**: If you don't register your application URL in this field, your application will be unable to silently refresh the authentication tokens, and your users will be logged out the next time they visit the application or refresh the page. For development, you'd typically add `http://localhost:3000`\n\nOnce you save these settings, you can move on to the next step.\n\n### Install the Auth0 React SDK\n\nNow, we're ready to install the Auth0 React SDK. To do this, open a terminal window, navigate to your project directory, and run:\n\n```bash\nnpm install @auth0/auth0-react\n``` \n\nNow you're all set to start writing your application's code and tests.\n\n## Using TDD to Build Your Application\n\nTest-driven development (TDD) is a powerful and popular methodology for building software. It's based on the idea that you should write tests first, then write code to ensure those tests pass. This process helps developers create better code by designing test cases up front and streamlining the coding process.\n\nIn this section, you'll use TDD to build a simple application that uses Auth0 to authenticate and display information about a user.\n\nYou'll start by checking the UI renders a \"Log In\" button, so head to your `App.test.js` file and replace it with the following code:\n\n```javascript\n// src/App.test.js\n\nimport { render, screen } from '@testing-library/react';\nimport App from './App';\n\ntest('When the app starts it renders a log in button', () =\u003e {\n render(\u003cApp /\u003e);\n const loginElement = screen.getByText(\"Log In\");\n expect(loginElement).toBeInTheDocument();\n});\n```\n\nNext, you'll run the tests using the following command:\n\n```bash\nnpm run test\n```\n\nAnd it should be no surprise if the test fails; after all, you haven't implemented the \"Log In\" button yet. But no worries, you'll do that next.\n\nReplace the file `App.js` with the following content:\n\n```javascript\n// src/App.js\n\nimport './App.css';\n\nfunction App() {\n return (\n \u003cdiv className=\"App\"\u003e\n \u003cheader className=\"App-header\"\u003e\n \u003cbutton\u003e\n Log In\n \u003c/button\u003e\n \u003c/header\u003e\n \u003c/div\u003e\n );\n}\n\nexport default App;\n```\n\nWith the button implemented, you can re-run the tests. This time the result should be `1 passed, 1 total`.\n\nBut the \"Log In\" button isn't doing anything yet. Let's make sure it works by using Auth0.\n\nHead back to your `App.test.js` and replace the file with the new contents:\n\n```javascript\n// src/App.test.js\n\nimport { render, screen, waitFor } from \"@testing-library/react\";\nimport App from './App';\n\nimport { useAuth0 } from \"@auth0/auth0-react\";\n\njest.mock(\"@auth0/auth0-react\");\n\ndescribe(\"The Application Component in logged out state\", () =\u003e {\n\n beforeEach(() =\u003e {\n useAuth0.mockReturnValue({\n loginWithRedirect: jest.fn(),\n });\n });\n\n afterEach(() =\u003e {\n jest.clearAllMocks();\n });\n\n test('When the app starts it renders a log in button', () =\u003e {\n render(\u003cApp /\u003e);\n const loginElement = screen.getByText(\"Log In\");\n expect(loginElement).toBeInTheDocument();\n });\n\n test('It redirects the user to the Auth0 Universal Login page when the Log In button is pressed', async () =\u003e {\n const { loginWithRedirect } = useAuth0();\n\n render(\u003cApp /\u003e);\n const loginElement = screen.getByText(\"Log In\");\n loginElement.click();\n\n // Expect that if we click the \"Log In\" button, the loginWithRedirect function gets called\n await waitFor(() =\u003e expect(loginWithRedirect).toHaveBeenCalledTimes(1));\n });\n});\n```\n\nThis time we added a new test \"It redirects the user to the Auth0 Universal Login page when the Log In button is pressed\", which validates that the function `loginWithRedirect` from the Auth0 React SDK is called at least one time after pressing the \"Log In\" button.\n\nIn this code snippet, we introduced a few new concepts; I recommend the following read if you want to familiarize yourself with [jest and mocking functions](https://jestjs.io/docs/mock-functions).\n\nAs it is required by `jest`, we had to first mock the Auth0 API using `mockReturnValue` at the beginning of each test suite.\n\nNow if you run the test, you'll receive:\n\n```text\nThe Application Component in logged out state\n ✓ When the app starts, it renders a log-in button (15 ms)\n ✕ It redirects the user to the Auth0 Universal Login page when the Log In button is pressed (1015 ms)\n\n ● The Application Component in logged out state › It redirects the user to the Auth0 Universal Login page when the Log In button is pressed\n\n expect(jest.fn()).toHaveBeenCalledTimes(expected)\n\n Expected number of calls: 1\n Received number of calls: 0\n```\n\nWhich is exactly what we expected. Next, you'll make that \"Log In\" button work.\n\n## Implementing Login with Auth0\n\nUnder the hood, the Auth0 React SDK uses [React Context](https://reactjs.org/docs/context.html) to manage the authentication state of your users. One way to integrate Auth0 with your React app is to wrap your root component with an Auth0Provider that you can import from the SDK.\n\nHead to your `index.js` file and update its content as the following:\n\n```javascript\n// src/index.js\n\nimport React from 'react';\nimport ReactDOM from 'react-dom/client';\nimport './index.css';\nimport App from './App';\nimport reportWebVitals from './reportWebVitals';\nimport { Auth0Provider } from \"@auth0/auth0-react\"; // 👈 New code\n\nconst root = ReactDOM.createRoot(document.getElementById('root'));\nroot.render(\n \u003cReact.StrictMode\u003e\n {/* 👇 New code */}\n \u003cAuth0Provider\n domain=\"{auth0-domain}\"\n clientId=\"{auth0-clientid}\"\n authorizationParams={{\n redirect_uri: window.location.origin\n }}\n \u003e\n {/* 👆 New code */}\n \u003cApp /\u003e\n {/* 👇 New code */}\n \u003c/Auth0Provider\u003e\n {/* 👆 New code */}\n \u003c/React.StrictMode\u003e\n);\n\n// If you want to start measuring performance in your app, pass a function\n// to log results (for example reportWebVitals(console.log))\n// or send to an analytics endpoint. Learn more: https://bit.ly/CRA-vitals\nreportWebVitals();\n```\n\nThe `Auth0Provider` requires you to provide the domain for your Auth0 tenant and the clientId for your Auth0 application. Both values are present in your [Auth0 Application's Dashboard](https://manage.auth0.com/#/applications), as shown below:\n\n\n\nAfter setting those two values in the code, all we have to do is to change the \"Log In\" button to enable the `onClick` event.\n\n```javascript\n// src/App.js\n\n// 👇 New code\nimport { useAuth0 } from \"@auth0/auth0-react\";\n// 👆 New code\nimport './App.css';\n\nfunction App() {\n // 👇 New code\n const { loginWithRedirect } = useAuth0();\n // 👆 New code\n\n return (\n \u003cdiv className=\"App\"\u003e\n \u003cheader className=\"App-header\"\u003e\n {/* 👇 Updated code */}\n \u003cbutton onClick={() =\u003e loginWithRedirect()}\u003e\n {/* 👆 Updated code */}\n Log In\n \u003c/button\u003e\n \u003c/header\u003e\n \u003c/div\u003e\n );\n}\n\nexport default App;\n```\n\nNow if you run your tests once more, you'll see both of them passing.\n\n```text\n PASS src/App.test.js\n The Application Component in logged out state\n ✓ When the app starts, it renders a log in button (11 ms)\n ✓ It redirects the user to the Auth0 Universal Login page when the Log In button is pressed (4 ms)\n\nTest Suites: 1 passed, 1 total\nTests: 2 passed, 2 total\n```\n\n## Displaying the User’s Profile\n\nSo far, we have been able to test the application while in a logged-out state, but how would we go about testing the application after the user signs in, for example, to test if the user name is displayed correctly on the screen?\n\nThe simple answer is to continue mocking the `useAuth0` hook, altering the different properties we need for our test.\n\nLet's start by writing a new test to validate if the \"Log Out\" button is present after the user signs in. Change the content of your `App.test.js` file by adding the following code:\n\n```javascript\n// src/App.test.js\n\n...\n// 👇 New code\ndescribe(\"The Application Component in logged in state\", () =\u003e {\n beforeEach(() =\u003e {\n useAuth0.mockReturnValue({\n isAuthenticated: true,\n });\n });\n\n afterEach(() =\u003e {\n jest.clearAllMocks();\n });\n\n test('When the app starts it renders a log out button', () =\u003e {\n render(\u003cApp /\u003e);\n const logoutElement = screen.getByText(\"Log Out\");\n expect(logoutElement).toBeInTheDocument();\n });\n});\n// 👆 New code\n```\n\nRunning the tests will now fail until we add the new \"Log Out\" button to the screen.\n\n```javascript\n// src/App.js\n\nimport { useAuth0 } from \"@auth0/auth0-react\";\nimport './App.css';\n\nfunction App() {\n const { loginWithRedirect, logout, isAuthenticated } = useAuth0(); // 👈 Updated code\n\n return (\n \u003cdiv className=\"App\"\u003e\n \u003cheader className=\"App-header\"\u003e\n {/* 👇 Updated code */}\n {isAuthenticated ? (\n \u003cbutton onClick={() =\u003e logout()}\u003e\n Log Out\n \u003c/button\u003e\n ) : (\n \u003cbutton onClick={() =\u003e loginWithRedirect()}\u003e\n Log In\n \u003c/button\u003e\n )}\n {/* 👆 Updated code */}\n \u003c/header\u003e\n \u003c/div\u003e\n );\n}\n\nexport default App;\n```\n\nAnd when you check the tests again, all of them are passing.\n\n```text\n PASS src/App.test.js\n The Application Component in logged out state\n ✓ When the app starts, it renders a log in button (11 ms)\n ✓ It redirects the user to the Auth0 Universal Login page when the Log In button is pressed (4 ms)\n The Application Component is logged in the state\n ✓ When the app starts, it renders a log-out button (1 ms)\n\nTest Suites: 1 passed, 1 total\nTests: 3 passed, 3 total\n```\n\nFinally, we'll validate that the user's name and email address are shown on the screen.\n\n```javascript\n// src/App.test.js\n\n...\n beforeEach(() =\u003e {\n useAuth0.mockReturnValue({\n isAuthenticated: true,\n // 👇 New code\n user: {\n name: \"Juan\",\n email: \"jc@example.com\",\n picture: \"https://avatar.com\",\n },\n // 👆 New code\n });\n });\n \n ...\n\n test('When the app starts it renders a log out button', () =\u003e {\n render(\u003cApp /\u003e);\n const logoutElement = screen.getByText(\"Log Out\");\n expect(logoutElement).toBeInTheDocument();\n });\n\n // 👇 New code\n test('It renders the user name and email address', () =\u003e {\n render(\u003cApp /\u003e);\n const userNameElement = screen.getByTestId(\"user-name\");\n expect(userNameElement).toHaveTextContent('Juan');\n\n const userEmailElement = screen.getByTestId(\"user-email\");\n expect(userEmailElement).toHaveTextContent('jc@example.com');\n });\n // 👆 New code\n});\n```\n\nFor the logged-in state, not only do we need to mock the authentication status with the `isAuthenticated` flag, but we also need to set the user information.\n\nOnce that's done, we can fix the UI to display such values and get the test passing.\n\n```javascript\n// src/App.js\n\nimport { useAuth0 } from \"@auth0/auth0-react\";\nimport './App.css';\n\nfunction App() {\n const { loginWithRedirect, logout, isAuthenticated, user } = useAuth0(); // 👈 Updated Code\n\n return (\n \u003cdiv className=\"App\"\u003e\n \u003cheader className=\"App-header\"\u003e\n {isAuthenticated ? (\n // 👇 Updated code\n \u003cdiv\u003e\n \u003ch2\u003eUser:\u003c/h2\u003e\n \u003cp data-testid=\"user-name\"\u003e{user.name}\u003c/p\u003e\n \u003ch2\u003eEmail:\u003c/h2\u003e\n \u003cp data-testid=\"user-email\"\u003e{user.email}\u003c/p\u003e\n \u003cbutton onClick={() =\u003e logout()}\u003e\n Log Out\n \u003c/button\u003e\n \u003c/div\u003e\n // 👆 Updated code\n ) : (\n \u003cbutton onClick={() =\u003e loginWithRedirect()}\u003e\n Log In\n \u003c/button\u003e\n )}\n \u003c/header\u003e\n \u003c/div\u003e\n );\n}\n\nexport default App;\n```\n\nNow the application displays the user name and email as well as the logged-out button.\n\nLet's run the tests and see the final results.\n\n```text\n PASS src/App.test.js\n The Application Component in logged out state\n ✓ When the app starts, it renders a log in button (12 ms)\n ✓ It redirects the user to the Auth0 Universal Login page when the Log In button is pressed (4 ms)\n The Application Component is logged in the state\n ✓ It renders a log-out button (2 ms)\n ✓ It renders the user name and email address (3 ms)\n\nTest Suites: 1 passed, 1 total\nTests: 4 passed, 4 total\n```\n\nCongrats! But before you leave this tutorial, there's another more thing you'll have to do, and that is user testing.\n\nSo far, all tests you run on the application are unit tests. Even though they are great for validating functionality, they don't verify that the integrations are working or set up correctly. For example, we mocked the Auth0 API to return the data we would expect if everything was fine. Still, we don't validate if the given Auth0 Domain or Client ID is correct or if the configuration on the Auth0 dashboard is appropriately set.\n\nFor that, you can write integration tests or perform manual tests by running the application on the browser.\n\nTo test your application manually, go to your terminal and start the app by running the following:\n\n```bash\nnpm run start\n```\n\nVisit `http://localhost:3000`, click the login button, and sign up for a new test user if you don't have one. After you're done, you'll be redirected back to the application where your name is displayed.\n\n| 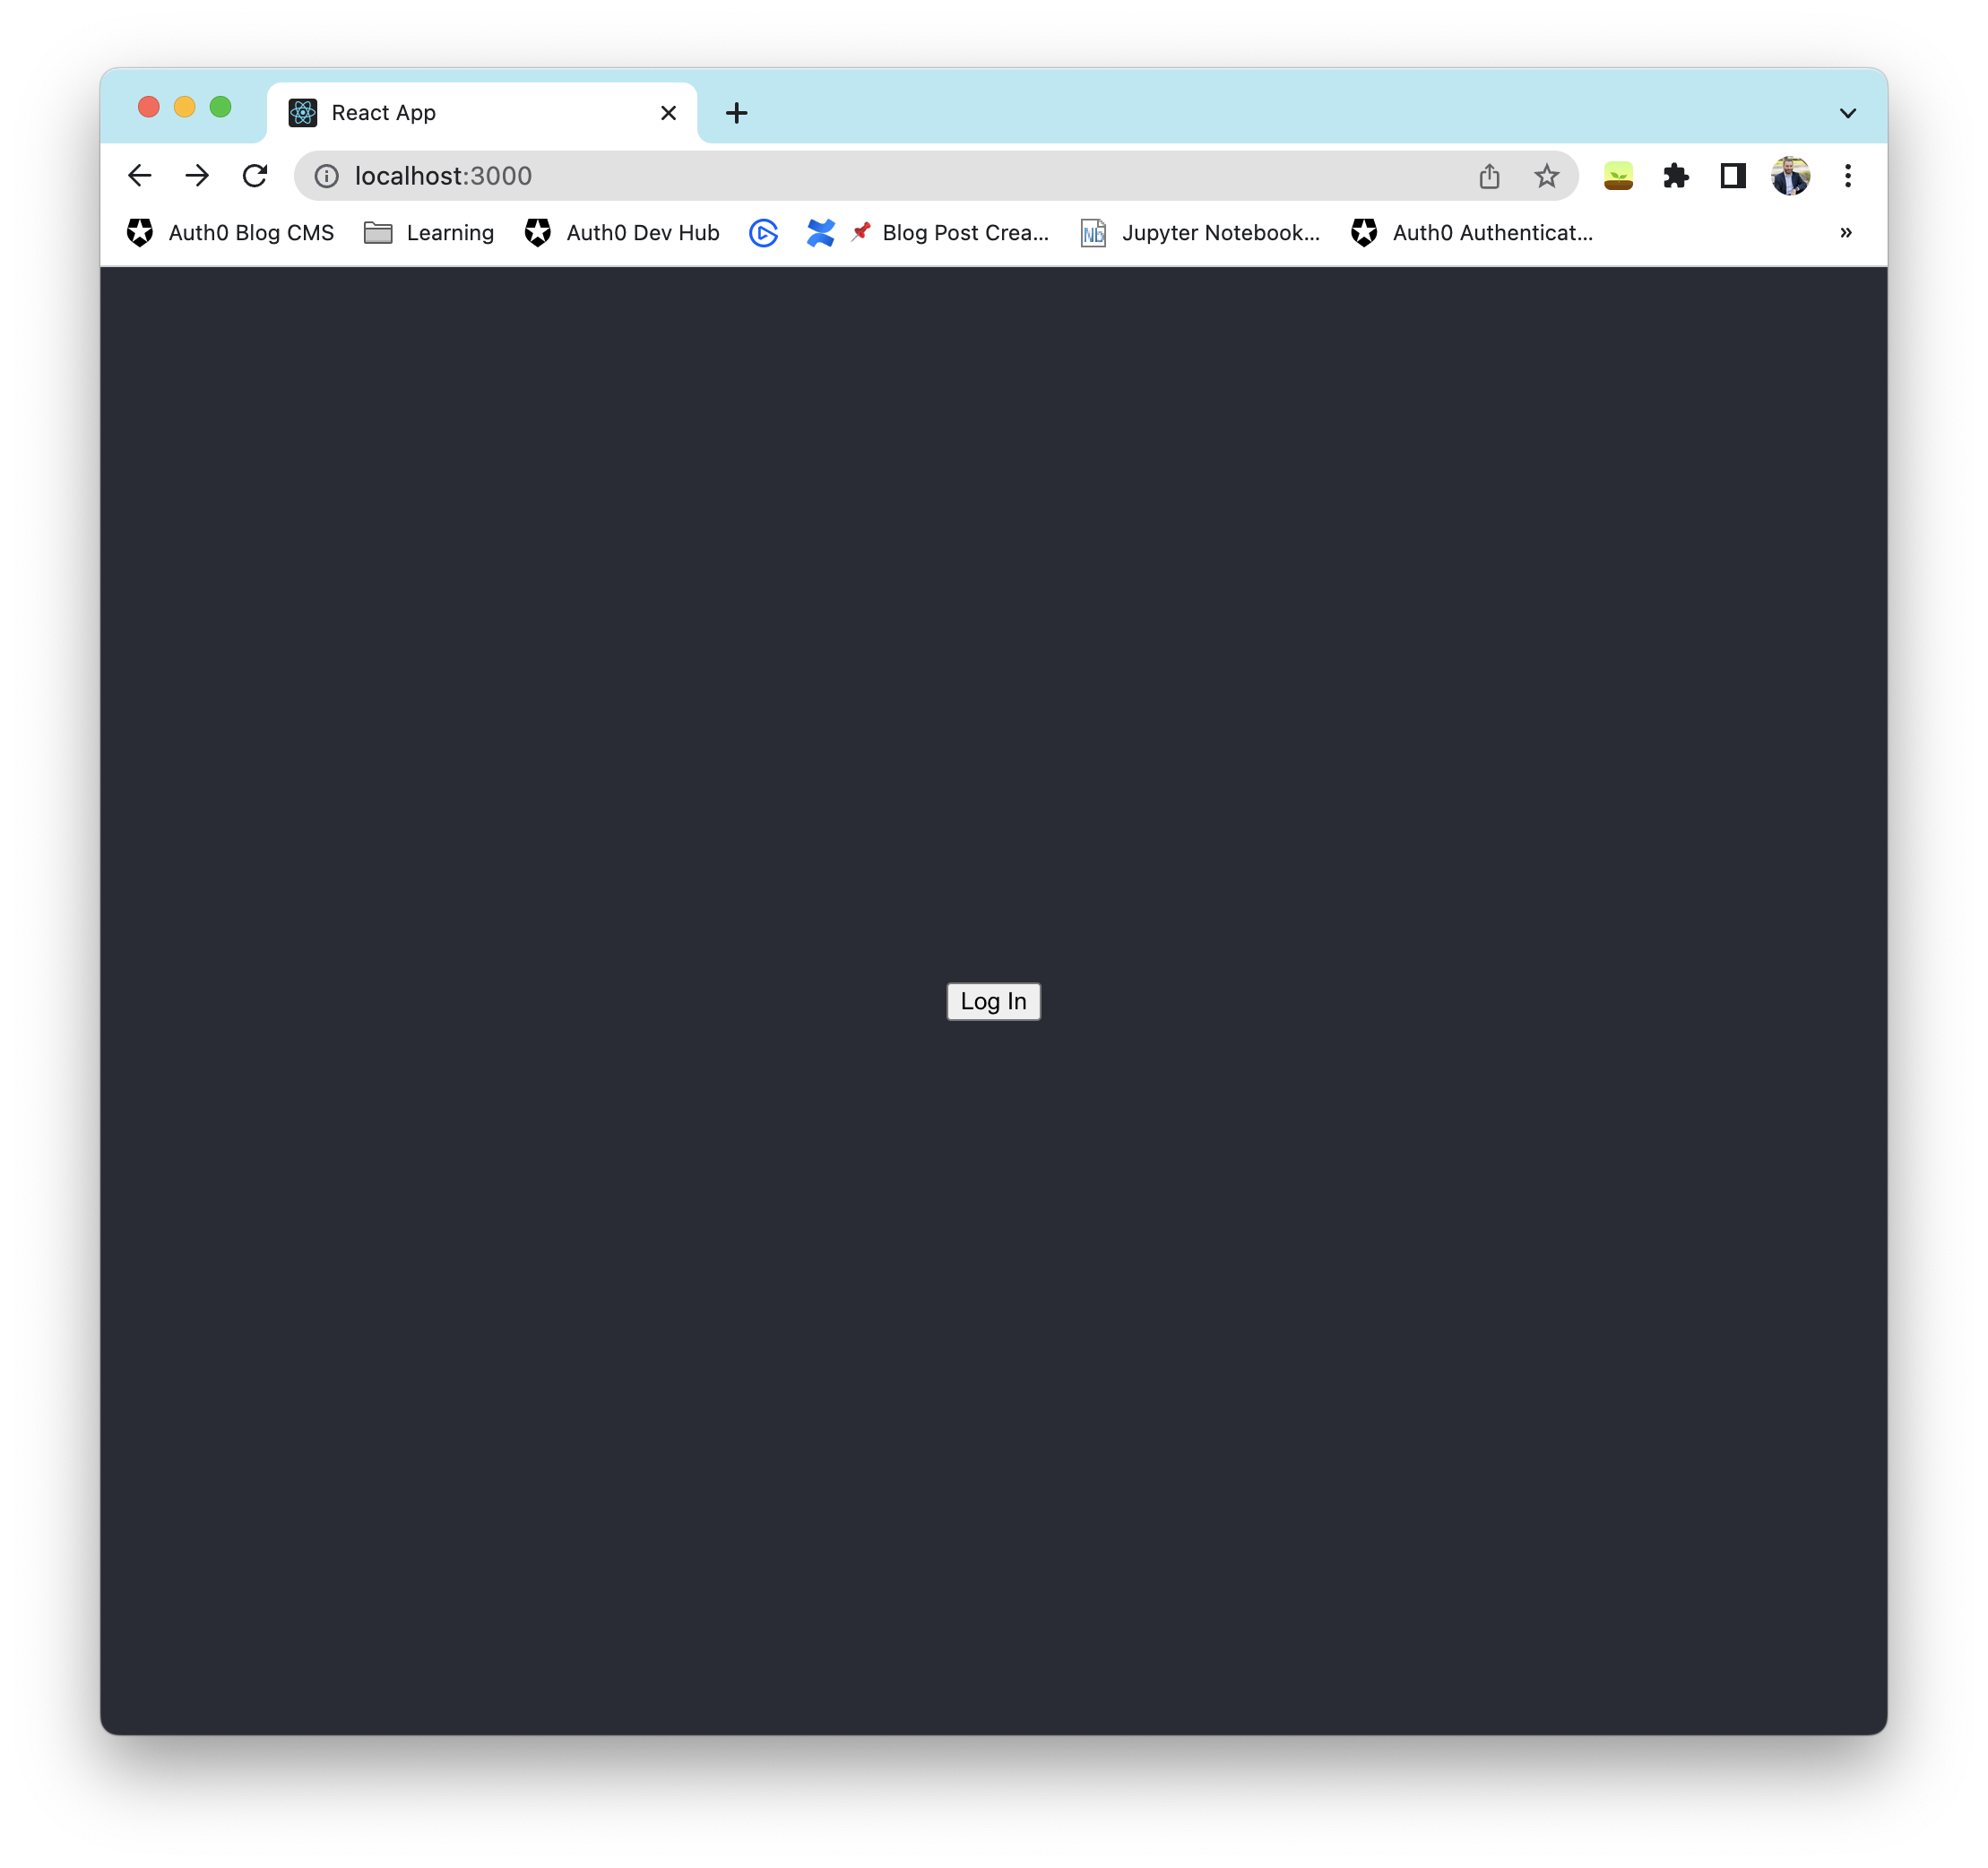|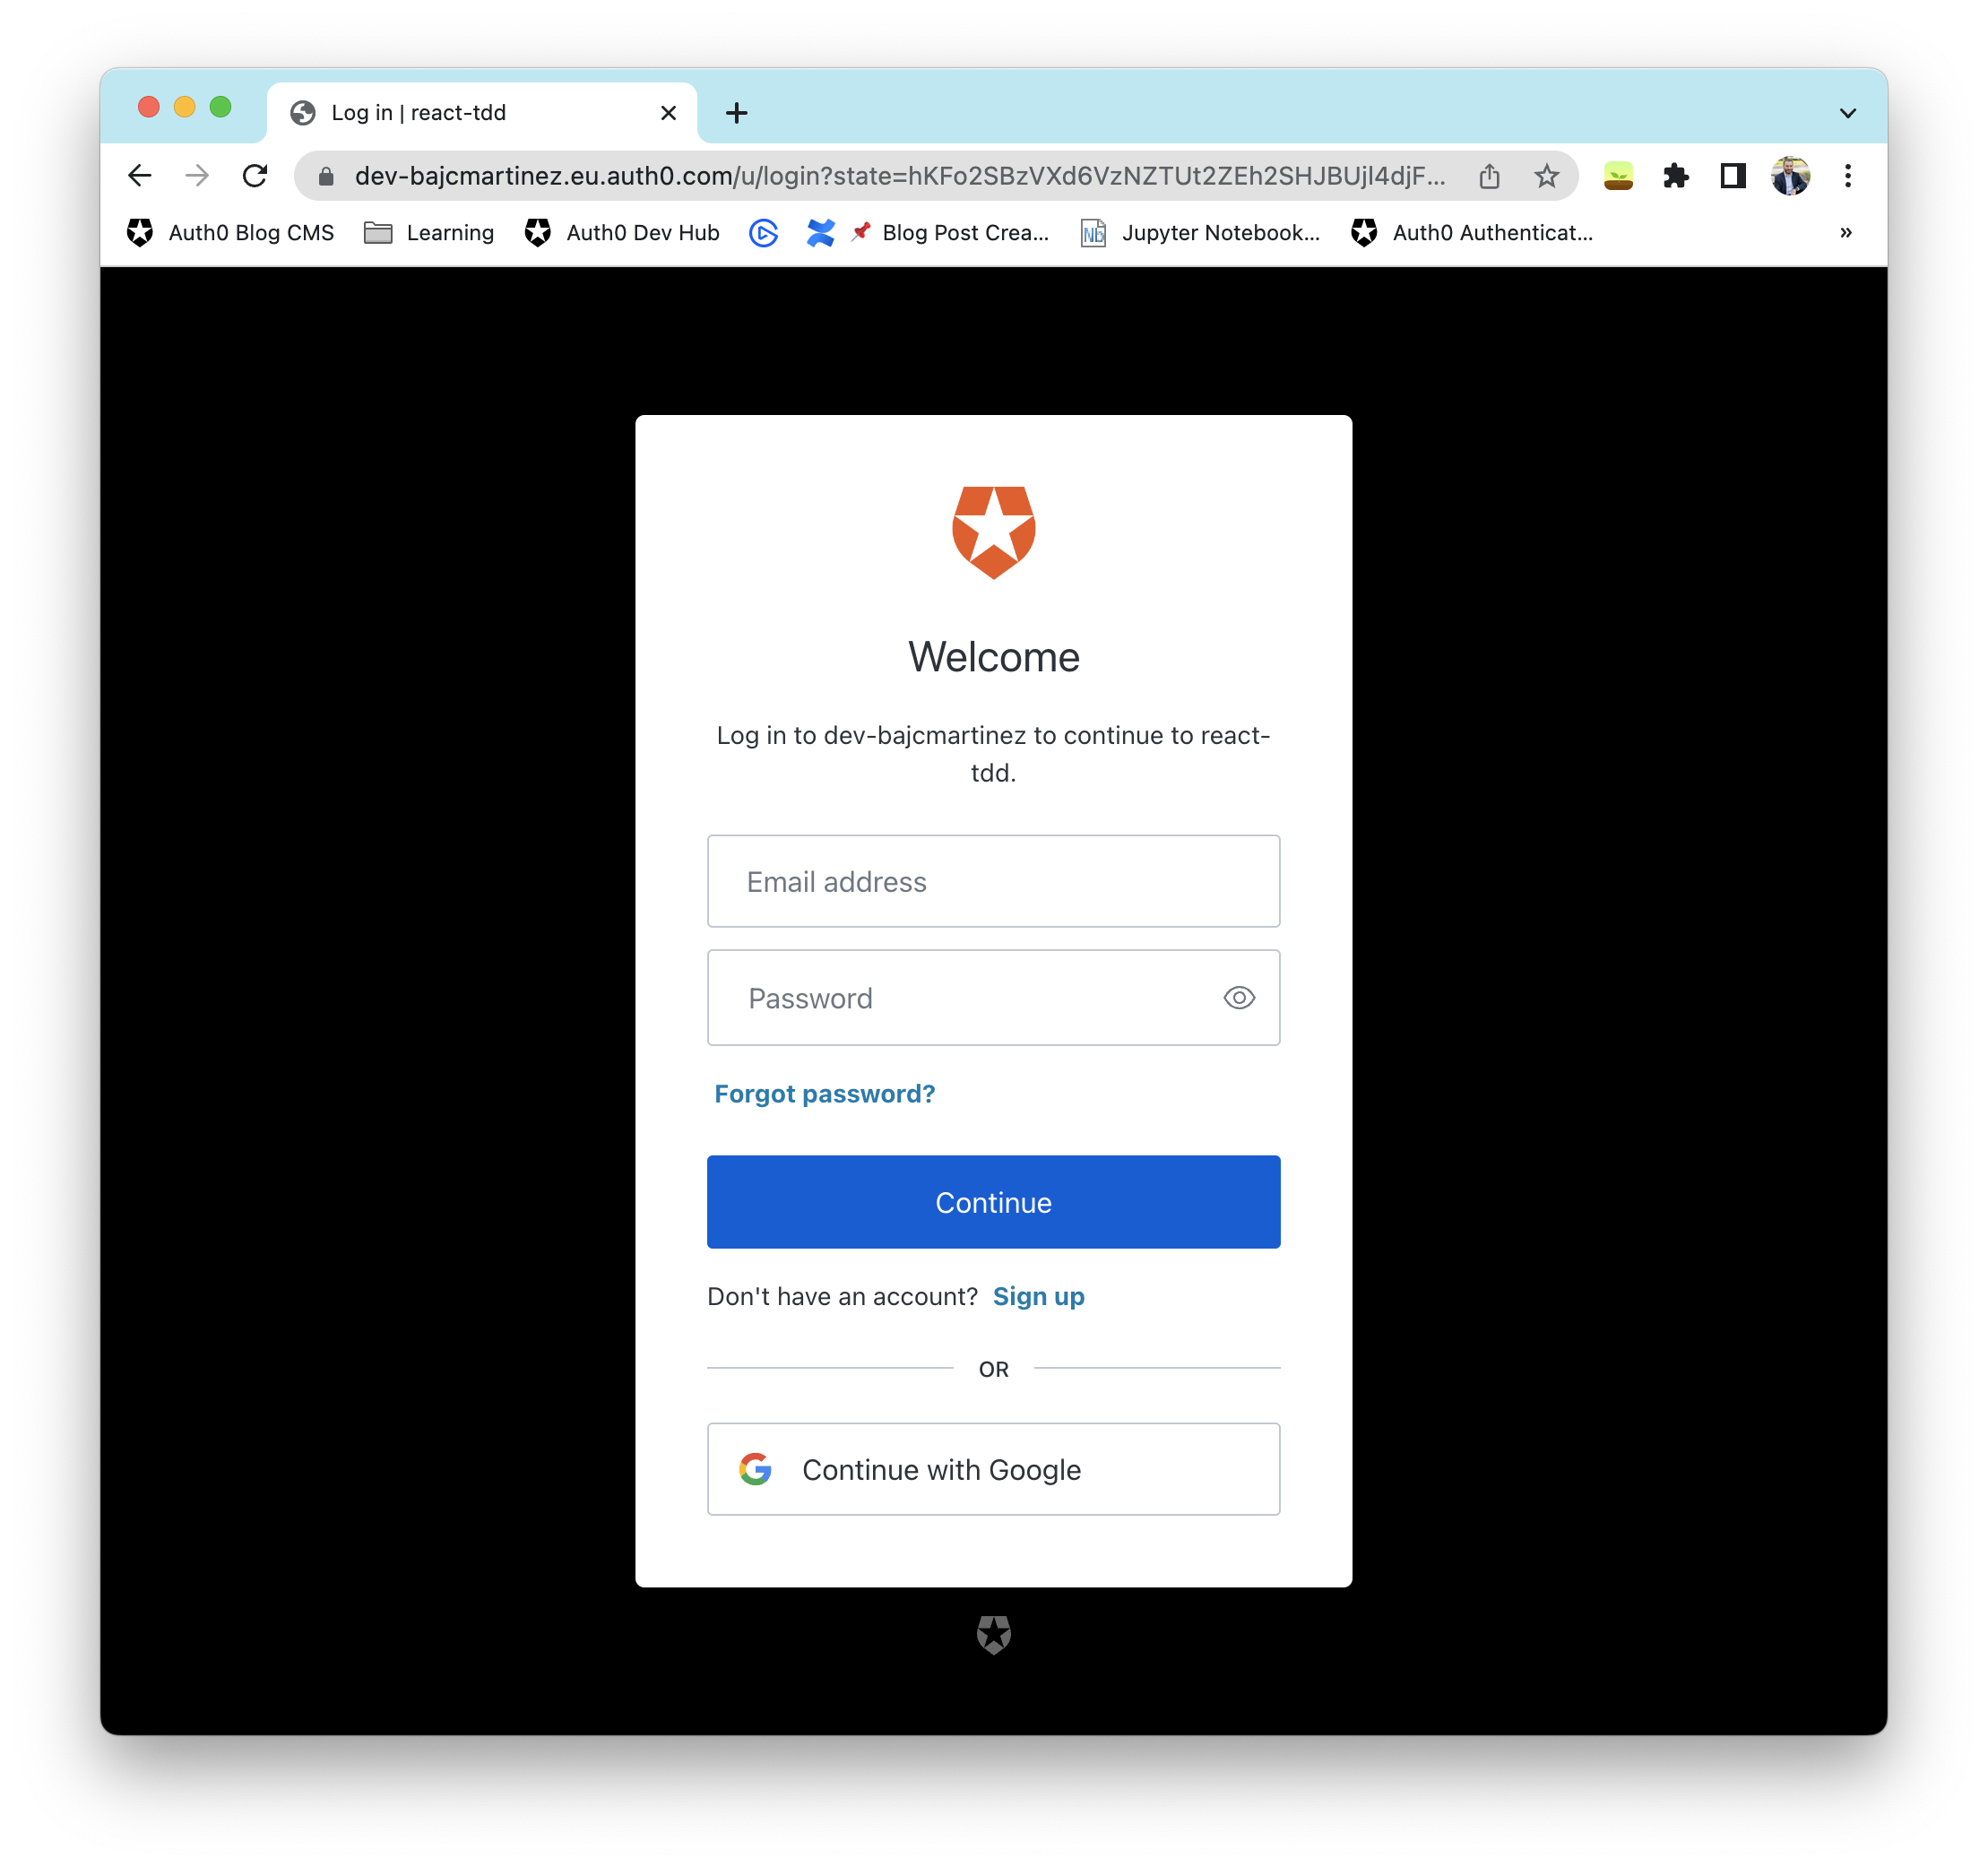 | 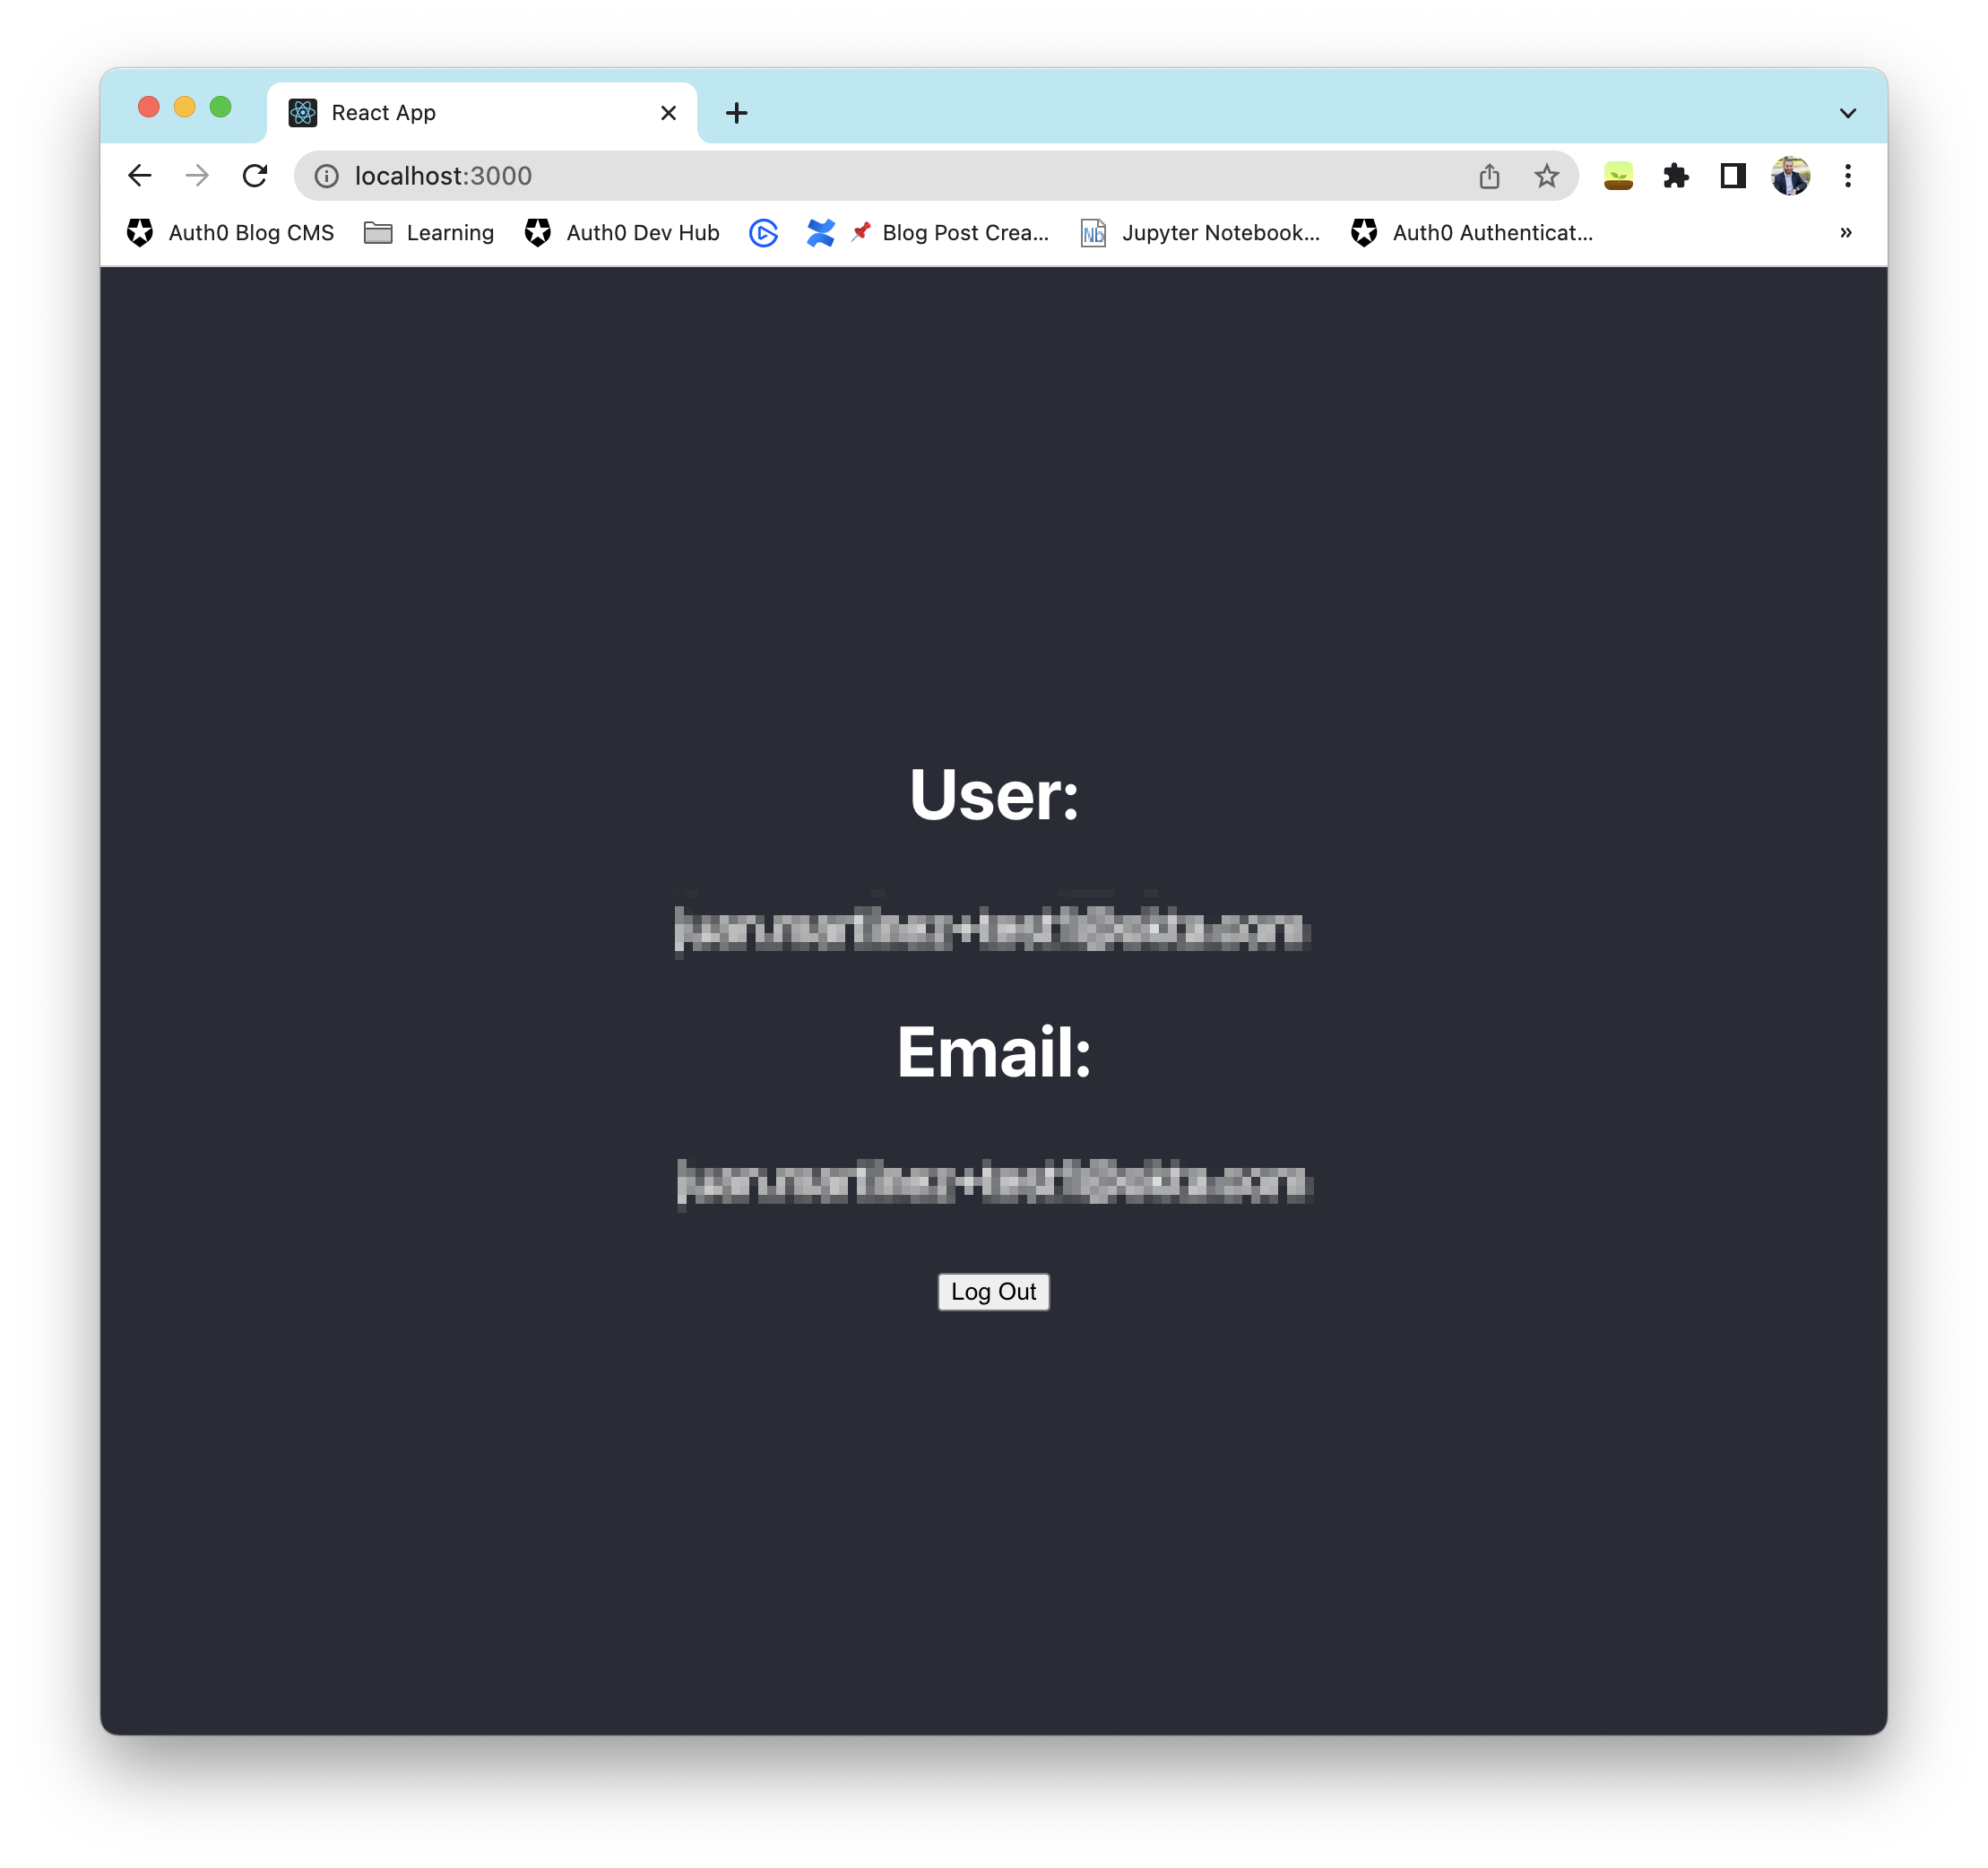 |\n| --- | --- | --- | \n\n## Conclusion\n\nIn this tutorial, you have implemented user authentication to identify your users and get user profile information in React following the TDD process to ensure that our code is well-tested.\n\nThis tutorial covered the most common authentication use case for a React application, and to keep it simple, we took some shortcuts, like working off a single component.\n\nIf you want to learn more about the possibilities of Auth0 with React, please check the [React Authentication by Example Guide](https://developer.auth0.com/resources/guides/spa/react/basic-authentication).\n\nLet me know in the comments below what you think of this tutorial.\n\nThanks for reading!","readTime":13,"formattedDate":"Mar 14, 2023"},{"path":"auth0-nextjs-sdk-v2-released","title":"Auth0 SDK for NextJS v2.0 released!","heroImage":{"url":"https://images.ctfassets.net/23aumh6u8s0i/3jY4eCzPqbJ8bP7RX8SnTe/d6252025eff38698a5ed4ffdbd02f580/nextjs_hero","size":{"width":1176,"height":1056}},"category":["Developers","Product","SDK"],"authors":[{"metadata":{"tags":[],"concepts":[]},"sys":{"space":{"sys":{"type":"Link","linkType":"Space","id":"23aumh6u8s0i"}},"id":"7qC8LJD80VSx1qYcSdQ1Zh","type":"Entry","createdAt":"2021-08-23T12:59:46.069Z","updatedAt":"2025-01-08T14:00:38.100Z","environment":{"sys":{"id":"master","type":"Link","linkType":"Environment"}},"publishedVersion":42,"revision":6,"contentType":{"sys":{"type":"Link","linkType":"ContentType","id":"author"}},"locale":"en-US"},"fields":{"path":"juan-cruz-martinez","name":"Juan Cruz Martinez","avatar":{"metadata":{"tags":[{"sys":{"type":"Link","linkType":"Tag","id":"user"}}],"concepts":[]},"sys":{"space":{"sys":{"type":"Link","linkType":"Space","id":"23aumh6u8s0i"}},"id":"5b3YvfAb53h2I5U6uanww4","type":"Asset","createdAt":"2022-07-07T09:23:40.589Z","updatedAt":"2022-07-07T09:23:56.422Z","environment":{"sys":{"id":"master","type":"Link","linkType":"Environment"}},"publishedVersion":10,"revision":5,"locale":"en-US"},"fields":{"title":"jcm","description":"Juan Cruz Martinez","file":{"url":"//images.ctfassets.net/23aumh6u8s0i/5b3YvfAb53h2I5U6uanww4/f1dfa0e19f15f5df8eacd53f78a813f6/jcm.jpeg","details":{"size":29371,"image":{"width":400,"height":400}},"fileName":"jcm.jpeg","contentType":"image/jpeg"}}},"lastUpdatedBy":"Juan Cruz Martinez","email":"juan.martinez@okta.com","twitter":"https://twitter.com/bajcmartinez","github":"https://github.com/bajcmartinez","linkedin":"https://www.linkedin.com/in/bajcmartinez/","isPopular":true,"personalWebsite":"https://jcmartinez.dev/","type":"Auth0 Employee","jobTitle":"Staff Developer Advocate","description":"I stream, blog, and make youtube videos about tech stuff. I love coding, I love AI, and I love building stuff!"}}],"redirectTo":null,"isHiddenFromBlogPostGrid":false,"lang":"en","tags":["sdk","nextjs","auth0"],"dateCreated":"2022-12-22T14:00","dateLastUpdated":null,"postContent":"The Auth0 team released a new major version of the [Auth0 NextJS SDK](https://github.com/auth0/nextjs-auth0) which incorporates much of the received feedback from our v1, including support for NextJS middleware, changes in the API, first-class testing support, optimizations on the Front End package, and lots more.\n\nThis article will cover some of the most significant changes, but for a complete set, plus indications on how to migrate your current project to the new SDK, I recommend following the official [migration guide](https://github.com/auth0/nextjs-auth0/blob/v2.0.0/V2_MIGRATION_GUIDE.md).\n\n\n## NextJS Middleware Support\n\nThe introduction of NextJS middleware in v12 was a big step for the framework that allows you to run code before a request is completed.\n\nThis support has been highly requested by the community, and the benefits can be summarized in two aspects: simplification and performance improvement.\n\n### It's a lot easier to add authentication code\n\nPrior to middleware support, each page that required authentication would need to add a snippet of code to tell NextJS only to allow access to authenticated users.\n\nIn v2, all that spread-out code can be rewritten at a single location by using middleware like the following:\n\n```javascript\n// middleware.js\nimport { withMiddlewareAuthRequired } from '@auth0/nextjs-auth0/middleware';\n\nexport default withMiddlewareAuthRequired();\n\nexport const config = {\n matcher: '/user/:path*',\n}\n```\n\nWith that simple configuration, NextJS will run the middleware `withMiddlewareAuthRequired` when the URL matches the given `matcher` expression. The matcher expressions are a feature of NextJS, they are very customizable, and you can read more information about them on [NextJS's middleware docs](https://nextjs.org/docs/advanced-features/middleware#matcher).\n\n### Performance\n\nSince middleware in NodeJS runs on the [NextJS Edge Runtime](https://nextjs.org/docs/api-reference/edge-runtime), validating user sessions at that level gives an immediate performance boost by simply reducing the latency for users. It is no longer required for the request to be sent to the origin server and back if the user is not authenticated.\n\nIn the image below, you can see how the NextJS Middleware Architecture plays a role in performance by being closer to the user's location.\n\n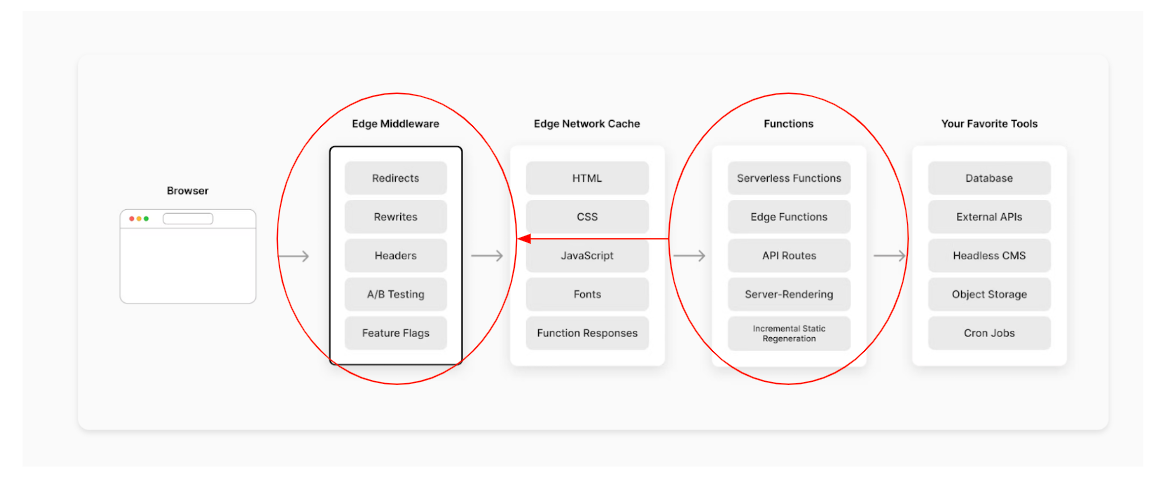\n\n## A Delightful New Declarative Routing API\n\nFrom v1, the SDK has been deeply customizable, but users often have to write full request handlers to access some of the lower-level features of the SDK. With the new declarative API for creating request handlers, this can be done simply and beautifully through the API.\n\nTake a look at the following snippets of code.\n\n### Using SDK v1\n\n```javascript\nexport default handleAuth({\n signup: async function signup(req, res) {\n try {\n await handleLogin(req, res, {\n authorizationParams: {\n screen_hint: 'signup'\n }\n });\n } catch (error) {\n res.status(error.status || 400).end(error.message);\n }\n },\n invite: async function invite(req, res) {\n try {\n await handleLogin(req, res, {\n authorizationParams: {\n invitation: req.query.invitation\n }\n });\n } catch (error) {\n res.status(error.status || 400).end(error.message);\n }\n },\n 'login-with-google': async function loginWithGoogle(req, res) {\n try {\n await handleLogin(req, res, {\n authorizationParams: {\n connection: 'google'\n }\n });\n } catch (error) {\n res.status(error.status || 400).end(error.message);\n }\n },\n 'refresh-profile': async function refreshProfile(req, res) {\n try {\n await handleProfile(req, res, {\n refetch: true\n });\n } catch (error) {\n res.status(error.status || 400).end(error.message);\n }\n },\n}\n```\n\n### Using SDK v2\n\n```javascript\nexport default handleAuth({\n signup: loginHandler({ authorizationParams: { login_hint: 'signup' } }),\n invite: loginHandler({ authorizationParams: (req) =\u003e { invitation: req.query.invitation } }),\n 'login-with-google': loginHandler({ authorizationParams: { connection: 'google' } }),\n 'refresh-profile': profileHandler({ refetch: true }),\n}\n```\n\nIsn't that much nicer?\n\n## First Class Testing Support\n\nTesting routes that require login has always been a complex problem for developers. The new SDK release includes built-in support for seeding the session cookie on your tests to make testing authenticated pages a breeze. \n\nInstead of having to manage secrets in tests, visit third-party websites or mock complex internals of authentication libraries, users can use the new testing functionality built right into the SDK.\n\nConsider the following code:\n\n```javascript\nimport { generateSessionCookie } from '@auth0/nextjs-auth0/testing';\n\ntest('should visit profile page', async () =\u003e {\n const cookie = await generateSessionCookie(session, config);\n const res = visit('/profile', { headers: { cookies: `appSession=${cookie}` } });\n expect(res.status).toBe(200);\n})\n```\n\nThe code above uses Auth0 NextJS SDK to generate a session cookie which is later sent as part of the `visit` request.\n\nIf the session is not provided, the request would respond with a `403 Forbidden` as the URL is protected against unauthenticated requests.\n\n## And LOTS more…\nBut that is not all. The new SDK offers you:\n\n- New session lifecycle and `updateUser` method.\n- New package export profile to support React Server Components. \n- Improved API Docs.\n- Improved Error Handling.\n- Lighter Front-End binary.\n- Support for custom Logout Options.\n- Easier options for managing cookie size.\n\n## Summary\n\nThe [Auth0 NextJS SDK](https://github.com/auth0/nextjs-auth0) v2 introduced some pretty neat changes that will ultimately provide a better developer and end-user experience.\n\nFor those projects migrating from the SDK v1, I recommend reading the official [migration guide](https://github.com/auth0/nextjs-auth0/blob/v2.0.0/V2_MIGRATION_GUIDE.md).\n\nThanks for reading!","readTime":4,"formattedDate":"Dec 22, 2022"},{"path":"auth0-spa-sdk-v2-released","title":"Auth0 SDK for Single Page Applications v2.0 released!","heroImage":{"url":"https://images.ctfassets.net/23aumh6u8s0i/2QjNmyDo6LfK4HC8F1q4qw/b8baddde46d79ec9432a15f14b4a41a2/javascript","size":{"width":1176,"height":1056}},"category":["Developers","Product","SDK"],"authors":[{"metadata":{"tags":[],"concepts":[]},"sys":{"space":{"sys":{"type":"Link","linkType":"Space","id":"23aumh6u8s0i"}},"id":"7qC8LJD80VSx1qYcSdQ1Zh","type":"Entry","createdAt":"2021-08-23T12:59:46.069Z","updatedAt":"2025-01-08T14:00:38.100Z","environment":{"sys":{"id":"master","type":"Link","linkType":"Environment"}},"publishedVersion":42,"revision":6,"contentType":{"sys":{"type":"Link","linkType":"ContentType","id":"author"}},"locale":"en-US"},"fields":{"path":"juan-cruz-martinez","name":"Juan Cruz Martinez","avatar":{"metadata":{"tags":[{"sys":{"type":"Link","linkType":"Tag","id":"user"}}],"concepts":[]},"sys":{"space":{"sys":{"type":"Link","linkType":"Space","id":"23aumh6u8s0i"}},"id":"5b3YvfAb53h2I5U6uanww4","type":"Asset","createdAt":"2022-07-07T09:23:40.589Z","updatedAt":"2022-07-07T09:23:56.422Z","environment":{"sys":{"id":"master","type":"Link","linkType":"Environment"}},"publishedVersion":10,"revision":5,"locale":"en-US"},"fields":{"title":"jcm","description":"Juan Cruz Martinez","file":{"url":"//images.ctfassets.net/23aumh6u8s0i/5b3YvfAb53h2I5U6uanww4/f1dfa0e19f15f5df8eacd53f78a813f6/jcm.jpeg","details":{"size":29371,"image":{"width":400,"height":400}},"fileName":"jcm.jpeg","contentType":"image/jpeg"}}},"lastUpdatedBy":"Juan Cruz Martinez","email":"juan.martinez@okta.com","twitter":"https://twitter.com/bajcmartinez","github":"https://github.com/bajcmartinez","linkedin":"https://www.linkedin.com/in/bajcmartinez/","isPopular":true,"personalWebsite":"https://jcmartinez.dev/","type":"Auth0 Employee","jobTitle":"Staff Developer Advocate","description":"I stream, blog, and make youtube videos about tech stuff. I love coding, I love AI, and I love building stuff!"}}],"redirectTo":null,"isHiddenFromBlogPostGrid":false,"lang":"en","tags":["javascript","release","announcement"],"dateCreated":"2022-11-10T14:00","dateLastUpdated":null,"postContent":"\u003e The Auth0 team released the new Auth0 Single Page App SDK v2.0, and it's now available in the [npm registry](https://www.npmjs.com/package/@auth0/auth0-spa-js). It is a major new release with a focus on development and user experience.\n\nThe new release makes an important step towards improving usability and reducing the footprint (size) of the SDK.\n\n## Quick Start with the New SDK\n\nYou can follow the [quick start guide](https://auth0.com/docs/quickstart/spa/vanillajs) if you build a new application or connect your SPA with Auth0 using the SDK for the first time.\n\nIf you use frameworks such as React, Angular, or Vue, you can use framework-specific libraries instead. You can learn more about specific frameworks in our [SPA guides section](https://auth0.com/docs/quickstart/spa).\n\n\u003e All of the mentioned improvements will be available in the next beta versions of our framework-specific SDKs. Be sure to keep an eye on them to be notified when their beta versions are available.\n\n## Migrating from v1.x\n\nWith the improvements from v1.x, it was necessary to introduce some breaking changes. We will cover the most impactful changes in this post, but we recommend reviewing the [migration guide](https://github.com/auth0/auth0-spa-js/blob/master/MIGRATION_GUIDE.md) for the details of all breaking changes and their corresponding migration path.\n\n## Reduced Bundle Size by 60%\n\nAuth0 SPA SDK V1.x shipped with built-in polyfills to compensate for the lack of native support on some browsers for features such as:\n\n- [AbortController](https://caniuse.com/mdn-api_abortcontroller_abortcontroller)\n- [Promise](https://caniuse.com/promises)\n- [TextEncoder \u0026 TextDecoder](https://caniuse.com/textencoder)\n- [Fetch](https://caniuse.com/fetch)\n\nAs the above APIs are now available for most browsers, we believe there's no more need to include those polyfills. Primarily users of IE11 would require them, and with [Microsoft dropping support for IE11](https://blogs.windows.com/windowsexperience/2022/06/15/internet-explorer-11-has-retired-and-is-officially-out-of-support-what-you-need-to-know/), we believe it makes sense to capitalize on the gains and **drop support for IE11 as of V2**.\n\nBy removing these polyfills, and with some small improvements on our side, we **reduced the bundle size by an outstanding 60%**.\n\nSuch a reduction will allow for faster download and processing times for application users.\n\n## API Consistency\n\nOur SDK offers a variety of settings that can be divided into two categories:\n\n- Properties used to configure our SDK\n- Properties used solely to pass through to Auth0\n\nIn v1.x, passing both types of properties to the SDK was possible when instantiating a new `Auth0Client`. Because the different types of arguments were differentiated only by the case (camel vs. snake case), with no additional separation in the object argument, it wasn't very evident what arguments were SDK properties and which ones were authorization parameters.\n\nHere is an example of what setting such options on v1.x looks like:\n\n```javascript\nconst client = new Auth0Client({\n client_id: '...',\n useRefreshTokens: true,\n useRefreshTokensFallback: false,\n redirect_uri: '...',\n custom_param: '...',\n screen_hint: 'signup'\n});\n```\n\nWith v2, we are ensuring the distinction between the two categories is clear by putting any property solely used to pass through to Auth0 in a property bag named `authorizationParams`. On top of that, any property outside of `authorizationParams` will now be using camel casing.\n\nHere is what the configuration looks like in v2:\n\n```javascript\nconst client = new Auth0Client({\n clientId: '...', // \u003c= camelCasing\n useRefreshTokens: true,\n useRefreshTokensFallback: false,\n authorizationParams: { // \u003c= new property bag\n redirect_uri: '...', // \u003c= moved into authorizationParams\n custom_param: '...', // \u003c= moved into authorizationParams\n screen_hint: 'signup' // \u003c= moved into authorizationParams\n }\n});\n```\n\n## `localOnly` Logout\n\nIn v1.x of the SDK, it was possible to pass a `localOnly` when calling `logout`. In the current release, we dropped the `localOnly` argument in favor of a new `onRedirect` event that allows for more control, including the possibility of not redirecting, and thus produces the same effect the `localOnly` property intended.\n\nTo replicate the `localOnly` behavior, you can implement the following:\n\n```javascript\nawait client.logout({\n onRedirect: async (url) =\u003e {\n // Do not do anything\n // Or do something else but redirecting\n }\n})\n```\n\n## Removed `buildAuthorizeUrl` and `buildLogoutUrl`\n\nIn v1.x, it was possible to use the methods `buildAuthorizeUrl` and `buildLogoutUrl` for applications that couldn't rely on `window.location.assign` to redirect to Auth0 when calling `loginWithRedirect` or `logout` respectively. A typical example of this was when developers needed to set a specific URL in the context of a mobile application using frameworks such as Ionic.\n\nIn v2, developers would rely on `onRedirect` to specify such behavior.\n\nFor example:\n\n```javascript\nawait client.loginWithRedirect({\n async onRedirect(url) {\n // Redirect using Capacitor's Browser plugin\n await Browser.open({ url });\n }\n});\n```\n\n## `getUser` and `getIdTokenClaims`\n\nAs part of our optimization efforts, we reworked the SDK's internal cache to store tokens. Consequently, it was possible to simplify the methods `getUser` and `getIdTokenClaims`.\n\nIn v1.x, developers could pass a specific scope and audience when calling either of those functions.\n\nHere are some examples of how these functions were used in v1:\n\n```javascript\nconst user = await getUser();\nconst user = await getUser({ audience, scope });\n\nconst claims = await getIdTokenClaims();\nconst claims = await getIdTokenClaims({ audience, scope });\n```\n\nHowever, as an application should only have one user, such parameters wouldn't be required. So from v2, we dropped those parameters and simplified the methods to:\n\n```javascript\nconst user = await getUser();\nconst claims = await getIdTokenClaims();\n```\n\n## Retrieve a Token from the Cache\n\nWith v2, we are introducing the possibility of retrieving a token from the cache without contacting Auth0 if no entry is found. To achieve that, we reworked the already existing `ignoreCache` argument for `getTokenSilently`, which takes a boolean, to `cacheMode`, which can accept three values:\n\n- **on** (default value): Use the cache, but call the `oauth/token` endpoint when no entry is found. This is the equivalent of when `ignoreCache` was omitted or its value was set to false in v1.\n- **off**: Do not use the cache, always call the `oauth/token` endpoint. This is the equivalent of `ignoreCache: true` in v1.\n- **cache-only**: Use the cache, do not call the `oauth/token` endpoint when no entry is found.\n\nTo use our SDK and see if we have a token in the cache without contacting Auth0, you must set `cacheMode` to `cache-only` when calling `getTokenSilently`.\n\n```javascript\nconst token = await client.getTokenSilently({\n cacheMode: 'cache-only'\n});\n```\n\n## URL Encoded Form Data\n\nV1 of SPA-JS defaults to sending payloads using JSON when calling Auth0's `oauth/token` endpoint, but users can opt-in to send the data as `x-www-form-urlencoded` instead.\n\nWith the release of v2, we will default to sending the requests to the `oauth/token` endpoint using `x-www-form-urlencoded`, while users can opt-in to using JSON as needed. Using `x-www-form-urlencoded` has shown to have a small performance optimization and aligns more with what the [spec describes](https://datatracker.ietf.org/doc/html/rfc6749#section-3.2).\n\n## Summary\n\nThe Auth0 Single Page App SDK v2 improves both the developer and the user experience. On the one hand, it simplifies and makes working with the SDK API easier. On the other hand, it reduces the bundle size, which translates into faster downloads and processing times.\n\nThanks for reading!","readTime":6,"formattedDate":"Nov 10, 2022"},{"path":"stranger-scripts","title":"Stranger Scripts","heroImage":{"url":"https://images.ctfassets.net/23aumh6u8s0i/6lqTkgVSJQaLelQFgrba9z/7706f12bfa14398c0b2aef54f0a2612b/stranger-scripts.png","size":{"width":2000,"height":1798}},"category":["Developers","Tips","JavaScript"],"authors":[{"metadata":{"tags":[],"concepts":[]},"sys":{"space":{"sys":{"type":"Link","linkType":"Space","id":"23aumh6u8s0i"}},"id":"7qC8LJD80VSx1qYcSdQ1Zh","type":"Entry","createdAt":"2021-08-23T12:59:46.069Z","updatedAt":"2025-01-08T14:00:38.100Z","environment":{"sys":{"id":"master","type":"Link","linkType":"Environment"}},"publishedVersion":42,"revision":6,"contentType":{"sys":{"type":"Link","linkType":"ContentType","id":"author"}},"locale":"en-US"},"fields":{"path":"juan-cruz-martinez","name":"Juan Cruz Martinez","avatar":{"metadata":{"tags":[{"sys":{"type":"Link","linkType":"Tag","id":"user"}}],"concepts":[]},"sys":{"space":{"sys":{"type":"Link","linkType":"Space","id":"23aumh6u8s0i"}},"id":"5b3YvfAb53h2I5U6uanww4","type":"Asset","createdAt":"2022-07-07T09:23:40.589Z","updatedAt":"2022-07-07T09:23:56.422Z","environment":{"sys":{"id":"master","type":"Link","linkType":"Environment"}},"publishedVersion":10,"revision":5,"locale":"en-US"},"fields":{"title":"jcm","description":"Juan Cruz Martinez","file":{"url":"//images.ctfassets.net/23aumh6u8s0i/5b3YvfAb53h2I5U6uanww4/f1dfa0e19f15f5df8eacd53f78a813f6/jcm.jpeg","details":{"size":29371,"image":{"width":400,"height":400}},"fileName":"jcm.jpeg","contentType":"image/jpeg"}}},"lastUpdatedBy":"Juan Cruz Martinez","email":"juan.martinez@okta.com","twitter":"https://twitter.com/bajcmartinez","github":"https://github.com/bajcmartinez","linkedin":"https://www.linkedin.com/in/bajcmartinez/","isPopular":true,"personalWebsite":"https://jcmartinez.dev/","type":"Auth0 Employee","jobTitle":"Staff Developer Advocate","description":"I stream, blog, and make youtube videos about tech stuff. I love coding, I love AI, and I love building stuff!"}}],"redirectTo":null,"isHiddenFromBlogPostGrid":false,"lang":"en","tags":["javascript","js","scripts"],"dateCreated":"2022-10-27T15:00","dateLastUpdated":null,"postContent":"It is 1995, in a small US town. A group of friends is playing Dungeons \u0026 Dragons. When they see that Demogorgon enters the game, Brendan casts Fireball. He rolls the die, but it goes missing on the floor. They keep playing.\n\nAfter the game ends, Brendan rides his bike through the woods, passing by the Netscape Communications Corporation. Then he sees something weird in front of him. He loses his balance, falls down a steep hill, and crashes.\n\nThe boy runs home. He's shivering as he looks back, ensuring that thing doesn't follow him. He arrives home only to find out no one is there. He tries to call his parents, but he can't get through.\n\nSomething unlocks the door. Brendan runs out to the backyard when he sees the thing. A light glows brightly and then fades, revealing no one is there anymore.\n\nAfter ten days of searching, Brendan Eich reappears in the forest, but he is not alone. A yellow and mysterious creature is with him, with odd characteristics but a powerful presence.\n\n\u003e \u003cimg alt=\"JavaScript\" src=\"https://images.ctfassets.net/23aumh6u8s0i/2QjNmyDo6LfK4HC8F1q4qw/b8baddde46d79ec9432a15f14b4a41a2/javascript\" height=\"35\" style=\"margin-right: 1rem\" align=\"left\" /\u003e\nIt is too late for the world. JavaScript is out!\n\n## The Weirdo on Maple Street\nJoey, Andrea, and Juan are wandering in the woods when they encounter JavaScript. They freeze as the programming language tries to communicate with them but can't figure out what it's trying to say.\n\nWith the help of an interpreter, they managed to capture the strange language, but what does it all mean?\n\nIn front of them lay the script\n\n```javascript\n([![]] + [][[]])[+!+[] + [+[]]] + \n([![]] + [][[]])[+!+[] + [+!+[]+!+[]]]\n+ \" \" +\n(![] + [])[+[]] +\n(![] + [])[+!+[]] +\n([![]] + [][[]])[+!+[] + [+[]]] +\n(![] + [])[!+[] + !+[]] + \n(![] + [])[+!+[]+!+[]+!+[]]\n```\n\nAfter some thought, the team got to work on the problem. They split it up into smaller chunks and worked it out.\n\nFirst let's take a look at `([![]] + [][[]])` which is repeated throughout the snippet.\n\nBreaking it down, even more, we get:\n\n`[![]]` and we know that `![]` is `false`, so we have `[false]` as a result.\n\nNext, `[][[]]` looks confusing, but looking into more details, it follows this pattern: `array[index]` where `array = []` and index = `[]`, and accessing an empty array at any position, will return `undefined`, even if that position happens to be another array.\n\nPutting this part of the script back together, we get:\n\n\n```javascript\n([![]] + [][[]]) === [false] + undefined \u0026\u0026\n[false] + undefined === 'falseundefined'\n```\n\nAnd so they replaced\n\n```javascript\n'falseundefined'[+!+[] + [+[]]] + \n'falseundefined'[+!+[] + [+!+[]+!+[]]]\n+ \" \" +\n(![] + [])[+[]] +\n(![] + [])[+!+[]] +\n'falseundefined'[+!+[] + [+[]]] +\n(![] + [])[!+[] + !+[]] + \n(![] + [])[+!+[]+!+[]+!+[]]\n```\n\nBut then:\n\n```javascript\n(![] + []) === 'false'\n```\n\nand\n\n```javascript\n'falseundefined'[+!+[] + [+[]]] + \n'falseundefined'[+!+[] + [+!+[]+!+[]]]\n+ \" \" +\n'false'[+[]] +\n'false'[+!+[]] +\n'falseundefined'[+!+[] + [+[]]] +\n'false'[!+[] + !+[]] + \n'false'[+!+[]+!+[]+!+[]]\n```\n\nNow we understand more. Using this strange language, we could decode strings. Since JavaScript allows us to access any character in a string by asking for its position, each particular line seems to be capturing a unique character on each string.\n\nWe have the strings, but we need a way to build up indexes; fortunately, there are a few tricks we can use.\n\nFor starters, thanks to Math in JavaScript, we know that `+true === 1` and that `+false === 0`, why? the `+` sign at the beginning tells JavaScript to cast the boolean value to its numeric form.\n\nOnce we have those numbers, we can make any combination. For example, `2` can be written as `+true+true`, but what if we want something in the two digits order? It will take a long of those... Or we can use a different technique.\n\n`number1+[number2] === \"numbernumber2\"`, this happens because the sum now acts as a concatenate and converts each side of the `+` sign into a string. This is done by design, as JavaScript can't add an array to an integer.\n\nFinally, we can use this little array to bool conversion table to get our numbers:\n\n```\n+[] -\u003e +false -\u003e 0\n!+[] -\u003e !false -\u003e true\n+!+[] -\u003e +true -\u003e 1\n```\n\nNow that we can form single and two-digit numbers, we can easily convert all the indexes into numbers or strings and form our final answer:\n\n```javascript\n'falseundefined'['10'] + \n'falseundefined'['12']\n+ \" \" +\n'false'[0] +\n'false'[1] +\n'falseundefined'['10'] +\n'false'[2] + \n'false'[3]\n```\n\nNow, we have to count.\n\n```javascript\ni\ne\n\" \"\nf\na\ni\nl\ns\n```\n\nThat's it! He is trying to say, \"ie fails\"!\n\n## Holly, Jolly, and The Body\nCarla, Brendan's mom, is sure that he is trying to communicate with her through the lights of her house. Carla is determined to find out, so she elaborates on a simple math test.\n\n\"Brendan, can you hear me?\" she asks. If you can hear me, tell me, what is `1 + 1`, and the lights go on and off two times.\n\nFor the second test, `3 + 1`, the lights go on and off four times.\n\nIs this a coincidence? She is, by now, freaking out.\n\n`\"3\" - 1`, and the lights go twice.\n\nIt has to be him! One more to be sure\n\n`\"3\" + 1`, but the lights start a different show this time. They go on and off for a while. When they stopped, she had counted `\"31\"`.\n\nMaybe I am a mess; maybe I'm crazy, she concluded. What kind of math is that?\n\nShe doesn't know JavaScript, or she would have understood. The lights were correct, according to JavaScript, of course.\n\nIf the same happens to you, remember, in JavaScript.\n\n```\nNumber + Number -\u003e addition\nBoolean + Number -\u003e addition\nBoolean + Boolean -\u003e addition\nNumber + String -\u003e concatenation\nString + Boolean -\u003e concatenation\nString + String -\u003e concatenation\n```\n\nFor example:\n\n```javascript\n3 - 1 // -\u003e 2\n 3 + 1 // -\u003e 4\n'3' - 1 // -\u003e 2\n'3' + 1 // -\u003e '31'\n\n'' + '' // -\u003e ''\n[] + [] // -\u003e ''\n{} + [] // -\u003e 0\n[] + {} // -\u003e '[object Object]'\n{} + {} // -\u003e '[object Object][object Object]'\n\n'222' - -'111' // -\u003e 333\n\n[4] * [4] // -\u003e 16\n[] * [] // -\u003e 0\n[4, 4] * [4, 4] // NaN\n```\n\n## The Flea and the Acrobat\nTony, the local chief of police, who starts to believe in Carla's story, decides to break into the Netscape Communications Corporation, looking to learn more about JavaScript.\n\nJuan, Andrea, and Joey, who had a conversation with Brendan, believe that JavaScript came from an alternate dimension, the \"Upside Down\".\n\nIn this dimension, there are special considerations, he adds. For example,\n\n```javascript\nMath.min() \u003e Math.max(); // -\u003e true\nMath.min() \u003c Math.max(); // -\u003e false\n```\n\nIntuitively it is strange, but in the JavaScript dimension, it makes sense, as \n\n```javascript\nMath.min(); // -\u003e Infinity\nMath.max(); // -\u003e -Infinity\nInfinity \u003e -Infinity; // -\u003e true\n```\n\nBut why does `Math.min() === Infinity`? `Math.min` takes arguments, tries to convert each one to a number, and then it returns the smallest of them. If you don't provide any arguments, the result is `Infinity`.\n\nAnd the opposite thing happens to `Math.max`.\n\nMeanwhile, Tony had an encounter.\n\n## The Monster and The Upside Down\nDeep in the lab, where the shadows cover the rooms, Tony feels there's something around. He calls in for backup. On the other side, Greg and Dan are on their way.\n\nJuan, Andrea, and Joey know that the only way to conquer JavaScript is to enter into its dimension, so they fire up a terminal and open the portal. They all jump inside.\n\nIn the lab, another portal opens. Tony, who already met with Greg and Dan, gets inside, and the portal collapses right after.\n\nFrom the shadows, a strange passage appears. It contains a challenge, \"solve me, and I'll let you go!\"\n\n```javascript\n['1', '7', '11'].map(parseInt);\n```\n\nIntuitively, the group tries to guess the first answer, `[1, 7, 11]`, but Juan, Andrea, and Joey stop them before they can input it.\n\nIn this place, not all things are what they look like, so we must treat arguments very carefully, mentioned Juan.\n\nCarla, who found her way to the \"Upside Down\", provided some more insights into the problem.\n\nThe function `parseInt` expects two parameters, a string and the radix. The latter is an integer between `2` and `36`, representing the base in mathematical numeral systems.\n\nSo the `map` function could be providing more than one argument, so more than just the string to the `parseInt` function, added Joey.\n\nBreaking it down, the team formed the following statement:\n\n```javascript\n['1', '7', '11'].map((currentValue, index, array) =\u003e parseInt(currentValue, index, array));\n```\n\nThe `index` from the `map` function is passed to the `parseInt` function as the radix, and thus, the resulting value would be different from the expected.\n\nSo the team calculates each value:\n\n```javascript\nparseInt('1', 0) // 1\nparseInt('7', 1) // NaN\nparseInt('11', 2) // 3\n```\n\nSo the final result is `[1, NaN, 3]`.\n\nAs they type it in, the dimension starts shaking, and a new portal opens up.\n\nThey all rush out. \"We are safe. We are back home\", they rejoiced.\n\nBut that thing is still out there. Let's get it - Tony.\n\nThe team prepares for battle...\n\nTo be continued.\n\n-----\n\nI hope you enjoyed this little informative parody of Stranger Things, our treat for this Halloween.","readTime":8,"formattedDate":"Oct 27, 2022"},{"path":"provisioning-auth0-resources-with-type-script-and-pulumi","title":"Provisioning Auth0 resources with TypeScript and Pulumi","heroImage":{"url":"https://images.ctfassets.net/23aumh6u8s0i/71E0YoibROWGKUuXrJhLIJ/23a8978cc9b98df5b3cd6212506594b5/Pulumi_hero.png","size":{"width":1176,"height":1056}},"category":["Developers","Tutorial","Pulumi"],"authors":[{"metadata":{"tags":[],"concepts":[]},"sys":{"space":{"sys":{"type":"Link","linkType":"Space","id":"23aumh6u8s0i"}},"id":"7qC8LJD80VSx1qYcSdQ1Zh","type":"Entry","createdAt":"2021-08-23T12:59:46.069Z","updatedAt":"2025-01-08T14:00:38.100Z","environment":{"sys":{"id":"master","type":"Link","linkType":"Environment"}},"publishedVersion":42,"revision":6,"contentType":{"sys":{"type":"Link","linkType":"ContentType","id":"author"}},"locale":"en-US"},"fields":{"path":"juan-cruz-martinez","name":"Juan Cruz Martinez","avatar":{"metadata":{"tags":[{"sys":{"type":"Link","linkType":"Tag","id":"user"}}],"concepts":[]},"sys":{"space":{"sys":{"type":"Link","linkType":"Space","id":"23aumh6u8s0i"}},"id":"5b3YvfAb53h2I5U6uanww4","type":"Asset","createdAt":"2022-07-07T09:23:40.589Z","updatedAt":"2022-07-07T09:23:56.422Z","environment":{"sys":{"id":"master","type":"Link","linkType":"Environment"}},"publishedVersion":10,"revision":5,"locale":"en-US"},"fields":{"title":"jcm","description":"Juan Cruz Martinez","file":{"url":"//images.ctfassets.net/23aumh6u8s0i/5b3YvfAb53h2I5U6uanww4/f1dfa0e19f15f5df8eacd53f78a813f6/jcm.jpeg","details":{"size":29371,"image":{"width":400,"height":400}},"fileName":"jcm.jpeg","contentType":"image/jpeg"}}},"lastUpdatedBy":"Juan Cruz Martinez","email":"juan.martinez@okta.com","twitter":"https://twitter.com/bajcmartinez","github":"https://github.com/bajcmartinez","linkedin":"https://www.linkedin.com/in/bajcmartinez/","isPopular":true,"personalWebsite":"https://jcmartinez.dev/","type":"Auth0 Employee","jobTitle":"Staff Developer Advocate","description":"I stream, blog, and make youtube videos about tech stuff. I love coding, I love AI, and I love building stuff!"}}],"redirectTo":null,"isHiddenFromBlogPostGrid":false,"lang":"en","tags":["cloud","pulumi","infrastructure","typescript"],"dateCreated":"2022-09-30T15:04","dateLastUpdated":null,"postContent":"Pulumi is a fantastic solution for IaC (Infrastructure as Code). It allows you to manage your cloud services with high-level SDKs for popular programming languages like TypeScript, C#, GoLang, and Python. The familiarity and characteristics of those programming languages make it easier to set up, maintain and write code for your cloud services, including your friendly authentication provider Auth0.\n\nThis blog post will show you how to provision Auth0 resources using TypeScript and Pulumi. We will use the Pulumi tool to create and manage our infrastructure as code which is a great way to keep your infrastructure in a safe, version-controlled repository.\n\nLet's get started!\n\n## What Is Pulumi\n\n\n\nManaging your cloud infrastructure can be a daunting task. When even automated, you need to learn a new programming language (or multiple languages) to write code for your cloud services.\n\nPulumi is a tool that enables developers to write code for their cloud services using familiar programming languages like TypeScript, C#, GoLang, and Python. This makes it easier than ever to get started with Infrastructure as Code.\n\nPulumi also abstracts away the cloud provider-specific resources and provides a unified view of all your resources in one place. This makes it easy to see what changes need to be made when you want to migrate to a different cloud provider.\n\n## What Is Auth0 and the Auth0 Marketplace\n\nAuth0 is a cloud-based identity and authentication management platform. It provides a platform for developers to add user authentication to their applications and supports a variety of authentication methods, including social login, username and password, and SSO.\n\nThe [Auth0 marketplace](https://marketplace.auth0.com) is where developers can find and use pre-built integrations for their applications. These integrations provide user authentication, management, and security features. The Auth0 marketplace offers a variety of integrations, including social login, enterprise federation, and developer tools.\n\n## Setting Up Pulumi with Auth0\n\nFor this tutorial, you don't need to have prior knowledge of either Pulumi or Auth0, and we will guide you through the process of signing up, installing, setting up, and seeing your cloud resources created.\n\n### Installing Pulumi\n\nThe first step before we start working on our project is to install Pulumi.\n\nPulumi is easy to install but slightly different on each operating system.\n\nOn a Mac, open your terminal, and enter.\n\n```bash\nbrew install pulumi/tap/pulumi\n```\n\nOn Linux, similarly, open your terminal, and enter:\n\n```bash\ncurl -fsSL https://get.pulumi.com | sh\n```\n\nOn Windows, it does require downloading an installer, so visit their [official installation guide](https://www.pulumi.com/docs/get-started/install/) for more information.\n\nOnce installed on any OS, you can verify that it is properly installed by running the following command on your terminal:\n\n```bash\npulumi version\n```\n\nIf everything is fine, it will output the current Pulumi version at the time of writing `v3.40.1`.\n\n### Signing up for Pulumi\n\nPulumi is an open-source project and completely free to use; it requires having the Pulumi CLI installed and a backend system where the state and other configurations are installed.\n\nYou can set up and run a [self-managed backend instance](https://www.pulumi.com/docs/intro/concepts/state/#logging-into-a-self-managed-backend) or use Pulumi's cloud service, which is [free for individuals and offers several prices for teams and enterprises](https://www.pulumi.com/pricing/).\n\n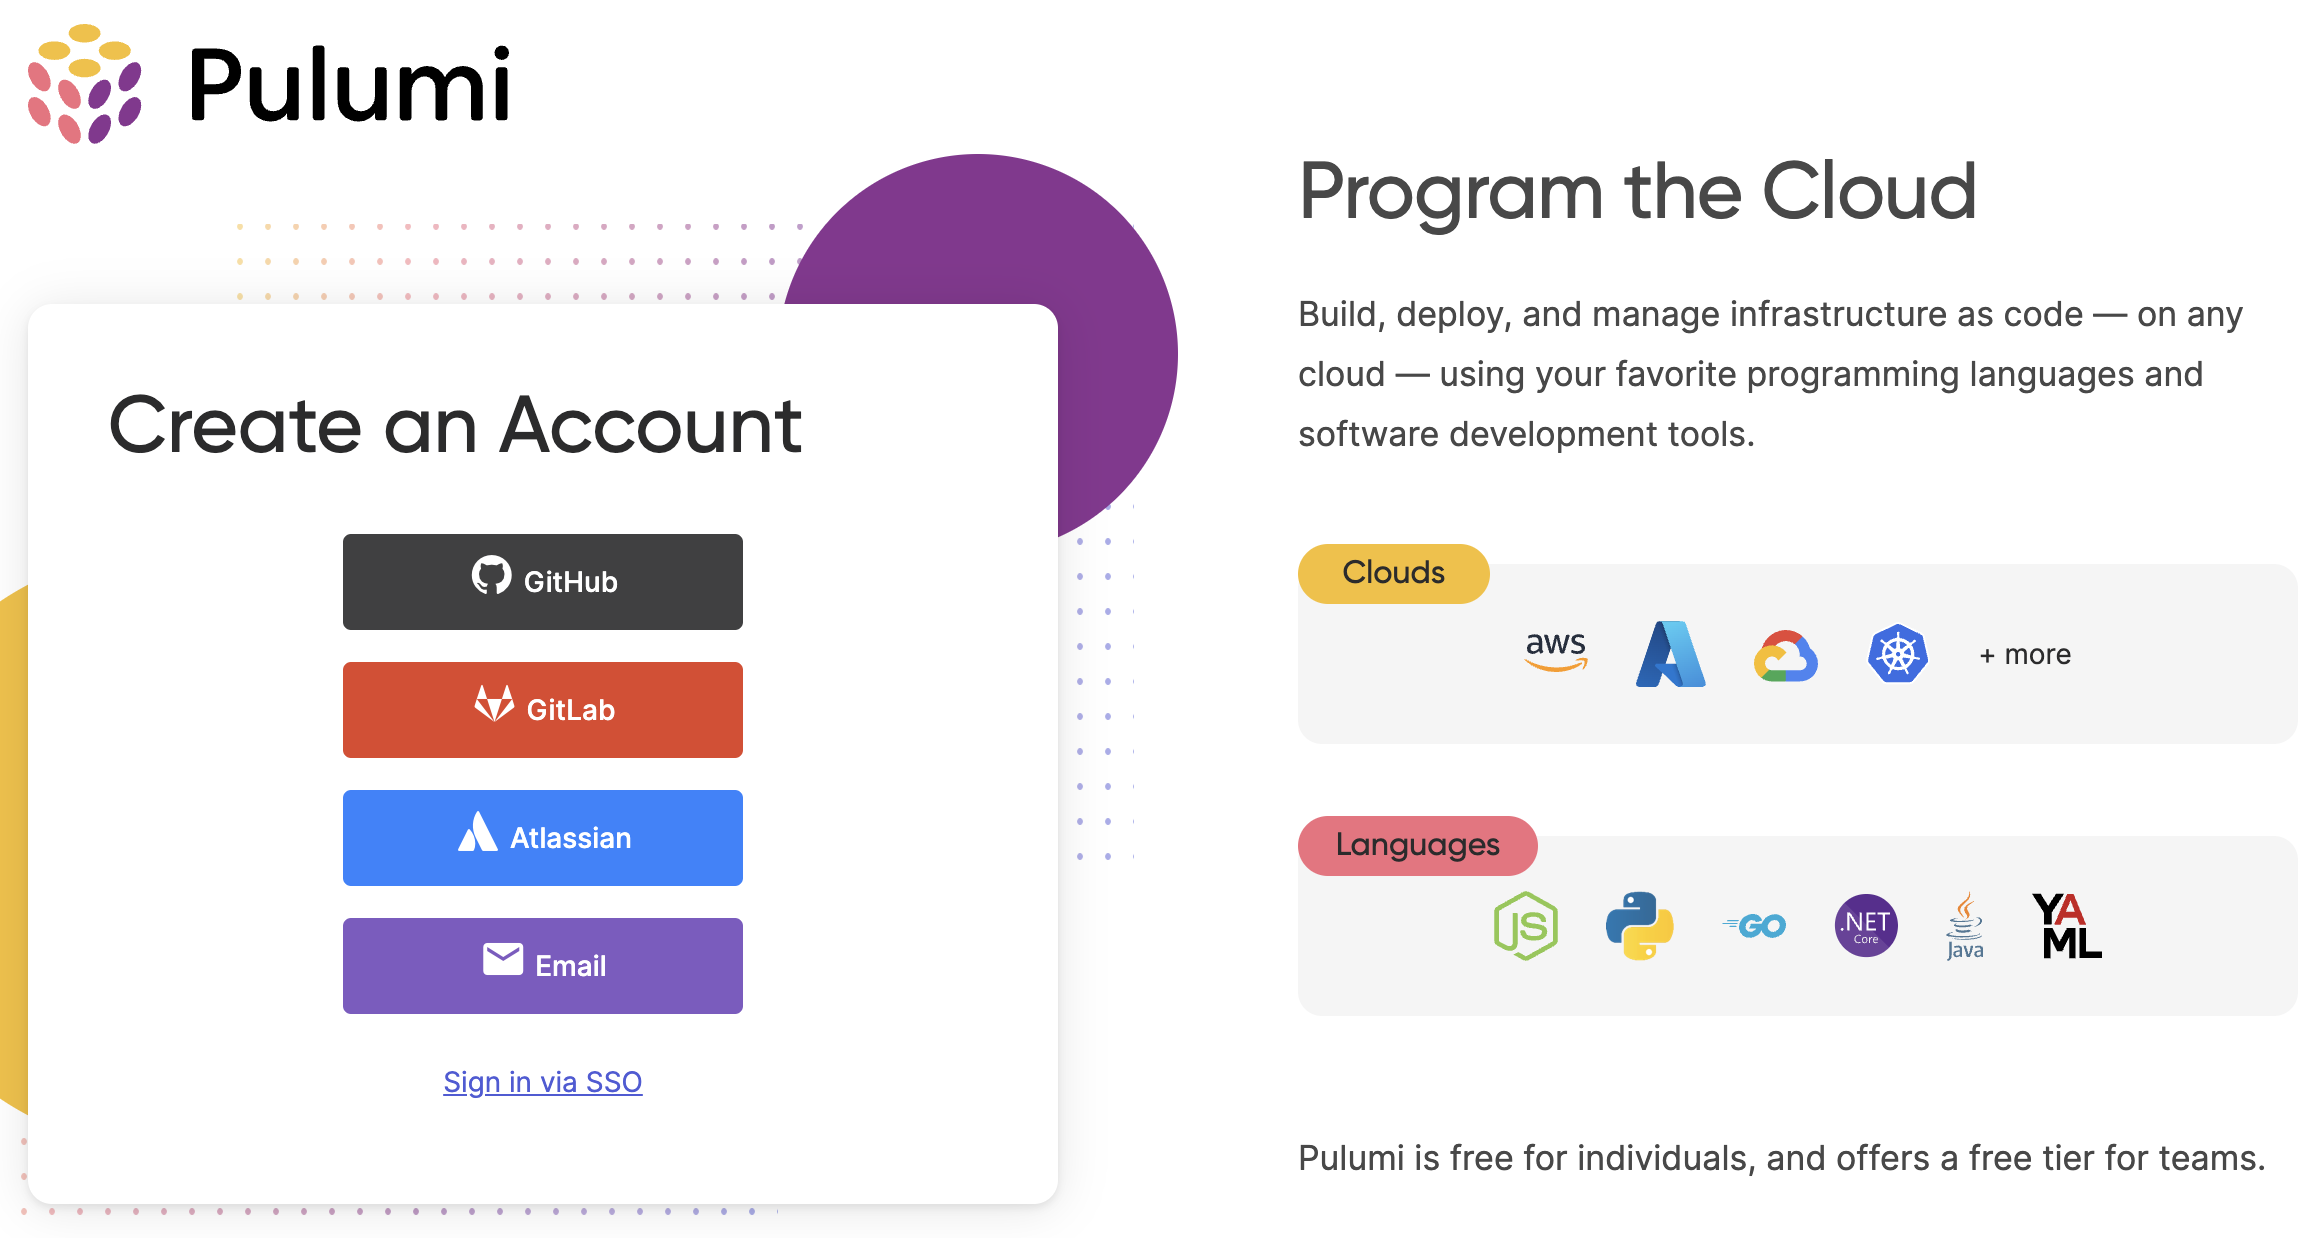\n\nSince we want to get started quickly, we will [sign up for a FREE account](https://app.pulumi.com/signup) using any authentication provider.\n\nAfter you log in to pulumi.com, go to your terminal and run the following command:\n\n```bash\npulumi login\n```\n\nYou will see an output like\n\n```bash\nManage your Pulumi stacks by logging in.\nRun `pulumi login --help` for alternative login options.\nEnter your access token from https://app.pulumi.com/account/tokens\n or hit \u003cENTER\u003e to log in using your browser : \n```\n\nHit `\u003cEnter\u003e` to log in through your browser, and it's done. Alternatively, you can manually login into https://app.pulumi.com/account/tokens to generate a token and enter it into the CLI.\n\n### Create an Auth0 application for the Pulumi service\n\nPulumi can manage a lot of the resources of your Auth0 account, but it can't create one for you. Fortunately, that's easy to do. Go ahead and \u003ca href=\"https://auth0.com/signup\" data-amp-replace=\"CLIENT_ID\" data-amp-addparams=\"anonId=CLIENT_ID(cid-scope-cookie-fallback-name)\"\u003esign up for a free Auth0 account\u003c/a\u003e now.\n\nWhile on the [Auth0 dashboard](https://manage.auth0.com/dashboard/), navigate to the \"Applications\" section on the left-side menu.\n\n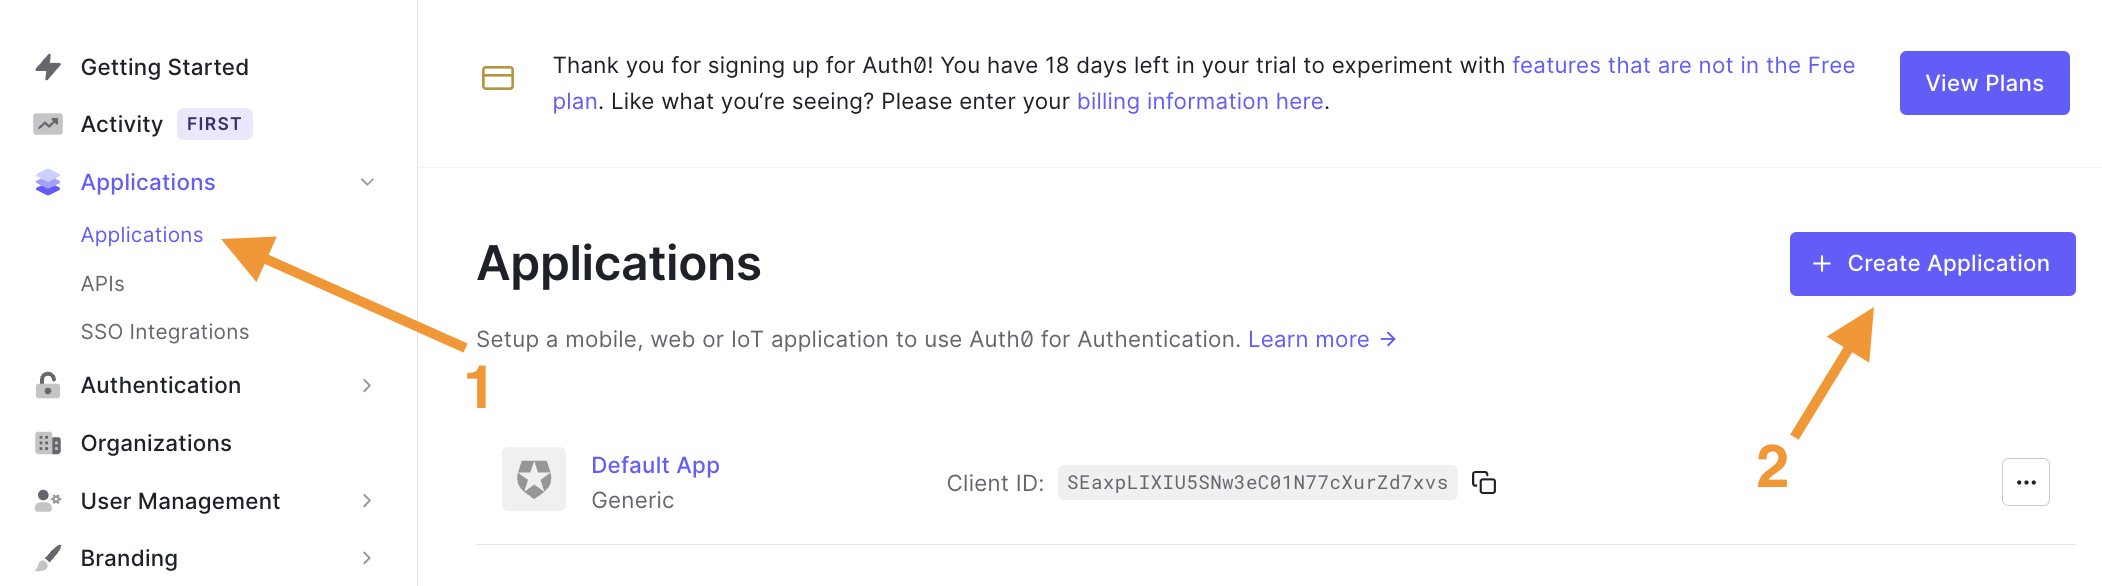\n\nNext, the new application dialog appears; enter an application name, e.g., \"Pulumi App\", and select the \"Machine to Machine Applications\" type.\n\n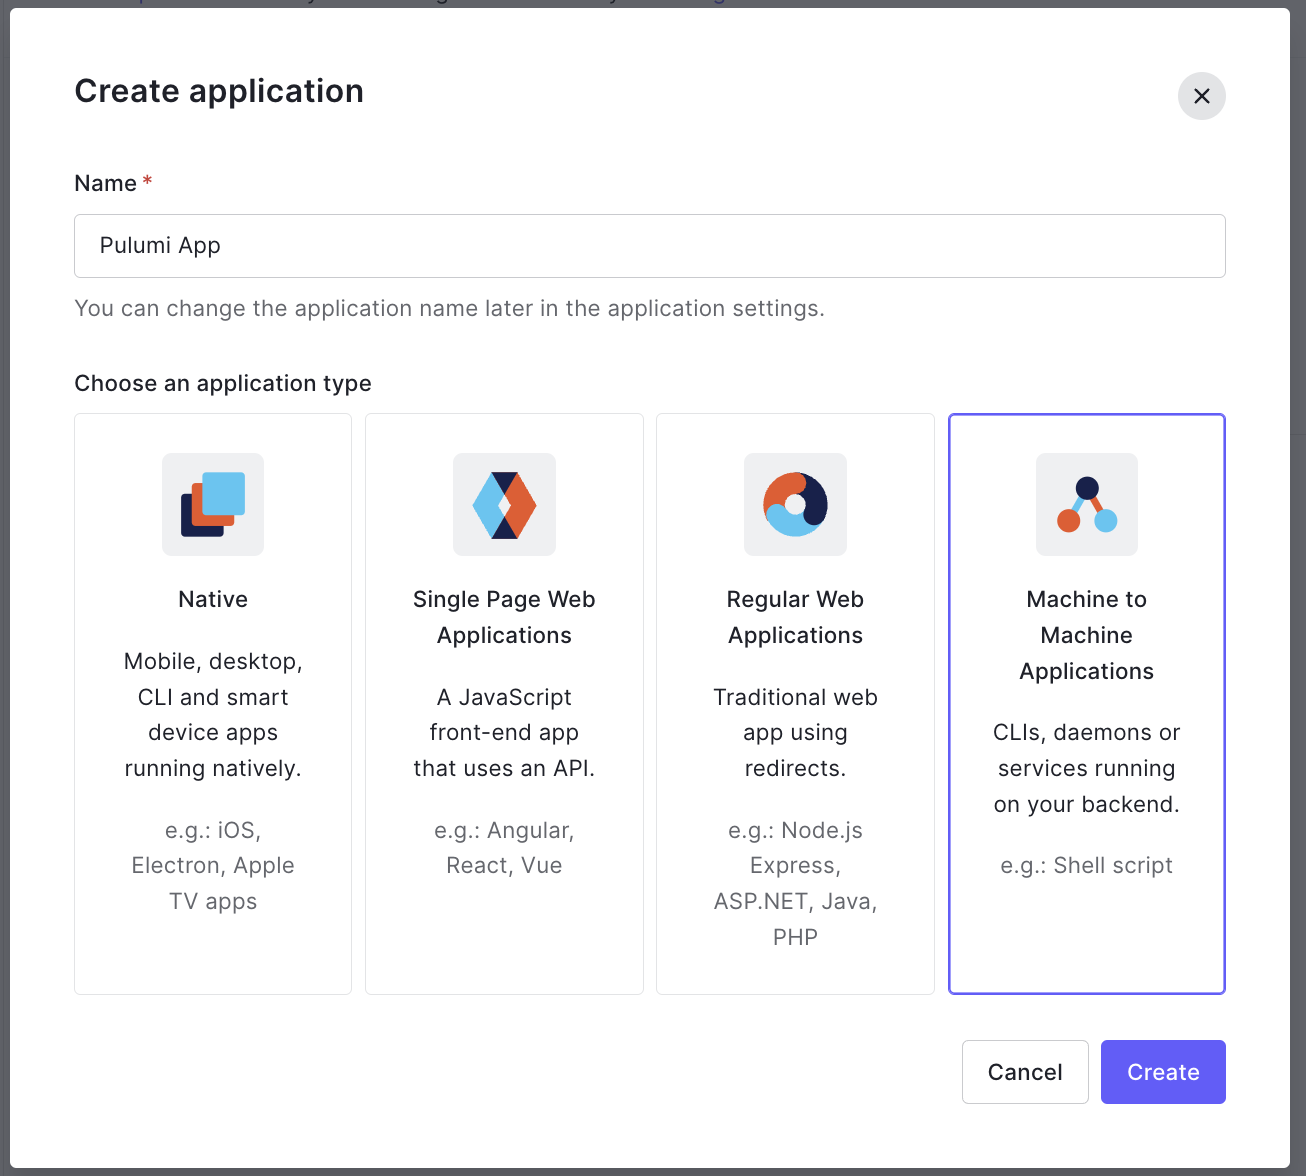\n\nSince we selected the \"Machine to Machine\" type, we won't need a user for Pulumi; instead, we will use client credentials. But first, we need to authorize the app to access an API, and in our case, we will select the _Auth0 Management API_, which is available by default with your tenant.\n\n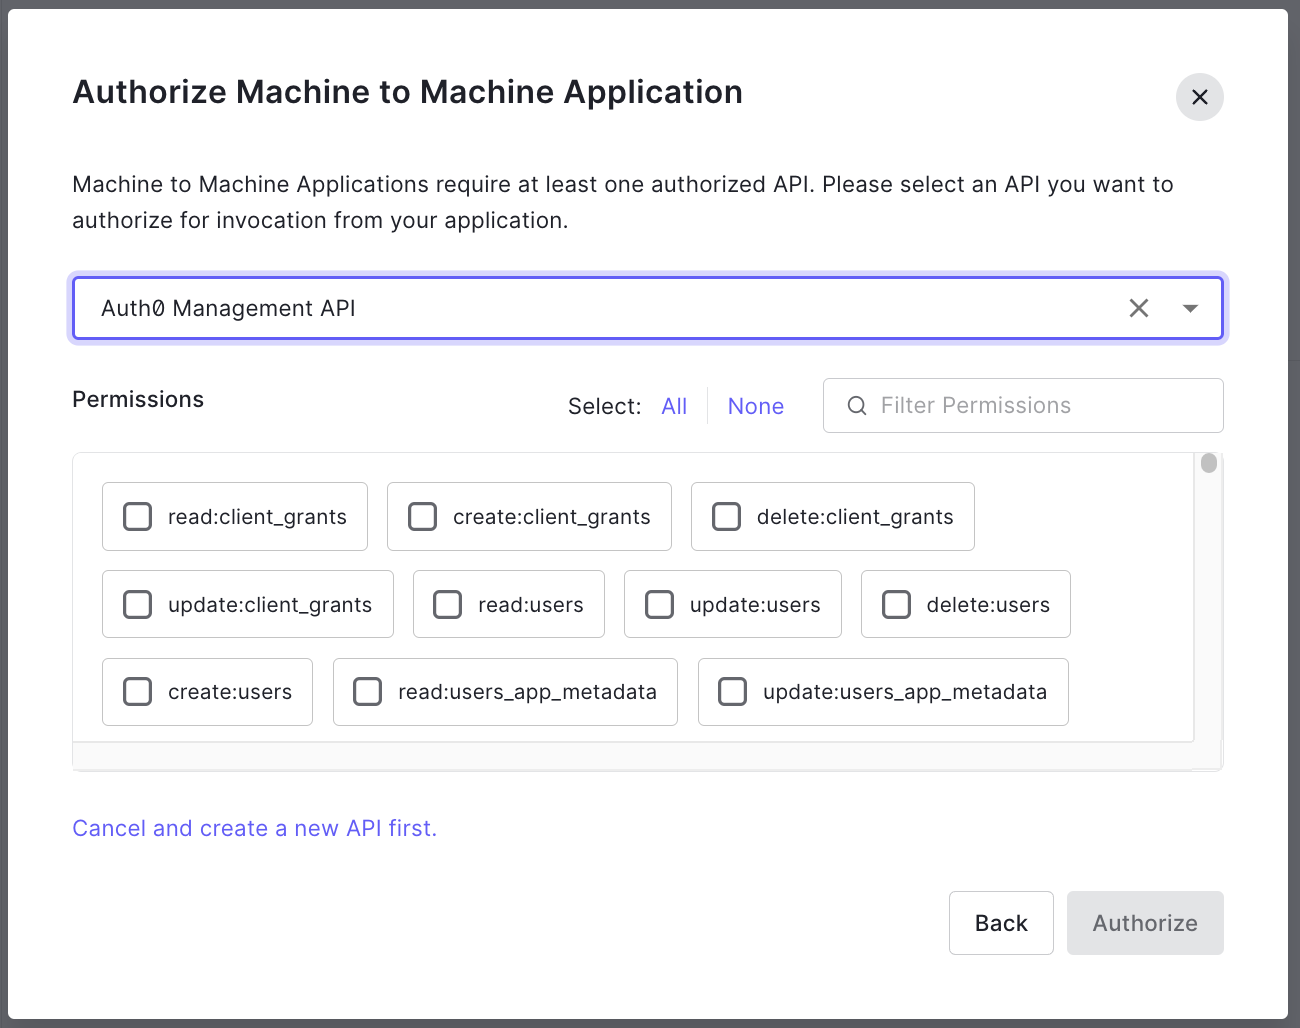\n\nAfter selecting the API, the dialog will expand, listing all the permissions available for that API. We recommended that you follow the [principle of least-privilege](https://www.okta.com/identity-101/what-is-least-privilege-access/) and choose the authorizations carefully based on your project requirements, and no more.\n\nWith that said, and only because this is a sandbox account, we'll select all to continue, so you are not limited while following this tutorial and dealing with unauthorized access due to missing grants.\n\n### Create a new Pulumi project\n\nWe are done with all the platform sign-ups and configurations, and we are ready to start coding.\n\nWhen working with Pulumi, or any other IaC tool, you'll have to decide if you want to include your Pulumi code alongside your application code or on a separate repository. The steps won't differ, though you may want to name and place directories differently.\n\nTo start, let's create a new working directory where we'll place all our Pulumi code:\n\n```bash\nmkdir pulumi-auth0-quickstart \u0026\u0026 cd pulumi-auth0-quickstart\n```\n\nNext, we will generate a new project using the Auth0 template:\n\n```bash\npulumi new auth0-typescript\n```\n\n\u003e Note that we specified the template name `auth0-typescript`, but there are other languages available. You can read more about Auth0 and Pulumi in the [Auth0 Marketplace](https://marketplace.auth0.com/integrations/pulumi) and the [Pulumi registry docs](https://www.pulumi.com/registry/packages/auth0/).\n\nOnce you run the command above, the terminal window will prompt you for a few values:\n\n- Project name: A unique project name.\n- Project description: A short description of your project.\n- Stack name: typically referred to as the environment or the organization plus the environment, e.g., \"dev\" or \"auth0/dev\".\n- auth0:clientId: The Auth0 client id for the Pulumi App; we'll go into details on how to get this information next.\n- auth0:clientSecret: The Auth0 client secret for the Pulumi App.\n- auth0:domain: The Auth0 domain where your Pulumi App is running.\n\n#### How to capture the Auth0 values from my Auth0 account\n\nHeading back to the [Auth0 dashboard](https://manage.auth0.com/dashboard/) and into the recently created application \"Pulumi App\", you'll see the app overview, then click the _Settings_ tab to access the information we need.\n\n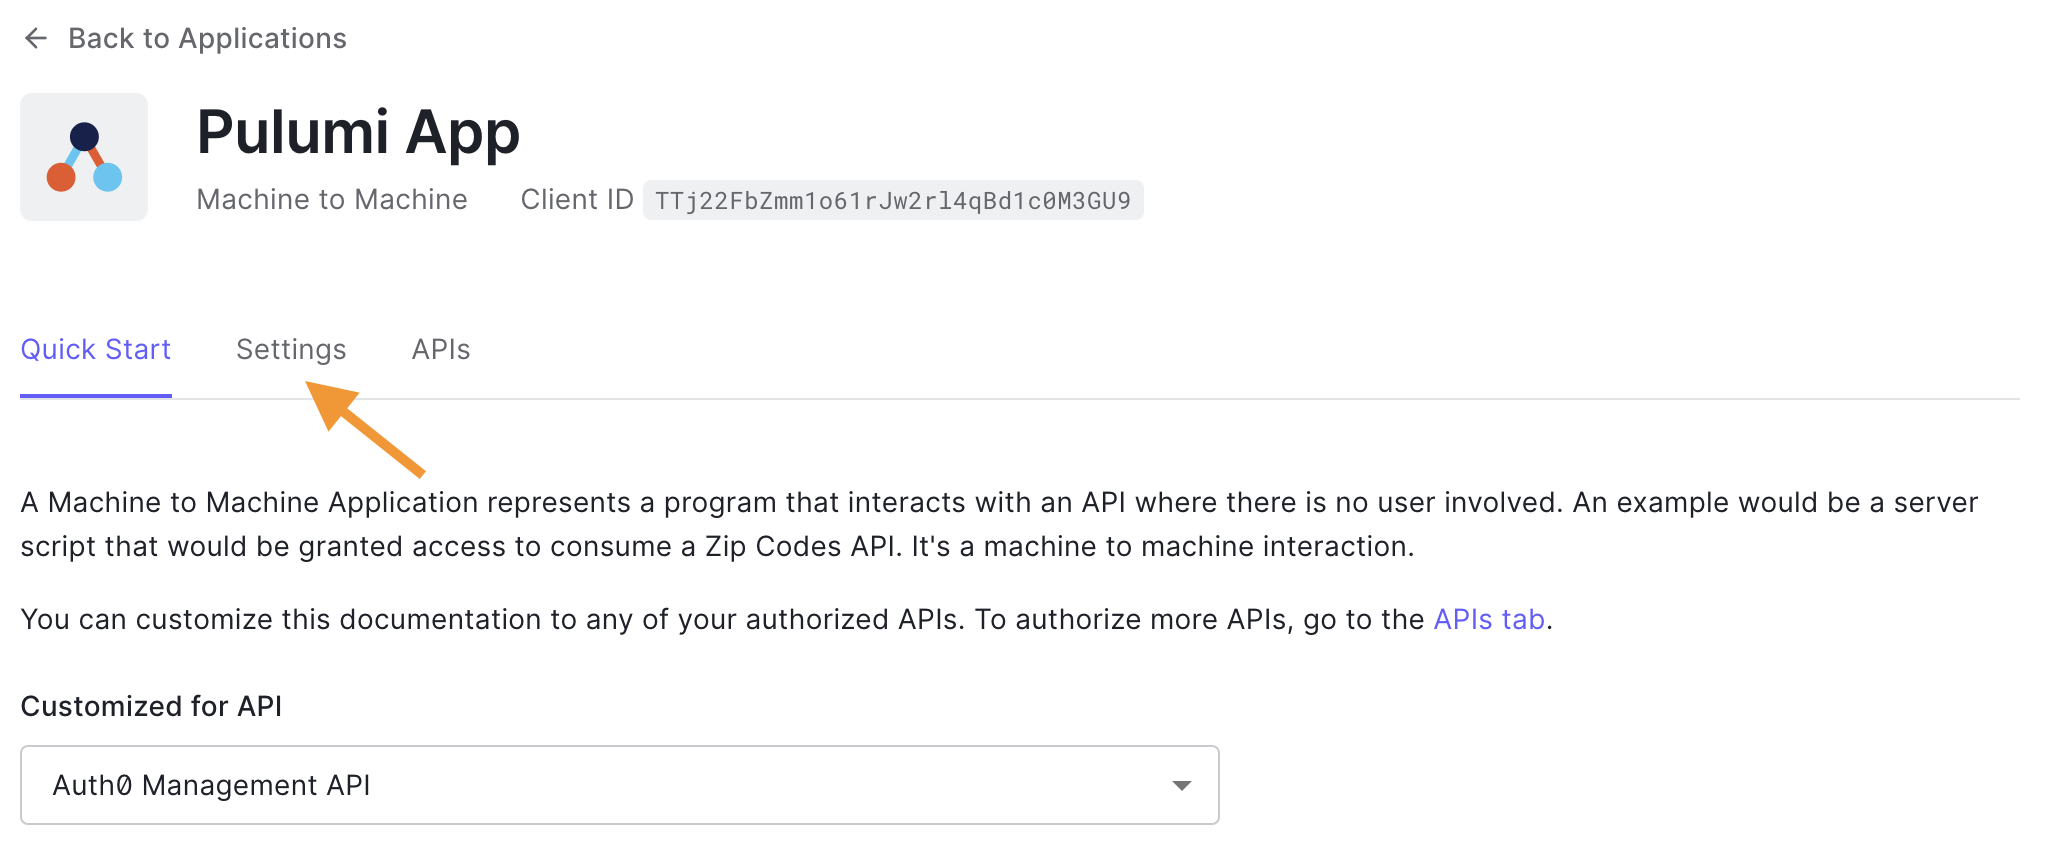\n\nOnce on the settings page, the three values we need, clientId, client secret, and domain, are readily available to copy on your screen.\n\n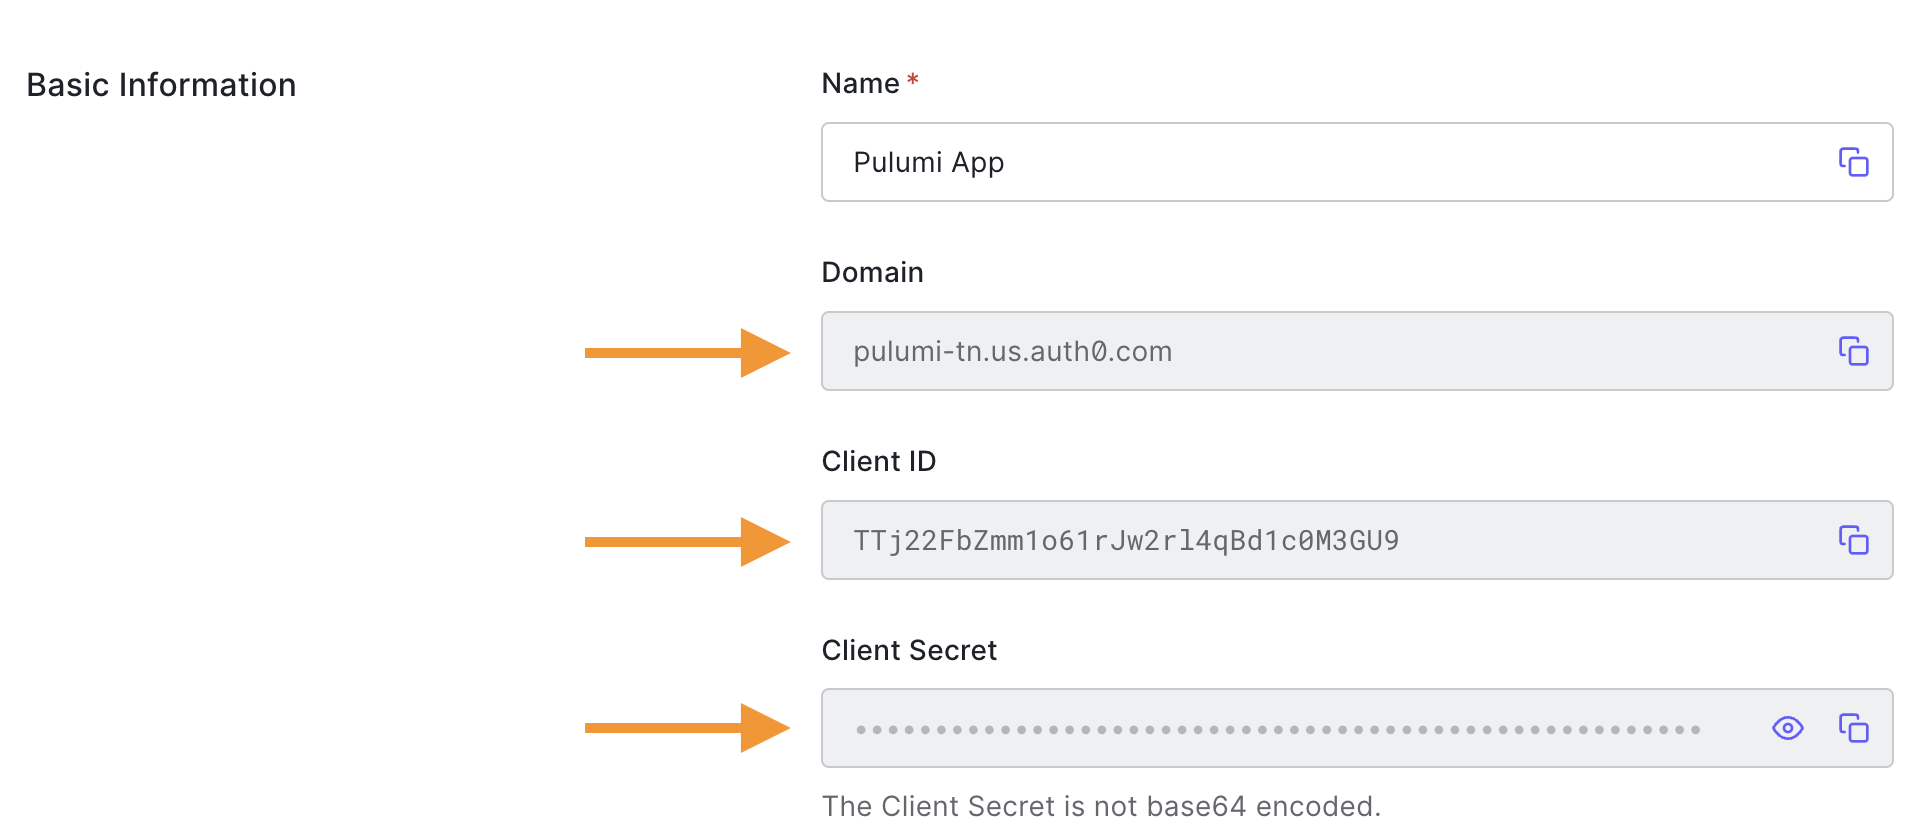\n\nFinally, enter those values in the terminal and way for the project to generate. It may take a minute or two, depending on the programming language.\n\nAnd don't worry about adding your client secret here, it will be only [stored encrypted](https://www.pulumi.com/learn/building-with-pulumi/secrets/), and you can decide the level of control and encryption provider of your choice if necessary.\n\n#### Pulumi and Auth0 quick start project structure\n\nAfter your project completes, Pulumi will have generated an npm project with three essential files:\n\n- `index.ts`\n- `Pulumi.[env].yaml`: Configuration file where all your Auth0 values are stored.\n- `Pulumi`: Project related metadata\n\nLet's next take a look at the generated `index.ts` file;\n\n```typescript\nimport * as pulumi from \"@pulumi/pulumi\";\nimport * as auth0 from \"@pulumi/auth0\";\n\nconst client = new auth0.Client(\"client\", {\n allowedLogoutUrls: [\"https://www.example.com/logout\"],\n allowedOrigins: [\"https://www.example.com\"],\n callbacks: [\"https://example.com/auth/callback\"],\n appType: \"regular_web\",\n jwtConfiguration: {\n alg: \"RS256\"\n },\n\n})\n\nexport const clientId = client.clientId\nexport const clientSecret = client.clientSecret\n```\n\nIt is a simple file that will create a new _Auth0 Client_ (or _Auth0 application_), and will set configurations like the application type, logout URLs, callbacks, and allowed origins, all the typical settings you'll need to set up a regular web application.\n\n### Set up the auth0 provider into an existing Pulumi project\n\nIf you already have an existing Pulumi project and would like to provision Auth0's resources, you'll first have to install the Auth0 provider for your programming language.\n\nIf using typescript, from your terminal, on the root of your Pulumi project, run:\n\n```bash\nnpm i @pulumi/auth0\n```\n\nIf you are using other programming languages, check out their official documentation on [how to install the Auth0 provider](https://www.pulumi.com/registry/packages/auth0/installation-configuration/)\n\nAfter installing the provider, you'll have to configure the Auth0 clientId, client secret, and domain from your \"Pulumi App\".\n\nTo capture the value, check the previous section [How to capture the Auth0 values from my Auth0 Account](#how-to-capture-the-auth0-values-from-my-auth0-account) and, on your terminal, enter the following command with the updated values:\n\n```bash\npulumi config set auth0:domain XXXXXXXXXXXXXX\npulumi config set auth0:client_id YYYYYYYYYYYYYY --secret\npulumi config set auth0:client_secret ZZZZZZZZZZZZZZ --secret\n```\n\nDon't forget to use `--secret` for _client_id_ and _client_secret_ as that will tell Pulumi to encrypt the values.\n\n## Running Pulumi and Provisioning the Auth0 Resources\n\nNow we are ready to use Pulumi to provision our Auth0 resources.\n\nOn your terminal, run:\n\n```bash\npulumi up\n```\n\nPulumi will first compare the current state (generated by the written code) versus the previously saved state (empty since it is our first execution) and will prepare a plan based on the results.\n\nHere is what it looks like on the terminal:\n\n```text\nPreviewing update (dev)\n\nView Live: https://app.pulumi.com/bajcmartinez/pulumi-auth0-quickstart/dev/previews/e93bebef-eecf-49ec-a58f-86d0b7ea11db\n\n Type Name Plan \n + pulumi:pulumi:Stack pulumi-auth0-quickstart-dev create \n + └─ auth0:index:Client client create \n \nOutputs:\n clientId : output\u003cstring\u003e\n clientSecret: output\u003cstring\u003e\n\nResources:\n + 2 to create\n\nDo you want to perform this update? [Use arrows to move, enter to select, type to filter]\n yes\n\u003e no\n details\n```\n\nSince it is the first time we run Pulumi for this project, it will create a new Pulumi stack on the backend and will provision the Auth0 application as we defined it in the `index.ts`.\n\nSince we agree with the plan, we proceed to execute by selecting the option `yes` on the screen.\n\nNow Pulumi is creating all the resources and will print the results on the terminal when it finishes.\n\n```text\nUpdating (dev)\n\nView Live: https://app.pulumi.com/bajcmartinez/pulumi-auth0-quickstart/dev/updates/1\n\n Type Name Status \n + pulumi:pulumi:Stack pulumi-auth0-quickstart-dev created \n + └─ auth0:index:Client client created \n \nOutputs:\n clientId : \"ltiZx0e53LJoqr5IpIJrmZHAuwhsj2WZ\"\n clientSecret: [secret]\n\nResources:\n + 2 created\n\nDuration: 7s\n```\n\nWhat would happen if I were to run `pulumi up` again? It should be totally safe, so let's try it and see the results.\n\n```text\nPreviewing update (dev)\n\nView Live: https://app.pulumi.com/bajcmartinez/pulumi-auth0-quickstart/dev/previews/7fd259e6-cadf-43ab-8b74-3e2329ed818c\n\n Type Name Plan \n pulumi:pulumi:Stack pulumi-auth0-quickstart-dev \n \nResources:\n 2 unchanged\n\nDo you want to perform this update? [Use arrows to move, enter to select, type to filter]\n yes\n\u003e no\n details\n```\n\nAs expected, Pulumi doesn't detect any changes, the state variable hosted in Pulumi's service and the local configuration given in the code match.\n\n**But what exactly happened in our Auth0 account?** If we go back to the [Auth0 dashboard](https://manage.auth0.com/dashboard/), a new application will appear with the name `client-{unique identifier}`, e.g. `client-8c41df9`. Pulumi, by default, adds that unique identifier at the end of each resource name to prevent name clashing.\n\n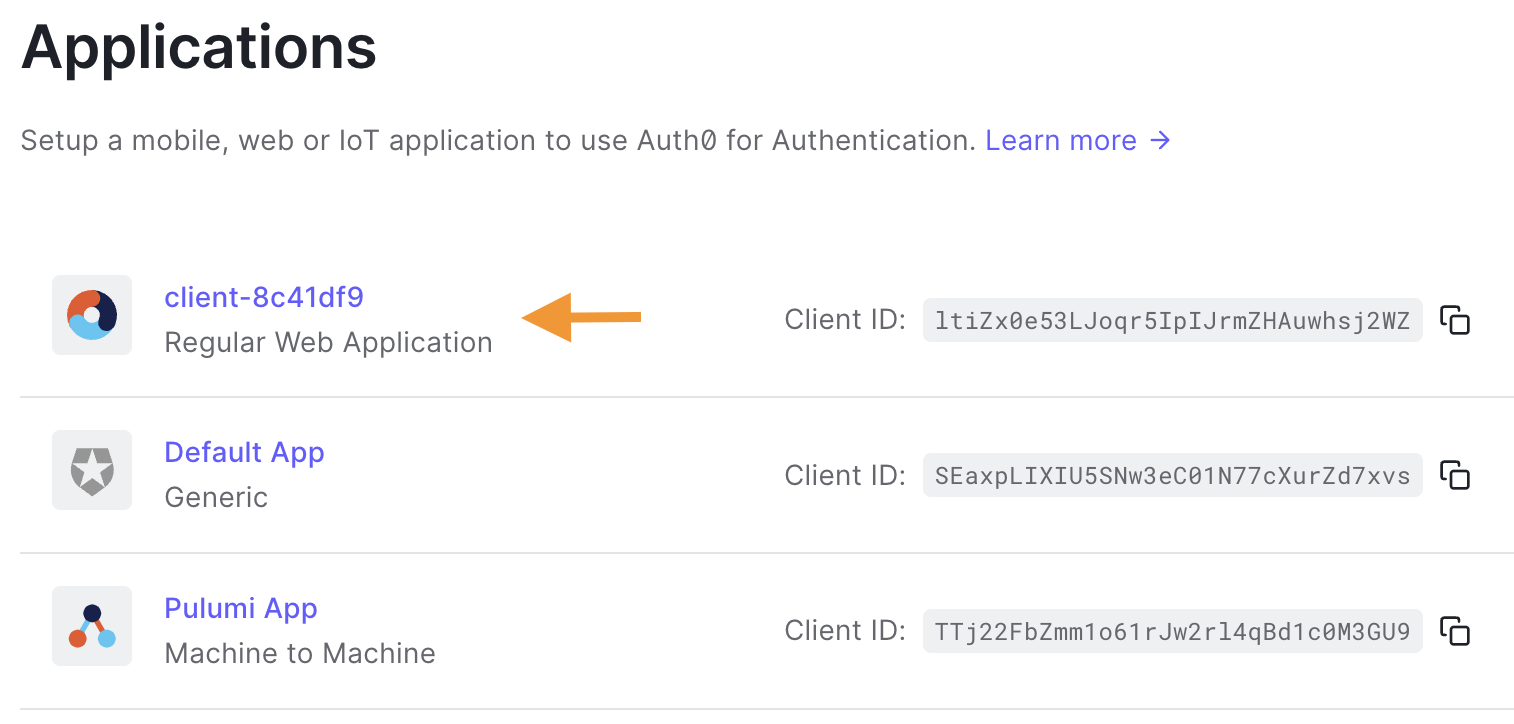\n\n## Use Case Examples for the Pulumi Auth0 SDK\nLet's see next some examples of what can be done with the Pulumi Auth0 SDK.\n\n### Provision a new Auth0 application\nOne of the most common tasks when automating the provisioning of Auth0 resources is to create applications, and as we discussed, we do that by leveraging the [_Client module_](https://www.pulumi.com/registry/packages/auth0/api-docs/client/).\n\nThe [official documentation](https://www.pulumi.com/registry/packages/auth0/api-docs/client/) goes into detail on all the parameters and presets for applications, but here is a small sample for a typical scenario for a SPA application (since we already covered web apps):\n\n```typescript\nconst client = new auth0.Client(\"my-spa\", {\n allowedLogoutUrls: [\"https://www.my-spa.com/logout\"],\n allowedOrigins: [\"https://www.my-spa.com\"],\n callbacks: [\"https://my-spa.com/auth/callback\"],\n appType: \"spa\",\n});\n```\n\n### Provision a new Auth0 user\nAnother typical use case is to create users. This is commonly done for admins, other super users, or even test users.\n\nLet's see an example of creating an _admins_ role and a user belonging to the group.\n\n```typescript\nconst adminGroup = new auth0.Role(\"admin\", {description: \"Administrator\"});\nconst jc = new auth0.User(\"bajcmartinez\", {\n connectionName: \"Username-Password-Authentication\",\n givenName: \"Juan Cruz\",\n familyName: \"Martinez\",\n email: \"youremail@yourcompany.com\",\n password: \"very-secure-!nitial-passw0rd\",\n emailVerified: true, // We don't want to email the user to confirm its registration\n roles: [adminGroup.id],\n});\n```\n\nIn the example above, we use the [default database connection](https://auth0.com/docs/authenticate/database-connections) \"Username-Password-Authentication\". Optionally you can create and use other connections.\n\n\u003e Remember that the user requirements from your connection will apply even when using Pulumi, and if a condition does not match, e.g., \"Password is too weak\", then the resource will fail to create.\n\n### Set your Branding and personalization with Pulumi and Auth0\nAnother area where Auth0 excels is personalization, allowing you to personalize the experience with your brand, your colors, logo, messages, email addresses, and even email templates.\n\nYou can customize everything about your user's experience through the Auth0 dashboard, but if you are using Pulumi, you can change those parameters through code, thanks to the modules like [Branding](https://www.pulumi.com/registry/packages/auth0/api-docs/branding/), [Email template](https://www.pulumi.com/registry/packages/auth0/api-docs/emailtemplate/), [Prompts](https://www.pulumi.com/registry/packages/auth0/api-docs/promptcustomtext/) and more.\n\nHere is an example of how to change your brand colors and logo using TypeScript:\n\n```typescript\nconst myBrand = new auth0.Branding(\"my_brand\", {\n colors: {\n pageBackground: \"#000000\",\n primary: \"#0059d6\",\n },\n logoUrl: \"https://mycompany.org/logo.png\",\n universalLogin: {\n body: \"\u003c!DOCTYPE html\u003e\u003chtml\u003e\u003chead\u003e{%- auth0:head -%}\u003c/head\u003e\u003cbody\u003e{%- auth0:widget -%}\u003c/body\u003e\u003c/html\u003e\",\n },\n});\n```\n\n\n### What resources are available with the Pulumi Auth0 integration?\nWith Pulumi, you can set up pretty much everything you can do with the Auth0 dashboard, so no surprise there are quite a few modules available for us to use, like [Actions](https://www.pulumi.com/registry/packages/auth0/api-docs/action/), [Client Grants](https://www.pulumi.com/registry/packages/auth0/api-docs/clientgrant/), [Attack Protection](https://www.pulumi.com/registry/packages/auth0/api-docs/attackprotection/).\n\nYou can read the full list on [Pulumi's official docs](https://www.pulumi.com/registry/packages/auth0/api-docs/).\n\n## Final Thoughts\nMore and more companies embrace DevOps and infrastructure as code to provision, manage and maintain the ever-increasing complexity of cloud services.\n\nPulumi helps individuals and teams to handle their IaC strategy through familiar programming languages, reducing the effort and skills needed.\n\nThanks to its extensibility with libraries, you can provision your servers, databases, queues, and, for example, Auth0 resources to build and customize the online identity experiences of your apps.\n\nThanks for learning!","readTime":12,"formattedDate":"Sep 30, 2022"},{"path":"introducing-the-auth0-flutter-sdk","title":"Introducing the Auth0 Flutter SDK","heroImage":{"url":"https://images.ctfassets.net/23aumh6u8s0i/2RrLE9Sz4VcKrh4pa3I0kn/8e1bbadef51dd4e26aa8174c2afbfd3a/flutter.png","size":{"width":588,"height":528}},"category":["Developers","Tutorial","Flutter"],"authors":[{"metadata":{"tags":[],"concepts":[]},"sys":{"space":{"sys":{"type":"Link","linkType":"Space","id":"23aumh6u8s0i"}},"id":"7qC8LJD80VSx1qYcSdQ1Zh","type":"Entry","createdAt":"2021-08-23T12:59:46.069Z","updatedAt":"2025-01-08T14:00:38.100Z","environment":{"sys":{"id":"master","type":"Link","linkType":"Environment"}},"publishedVersion":42,"revision":6,"contentType":{"sys":{"type":"Link","linkType":"ContentType","id":"author"}},"locale":"en-US"},"fields":{"path":"juan-cruz-martinez","name":"Juan Cruz Martinez","avatar":{"metadata":{"tags":[{"sys":{"type":"Link","linkType":"Tag","id":"user"}}],"concepts":[]},"sys":{"space":{"sys":{"type":"Link","linkType":"Space","id":"23aumh6u8s0i"}},"id":"5b3YvfAb53h2I5U6uanww4","type":"Asset","createdAt":"2022-07-07T09:23:40.589Z","updatedAt":"2022-07-07T09:23:56.422Z","environment":{"sys":{"id":"master","type":"Link","linkType":"Environment"}},"publishedVersion":10,"revision":5,"locale":"en-US"},"fields":{"title":"jcm","description":"Juan Cruz Martinez","file":{"url":"//images.ctfassets.net/23aumh6u8s0i/5b3YvfAb53h2I5U6uanww4/f1dfa0e19f15f5df8eacd53f78a813f6/jcm.jpeg","details":{"size":29371,"image":{"width":400,"height":400}},"fileName":"jcm.jpeg","contentType":"image/jpeg"}}},"lastUpdatedBy":"Juan Cruz Martinez","email":"juan.martinez@okta.com","twitter":"https://twitter.com/bajcmartinez","github":"https://github.com/bajcmartinez","linkedin":"https://www.linkedin.com/in/bajcmartinez/","isPopular":true,"personalWebsite":"https://jcmartinez.dev/","type":"Auth0 Employee","jobTitle":"Staff Developer Advocate","description":"I stream, blog, and make youtube videos about tech stuff. I love coding, I love AI, and I love building stuff!"}}],"redirectTo":null,"isHiddenFromBlogPostGrid":false,"lang":"en","tags":["mobile","ios","android","flutter","native"],"dateCreated":"2022-08-29T15:01","dateLastUpdated":null,"postContent":"Today we are announcing the release of the [Auth0 Flutter SDK](https://pub.dev/packages/auth0_flutter), a new SDK that makes it easy to secure Flutter applications with Auth0. Whether you need to secure access to an iOS or Android application, the Auth0 Flutter SDK got you covered!\n\nThe new Flutter SDK builds on a strong foundation by wrapping our existing and robust [Auth0.Android](https://github.com/auth0/Auth0.Android) and [Auth0.swift](https://github.com/auth0/Auth0.swift) libraries while focusing on the developer experience first.\n\nOur SDK team optimized the Auth0 Flutter SDK for quick integration into your applications and for flexibility to accommodate simple and advanced use cases.\n\nSince the introduction of [Flutter 3](https://medium.com/flutter/introducing-flutter-3-5eb69151622f), the framework allows for building cross-platform applications, extending from mobile applications to desktop applications and platforms. Our SDK allows for extension in such platforms by leveraging federated plugins, which means you can easily add support for other platforms without forking the SDK.\n\n## Auth0 Flutter SDK Features\n\nThe new SDK offers features for multiple use-cases and complexity, going from magically getting the job done to providing a rich set of APIs enabling you to build your authentication flow per your specific requirements.\n\nLet's explore the essential features of the Auth0 Flutter SDK that enable developers to do more:\n\n- ⚡️ Quick implementation of login, logout, and automatic storage and renewal of tokens functionality into Flutter apps using WebAuth and the [Auth0 Universal Login](https://auth0.com/docs/authenticate/login/auth0-universal-login) page.\n- ⚙️ For more advanced use-cases, developers have access to the [Authentication API](https://pub.dev/documentation/auth0_flutter/latest/auth0_flutter/AuthenticationApi-class.html), which at the time of release supports:\n\t- Logging in with a username or email and password\n\t- Signing up new users\n\t- Getting user information from `/userinfo`\n\t- Renew tokens\n\t- Reset passwords\n- 🔐 Auth0 provides a default instance of [Credentials Manager](https://pub.dev/documentation/auth0_flutter/latest/auth0_flutter/DefaultCredentialsManager-class.html) that automatically stores the user's credentials. If you need your own solution for handling credentials, you can create your own [custom credentials manager](https://pub.dev/documentation/auth0_flutter/latest/auth0_flutter/CredentialsManager-class.html).\n- ➕ And more [advanced features](https://pub.dev/packages/auth0_flutter#advanced-features) like accepting user invites, login into organizations, and bot detection.\n\n## Requirements\n\nThe Auth0 Flutter SDK doesn't require any other library to work. However, there are SDK version and platform requirements for your project:\n\n\u003ctable style=\"width:100%\" cellspacing=\"2\" cellpadding=\"5\"\u003e\n \u003cthead\u003e\n \u003ctr style=\"border-bottom: solid 1px\"\u003e\n \u003ctd\u003e**Flutter**\u003c/td\u003e\n \u003ctd\u003e**Android**\u003c/td\u003e\n \u003ctd\u003e**iOS**\u003c/td\u003e\n \u003c/tr\u003e\n \u003c/thead\u003e\n \u003ctbody\u003e\n \u003ctr\u003e\n \u003ctd\u003eSDK 3.0+\u003c/td\u003e\n \u003ctd\u003eAndroid API 21+\u003c/td\u003e\n \u003ctd\u003eiOS 12+\u003c/td\u003e\n \u003c/tr\u003e\n \u003ctr\u003e\n \u003ctd\u003eDart 2.17+\u003c/td\u003e\n \u003ctd\u003eJava 8+\u003c/td\u003e\n \u003ctd\u003eSwift 5.3+\u003c/td\u003e\n \u003c/tr\u003e\n \u003ctr\u003e\n \u003ctd\u003e\u003c/td\u003e\n \u003ctd\u003e\u003c/td\u003e\n \u003ctd\u003eXcode 13.x / 14.x\u003c/td\u003e\n \u003c/tr\u003e\n \u003c/tbody\u003e\n\u003c/table\u003e\n\nCheck the [project on GitHub](https://github.com/auth0/auth0-flutter/tree/main/auth0_flutter#requirements) to for the most up-to-date set of requirements.\n\n## Installing the SDK\n\nThe Auth0 Flutter SDK is distributed via [pub.dev](https://pub.dev/packages/auth0_flutter).\n\nTo add the SDK, run the following command from the root directory of your project:\n\n```bash\nflutter pub get auth0_flutter\n```\n\n## Adding Universal Login to Your Flutter Application\n\nAdding the full-featured [Auth0 Universal Login](https://auth0.com/docs/authenticate/login/auth0-universal-login) authentication page to your application is easy with the SDK.\n\nPlease explore the [Flutter Quickstart guide](https://auth0.com/docs/quickstart/native/flutter/interactive) to see in detail how to set up your Flutter application to use the Auth0 SDK. For now, let's take a quick peak at how the Flutter SDK integration goes!\n\n### Add login to your app\n\nIntegrate Auth0 Universal Login in your Flutter app by using the Auth0 class. Redirect your users to the Auth0 Universal Login page using `webAuthentication().login()`. This is a `Future` and must be awaited for you to retrieve the user's tokens.\n\n```dart\nawait auth0.webAuthentication(scheme: 'YOUR CUSTOM SCHEME').login();\n```\n\n### Add logout to your app\n\nLogging out users is as easy as calling the Auth0 Flutter SDK `webAuthentication().logout()` function. The `logout()` function is responsible for calling the `logout` endpoint to clear their login session and to clear the user login state from the device session.\n\n```dart\nawait auth0.webAuthentication(scheme: 'YOUR CUSTOM SCHEME').logout();\n```\n\n## Next Steps\n\nThere are a lot of options to work with with the SDK, and in this post, we only barely scratch the surface of it. If you want to learn more about the SDK, please check out the [quick start guide](https://auth0.com/docs/quickstart/native/flutter/interactive) and the [SDK documentation](https://pub.dev/packages/auth0_flutter).\n\nThanks for reading!","readTime":4,"formattedDate":"Aug 29, 2022"},{"path":"best-practices-for-flask-api-development","title":"Best Practices for Flask API Development","heroImage":{"url":"https://images.ctfassets.net/23aumh6u8s0i/6uBzrqHNLlSAoER6HtgDN0/accd8f871b1de37f472b94da4346afa2/python-hero","size":{"width":1176,"height":1056}},"category":["Developers","Tutorial","Flask"],"authors":[{"metadata":{"tags":[],"concepts":[]},"sys":{"space":{"sys":{"type":"Link","linkType":"Space","id":"23aumh6u8s0i"}},"id":"7qC8LJD80VSx1qYcSdQ1Zh","type":"Entry","createdAt":"2021-08-23T12:59:46.069Z","updatedAt":"2025-01-08T14:00:38.100Z","environment":{"sys":{"id":"master","type":"Link","linkType":"Environment"}},"publishedVersion":42,"revision":6,"contentType":{"sys":{"type":"Link","linkType":"ContentType","id":"author"}},"locale":"en-US"},"fields":{"path":"juan-cruz-martinez","name":"Juan Cruz Martinez","avatar":{"metadata":{"tags":[{"sys":{"type":"Link","linkType":"Tag","id":"user"}}],"concepts":[]},"sys":{"space":{"sys":{"type":"Link","linkType":"Space","id":"23aumh6u8s0i"}},"id":"5b3YvfAb53h2I5U6uanww4","type":"Asset","createdAt":"2022-07-07T09:23:40.589Z","updatedAt":"2022-07-07T09:23:56.422Z","environment":{"sys":{"id":"master","type":"Link","linkType":"Environment"}},"publishedVersion":10,"revision":5,"locale":"en-US"},"fields":{"title":"jcm","description":"Juan Cruz Martinez","file":{"url":"//images.ctfassets.net/23aumh6u8s0i/5b3YvfAb53h2I5U6uanww4/f1dfa0e19f15f5df8eacd53f78a813f6/jcm.jpeg","details":{"size":29371,"image":{"width":400,"height":400}},"fileName":"jcm.jpeg","contentType":"image/jpeg"}}},"lastUpdatedBy":"Juan Cruz Martinez","email":"juan.martinez@okta.com","twitter":"https://twitter.com/bajcmartinez","github":"https://github.com/bajcmartinez","linkedin":"https://www.linkedin.com/in/bajcmartinez/","isPopular":true,"personalWebsite":"https://jcmartinez.dev/","type":"Auth0 Employee","jobTitle":"Staff Developer Advocate","description":"I stream, blog, and make youtube videos about tech stuff. I love coding, I love AI, and I love building stuff!"}}],"redirectTo":null,"isHiddenFromBlogPostGrid":false,"lang":"en","tags":["flask","rest","api"],"dateCreated":"2021-08-30T14:56","dateLastUpdated":null,"postContent":"Python is my favorite programming language. Its adaptability, readability, and coding speed are unique and make [python a powerful choice in various projects](https://livecodestream.dev/post/what-is-python-best-for/), from data science projects to scripting and, of course, APIs.\n\nPython is a popular choice for API development, not only because it is one of the [most loved programming languages](https://insights.stackoverflow.com/survey/2020#technology-most-loved-dreaded-and-wanted-languages), but also because of its rich ecosystem of libraries and frameworks that serve that goal, libraries with immense popularity such as [Django](https://www.djangoproject.com/), [Flask](https://flask.palletsprojects.com/), and [FastAPI](https://fastapi.tiangolo.com/).\n\nBut which framework should you use to build your APIs with Python? It’s 100% up to you, but there are important considerations to keep in mind. After all, some of these frameworks are different, even from the ideology.\n\n- Django is an all-inclusive framework. It provides tools and modules for handling API requests, serialization, database connections, automatic admin UI generation, and so much more.\n- Flask, on the contrary, is a minimalist framework, it provides only the necessary tools, but it extends its functionality with additional libraries and frameworks. The great part is, you decide exactly what you need for your project, nothing more.\n- FastAPI is a relatively new framework. It makes use of newer python features such as type-hints, concurrency handling (with async), and it’s super fast.\n\nI work a lot with Flask and FastAPI, and I love both. I love the flexibility and adaptability of these frameworks, and for today's article, we will be focusing on Flask.\n\nThe following tips and practices are the result of research and more than eight years of experience building and shipping production-grade APIs with Python:\n\n- Design your API endpoints with proper names and HTTP verbs\n- How to properly structure your application\n- Build your documentation from the code\n- Testing\n\n\u003cbr\u003e\n**Let’s get started!** 🚀\n\n## Design Your API Endpoints with Proper Names and HTTP Verbs\n\nAn adequately designed API is easy and straightforward for developers to understand. By reading the [URI](https://en.wikipedia.org/wiki/Uniform_Resource_Identifier) and HTTP verb (more on this later), a developer can pretty much have a good understanding of what to expect to happen when calling a particular method.\n\nBut how does that work? Let’s start with naming URIs. In REST, we called `Resource` to a first-level data representation. Naming these resources **consistently** throughout your API will turn out to be one of the best decisions for the long term.\n\nNote that I highlighted consistently in the previous sentence, as it’s a key factor. Sure, there are particular ways to name your resources, and we will cover them, but being consistent is more important to the actual convention you choose.\n\nLet’s start getting practical by modeling a simple eCommerce website with customers, orders, and a checkout process.\n\nOur primary resource is `customers`, which is a collection of the instance `customer`. With this information, we can identify the collection resource by the URI `/customers` or a single resource by using the URI `/customers/{customerId}`. Subsequently, we can identify sub-resources such as `orders`, and we can identify them as `/customers/{customerId}/orders`, or a single order resource by `/customers/{customerId}/orders/{orderId}`.\n\n### Best practices naming resources\n\n1. Use nouns in their plural form to represent resources, eg:\n - ✅ Users of a system: `/users`, `/users/{userId}`\n - ✅ User’s playlists: `/users/{userId}/playlists`, `/users/{userId}/playlists/{playlistId}`\n2. Use hyphens “-” to separate words and improve redeability\n - ✅ `/users/{userId}/-mobile-devices`\n - ❌ `/users/{userId}/mobileDevices`\n - ❌ `/users/{userId}/mobile_devices`\n3. Use forward slashes “/’ to indicate hierarchy\n - ✅ `/users/{userId}/mobile-devices`\n - ❌ `/users-mobile-devices/{userId}`\n - ❌ `/users-mobile-devices/?userId={userId}`\n4. Use only lowercase letters in URIs\n - ✅ `/users/{userId}/mobile-devices`\n - ❌ `/Users/{userId}/Mobile-Devices`\n\nNow that we understand how to name resources, we need to think about actions. There are methods in our APIs that are procedural by nature and are not related to a specific resource, e.g., checkout, run, play, etc.\n\n### Best practices naming actions\n\n1. Use verbs to represent actions, e.g.:\n - ✅ Execute a checkout action: `/users/{userId}/cart/checkout`\n2. Same as resources, use hyphens, forward slashes, and lowercase letters.\n\nOne crucial point here is to differentiate between CRUD functions and actions, as both are actions. In REST, CRUD operations, such as Create, Read, Update and Delete, are handled through HTTP verbs and not by the URI.\n\n### But what are HTTP verbs or HTTP request methods?\n\nHTTP defines a set of request methods to indicate an action to be performed for a resource (sounds familiar?). The list includes several, but we will be focusing on 5:\n\n- **GET**: should be for data retrieval.\n- **POST**: should be used to create a new resource.\n- **PUT**: should be used to update information about a specific resource.\n- **DELETE**: should be used to delete a particular resource.\n- **PATCH**: should be used to update partial information about a particular resource.\n\n### Example for our eCommerce website\n\n- ✅ **GET** `/users`: lists of all users.\n- ✅ **POST** `/users`: creates a new user.\n- ✅ **PUT** `/users/{userId}`: updates a user.\n- ✅ **DELETE** `/users/{userId}`: deletes a specific user.\n- ✅ **PATCH** `/users/{userId}`: partially updates a user.\n- ✅ **GET** `/users/{userId}/orders`: lists of all orders for a particular user.\n- ✅ **POST** `/users/{userId}/cart/checkout`: runs the checkout process.\n\nWhat you shouldn't do:\n\n- ❌ `/users/get-all`\n- ❌ `/users/create`\n- ❌ `/users/{userId}/list-orders`\n\nIn any form of GET, POST, or another verb.\n\n## How to Properly Structure Your Application\n\nI’d like to start this section by saying that there’s no one correct way to structure your application depending on application size, modules, requirements, or even personal preferences. This could vary. However, I’d like to introduce you to how my team structures Flask applications, and we used this setup for multiple production projects.\n\nYou can follow the explanation of the structure in the article, and you can also find this structure ready to use in the [Flask API starter kit on github](https://github.com/bajcmartinez/flask-api-starter-kit).\n\n```text \nproject/\n api/\n model/\n __init__.py\n welcome.py\n route/\n home.py\n schema/\n __init__.py\n welcome.py\n service\n __init__.py\n welcome.py\n\n test/\n route/\n __init__.py\n test_home.py\n __init.py\n\n .gitignore\n app.py\n Pipfile\n Pipfile.lock\n```\n\nLet’s now break it down and explain each module.\n\nAll the application magic happens inside the API module (`/api`), there, we split the code into 4 main parts:\n\n- The `models` are the data descriptor of our application, in many cases related to the database model. How each model is defined will heavily depend on the library you use to connect to your database.\n- The `routes` are the URIs to our application, where we define our resources and actions.\n- The `schemas` are the definitions for inputs and outputs of our API, what parameters are allowed, what information we will output. They correlate to our resources, but they are not necessarily the same as our models.\n- The `services` are modules that define application logic or interact with other services or the db layer. Routes should be as simple as possible and delegate all logic to the services. \n\nEach endpoint in Flask can be defined on its own or by groups called [blueprints](https://flask.palletsprojects.com/en/2.0.x/blueprints/). In my case, I like the grouping Blueprints provide, and I use them for each resource. Let’s take a look at what an example of our welcome route (`./api/route/home.py`) would look like:\n\n```python\nfrom http import HTTPStatus\nfrom flask import Blueprint\nfrom flasgger import swag_from\nfrom api.model.welcome import WelcomeModel\nfrom api.schema.welcome import WelcomeSchema\n\nhome_api = Blueprint('api', __name__)\n\n\n@home_api.route('/')\n@swag_from({\n 'responses': {\n HTTPStatus.OK.value: {\n 'description': 'Welcome to the Flask Starter Kit',\n 'schema': WelcomeSchema\n }\n }\n})\ndef welcome():\n \"\"\"\n 1 liner about the route\n A more detailed description of the endpoint\n ---\n \"\"\"\n result = WelcomeModel()\n return WelcomeSchema().dump(result), 200\n```\n\nLet’s break all of it into 3 pieces:\n\n```python\nhome_api = Blueprint('api', __name__)\n```\n\nHere is where we declared our Blueprint, which we can consequently use to declare our endpoints or routes. In this case, our grouping is pretty basic, but we can do much more with grouping, like defining prefixes, resource folders, and more.\n\nFor example if we would like to have our `home` blueprint always as a nested route of `/home-service`, we could do:\n\n```python\nhome_api = Blueprint('api', __name__, url_prefix='/home-service')\n```\n\nNext we declare one route, but we split it in 2 parts:\n\n```python\n@home_api.route('/')\n@swag_from({\n 'responses': {\n HTTPStatus.OK.value: {\n 'description': 'Welcome to the Flask Starter Kit',\n 'schema': WelcomeSchema\n }\n }\n})\n```\n\nWe use annotations on top of functions to convert them into endpoints and provide additional information, e.g., documentation information, more on that in the next section.\n\nAnd finally, our route code, which is just a Python function.\n\n```python\ndef welcome():\n \"\"\"\n 1 liner about the route\n A more detailed description of the endpoint\n ---\n \"\"\"\n result = WelcomeModel()\n return WelcomeSchema().dump(result), 200\n```\n\nNote that we don’t simply return a string or JSON object directly, but we use our schemas instead. In our example, I’m using [flask-marshmallow](https://flask-marshmallow.readthedocs.io/en/latest/) serialization library for its purposes.\n\n## Build Your Documentation from the Code\n\nYou build your API, you shipped to production, and developers are eager to consume it, but how would they know what endpoints are available and how to use them? The simple answer is by reading the documentation.\n\nThe documentation can be built in 2 ways, you can open up an editor and write it “manually”, or you can use the code to generate your documentation. If you like the idea of automatic documentation, you will love [swagger](https://swagger.io/).\n\nSwagger is an open-source specification that allows you to describe each element of your API so that any machine or system can interpret it and interact with it. Thanks to this specification, many tools have been developed to provide rich interfaces to make our documentation dynamic and interactive, but also to provide developers with tools to easily generate these swagger files.\n\nFor Flask, there are multiple libraries for automatic Swagger generation, but my favorite is [flasgger](https://github.com/flasgger/flasgger). Flassger provides annotations and other tools to generate your documentation, and it also provides a pretty web interface where you can see each endpoint, its inputs, and outputs and even run the endpoints directly from the docs.\n\nHere is an image of it in action:\n\n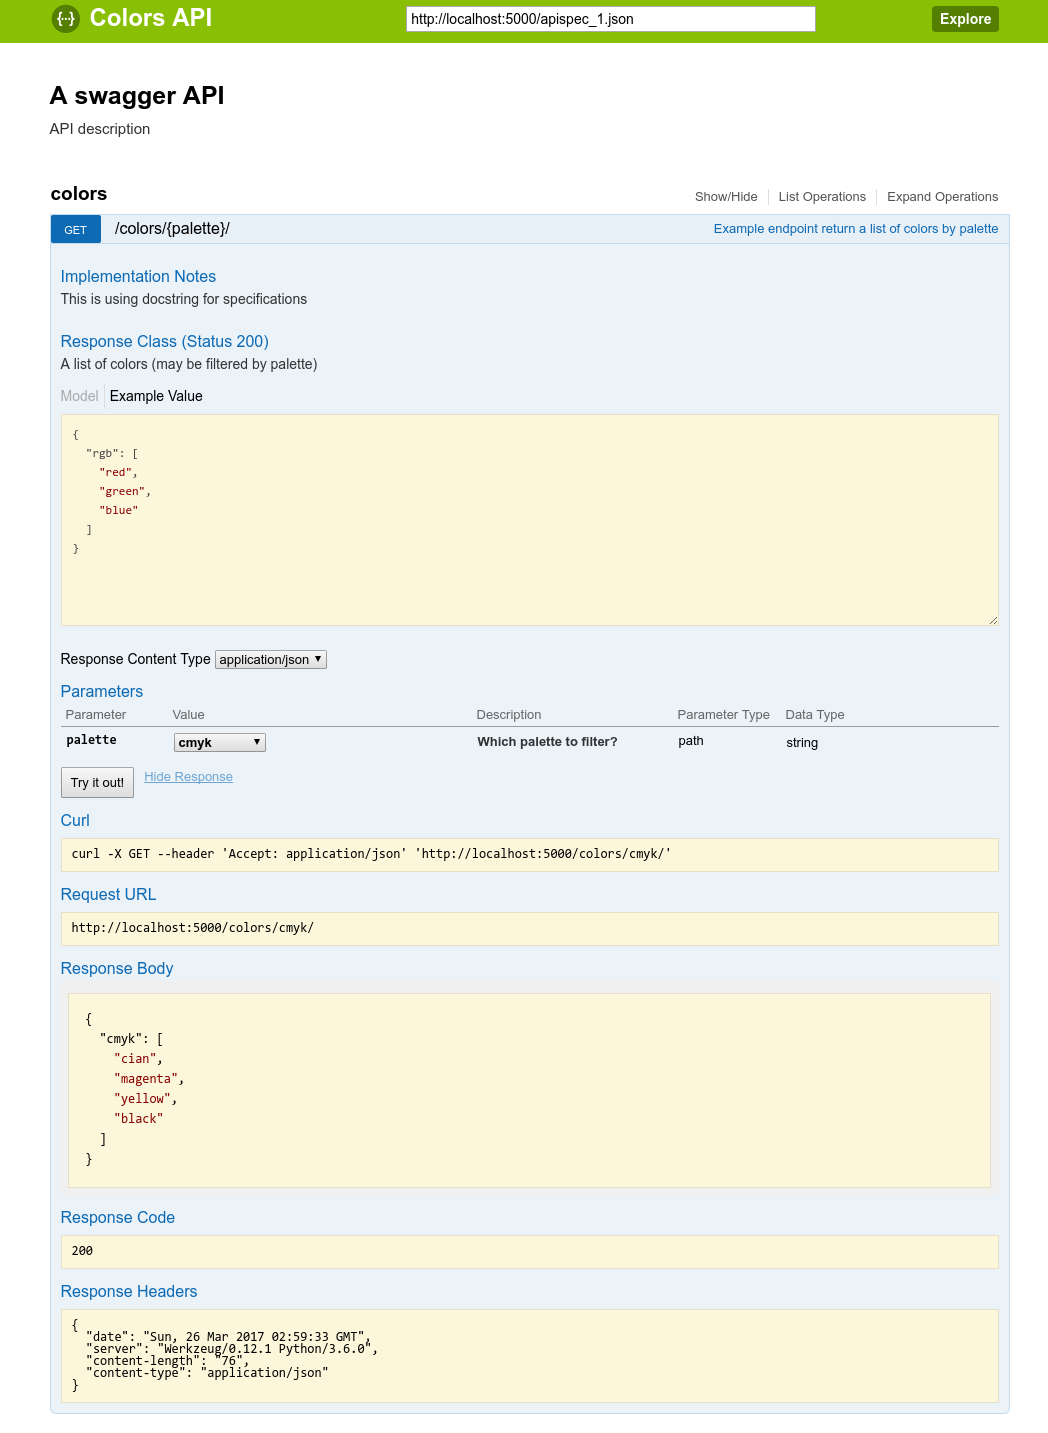\n\nIt’s highly configurable and compatible with our serialization library by using an additional library called [apispec](https://apispec.readthedocs.io/en/latest/). It’s all pretty easy to set up, but you can also make use of the [Flask starter kit](https://github.com/bajcmartinez/flask-api-starter-kit), and you will have it all done for you.\n\nBut once you have it up and running, where is the information taken for the docs? From 2 places:\n\n- Remember our swag_from function annotation? There we can provide detailed information about the inputs and outputs\n\n ```python\n @swag_from({\n 'responses': {\n HTTPStatus.OK.value: {\n 'description': 'Welcome to the Flask Starter Kit',\n 'schema': WelcomeSchema\n }\n }\n })\n ```\n\n- We can also use string literals in functions to provide a description for the endpoint, similar to what we did here:\n\n ```python\n def welcome():\n \"\"\"\n 1 liner about the route\n A more detailed description of the endpoint\n ---\n \"\"\"\n ```\n\nThere are many more options and customizations; it’s all well documented on their [official docs](https://github.com/flasgger/flasgger).\n\n## Testing\n\nIf you are like me, perhaps you hate writing tests, but if you are like me, you know it’s worth it. Testing, when done properly, increases efficiency and quality in the long run. They also reassure developers when making changes, refactoring, or building new features on existing systems.\n\nBuilding tests shouldn’t be too hard, and it should happen naturally during development. I struggled a lot with it in the past because I’d always first develop the feature, the endpoint, or the function and then write the tests, just to get it done.\n\nI’m not saying that approach is wrong, but there’s a better way. TDD, or test-driven development, it’s a concept idea where you write tests first, and just then you write the actual code we want to test.\n\nHow does it work? Let’s suppose we need to write a function that will add 2 numbers and return the result; exciting, right?\n\nWith TDD, our approach would be first to write the tests.\n\n```python\ndef test_answer():\n assert sum_two_numbers(3, 5) == 8\n```\n\nNext, we run the tests, and it fails because our function doesn’t even exist yet. So next, we write our function:\n\n```python\ndef sum_two_numbers(num1, num2):\n return num1 * num2\n```\n\nNext, we rerun our tests, and they still fail. Our assertion fails, but why? It turns out that I made a simple mistake. As clumsy as I am, I put a * instead of a +; this would have been very hard to notice without our tests, but thanks god, we have them.\n\nWe fix our function, and now everything runs perfectly.\n\n```python\ndef sum_two_numbers(num1, num2):\n return num1 + num2\n```\n\nIn the exercise we did, it sounds kind of silly, but with more complex functions and code mistakes happen, and having tests first will help a lot; I say that from experience.\n\n## Conclusion\n\nBest practices can be different for different frameworks, problems to solve, or even people, there’s no one way of doing things right, and that’s something I love about programming. However, having basic principles to rely on when designing and developing APIs can help your team, and other developers consume your API products.\n\nBeing consistent in naming, separating concepts in modules or folders in your project, documenting directly from your code, and properly testing are just examples of things that can make your life easier, more productive, and take you to the next level.\n\nI hope you enjoyed reading this article!","readTime":12,"formattedDate":"Aug 30, 2021"},{"path":"jp-digital-identity-management","title":"SaaSアプリケーションのデジタルアイデンティティ管理を解決","heroImage":{"url":"https://images.ctfassets.net/23aumh6u8s0i/lpo0yom5xDZonfNzlOkHc/c55bd864b5d7360bf8a2c307f99c8e40/Security_and_Identity_4x.jpg","size":{"width":1176,"height":1056}},"category":["Identity \u0026 Security","Identity","SaaS"],"authors":[{"metadata":{"tags":[],"concepts":[]},"sys":{"space":{"sys":{"type":"Link","linkType":"Space","id":"23aumh6u8s0i"}},"id":"7qC8LJD80VSx1qYcSdQ1Zh","type":"Entry","createdAt":"2021-08-23T12:59:46.069Z","updatedAt":"2025-01-08T14:00:38.100Z","environment":{"sys":{"id":"master","type":"Link","linkType":"Environment"}},"publishedVersion":42,"revision":6,"contentType":{"sys":{"type":"Link","linkType":"ContentType","id":"author"}},"locale":"en-US"},"fields":{"path":"juan-cruz-martinez","name":"Juan Cruz Martinez","avatar":{"metadata":{"tags":[{"sys":{"type":"Link","linkType":"Tag","id":"user"}}],"concepts":[]},"sys":{"space":{"sys":{"type":"Link","linkType":"Space","id":"23aumh6u8s0i"}},"id":"5b3YvfAb53h2I5U6uanww4","type":"Asset","createdAt":"2022-07-07T09:23:40.589Z","updatedAt":"2022-07-07T09:23:56.422Z","environment":{"sys":{"id":"master","type":"Link","linkType":"Environment"}},"publishedVersion":10,"revision":5,"locale":"en-US"},"fields":{"title":"jcm","description":"Juan Cruz Martinez","file":{"url":"//images.ctfassets.net/23aumh6u8s0i/5b3YvfAb53h2I5U6uanww4/f1dfa0e19f15f5df8eacd53f78a813f6/jcm.jpeg","details":{"size":29371,"image":{"width":400,"height":400}},"fileName":"jcm.jpeg","contentType":"image/jpeg"}}},"lastUpdatedBy":"Juan Cruz Martinez","email":"juan.martinez@okta.com","twitter":"https://twitter.com/bajcmartinez","github":"https://github.com/bajcmartinez","linkedin":"https://www.linkedin.com/in/bajcmartinez/","isPopular":true,"personalWebsite":"https://jcmartinez.dev/","type":"Auth0 Employee","jobTitle":"Staff Developer Advocate","description":"I stream, blog, and make youtube videos about tech stuff. I love coding, I love AI, and I love building stuff!"}}],"redirectTo":null,"isHiddenFromBlogPostGrid":false,"lang":"ja","tags":["saas","identity","management"],"dateCreated":"2024-08-28T15:33","dateLastUpdated":null,"postContent":"今日のSaaSビルダーにとって、迅速なイノベーションとシームレスなスケーリングのプレッシャーは非常に大きなものです。\n\n\nマクロ経済圧力の高まりは、SaaSアプリケーションを構築する企業が、少ないリソースでより多くのことを実行しなければならないことを意味しています。また、B2Cのあらゆるイノベーションが、SaaSの顧客の期待を高めています。AIは、競争環境にさらなる変化をもたらし、製品差別化の機会と脅威の両方をもたらしています。[攻撃者が迅速かつ、広範な攻撃を行えるようになった](https://www.securitymagazine.com/articles/99832-study-finds-increase-in-cybersecurity-attacks-fueled-by-generative-ai)のです。 \n\n\n顧客がこういった変化のスピードに対して追いつけるようにSaaS企業もスピードとセキュリティの向上を実現する必要があります。SaaS企業はこのめまぐるしいスピードの社会で生き残るために、期待以上のものを提供する必要があります。 \n\n\nSaaSは常に進化し続ける領域です。競合他社よりも一歩先を行くには、ビジネスレベルで遅れを取らないようにしなければなりません。また、開発者は最新のバックエンドメソッドを継続的に学び、新しいテクノロジーに対応する必要があります。 \n\n\nAuth0 by Oktaが、どのようにSaaSの進化に対応し、お客様の業務負担を軽減しているのかご紹介します。\n\n\n## Auth0 by OktaがどのようにSaaSに役立つのか\n\n\nシームレスなユーザーエクスペリエンスの確保や、データセキュリティの維持、規制要件の遵守といったさまざまな要件を実現するには強固なアイデンティティ管理が不可欠です。アイデンティティとアクセス管理(IDaaS)プラットフォームを提供するAuth0 by Oktaは、その包括的な機能や使いやすさ、強固なセキュリティ対策によりSaaSアプリケーションの理想的なソリューションとして際立っています。 \n\n\nAuth0 by Oktaは、SaaSアプリケーションの認証、認可プロセスを簡素化し、開発者は独自のアイデンティティソリューションの構築やアイデンティティインフラの管理ではなく、コア機能の構築に集中できます。 \n\n\n[Universal Login](https://auth0.com/jp/features/universal-login)は幅広い認証フロー、デバイス、画面サイズをサポートし、すべてのアプリケーションでユーザーに一元的で統一されたログイン体験を提供します。Universal Loginは、ユーザー体験を向上させ、開発者の統合プロセスを簡素化します。Universal Loginを使用すると、ユーザーは[パスキー](https://auth0.com/docs/authenticate/database-connections/passkeys)などの新しい認証方法を利用できるのはもちろん、ソーシャルメディアプラットフォーム、企業ディレクトリ、メールアドレスなどの既存の認証情報を使用できます。そのためアプリケーションごとに個別のアカウントを作成する必要がありません。 \n\n\nUniversal Loginに加え、Auth0 by Oktaはさまざまなプログラミング言語やフレームワーク用のSDKを提供しているため、開発者は製品の機能をアプリケーションに簡単に統合できます。これらのSDKはログインフォームやパスワードのリセットといった日常的な認証タスクを処理し、アプリケーション間で一貫性のある安全なユーザーエクスペリエンスを実現します。よりカスタマイズされたシナリオでは、Auth0 by Oktaの強力なAPIにより、認証と認可のフローをきめ細かく制御し、開発者が特定の要件に合わせてカスタマイズできるため、サードパーティのサービスとシームレスに統合できます。 \n\n\n**SaaSアプリケーションにAuth0 by Oktaを使用する具体的なメリットは以下の通りです。**\n\n\n* **ユーザーオンボーディングの合理化**: Universal Loginにより、ユーザーはアプリケーションごとにアカウントを作成する必要がなくなり、簡単に使用を開始できます。\n* **ユーザーエクスペリエンスの向上**: すべてのアプリケーションでシームレスかつ一貫したログイン体験が得られるため、ユーザーの満足度が向上し、摩擦が減少します。\n* **カスタマイズ性**: Universal Loginページは、ブランドやニーズに合わせてカスタマイズできます。同時に[Auth0 Actions](https://auth0.com/jp/features/actions)を利用すると、開発者はAuth0 by Oktaのコア機能を拡張しAPI(CRM、課金、メール自動送信、マーケティングツールなど)との統合や、認証・認可フローへのカスタムポリシーの書き込みなど、カスタムロジックを組み込むことができます。\n* **開発時間の短縮**: 開発者は、構築済みのUniversal LoginコンポーネントとSDKを使用して時間と労力を節約し、統合プロセスを簡素化できます。\n* **グローバルまたはリージョナルなスケーラビリティ**: Auth0 by Oktaのパブリックおよびプライベートクラウドベースのインフラストラクチャは、国際的なユーザー需要や変動するトラフィックの急増に対応するため、シームレスに拡張できます。\n* **セキュリティセンターとログストリーミング**: Auth0 by Oktaは、SaaSアプリケーションのユーザーとビジネスを保護する強固なセキュリティ機能を提供します。ボット検知やパスワード漏えい検知などの攻撃防御機能により、クレデンシャルスタッフィング攻撃に対する包括的な防御を提供できます。また、合理化されたセキュリティを提供し、MFAとRBACによるコンプライアンスに従うことができます。さらに、セキュリティセンターを使用すると、アイデンティティに関わる攻撃の検出を目的としたアプリケーション監視が可能なほか、ログストリーミングを使用した他のセキュリティツールキットへのアクティビティログの統合が可能です。\n* **さまざまなプラットフォームへのサポートを拡大**: Universal LoginとSDKは、多くのプログラミング言語とフレームワークで利用できるため、開発者はさまざまなプラットフォームで安全でスケーラブルなSaaSアプリケーションを構築できます。\n* **将来を見据えた機能**: Auth0 by Oktaは最新のセキュリティと認証技術を取り入れ、常にイノベーションに投資し続けています。Auth0 by Oktaと統合したSaaSアプリケーションは、これらの将来性のある機能を活用でき、セキュリティを維持し、進化する業界標準に準拠できます。\n\n\n## Auth0 OrganizationsによるB2B対応\n\n\nSaaSアプリケーションの中には、B2Bの側面がコア設計に組み込まれており、異なる組織のユーザーを管理するための要件を明確に把握しているものがあります。しかし、多くのSaaSアプリケーションは、迅速な実装が必要な要件としてB2Bシナリオをサポートする必要性が生じます。このような場合、開発が複雑化し、各組織のアイデンティティ管理システムを統合し、維持するために多大な労力が必要になります。\n\n\nAuth0 by Oktaは、この課題に対処するためB2Bの関係を管理するための統一されたプラットフォームである[Auth0 Organizations](https://auth0.com/jp/organizations)を提供します。Auth0 Organizationは複数の組織にまたがるユーザーアイデンティティに対し、効率的なオンボーディング機能、管理機能、保護機能をSaaSアプリケーションに追加できます。\n\n\nAuth0 Organizationsを用いると、次のシナリオの実現が可能です。\n\n\n* 法人顧客やパートナーのユーザー情報をAuth0 by Oktaで保持し、メンバーシップを管理します。\n* 企業顧客は、プライベートクラウドのテナントに必要な数の組織を追加できるため、エンドユーザーがアプリにアクセスする方法を安全に管理し、カスタマイズできます。\n* 企業ごとにブランド化され、連携されたログインフローを構成します。\n* Organizations APIを使用して自社製品に管理機能を組み込み、各企業がOrganizationを管理できるようにします。\n* マルチテナント製品を標準でサポートしているため、単一のテナントからすぐにサービスを提供できます。\n\n\n\n\n\n## エンタープライズ対応\n\n\nエンタープライズレベルのSaaSアプリケーションの領域では、包括的なアイデンティティ管理の必要性は、従来のユーザー認証の域をはるかに超えています。エンタープライズは、既存のITインフラとシームレスに統合し、複雑なアクセスポリシーを管理し、厳格なセキュリティ標準に準拠する堅牢なソリューションを求めています。\n\n\nAuth0 by Oktaはカスタム統合を構築することなく、SaaSアプリケーションをエンタープライズシステムとシームレスに接続することを可能にします。その結果、開発者が複数の統合を維持する必要性を排除し、開発時間と労力を削減します。\n\n\n* **企業アイデンティティシステムとのシームレスな統合**: Auth0 Organizationsは、Active Directory、LDAP、SAML IdPなどの既存の[エンタープライズアイデンティティプロバイダーとシームレスに統合](https://auth0.com/docs/authenticate/identity-providers/enterprise-identity-providers)できます。\n* **エンタープライズアプリケーションのシングルサインオン(SSO)**: Auth0 Organizationsは、エンタープライズアプリケーションのSSOをサポートしており、従業員は単一の認証情報を使用して複数のアプリケーションにサインインできます。これにより、ユーザーエクスペリエンスが合理化され、生産性が向上します。\n* **企業コンプライアンスのためのアクティビティ監査**: Auth0 by Oktaは、企業コンプライアンスのための詳細なアクティビティ監査を提供し、企業はユーザーのアクティビティとアクセスパターンを追跡できます。この監査機能により、疑わしいアクティビティを特定し、潜在的なセキュリティ侵害を調査し、規制要件へのコンプライアンスを確保できます。\n\n\n\n\n## ビルトインセキュリティ\n\n\n組み込みのセキュリティ機能と継続的な技術革新により、Auth0 by Oktaは、ユーザーID、機密データ、アプリケーションをさまざまな脅威から保護する安全なSaaSアプリケーションを構築するためのツールと専門知識を開発者に提供します。Auth0 by Oktaのセキュリティ機能は、開発者にとって有益であるだけでなく、顧客のデータやアプリケーションの安全性を確保したいSaaSプロバイダーにとっても重要なセールスポイントとなります。\n\n\n以下に、Auth0 by Oktaに組み込まれているセキュリティ機能の一部をご紹介します。\n\n\n### Attack Protection\n\n\nAuth0 by OktaのAttack Protection機能は、アプリケーションにアクセスしようとする悪意のある試みを検知し阻止できます。\n\n\n* **[Bot Detection](https://auth0.com/docs/secure/attack-protection/bot-detection)**: ボットとは、クレデンシャルスタッフィング攻撃を目的とする悪意のある行為者によってしばしば採用される自動化されたプログラムであり、オンラインアプリケーションやサービスに重大な脅威をもたらします。Auth0 by Oktaのボット検知機能は、高度な技術を駆使してボットを特定しブロックすることで、ボットによるアプリケーションへのアクセスやユーザー体験の中断を防ぎます。\n* **[Suspicious IP Throttling](https://auth0.com/docs/secure/attack-protection/suspicious-ip-throttling)**: あまりにも多くのログインやサインアップを急激に試みるIPアドレスからのトラフィックをブロックします。これにより、複数のアカウントを標的とした高速攻撃からアプリケーションを保護できます。\n* **[Brute Force Protection](https://auth0.com/docs/secure/attack-protection/brute-force-protection)**: 総当たり攻撃(ブルートフォース攻撃)は、スクリプトやボットネットによって自動化されたユーザーログイン認証情報を繰り返し推測しようとします。こうした攻撃に対抗するため、Auth0 by Oktaの総当たり攻撃保護機能は、1つのIPアドレスからのログイン失敗回数を制限します。ログインの失敗回数がしきい値に達すると、そのIPアドレスは一時的にブロックされ、それ以上の試行を防止し、総当たり攻撃の成功リスクを軽減します。\n* **[Breached Password Detection](https://auth0.com/docs/secure/attack-protection/breached-password-detection)**: Auth0 by Oktaは、主要なサードパーティサイトで発生した大規模なセキュリティ侵害を追跡します。ユーザーの認証情報が情報漏えいの一部であることを識別した場合、漏えいパスワードの検知によるセキュリティ機能が起動し、アカウントの安全を守ります。\n\n\n\n\n\nAuth0 by OktaのAttack Protection機能は、業界標準のセキュリティプロトコルに基づいており、幅広い攻撃ベクトルからアプリケーションを保護できます。Auth0 by Oktaをアプリケーションに組み込むと、追加の開発を必要とせずにAuth0 by OktaのAttack Protection機能を利用でき、アプリケーションを攻撃から保護します。\n\n\n## 拡張性\n\n\nAuth0 by Oktaは、堅牢な認証、認可プラットフォームを提供するだけでなく、幅広い拡張機能を提供するため、開発者は特定のアプリケーション要件に合わせてプラットフォームをカスタマイズし、既存のインフラストラクチャと統合できます。\n\n\n### Auth0 Actions\n\n\n[Auth0 Actions](https://auth0.com/jp/features/actions)は、開発者がAuth0 by Oktaの認証、認可フローを変更できる強力な拡張メカニズムです。これらのJavaScript関数は、認証プロセスのさまざまなポイントで実行でき、開発者は以下を行うことができます。\n\n\n* **カスタムクレームによるアクセストークンの変更**: アクセストークンへのカスタムクレームの追加、更新、削除などが可能で、ユーザーのアクセス許可やデータ共有をきめ細かく制御できます。\n* **外部サービスとの統合**: CRMシステム、顧客データプラットフォーム、決済ゲートウェイなどの外部サービスと接続し、ユーザープロファイルを充実させ、シームレスなユーザージャーニーを促進します。\n* **ユーザーエクスペリエンスの向上**: ログインや登録体験をパーソナライズし、エラーメッセージをカスタマイズし、ユーザーのコンテキストを考慮したサポートを提供します。\n* **カスタムロジックの実装**: 二要素認証コードの検証やユーザーロールの管理など、特定のシナリオを処理するカスタムロジックを追加できます。\n\n\nカスタムAuth0 Actionsは、JavaScriptコードで作成できます。また、[Auth0 Marketplace](https://marketplace.auth0.com/)の厳選されたコレクションから利用シナリオに合致したActionをインストールできます。このマーケットプレイスでは、以下のような幅広い機能を提供するActionを見つけることができます。\n\n\n* **ソーシャルログインの統合**: Facebook、Google、LinkedInのような一般的なソーシャルネットワークと接続し、ユーザー認証とサインアップを容易にします。\n* **ID プルーフィング**: IDプルーフィングにより、アクセス権限を付与する前に、生活履歴(信用報告書)、生体認証(顔スキャン)、その他の要素に基づいてユーザーの実世界でのアイデンティティを確認できます。\n* **コンプライアンスとセキュリティソリューション**: 不正検知やデータプライバシー管理などのコンプライアンスソリューションを実装します。\n\n\nその他にも多数のメリットがあります。\n\n\n## SaaSスターターキットによる無料トライアル\n\n\nSaaSアプリケーションの開発に着手することは、楽しみでありながら挑戦し甲斐のある取り組みです。プロセスを簡素化し、市場投入までの時間を短縮するために、Auth0 by Oktaは、安全でスケーラブルなSaaSアプリケーションの構築をすぐに開始できる[SaaSスターターキット](https://developer.auth0.com/resources/guides/web-app/nextjs/saas-basic-authentication)をご用意しています。\n\n\nSaaSスターターキットは、Next.jsベースのSaaSアプリケーションを構築できるガイドとボイラープレートをご用意しており、次のユースケースに合わせてカスタマイズできます。\n\n\n* 単一のAuth0 by Oktaテナントにおいて、Auth0 Organizationsを利用したSaaSマルチテナント機能\n* Auth0 Actionsとユーザープロファイル[App Metadata](https://auth0.com/docs/manage-users/user-accounts/metadata#metadata-types)を使用した段階的な価格設定モデル\n * SaaSアプリケーションでのトライアル、パーソナル、チーム、エンタープライズプランのサポート\n* トライアルプランの有効期限とAuth0 Actionsによるユーザーコンバージョン\n * Auth0 Actionsを使用したユーザープロファイルデータの更新、カスタムクレームの追加によるIDトークン、アクセストークンへの情報追加、Stripe APIなどのサードパーティAPIを利用したユーザーサブスクリプションステータスの管理\n* Auth0 Management APIとOIDC接続をサポートするEnterprise Connectionsを使用した、ビジネスユーザーのセルフサービスSSO\n* **Auth0 Management APIを利用したセルフサービスによるユーザー管理\n\n\n[Auth0 SaaSスターターキット](https://developer.auth0.com/resources/guides/web-app/nextjs/saas-basic-authentication)を基盤として、認証と認可に関する業界のベストプラクティスに準拠しながら、シームレスなユーザーエクスペリエンスを提供するセキュアでスケーラブル、かつ機能豊富なSaaSアプリケーションを構築できます。\n\n\n## スタートアップ企業向けのカスタマーアイデンティティプラットフォーム\n\n\n[Auth0 by Okta for Startups](https://auth0.com/jp/startups)は、Auth0 by Oktaの利便性とセキュリティを、対象となるスタートアップ企業のお客様に1年間無料で提供するプログラムです。そのため、ユーザーのデータを安全に保護しながら、SaaSアプリケーションを迅速に立ち上げて運用できます。\n\n\nこのプログラムのメリットは次のとおりです。\n\n\n* 最大100,000人までの月間アクティブユーザー\n* 最大5つのEnterprise Connections設定\n* ビジネスの拡大に必要なすべてのB2B機能\n\n\n\u003e [プログラム](https://auth0.com/jp/startups)について詳細をご確認のうえ、お申し込みください。\n\n","readTime":2,"formattedDate":"Aug 28, 2024"},{"path":"jp-permit-or-deny-login-requests-using-auth0-actions","title":"Auth0 Actionsを使ったログインリクエストの許可または拒否","heroImage":{"url":"https://images.ctfassets.net/23aumh6u8s0i/18hCrkkVXFeeBwkAtezdS7/b2f50dd980a57e42e04866af64be8c14/Introducing_Auth0_Actions02C.png","size":{"width":2352,"height":2113}},"category":["Developers","Product","Actions"],"authors":[{"metadata":{"tags":[],"concepts":[]},"sys":{"space":{"sys":{"type":"Link","linkType":"Space","id":"23aumh6u8s0i"}},"id":"7qC8LJD80VSx1qYcSdQ1Zh","type":"Entry","createdAt":"2021-08-23T12:59:46.069Z","updatedAt":"2025-01-08T14:00:38.100Z","environment":{"sys":{"id":"master","type":"Link","linkType":"Environment"}},"publishedVersion":42,"revision":6,"contentType":{"sys":{"type":"Link","linkType":"ContentType","id":"author"}},"locale":"en-US"},"fields":{"path":"juan-cruz-martinez","name":"Juan Cruz Martinez","avatar":{"metadata":{"tags":[{"sys":{"type":"Link","linkType":"Tag","id":"user"}}],"concepts":[]},"sys":{"space":{"sys":{"type":"Link","linkType":"Space","id":"23aumh6u8s0i"}},"id":"5b3YvfAb53h2I5U6uanww4","type":"Asset","createdAt":"2022-07-07T09:23:40.589Z","updatedAt":"2022-07-07T09:23:56.422Z","environment":{"sys":{"id":"master","type":"Link","linkType":"Environment"}},"publishedVersion":10,"revision":5,"locale":"en-US"},"fields":{"title":"jcm","description":"Juan Cruz Martinez","file":{"url":"//images.ctfassets.net/23aumh6u8s0i/5b3YvfAb53h2I5U6uanww4/f1dfa0e19f15f5df8eacd53f78a813f6/jcm.jpeg","details":{"size":29371,"image":{"width":400,"height":400}},"fileName":"jcm.jpeg","contentType":"image/jpeg"}}},"lastUpdatedBy":"Juan Cruz Martinez","email":"juan.martinez@okta.com","twitter":"https://twitter.com/bajcmartinez","github":"https://github.com/bajcmartinez","linkedin":"https://www.linkedin.com/in/bajcmartinez/","isPopular":true,"personalWebsite":"https://jcmartinez.dev/","type":"Auth0 Employee","jobTitle":"Staff Developer Advocate","description":"I stream, blog, and make youtube videos about tech stuff. I love coding, I love AI, and I love building stuff!"}}],"redirectTo":null,"isHiddenFromBlogPostGrid":false,"lang":"ja","tags":["customer-identity","demos","actions","authentication"],"dateCreated":"2024-06-11T12:05","dateLastUpdated":null,"postContent":"\u003c!-- 本文 --\u003e\nAuth0 by Okta(以下、Auth0)は、堅牢なツールと機能のセットを提供し、アプリケーションの認証と認可を強化できます。その機能の1つがAuth0 Actionsです。Auth0 Actionsは、Auth0プラットフォームの動作をカスタマイズし拡張できます。この記事では、Auth0 Actionsを使って、拒否リストや許可リストなどの特定の条件に基づき、ログインリクエストを許可または拒否する方法についてご説明します。\n\n\n## 前提条件\n\n\n作業を実施する前に、次の前提条件を満たしておく必要があります。\n\n\n- **Auth0アカウント:** アカウントを持っていない場合は、\u003ca href=\"https://auth0.com/jp/signup\" data-amp-replace=\"CLIENT_ID\" data-amp-addparams=\"anonId=CLIENT_ID(cid-scope-cookie-fallback-name)\"\u003e無料のAuth0アカウント\u003c/a\u003eを作成してください。\n- **基本的なJavaScriptの知識:** Auth0 Actionsは、JavaScriptを用いてロジックを記述します。この記事では、その実装例をご紹介します。個別ユースケースに合わせてさらにカスタマイズするには、JavaScriptの基本的な知識が必要になります。\n\n\n## 新しいアクションを作成\n\n\nはじめに[Auth0 Action](https://auth0.com/docs/customize/actions/actions-overview)を新規に作成します。Auth0 Actionsは、安全なAuth0環境で実行されるサーバーレス関数です。\n\n\nAuth0 Actionを作成するには、[Auth0ダッシュボード](https://manage.auth0.com/#/actions/flows)にログインし、左サイドバーからActions - Flowsを選択します。このページでは、カスタマイズできるさまざまなフローが表示されています。今回のユースケースでは、ログインフローを選択します。\n\n\n\n\n\n選択後にログインフローページが表示され、Actionのインストール、作成、追加ができます。\n\n\n\n\n\n画面には2つの主要セクションがあります。ページ中央ではログインフローを図示しており、右側はActionsパネルとなっています。\n\n\nデフォルトのログインフローには、次の2つの状態が含まれています。\n\n\n- **Start:** ユーザーはログイン情報を入力済みで、ログインの準備ができている状態\n- **Complete:** ユーザーの認証情報(IDトークンと、必要に応じてアクセストークン)を発行した状態\n\n\nこの2つの状態の間でActionをドラッグ\u0026ドロップし、ログインフローに対してカスタムロジックを追加できます。その一例として、トークンを発行する前にログインリクエスト拒否できます。\n\n\n右のパネルには、2つのタブを持つActionsパネルがあります。\n\n\n- **Installed**: [Auth0 Actions Marketplace](https://marketplace.auth0.com/features/actions)からインストールされているActions\n- **Custom:** このテナント用に作成されたActions\n\n\nAuth0 Actionを作成するには、Actionsパネルで+(プラス)アイコンをクリックし、Build Customを選択します。\n\n\n\n\n\nモーダルウィンドウには作成するAuth0 Actionの情報を入力します。今回は名前を「Validate User Login(ユーザーログインを検証)」としました。トリガーとランタイムはデフォルト値のままにしておきます。\n\n\n\n\n\nCreateをクリックすると、Auth0 Actionのコードエディターが表示されます。ここでは、コードの記述や依存関係パッケージのインストール、テストが可能です。\n\n\n\n\n\n今回のAuth0 Actionでは、2つのJavaScript関数を使用し、ログインフローを変更できます。\n\n\n- `onExecutePostLogin`: Auth0が検証したログイン認証情報をユーザーが提供した直後に何が起こるべきかを定義します。このメソッドは2つのパラメータ、`event`および`api`を受け取ります。\n - `event`: ユーザーやコンテキストのような、ログインリクエストに関する詳細を含むオブジェクト\n - `api`: ログインの動作を操作するメソッドを含むオブジェクト\n- `onContinuePostLogin`: 他のWebページにリダイレクトされた後、制御がAuth0 Actionに戻ったときの動作を定義します。これは、リダイレクトされた後にユーザーが戻ってきた場合にのみ使われるため、デフォルトではコメントアウトされています。\n\n\nこの記事では、`onExecutePostLogin`関数に焦点を当てます。\n\n\n## 拒否リストの利用\n\n\n拒否リストは、特定のユーザーやIPアドレスからのログインをブロックする一般的な方法です。Auth0 Actionsを使用して拒否リストを実装するために、`event`パラメータを通じて提供されるコンテキストを活用できます。`event`オブジェクトには、ユーザーの詳細やIPアドレスなど、受信した認証リクエストに関する情報が含まれています。このオブジェクトにアクセスし、拒否リストと値を比較することで、認証リクエスト拒否などの適切な処理を実行できます。\n\n\n拒否リストを使用したコードを実装する前に、ユーザーのログインリクエストをキャンセルする方法を知っておく必要があります。この場合は`api`パラメータを使用できます。\n\n\n\n\n```javascript\napi.access.deny('reason');\n```\n\n\nこのたった1行のコードで、ログインリクエストを拒否できます。`deny`メソッドでは`reason`という1つのパラメータを使用します。このパラメータには、拒否の説明を記述します。\n\n\n拒否リストに対応できるよう関数をアップデートしてみましょう。\n\n\n```javascript\n// Array containing the email addresses that are blocked from logging on.\nconst denyList = ['myemail@example.com']\n\nexports.onExecutePostLogin = async (event, api) =\u003e {\n if (denyList.find(email =\u003e email === event.user.email)) {\n api.access.deny(\"Your email address is blocked from logging in to our systems.\");\n }\n};\n```\n\n\nこの関数では、システムへのログインを禁止するEメールアドレスのリストがハードコーディングされています。`onExecutePostLogin`は、ログインイベントにおいて入力されたユーザーのEメールアドレスがリストに含まれているかどうかを検証し、含まれている場合はユーザーのアクセスを拒否します。\n\n\nAuth0 Actionのエディタでコードを追加した後はテストを実施します。開発モードでテストする最善の方法は、テストパネルを使うことです。以下に示すように、エディタのサイドバーにある再生ボタンをクリックすると、テストパネルにアクセスできます。\n\n\n\n\n\nパネルを展開し、テスト用のイベントオブジェクトを必要に応じてカスタマイズできます。例えば`user`オブジェクトには`given_name`など、すべてのユーザープロパティが含まれていますが、今回のユースケースで重要なのは`email`です。\n\n\nテストパネルの下部にあるRunボタンをクリックすると、Auth0は与えられたデータに対してAuth0 Actionを実行し、テスト結果をテスト結果ウィンドウに出力します。指定されたユーザーが拒否リストにない場合、次のようなテスト出力が表示されます。\n\n\n\n\n\n\n\nJSONを更新し、拒否されたユーザーのEメールアドレスの1つを含めると、次のようなテスト出力が示されます。\n\n\n\n\n\nテストを完了した後、関数をデプロイしログインフローへ追加できるようにします。\n\n\n## 許可リストの利用\n\n\n一方、許可リストは、ログインを確実に許可されているユーザーまたはIPアドレスを指定します。拒否リストを扱うのと同じように、`event`オブジェクトを使って必要な情報にアクセスできます。許可リストと値を比較し、ユーザーまたはIPアドレスがリストにある場合のみ、ログインフローを進めます。そうでない場合は、認証リクエストを拒否し、アクセスを拒否できます。\n\n\n拒否リストと同様に、許可リストは`deny`メソッドを使って、許可リストに含まれるユーザーからのリクエスト以外のすべてのリクエストを拒否します。\n\n\n新しいコードは次のとおりです。\n\n\n```javascript\n// Array containing the email addresses that are allowed to log in.\nconst allowList = ['myemail@example.com', 'j+smith@example.com']\n\nexports.onExecutePostLogin = async (event, api) =\u003e {\n if (!allowList.find(email =\u003e email === event.user.email)) {\n api.access.deny(\"Your email address is not authorized to log into our systems.\");\n }\n};\n```\n\n\n更新したコードでテストを実行すると、リストに基づいたログインの許可を確認できます。\n\n\n## APIにリストを移譲\n\n\n拒否リストや許可リストに多くの項目がある場合、データベースやAPIなどの外部システムにリストを保存して管理した方法が実用的です。Auth0 Actionsではリストの取得と検証を外部APIに移譲できます。この場合はコード内で外部のAPIに対してリクエストを行い、その結果からユーザーのステータスを検証して認証リクエストを拒否または許可します。\n\n\nこの記事では、Eメールアドレスを受け取り、そのアドレスがアクセス許可されているかどうかを返すAPIエンドポイントがすで存在していると仮定します。\n\n\nこちらがAPIの例です。\n\n\n```bash\ncurl https://myaccessapi.com/users/is_authorized?email=myemail@example.com\n{\n is_authorized: false\n}\n```\n\n\nこのシンプルな例を踏まえて、コードを更新します。\n\n\n```javascript\nconst axios = require('axios');\n\nexports.onExecutePostLogin = async (event, api) =\u003e {\n const auth_result = await axios.get(`https://myaccessapi.com/users/is_authorized?email=${event.user.email}`)\n if (!auth_result.is_authorized) {\n api.access.deny(\"Your email address is blocked from logging in to our systems.\");\n }\n};\n```\n\n\n外部のAPIを呼び出すにはあらかじめAuth0 Actions環境で利用可能となっている`axios`ライブラリを使用できます。他の依存関係を利用したい場合は、Auth0 Actionsのバンドルの一部としてnpm依存関係を追加できます。[公式ドキュメント](https://auth0.com/docs/customize/actions/manage-dependencies)ではAuth0 Actionsの依存関係についてより詳しく学べます。\n\n\n\n\n## ログインフローにAuth0 Actionを追加\n\n\nAuth0 Actionsを実装し、テストを終えた後、デプロイを実行し、ログインフローの一部として使用しましょう。テスト結果に問題がなければ、画面右上の`Deploy`ボタンをクリックします。実装されているコードと設定からログインフローで利用できる関数のスナップショットが作成されます。\n\n\n関数の実装を変更した場合、変更箇所はすべて自動的に新しい下書きとして保存されます。この変更を反映する場合は、最新バージョンをデプロイする必要があります。\n\n\nコードをデプロイしても、対象のAuth0 Actionがログインフローの一部として使われるわけではありません。[ログインフロー画面](https://manage.auth0.com/#/actions/flows/login/)に戻り、フロー図を参照してください。Auth0 Actionがフローの一部として表示されていない場合は、Auth0 Actionが、まだアクティベートされていないことを意味します。フローの一部としてAuth0 Actionをアクティブにするには、ActionsパネルのCustomタブから追加したいAuth0 ActionをStartからCompleteまでのステップの間で、ドラッグ\u0026ドロップします。その後、画面右上のApplyボタンで変更を適用します。\n\n\n\n\n\n## まとめ\n\n\nこの記事では、Auth0 Actionsを活用してログインリクエストを許可または拒否する方法について説明しました。拒否リストや許可リストを使うことで、アプリケーションのセキュリティを強化し、特定の基準に基づいてアクセスを管理できます。また、リスト管理を外部APIに移譲するとスケーラビリティと柔軟性が得られる点についても説明しました。Auth0 Actionsを使用すると、ログインフローをカスタマイズし、アプリケーションにセキュリティの新たな層を加えることができます。\n\n\nこの記事の中で紹介した例は、最適なスタート地点です。次のステップとしてニーズに合わせてさらにカスタマイズが可能です。例えばEメールの代わりに、ドメインによる許可/拒否リスト、IPアドレス、国、曜日、時間などを判定材料にできます。\n\n\n実装の際は常にテストしたうえで、アプリケーションに必要な要件について特殊なケースも含めて考慮する必要があります。Auth0 Actionsを効果的に使用すると、ユーザーに確実で安全な認証を提供できます。\n\n\n\n\nこのブログはこちらの[英語ブログ](https://auth0.com/blog/permit-or-deny-login-requests-using-auth0-actions/)からの翻訳、[池原 大然](https://auth0.com/blog/authors/daizen-ikehara/)によるレビューです。\n","readTime":2,"formattedDate":"Jun 11, 2024"},{"path":"securing-a-python-cli-application-with-auth0","title":"Securing a Python CLI application with Auth0","heroImage":{"url":"https://images.ctfassets.net/23aumh6u8s0i/6uBzrqHNLlSAoER6HtgDN0/accd8f871b1de37f472b94da4346afa2/python-hero","size":{"width":1176,"height":1056}},"category":["Developers","Tutorial","Python"],"authors":[{"metadata":{"tags":[],"concepts":[]},"sys":{"space":{"sys":{"type":"Link","linkType":"Space","id":"23aumh6u8s0i"}},"id":"7qC8LJD80VSx1qYcSdQ1Zh","type":"Entry","createdAt":"2021-08-23T12:59:46.069Z","updatedAt":"2025-01-08T14:00:38.100Z","environment":{"sys":{"id":"master","type":"Link","linkType":"Environment"}},"publishedVersion":42,"revision":6,"contentType":{"sys":{"type":"Link","linkType":"ContentType","id":"author"}},"locale":"en-US"},"fields":{"path":"juan-cruz-martinez","name":"Juan Cruz Martinez","avatar":{"metadata":{"tags":[{"sys":{"type":"Link","linkType":"Tag","id":"user"}}],"concepts":[]},"sys":{"space":{"sys":{"type":"Link","linkType":"Space","id":"23aumh6u8s0i"}},"id":"5b3YvfAb53h2I5U6uanww4","type":"Asset","createdAt":"2022-07-07T09:23:40.589Z","updatedAt":"2022-07-07T09:23:56.422Z","environment":{"sys":{"id":"master","type":"Link","linkType":"Environment"}},"publishedVersion":10,"revision":5,"locale":"en-US"},"fields":{"title":"jcm","description":"Juan Cruz Martinez","file":{"url":"//images.ctfassets.net/23aumh6u8s0i/5b3YvfAb53h2I5U6uanww4/f1dfa0e19f15f5df8eacd53f78a813f6/jcm.jpeg","details":{"size":29371,"image":{"width":400,"height":400}},"fileName":"jcm.jpeg","contentType":"image/jpeg"}}},"lastUpdatedBy":"Juan Cruz Martinez","email":"juan.martinez@okta.com","twitter":"https://twitter.com/bajcmartinez","github":"https://github.com/bajcmartinez","linkedin":"https://www.linkedin.com/in/bajcmartinez/","isPopular":true,"personalWebsite":"https://jcmartinez.dev/","type":"Auth0 Employee","jobTitle":"Staff Developer Advocate","description":"I stream, blog, and make youtube videos about tech stuff. I love coding, I love AI, and I love building stuff!"}},{"metadata":{"tags":[],"concepts":[]},"sys":{"space":{"sys":{"type":"Link","linkType":"Space","id":"23aumh6u8s0i"}},"id":"3Foei3NJAWN9kruG5U1R8N","type":"Entry","createdAt":"2021-04-29T20:31:48.807Z","updatedAt":"2025-01-14T15:56:27.989Z","environment":{"sys":{"id":"master","type":"Link","linkType":"Environment"}},"publishedVersion":128,"revision":6,"contentType":{"sys":{"type":"Link","linkType":"ContentType","id":"author"}},"locale":"en-US"},"fields":{"path":"jessica-temporal","name":"Jessica Temporal","avatar":{"metadata":{"tags":[],"concepts":[]},"sys":{"space":{"sys":{"type":"Link","linkType":"Space","id":"23aumh6u8s0i"}},"id":"6Htsovalw75dpOr4QKy5pa","type":"Asset","createdAt":"2021-04-29T20:27:27.625Z","updatedAt":"2021-04-29T20:27:27.625Z","environment":{"sys":{"id":"master","type":"Link","linkType":"Environment"}},"publishedVersion":2,"revision":1,"locale":"en-US"},"fields":{"title":"jess-author","file":{"url":"//images.ctfassets.net/23aumh6u8s0i/6Htsovalw75dpOr4QKy5pa/4c44590856dcbde17d839c5608129ee7/jess-author.png","details":{"size":314619,"image":{"width":460,"height":460}},"fileName":"jess-author.png","contentType":"image/png"}}},"lastUpdatedBy":"Jessica Temporal","email":"jessica.temporal@auth0.com","twitter":"https://twitter.com/jesstemporal","github":"https://github.com/jtemporal","linkedin":"http://linkedin.com/in/jessicatemporal","isPopular":true,"personalWebsite":"https://jtemporal.com/en","type":"Auth0 Employee","jobTitle":"Sr. Developer Advocate","description":"Jessica Temporal is a Senior Developer Advocate at Auth0 and co-founder of the first Brazilian data science podcast called \u003ca target='_blank' href='https://pizzadedados.com'\u003e\u003cstrong\u003ePizza de Dados\u003c/strong\u003e\u003c/a\u003e. She’s the author of \u003ca target='_blank' href='https://www.amazon.com/dp/B0CDNX6NS7/ref=sr_1_1?\u0026_encoding=UTF8\u0026tag=jesstempora0e-20\u0026linkCode=ur2\u0026linkId=efc4229f6b816609dfce4f185781d99a\u0026camp=1789\u0026creative=9325' \u003e\u003cstrong\u003eThe Big Git Microbook\u003c/strong\u003e\u003c/a\u003e, creator of \u003ca target='_blank' href='https://gitfichas.com/en'\u003e\u003cstrong\u003eGitFichas.com\u003c/strong\u003e\u003c/a\u003e, and a part of \u003ca target='_blank' href='https://www.linkedin.com/learning/instructors/jessica-temporal'\u003e\u003cstrong\u003eLinkedIn Learning\u003c/strong\u003e\u003c/a\u003e instructors team. Jessica helped develop the AI that identifies possible unlawful expenses from Brazilian politicians. She is part of the Pyladies initiative that works to improve diversity and inclusion in technology. In her free time, she likes to knit, play video games, use her 3D printer, and is learning to create 3D models."}}],"redirectTo":null,"isHiddenFromBlogPostGrid":false,"lang":"en","tags":["python","cli","authentication"],"dateCreated":"2022-09-05T16:50","dateLastUpdated":"2024-04-29","postContent":"As a developer, you likely interact with CLIs daily to install libraries, run applications, check out your code, and much more. So you realize the potential of CLIs for automation and how simple it is to perform some tasks. But that's not the only use case for CLI applications, there are situations in which we may not even have access to a visual environment, where the terminal is our only choice, and there CLI applications are a must.\n\nWhen building a CLI, perhaps you need to interact with private APIs, or you may want to validate the user accessing the application. In either case, you require to add authentication to your application. But the question then is, what would be the best way to do it?\n\nThat is the focus of this article today. We will explore authentication methods for CLI applications and their use cases and build our own `hello to me` CLI with Python and Auth0.\n\n## The Authorization Flow\n\nWhen choosing the best [authentication flow](https://auth0.com/docs/get-started/authentication-and-authorization-flow) for our CLI application, we must consider its use case first.\n\nThere are available [three options when it comes to CLIs](https://auth0.com/docs/customize/integrations/secure-a-cli-with-auth0), and today, we will be focusing on the [device authorization flow](https://auth0.com/docs/get-started/authentication-and-authorization-flow/device-authorization-flow) which is the most secure way, and thanks to Auth0 it is also easy to integrate with the full power of [Universal Login](https://auth0.com/docs/authenticate/login/auth0-universal-login), which we will see in action later on this post.\n\n### How device flow works\n\nWith device flow, rather than directly authenticating users, the Application provides instructions to the user to access a website and authorize the device (in our case, the CLI) there.\n\nThis flow has grown in popularity in recent years with the introduction of smart TVs and other IoT devices, where for example, your TV would ask you to go to your YouTube app on your phone and confirm a code to access your user profile.\n\nIf you want to learn the flow details, I recommend reading the [device flow guide](https://auth0.com/docs/get-started/authentication-and-authorization-flow/device-authorization-flow).\n\n## The Sample Application\n\nAs we mentioned, we will build a `hello to me` CLI application using Python. The CLI will authenticate a user using device flow and, upon completing the authentication process, will extract information about the user and display it on the screen.\n\nLet's get started by creating our project's directory.\n\n```bash\nmkdir awesome-cli\ncd awesome-cli\n```\n\nNext, we create and activate the virtual environment, I'll be using [Python's integrated VENV](https://docs.python.org/3/library/venv.html), but you can use `pipenv`, `conda`, or any other.\n\n```bash\npython3 -m venv venv\nsource venv/bin/activate\n```\n\nNext, we need to install some dependencies. Here is the list and the command to set them up:\n\n- [typer](https://typer.tiangolo.com/): Typer is a library for building CLI applications.\n- [auth0-python](https://auth0-python.readthedocs.io/en/latest/): Auth0's Python SDK, which we will use to validate our tokens. \n- [requests](https://pypi.org/project/requests/): To make HTTP calls.\n\n```bash\npip install auth0-python requests typer\n```\nFinally, let's build the app's skeleton and run it.\n\n```bash\ntouch main.py\n```\nNext, open the file `main.py` and paste the following code:\n\n```python\nimport time\n\nfrom auth0.authentication.token_verifier import TokenVerifier, AsymmetricSignatureVerifier\nimport jwt\nimport requests\nimport typer\n\napp = typer.Typer()\n\n@app.command()\ndef say_hi():\n print(f\"Hello world!\")\n\nif __name__ == \"__main__\":\n app()\n```\n\nFinally, to run it:\n\n```bash\npython main.py\n```\n\nYou should see the message `Hello world!` on your terminal if all is well.\n\n\u003e Because we added only one command, we can run the file, and `Typer` will automatically execute it. If you have more than one command, you must provide the wanted command to run it by doing something like `python main.py say-hi`.\n\n## Set up an Auth0 CLI Application\nNow that you have the basic CLI project, we can start working on adding authentication.\n\n### Step 1: Register for an Auth0 account\n\nIf you don't have one, you can \u003ca href=\"https://auth0.com/signup\" data-amp-replace=\"CLIENT_ID\" data-amp-addparams=\"anonId=CLIENT_ID(cid-scope-cookie-fallback-name)\"\u003esign up for a FREE Auth0 account.\u003c/a\u003e\n\n### Step 2: Register the application with Auth0\n\n1. Go to the Auth0 Dashboard and select [_Applications_ \u003e _Applications_](https://manage.auth0.com/#/applications) and click _Create Application_.\n2. Enter your application name (e.g., Awesome CLI), select _Native_, and click _Create_.\n 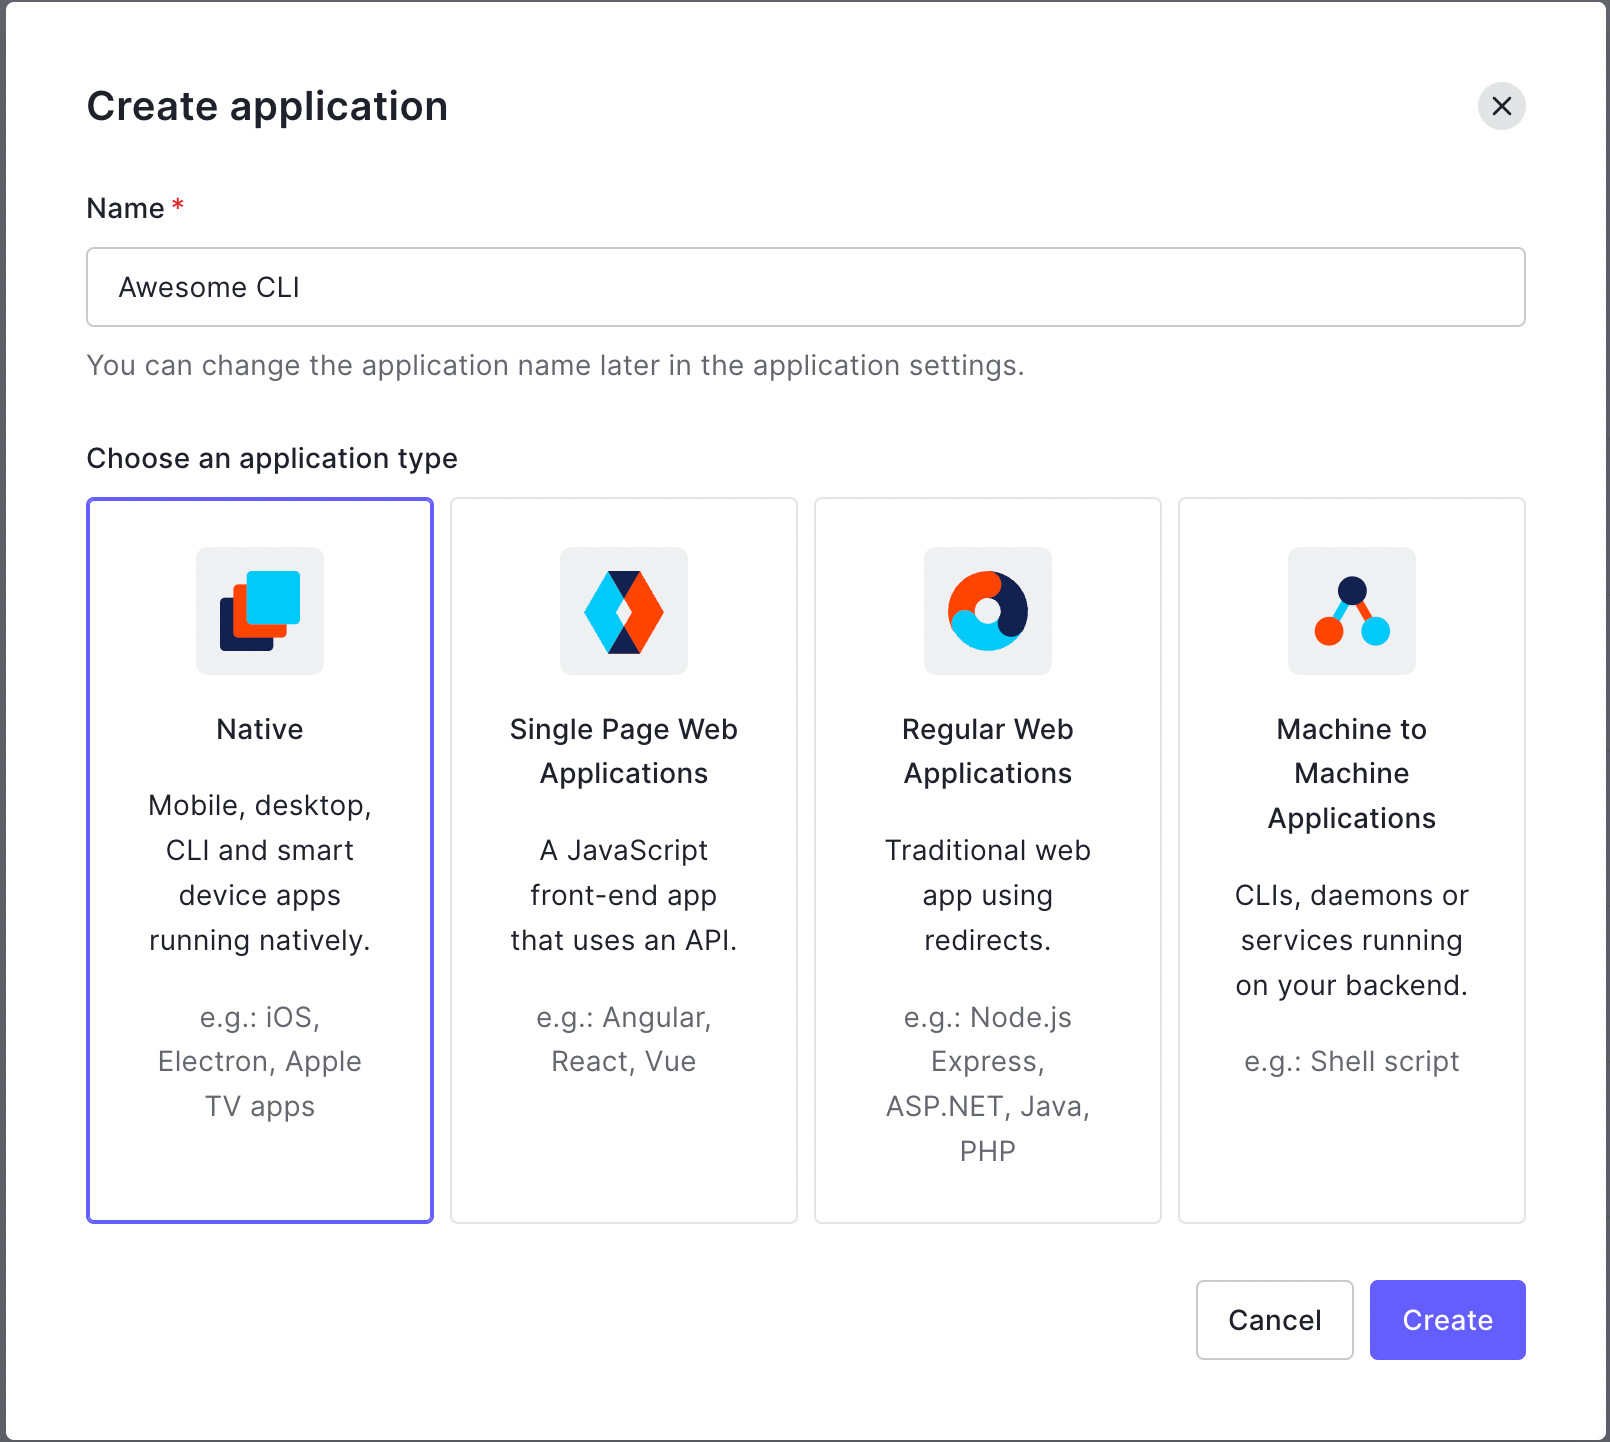\n3. After the _Quick Start_ page for the app appears, click the _Settings_ tab.\n4. Once there, scroll near the bottom to the section named _Advanced Settings_, and click the chevron to expand it.\n5. Next, click the _OAuth_ tab and ensure that _OIDC Conformant_ is in the “on” position. It should be on by default if you just created the application.\n \n6. Select the _Grant Types_ tab and check _Device Code_. It is unchecked by default.\n 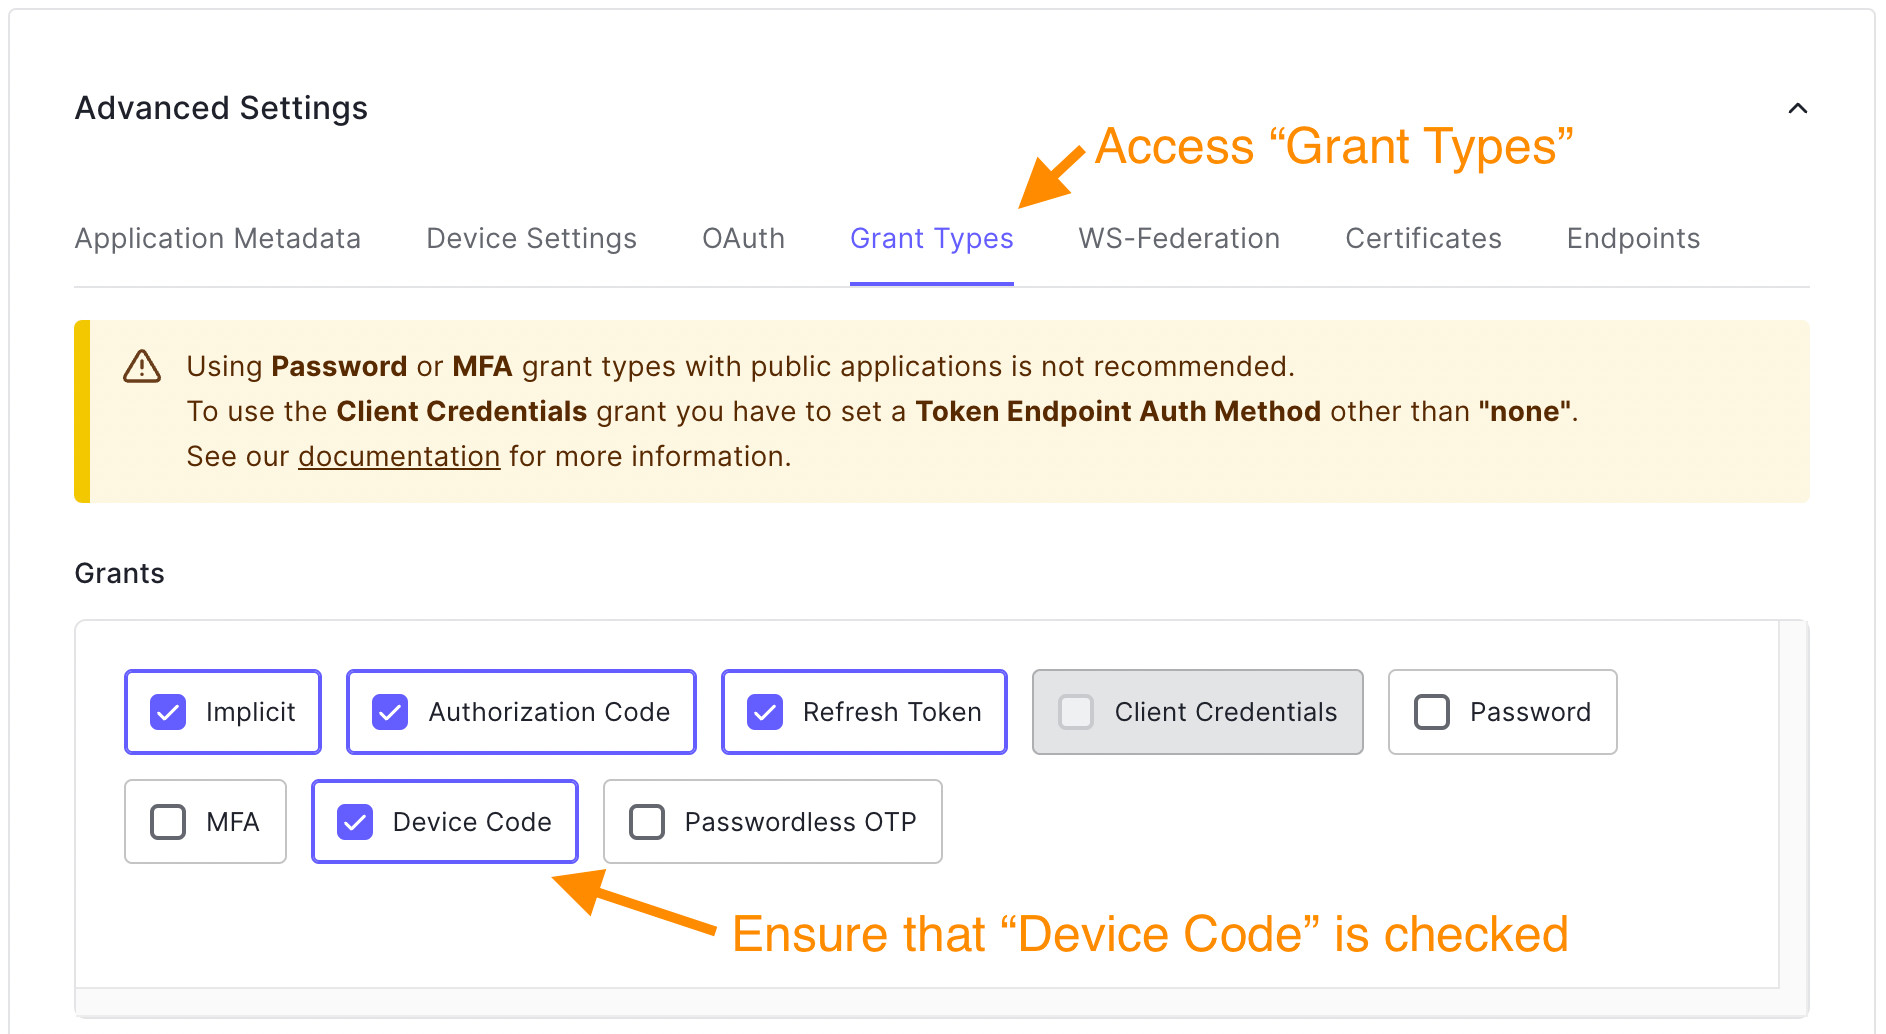\n7. Finally, click the _Save Changes_ button.\n\nAuth0 provides default settings for the randomly generated codes, but if you need to customize them, you can define new patterns in the [Device User Code Settings](https://auth0.com/docs/get-started/tenant-settings/configure-device-user-code-settings).\n\n## Implementing Authorization Flow with Python\n\nAs we mentioned, Device Code Flow requires a series of steps. In our case, we will implement them in the following logical order:\n\n- Request device code\n- Request tokens\n- Receive tokens\n\n### Request device code\n\nDuring this step, we will use Auth0's API to initiate a Device Authorization Flow and provide us with the setup URL and user code needed to authenticate and validate the device.\n\nWe'll have to get data from the [Auth0 Dashboard](https://manage.auth0.com/#/applications) to call the required APIs, so let's get them and set them as python variables like these:\n\n```python\n# main.py\n\n...\nimport typer\n\n# New code 👇\nAUTH0_DOMAIN = 'your-domain.auth0.com'\nAUTH0_CLIENT_ID = 'your-client-id'\nALGORITHMS = ['RS256']\n# New code 👆\n\napp = typer.Typer()\n...\n```\n\nTo capture the Auth0 domain and client ID, visit your [Auth0 application's dashboard](https://manage.auth0.com/#/applications) under the _Settings_ tab. Both values will be available on the screen. Please copy and paste them into the corresponding variable.\n\n\n\nNext, let's create a new `login()` function and add our code.\n\n```python\n# main.py\n\n...\nimport typer\n\napp = typer.Typer()\n\n# New code 👇\ndef login():\n \"\"\"\n Runs the device authorization flow and stores the user object in memory\n \"\"\"\n device_code_payload = {\n 'client_id': AUTH0_CLIENT_ID,\n 'scope': 'openid profile'\n }\n device_code_response = requests.post('https://{}/oauth/device/code'.format(AUTH0_DOMAIN), data=device_code_payload)\n\n if device_code_response.status_code != 200:\n print('Error generating the device code')\n raise typer.Exit(code=1)\n\n print('Device code successful')\n device_code_data = device_code_response.json()\n print('1. On your computer or mobile device navigate to: ', device_code_data['verification_uri_complete'])\n print('2. Enter the following code: ', device_code_data['user_code'])\n# New code 👆\n\n@app.command()\ndef say_hi():\n print(f\"Hello world!\")\n\nif __name__ == \"__main__\":\n app()\n```\n\nAfter calling [Auth0's device code API](https://auth0.com/docs/api/authentication#get-device-code), we get a JSON object response that, among other properties, contains:\n\n- `verification_uri`: URL the user needs to visit to authenticate the device.\n- `user_code`: The user should input the code at the `verification_uri` to authorize the device.\n- `verification_uri_complete`: The user can visit this URL to authorize the device without manually entering the user code. You may prefer this over `verification_uri` depending on your case.\n- `interval`: The interval (in seconds) at which the app should poll the token URL to request a token — more on that in the next section.\n\nWe display this information to the user on the screen. In more advanced UIs like smart TVs, you'll find QR codes or other tricks to facilitate user interaction.\n\n\u003e **Note**: When we call the API, we send a specific payload. In our case, we specified the scope, set as `openid profile`, so we can receive an `id_token`. In other scenarios where you perhaps need to call an API, you'll need an access token, and thus you should also provide an `audience`. Check out the guide on [calling APIs with Device Flow](https://auth0.com/docs/get-started/authentication-and-authorization-flow/call-your-api-using-the-device-authorization-flow#request-device-code) for more information.\n\n### Request tokens\n\nNext, two things in parallel happen. While the user accesses the URL and completes the authentication flow, the CLI will continuously check with Auth0's API for the status of the process.\n\nBecause the authentication flow occurs outside the scope of the application, maybe even on a different device from the one with our code, we have no way of knowing when the user completes the request. To overcome this situation, we will poll the API for the current status every few seconds until one of the following happens:\n\n- The user aborts the application.\n- We receive a cancellation.\n- Success from the API.\n\nNow you may wonder: how often should we be querying the API? Auth0 provided us with that information when we initiated the flow, with the attribute `interval` we discussed before.\n\nLet's do just that with code:\n\n```python\n# main.py\n\n...\ndef login():\n \"\"\"\n Runs the device authorization flow and stores the user object in memory\n \"\"\"\n device_code_payload = {\n 'client_id': AUTH0_CLIENT_ID,\n 'scope': 'openid profile'\n }\n device_code_response = requests.post('https://{}/oauth/device/code'.format(AUTH0_DOMAIN), data=device_code_payload)\n\n if device_code_response.status_code != 200:\n print('Error generating the device code')\n raise typer.Exit(code=1)\n\n print('Device code successful')\n device_code_data = device_code_response.json()\n print('1. On your computer or mobile device navigate to: ', device_code_data['verification_uri_complete'])\n print('2. Enter the following code: ', device_code_data['user_code'])\n\n # New code 👇\n token_payload = {\n 'grant_type': 'urn:ietf:params:oauth:grant-type:device_code',\n 'device_code': device_code_data['device_code'],\n 'client_id': AUTH0_CLIENT_ID\n }\n\n authenticated = False\n while not authenticated:\n print('Checking if the user completed the flow...')\n token_response = requests.post('https://{}/oauth/token'.format(AUTH0_DOMAIN), data=token_payload)\n\n token_data = token_response.json()\n if token_response.status_code == 200:\n print('Authenticated!')\n print('- Id Token: {}...'.format(token_data['id_token'][:10]))\n authenticated = True\n elif token_data['error'] not in ('authorization_pending', 'slow_down'):\n print(token_data['error_description'])\n raise typer.Exit(code=1)\n else:\n time.sleep(device_code_data['interval'])\n # New code 👆\n...\n```\n\nWe use the [token endpoint](https://auth0.com/docs/api/authentication#device-authorization-flow48) while we wait for the user to authenticate.\n\nOnce the user authenticates, the API will respond with a `200` status code and provide us with the requested token information. In our case, since we only asked for `openid`, we will receive an `id_token`, but we can also retrieve `access_token` and `refresh_token` if specified during the flow initiation and the app configuration allows for it.\n\nWhile the user is not authenticated, we will continually receive `4xx` error responses. We must look into these responses in more detail, as some mean we are still waiting, while others will indicate to us to terminate the authentication sequence.\n\n**Authentication pending**: You will see this error (shown below) while waiting for the user to take action. Continue polling using the suggested interval retrieved in the previous step of this tutorial.\n\n```json\n{\n \"error\": \"authorization_pending\",\n \"error_description\": \"...\"\n}\n```\n\n**Slow down**: You are polling too fast. Slow down and use the suggested interval retrieved in the previous step of this tutorial. To avoid receiving this error due to network latency (shown below), you should start counting each interval after receipt of the last polling request's response.\n\n```json\n{\n \"error\": \"slow_down\",\n \"error_description\": \"...\"\n}\n```\n\n**Expired token**: The user has not authorized the device quickly enough, so the `device_code` has expired. Your application should notify the user that the flow has expired and prompt them to reinitiate the flow.\n\n```json\n{\n \"error\": \"expired_token\",\n \"error_description\": \"...\"\n}\n```\n\n**Access denied**: Finally, if access is denied, you will receive:\n\n```json\n{\n \"error\": \"access_denied\",\n \"error_description\": \"...\"\n}\n```\nThis can occur if the authentication flow is interrupted for a variety of reasons, including:\n\n- The user refused to authorize the device.\n- The authorization server denied the transaction.\n- A configured Action or Rule denied access. (To learn more, read [Auth0 Actions](https://auth0.com/docs/customize/actions/flows-and-triggers/login-flow#login-post-login) or [Auth0 Rules](https://auth0.com/docs/customize/rules).)\n\n### Receive tokens\nWhen the user authorizes the device and completes the authentication flow, we can retrieve the tokens successfully. Still, we haven't done anything with them yet, other than displaying a few characters on the screen.\n\nIn the response from the token API, we got an HTTP 200 response with a payload containing `access_token`, `id_token`, `token_type`, and `expires_in` values.\n\nBefore we store or use any of these tokens, we need to validate them. In our application, we will validate the `id_token` we need, but you can also validate `access_tokens`. Read more on [validating access tokens](https://auth0.com/docs/secure/tokens/access-tokens/validate-access-tokens) and the [Auth0 Python SDK](https://github.com/auth0/auth0-python).\n\nWe'll start by defining a validation token function:\n\n```python\n# main.py\n\n...\napp = typer.Typer()\n\n# New code 👇\ncurrent_user = None\n\ndef validate_token(id_token):\n \"\"\"\n Verify the token and its precedence\n\n :param id_token:\n \"\"\"\n jwks_url = 'https://{}/.well-known/jwks.json'.format(AUTH0_DOMAIN)\n issuer = 'https://{}/'.format(AUTH0_DOMAIN)\n sv = AsymmetricSignatureVerifier(jwks_url)\n tv = TokenVerifier(signature_verifier=sv, issuer=issuer, audience=AUTH0_CLIENT_ID)\n tv.verify(id_token)\n# New code 👆\n\ndef login():\n...\n```\n\nTo validate the token, we use the [Auth0 Python SDK](https://github.com/auth0/auth0-python#id-token-validation).\n\nWe also created a global variable, `current_user`, which we will use next when we integrate the token validation into our login function.\n\n```python\n...\ndef login():\n ...\n print('Authenticated!')\n print('- Id Token: {}...'.format(token_data['id_token'][:10]))\n\n # New code 👇\n validate_token(token_data['id_token'])\n global current_user\n current_user = jwt.decode(token_data['id_token'], algorithms=ALGORITHMS, options={\"verify_signature\": False})\n # New code 👆\n\n authenticated = True\n ...\n```\n\nWhen we detect that the user logged in successfully, we validate the `id_token`, decode the user data from it, and store it in the global variable `current_user`.\n\nLast but not least, we need to connect our login function to the application:\n\n```python\n...\n@app.command()\ndef say_hi():\n # New code 👇\n if current_user is None:\n login()\n print(f\"Welcome {current_user['name']}!\")\n # New code 👆\n\nif __name__ == \"__main__\":\n app()\n```\n\nYou made it! Now you have a working app, but in case it has been too many code snippets to follow, here is the complete code:\n\n```python\nimport time\n\nfrom auth0.authentication.token_verifier import TokenVerifier, AsymmetricSignatureVerifier\nimport jwt\nimport requests\nimport typer\n\nAUTH0_DOMAIN = 'your-domain.auth0.com'\nAUTH0_CLIENT_ID = 'your-client-id'\nALGORITHMS = ['RS256']\n\napp = typer.Typer()\n\ncurrent_user = None\n\ndef validate_token(id_token):\n \"\"\"\n Verify the token and its precedence\n\n :param id_token:\n \"\"\"\n jwks_url = 'https://{}/.well-known/jwks.json'.format(AUTH0_DOMAIN)\n issuer = 'https://{}/'.format(AUTH0_DOMAIN)\n sv = AsymmetricSignatureVerifier(jwks_url)\n tv = TokenVerifier(signature_verifier=sv, issuer=issuer, audience=AUTH0_CLIENT_ID)\n tv.verify(id_token)\n\ndef login():\n \"\"\"\n Runs the device authorization flow and stores the user object in memory\n \"\"\"\n device_code_payload = {\n 'client_id': AUTH0_CLIENT_ID,\n 'scope': 'openid profile'\n }\n device_code_response = requests.post('https://{}/oauth/device/code'.format(AUTH0_DOMAIN), data=device_code_payload)\n\n if device_code_response.status_code != 200:\n print('Error generating the device code')\n raise typer.Exit(code=1)\n\n print('Device code successful')\n device_code_data = device_code_response.json()\n print('1. On your computer or mobile device navigate to: ', device_code_data['verification_uri_complete'])\n print('2. Enter the following code: ', device_code_data['user_code'])\n\n token_payload = {\n 'grant_type': 'urn:ietf:params:oauth:grant-type:device_code',\n 'device_code': device_code_data['device_code'],\n 'client_id': AUTH0_CLIENT_ID\n }\n\n authenticated = False\n while not authenticated:\n print('Checking if the user completed the flow...')\n token_response = requests.post('https://{}/oauth/token'.format(AUTH0_DOMAIN), data=token_payload)\n\n token_data = token_response.json()\n if token_response.status_code == 200:\n print('Authenticated!')\n print('- Id Token: {}...'.format(token_data['id_token'][:10]))\n\n validate_token(token_data['id_token'])\n global current_user\n current_user = jwt.decode(token_data['id_token'], algorithms=ALGORITHMS, options={\"verify_signature\": False})\n # New code 👆\n\n authenticated = True\n elif token_data['error'] not in ('authorization_pending', 'slow_down'):\n print(token_data['error_description'])\n raise typer.Exit(code=1)\n else:\n time.sleep(device_code_data['interval'])\n\n@app.command()\ndef say_hi():\n if current_user is None:\n login()\n print(f\"Welcome {current_user['name']}!\")\n\nif __name__ == \"__main__\":\n app()\n```\n\n### Application demo\nLet's try the application now and follow all the steps until we the \"welcome\" message.\n\nFirst, we run the application:\n\n```bash\npython main.py\n```\n\nWhen the application starts, it runs the `login()` function and requests a device code. Almost immediately, we receive the instructions to log in on the screen, and we see the CLI polling the token API in intervals.\n\n```bash\n(venv) ➜ awesome-cli python main.py\nDevice code successful\n1. On your computer or mobile device navigate to: https://dev2-bajcmartinez.eu.auth0.com/activate?user_code=RPSW-HMCW\n2. Enter the following code: RPSW-HMCW\nChecking if the user completed the flow...\n```\n\nWhen we access the link on the browser or another device, we see the [Auth0 Universal Login](https://auth0.com/docs/authenticate/login/auth0-universal-login) page with the device code already pre-loaded. We must look at the code and ensure it is the same as presented on the CLI. Once we confirm that, we click _Continue_.\n\n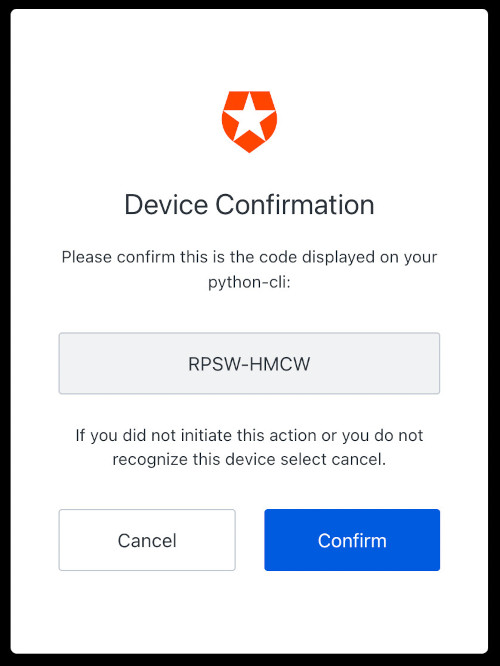\n\nYou probably know the following screen if you are already familiar with Auth0 Universal Login. It is where you can sign up or sign in using credentials, social logins, MFA, and more.\n\n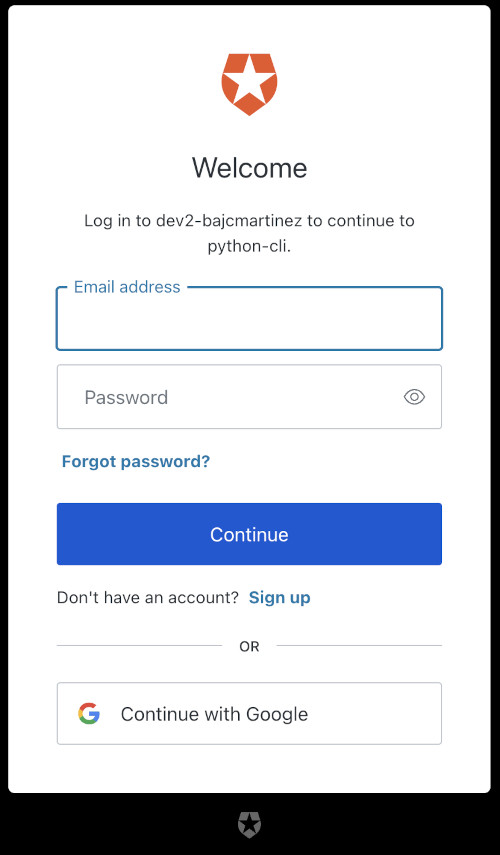\n\nEither register a new user or sign in to continue. Once you do, you will see the confirmation page that your device is now connected.\n\n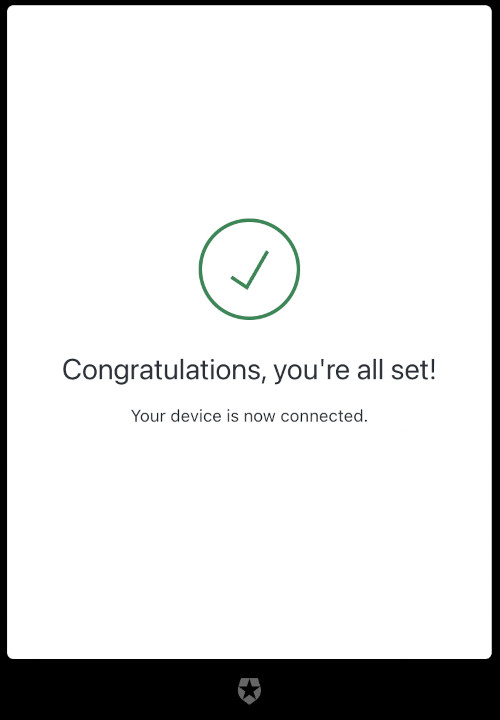\n\nYou may now close that window and head back to the CLI, where you will see your welcome message.\n\n```bash\n(venv) ➜ awesome-cli python main.py\nDevice code successful\n1. On your computer or mobile device navigate to: https://dev2-bajcmartinez.eu.auth0.com/activate?user_code=RPSW-HMCW\n2. Enter the following code: RPSW-HMCW\nChecking if the user completed the flow...\nChecking if the user completed the flow...\nChecking if the user completed the flow...\nChecking if the user completed the flow...\nAuthenticated!\n- Id Token: eyJhbGciOi...\nWelcome Juan!\n```\n\n## What's Next?\nCongratulations! Today, you learned to use [Device Authorization Flow](https://auth0.com/docs/customize/integrations/secure-a-cli-with-auth0#device-authorization-flow) with Python and Auth0 to authenticate users into CLI applications.\n\nBut this is only the beginning. There's so much more to learn.\n\nHere are some great additional resources for your reference:\n\n- [Call Your API Using the Device Authorization Flow](https://auth0.com/docs/secure/tokens/access-tokens/validate-access-tokens)\n- [Auth0 Device Code API](https://auth0.com/docs/api/authentication#get-device-code)\n- [Device Authorization Flow, how does it work?](https://auth0.com/docs/get-started/authentication-and-authorization-flow/device-authorization-flow)\n- [Building CLIs with Python](https://typer.tiangolo.com/)\n\nThanks for reading!","readTime":14,"formattedDate":"Apr 29, 2024"},{"path":"build-and-secure-fastapi-server-with-auth0","title":"Build and Secure a FastAPI Server with Auth0","heroImage":{"url":"https://images.ctfassets.net/23aumh6u8s0i/6uBzrqHNLlSAoER6HtgDN0/accd8f871b1de37f472b94da4346afa2/python-hero","size":{"width":1176,"height":1056}},"category":["Developers","Tutorial","FastAPI"],"authors":[{"metadata":{"tags":[],"concepts":[]},"sys":{"space":{"sys":{"type":"Link","linkType":"Space","id":"23aumh6u8s0i"}},"id":"285B7dnLxlSCFTNIfKkznf","type":"Entry","createdAt":"2021-10-08T13:58:38.599Z","updatedAt":"2021-10-08T13:58:38.599Z","environment":{"sys":{"id":"master","type":"Link","linkType":"Environment"}},"publishedVersion":11,"revision":1,"contentType":{"sys":{"type":"Link","linkType":"ContentType","id":"author"}},"locale":"en-US"},"fields":{"path":"mark-halpin","name":"Mark Halpin","avatar":{"metadata":{"tags":[],"concepts":[]},"sys":{"space":{"sys":{"type":"Link","linkType":"Space","id":"23aumh6u8s0i"}},"id":"6j7qCtlzfiqMEpE7x8W9QB","type":"Asset","createdAt":"2021-04-14T00:24:29.835Z","updatedAt":"2021-04-14T00:24:29.835Z","environment":{"sys":{"id":"master","type":"Link","linkType":"Environment"}},"publishedVersion":2,"revision":1,"locale":"en-US"},"fields":{"title":"apollo (1)","file":{"url":"//images.ctfassets.net/23aumh6u8s0i/6j7qCtlzfiqMEpE7x8W9QB/cb6cfed1851cd2f103590602753b49e0/apollo__1_.png","details":{"size":14485,"image":{"width":800,"height":800}},"fileName":"apollo (1).png","contentType":"image/png"}}},"lastUpdatedBy":"robertino.calcaterra@auth0.com","email":"mark@halpincodes.com","twitter":"https://twitter.com/halpinCodes","github":null,"linkedin":null,"isPopular":false,"personalWebsite":"https://www.halpincodes.com","type":"Guest Author","jobTitle":"Software Engineer","description":"I am a Software Engineer who has taught over 1,000 developers how to code.\n\nI love learning about new technology and making things!"}},{"metadata":{"tags":[],"concepts":[]},"sys":{"space":{"sys":{"type":"Link","linkType":"Space","id":"23aumh6u8s0i"}},"id":"7qC8LJD80VSx1qYcSdQ1Zh","type":"Entry","createdAt":"2021-08-23T12:59:46.069Z","updatedAt":"2025-01-08T14:00:38.100Z","environment":{"sys":{"id":"master","type":"Link","linkType":"Environment"}},"publishedVersion":42,"revision":6,"contentType":{"sys":{"type":"Link","linkType":"ContentType","id":"author"}},"locale":"en-US"},"fields":{"path":"juan-cruz-martinez","name":"Juan Cruz Martinez","avatar":{"metadata":{"tags":[{"sys":{"type":"Link","linkType":"Tag","id":"user"}}],"concepts":[]},"sys":{"space":{"sys":{"type":"Link","linkType":"Space","id":"23aumh6u8s0i"}},"id":"5b3YvfAb53h2I5U6uanww4","type":"Asset","createdAt":"2022-07-07T09:23:40.589Z","updatedAt":"2022-07-07T09:23:56.422Z","environment":{"sys":{"id":"master","type":"Link","linkType":"Environment"}},"publishedVersion":10,"revision":5,"locale":"en-US"},"fields":{"title":"jcm","description":"Juan Cruz Martinez","file":{"url":"//images.ctfassets.net/23aumh6u8s0i/5b3YvfAb53h2I5U6uanww4/f1dfa0e19f15f5df8eacd53f78a813f6/jcm.jpeg","details":{"size":29371,"image":{"width":400,"height":400}},"fileName":"jcm.jpeg","contentType":"image/jpeg"}}},"lastUpdatedBy":"Juan Cruz Martinez","email":"juan.martinez@okta.com","twitter":"https://twitter.com/bajcmartinez","github":"https://github.com/bajcmartinez","linkedin":"https://www.linkedin.com/in/bajcmartinez/","isPopular":true,"personalWebsite":"https://jcmartinez.dev/","type":"Auth0 Employee","jobTitle":"Staff Developer Advocate","description":"I stream, blog, and make youtube videos about tech stuff. I love coding, I love AI, and I love building stuff!"}}],"redirectTo":null,"isHiddenFromBlogPostGrid":false,"lang":"en","tags":["fastapi","api","auth0"],"dateCreated":"2021-10-08T20:00","dateLastUpdated":"2023-10-27","postContent":"FastAPI is a relatively new Python framework that enables you to create applications very quickly. This framework allows you to read API request data seamlessly with built-in modules and is a lightweight alternative to Flask.\n\nIn this article, we will go over the features of `FastAPI`, set up a basic API, protect an endpoint using Auth0, and you'll learn how simple it is to get started.\n\n## Prerequisites\n\nBefore you start building with [FastAPI](https://fastapi.tiangolo.com/), you need to have Python `3.8.2` and a \u003ca href=\"https://a0.to/blog_signup\" data-amp-replace=\"CLIENT_ID\" data-amp-addparams=\"anonId=CLIENT_ID(cid-scope-cookie-fallback-name)\"\u003efree Auth0 account; you can sign up here\u003c/a\u003e.\n\nIf you got that Python version installed and your Auth0 account, you can create a new `FastAPI` application. To begin, create a new directory to develop within. For this example, you will make a directory called `fastapi-example`, and a subfolder called `application`; this subfolder is where your code will live.\n\nIn the `fastapi-example` folder, create a virtual environment using the following command:\n\n```bash\npython3 -m venv .venv\n```\n\nThis creates a virtual environment, and it separates the dependencies from the rest of your computer libraries. In other words, you don't pollute the global namespace with libraries and dependencies, which might impact other Python projects.\n\nAfter creating the virtual environment, you need to activate it. For Unix-based operating systems, here's the command:\n\n```bash\nsource .venv/bin/activate\n```\n\nIf you are in another operating system, you can find a list of [how you can activate an environment on this documentation page](https://docs.python.org/3/library/venv.html#creating-virtual-environments). After activating your virtual environment, you can install the packages you are going to use: `FastAPI`, [uvicorn](https://www.uvicorn.org/) server, [pyjwt](https://pyjwt.readthedocs.io/en/latest/usage.html), and update `pip`:\n\n```bash\npip install -U pip\npip install fastapi 'uvicorn[standard]' pydantic-settings 'pyjwt[crypto]'\n```\n\n## Get Started with FastAPI\n\nNow that all the libraries are installed, you can create a `main.py` file inside the `application` folder; that's where your API code will live. The contents of the `main.py` will look like this:\n\n```python\n\"\"\"main.py\nPython FastAPI Auth0 integration example\n\"\"\"\n\nfrom fastapi import FastAPI\n\n# Creates app instance\napp = FastAPI()\n\n@app.get(\"/api/public\")\ndef public():\n \"\"\"No access token required to access this route\"\"\"\n\n result = {\n \"status\": \"success\",\n \"msg\": (\"Hello from a public endpoint! You don't need to be \"\n \"authenticated to see this.\")\n }\n return result\n```\n\nLet's break this down:\n\n- To start, you are importing the `FastAPI` library;\n- Then creating your app by instantiating a `FastAPI()` object;\n- After that, you use `@app.get` to define a route that handles `GET` requests;\n- Finally, you have the path operation function called `public()`, which is a function that will run each time that route is called and it returns a dictionary with the welcome message.\n\nNow that you've got your first endpoint code, to get the server up and running, run the following command on the root directory of the project:\n\n```bash\nuvicorn application.main:app --reload\n```\n\nWith your server is running, you can go either to http://127.0.0.1:8000/docs to see the automatically generated documentation for the first endpoint like shown in the image below:\n\n!https://images.ctfassets.net/23aumh6u8s0i/3fE3ngkaleHJw78ZNzQway/24719642235593cbf2016b4b86f38c54/Screen_Shot_2021-10-04_at_09.55.16.png\n\nOr you can make your first request in a new terminal window by using `cURL`. Keep in mind that if you are a Windows user on a older version of the operating system, you will have to [install curl](https://curl.se/dlwiz/?type=bin) before running the following command:\n\n```bash\ncurl -X 'GET' \\\n --url \u003chttp://127.0.0.1:8000/api/public\u003e\n```\n\nAnd you should see a JSON as a result of the request you just did similar to this:\n\n```json\n{\n \"status\": \"success\",\n \"msg\": \"Hello from a public endpoint! You don't need to be authenticated to see this.\"\n}\n```\n\nFor simplicity's sake, you are going to use the `cURL` for the rest of this post.\n\n## Create a Private Endpoint\n\nNow that a base API server is set up, you will add one more endpoint to your `main.py` file. In this application, you will have a `GET /api/public` route available for everyone and a `GET /api/private` route that only you can access with the access token you'll get from Auth0.\n\nNow you need to update the `main.py` file. Here's what you'll need to change to the imports section:\n\n- First, you need to import `Depends` from the `fastapi` module, that's FastAPI dependency injection system;\n- Then you'll also need to import the `HTTPBearer` class from the `fastapi.security` module, a built-in security scheme for authorization headers with bearer tokens;\n- You will need to create the authorization scheme based on the `HTTPBearer`. This will be used to guarantee the presence of the authorization header with the `Bearer` token in each request made to the private endpoint.\n\n\u003e The token informs the API that the bearer of the token has been authorized to access the API and perform specific actions specified by the scope that was granted during authorization.\n\u003e \n\nOther than updating the imports, you need to implement the private endpoint. The `/api/private` endpoint will also accept `GET` requests, and here is what the code `main.py` looks like for now:\n\n```python\n\"\"\"main.py\nPython FastAPI Auth0 integration example\n\"\"\"\n\nfrom fastapi import Depends, FastAPI # 👈 new imports\nfrom fastapi.security import HTTPBearer # 👈 new imports\n\n# Scheme for the Authorization header\ntoken_auth_scheme = HTTPBearer() # 👈 new code\n\n# Creates app instance\napp = FastAPI()\n\n@app.get(\"/api/public\")\ndef public():\n \"\"\"No access token required to access this route\"\"\"\n\n result = {\n \"status\": \"success\",\n \"msg\": (\"Hello from a public endpoint! You don't need to be \"\n \"authenticated to see this.\")\n }\n return result\n\n# new code 👇\n@app.get(\"/api/private\")\ndef private(token: str = Depends(token_auth_scheme)):\n \"\"\"A valid access token is required to access this route\"\"\"\n\n result = token.credentials\n\n return result\n```\n\nThe `Depends` class is responsible for evaluating each request that a given endpoint receives against a function, class, or instance. In this case, it will evaluate the requests against the `HTTPBearer` scheme that will check the request for an authorization header with a bearer token.\n\n\u003e You can find more details on how FastAPI dependency injection works on its documentation.\n\u003e \n\nNow your private endpoint returns the received token. If no token is provided, it will return a `403 Forbidden` status code with the detail saying you are `\"Not authenticated\"`. Because you used the `--reload` flag while running your server, you don't need to re-run the command; `uvicorn` will pick up the changes and update the server every time you save your files. Now make a request to the `GET /api/private` endpoint to check its behavior. First, let's make a request *without* passing an authorization header:\n\n```bash\ncurl -X 'GET' \\\n --url '\u003chttp://127.0.0.1:8000/api/private\u003e'\n# {\"detail\": \"Not authenticated\"}\n```\n\nAnd now, if you make a request with the authorization header, but with a **random** string as token value, you should see the same random value as a result:\n\n```bash\ncurl -X 'GET' \\\n --url '\u003chttp://127.0.0.1:8000/api/private\u003e' \\\\\n --header 'Authorization: Bearer FastAPI is awesome'\n# \"FastAPI is awesome\"\n```\n\nAs you can see, your endpoint **isn't protected** since it accepts any string as the value for the authorization header. It is **not enough** to receive an authorization header; you must also **verify the value of the bearer token** to let somebody access the endpoint. Let's fix that behavior.\n\n## Set Up an Auth0 API\n\nBefore you begin protecting endpoints in your API you’ll need to create an API on the [Auth0 Dashboard](https://manage.auth0.com/#/apis). If you haven't an Auth0 account, you can \u003ca href=\"https://auth0.com/signup\" data-amp-replace=\"CLIENT_ID\" data-amp-addparams=\"anonId=CLIENT_ID(cid-scope-cookie-fallback-name)\"\u003esign up for a free one\u003c/a\u003e. Then, go to the [APIs section](https://manage.auth0.com/#/apis) and click on *Create API*.\n\nThis will open a new window for configuring the API. Set the following fields in that window:\n\n- **Name**, a friendly name or description for the API. Enter **Fast API Example** for this sample.\n- **Identifier**, which is an identifier that the client application uses to request [access tokens](https://auth0.com/docs/secure/tokens/access-tokens) for the API. Enter the string `https://fastapiexample.com`. This identifier is also known as **audience**.\n- **Signing Algorithm**, leave the default setting, RS256.\n\nAfter entering those values, click the *Create* button.\n\n## Settings and Environment Variables\n\nNow that you created your Auth0 API, you need to get back to the code. To effectively protect our endpoints, we need to [verify that the token](https://auth0.com/docs/secure/tokens/access-tokens/validate-access-tokens) available in the `Authorization` header is valid, corresponds to our application, and was signed by the right party.\n\nTo do that, you’ll need to access on your application some Auth0 configuration values. We’ll use [FastAPI settings](https://fastapi.tiangolo.com/advanced/settings/) to retrieve this values either from a `.env` file or from environment variables.\n\nFor our local purposes, let’s start by storing the configuration values on a `.env` file like the following. Remember to update the values accordingly and to place the `.env` file in the root folder of your project:\n\n```\n# .env\n\nAUTH0_DOMAIN = your.domain.auth0.com\nAUTH0_API_AUDIENCE = https://your.api.audience\nAUTH0_ISSUER = https://your.domain.auth0.com/\nAUTH0_ALGORITHMS = RS256\n```\n\nThis configuration is the first piece of the puzzle of checking for the Auth0 configuration settings in the token validation stage. Another good rule to follow is to never commit your configuration files with environment variables to source code. To prevent this from occurring, you should create a `.gitignore` file in the project's root and add the `.env` file as an entry:\n\n```\n# .gitignore\n.env\n```\n\nNext, let’s create a module to retrieve the application settings. Start by creating a new file `application/config.py` with the following contents:\n\n```python\nfrom functools import lru_cache\n\nfrom pydantic_settings import BaseSettings\n\nclass Settings(BaseSettings):\n auth0_domain: str\n auth0_api_audience: str\n auth0_issuer: str\n auth0_algorithms: str\n\n class Config:\n env_file = \".env\"\n\n@lru_cache()\ndef get_settings():\n return Settings()\n```\n\nThe defined `Settings` class uses `Pydantic` settings module to retrieve the application’s settings directly from the either the `.env` file or from environment variables. It is important that the define properties match the configs ignoring capitalization.\n\n## Add JSON Web Token (JWT) Validation\n\nThe next piece of the puzzle is where the magic happens. You'll create a `VerifyToken` class to handle JWT token validation. Performing the right validations is critical to the security of your application, so we’ll delegate the hard tasks to the library `PyJWT`.\n\nCreate a new file `application/utils.py` to host our validation code and add the following helper code:\n\n```python\nfrom fastapi import HTTPException, status\n\nclass UnauthorizedException(HTTPException):\n def __init__(self, detail: str, **kwargs):\n \"\"\"Returns HTTP 403\"\"\"\n super().__init__(status.HTTP_403_FORBIDDEN, detail=detail)\n\nclass UnauthenticatedException(HTTPException):\n def __init__(self):\n super().__init__(\n status_code=status.HTTP_401_UNAUTHORIZED, detail=\"Requires authentication\"\n )\n```\n\nSo far we only defined two new exceptions, one for when no JWT token is given (unauthenticated), and the other when the validation of the JWT fails (unauthorized).\n\nLet’s now start with the verification code by creating a `VerifyToken` class that will initialize the application settings and will retrieve the KWKS that are needed to validate the incoming token’s signatures.\n\nUpdate the `application/utils.py` files as follows:\n\n```python\nfrom typing import Optional # 👈 new imports\n\nimport jwt # 👈 new imports\nfrom fastapi import Depends, HTTPException, status # 👈 new imports\nfrom fastapi.security import SecurityScopes, HTTPAuthorizationCredentials, HTTPBearer # 👈 new imports\n\nfrom application.config import get_settings # 👈 new imports\n\nclass UnauthorizedException(HTTPException):\n def __init__(self, detail: str, **kwargs):\n\"\"\"Returns HTTP 403\"\"\"\nsuper().__init__(status.HTTP_403_FORBIDDEN, detail=detail)\n\nclass UnauthenticatedException(HTTPException):\n def __init__(self):\n super().__init__(\n status_code=status.HTTP_401_UNAUTHORIZED, detail=\"Requires authentication\"\n )\n\n# 👇 new code\nclass VerifyToken:\n\"\"\"Does all the token verification using PyJWT\"\"\"\n\ndef __init__(self):\n self.config = get_settings()\n\n # This gets the JWKS from a given URL and does processing so you can\n # use any of the keys available\n jwks_url = f'https://{self.config.auth0_domain}/.well-known/jwks.json'\n self.jwks_client = jwt.PyJWKClient(jwks_url)\n# 👆 new code\n```\n\nFinally, we need a method that retrieves the token from the request and performs all validations. Here is the revised `VerifyToken` class with the new `verify` method:\n\n```python\nclass VerifyToken:\n \"\"\"Does all the token verification using PyJWT\"\"\"\n\n def __init__(self):\n self.config = get_settings()\n\n # This gets the JWKS from a given URL and does processing so you can\n # use any of the keys available\n jwks_url = f'https://{self.config.auth0_domain}/.well-known/jwks.json'\n self.jwks_client = jwt.PyJWKClient(jwks_url)\n\n\t\t# 👇 new code\n async def verify(self,\n security_scopes: SecurityScopes,\n token: Optional[HTTPAuthorizationCredentials] = Depends(HTTPBearer())\n ):\n if token is None:\n raise UnauthenticatedException\n\n # This gets the 'kid' from the passed token\n try:\n signing_key = self.jwks_client.get_signing_key_from_jwt(\n token.credentials\n ).key\n except jwt.exceptions.PyJWKClientError as error:\n raise UnauthorizedException(str(error))\n except jwt.exceptions.DecodeError as error:\n raise UnauthorizedException(str(error))\n\n try:\n payload = jwt.decode(\n token.credentials,\n signing_key,\n algorithms=self.config.auth0_algorithms,\n audience=self.config.auth0_api_audience,\n issuer=self.config.auth0_issuer,\n )\n except Exception as error:\n raise UnauthorizedException(str(error))\n\t\n return payload\n\t\t# 👆 new code\n```\n\nThe `verify` method consists of three steps to validate the integrity of the token:\n\n1. It grabs the token from the `Authorization` header.\n2. This method uses the key ID (`kid` claim present in the token header) to grab the key used from the JWKS to verify the token signature. If this step fails by any of the possible errors, the error message is returned.\n3. Then, the method tries to decode the JWT by using the information gathered so far. In case of errors, it returns the error message. When successful, the token payload is returned.\n\nAll done! You are ready now to start securing your endpoints.\n\n## Protect Your Endpoints\n\nThe final puzzle piece is to import the class you just created in the `utils.py` file and use it in the `GET /api/private` endpoint.\n\nSince we abstracted all of the logic to the `VerifyToken` class, validating endpoints is now easy.\n\nHere's what your `main.py` file should look like with all the changes above:\n\n```python\n\"\"\"Python FastAPI Auth0 integration example\n\"\"\"\n\nfrom fastapi import FastAPI, Security\nfrom .utils import VerifyToken # 👈 Import the new class\n\n# Creates app instance\napp = FastAPI()\nauth = VerifyToken() # 👈 Get a new instance\n\n@app.get(\"/api/public\")\ndef public():\n \"\"\"No access token required to access this route\"\"\"\n\n result = {\n \"status\": \"success\",\n \"msg\": (\"Hello from a public endpoint! You don't need to be \"\n \"authenticated to see this.\")\n }\n return result\n\n@app.get(\"/api/private\")\ndef private(auth_result: str = Security(auth.verify)): # 👈 Use Security and the verify method to protect your endpoints\n \"\"\"A valid access token is required to access this route\"\"\"\n return auth_result\n```\n\nWith this update, you are properly setting up your protected endpoint and doing all the verification steps for the access tokens you need 🎉.\n\nEven though you started your server with the `--reload` flag because you need to make sure the configuration is loaded, it is a good time to terminate the `uvicorn` process and then restart the server. That will guarantee the proper functionality of your API with the configuration parameters from the `.env` file or environment variables.\n\nBefore you can make requests to the protected endpoint in the `FastAPI` server, you need the access token from Auth0. You can get it by copying it from the Auth0 dashboard, in the `Test` tab of your API.\n\nYou can also use a curl `POST` request to Auth0's `oauth/token` endpoint to get the access token, and you can copy this request from the `Test` tab of your API in the Auth0 dashboard. The curl request will look like this; remember to fill the values as necessary:\n\n```bash\ncurl -X 'POST' \\\n--url 'https://\u003cYOUR DOMAIN HERE\u003e/oauth/token' \\\n --header 'content-type: application/x-www-form-urlencoded' \\\n --data grant_type=client_credentials \\\n --data 'client_id=\u003cYOUR CLIENT ID HERE\u003e' \\\n --data client_secret=\u003cYOUR CLIENT SECRET HERE\u003e \\\n --data audience=\u003cYOUR AUDIENCE HERE\u003e\n```\n\nIn the command line, you should see a response containing your bearer token, like this one:\n\n```json\n{\n \"access_token\": \"\u003cYOUR_BEARER_TOKEN\u003e\",\n \"expires_in\": 86400,\n \"token_type\": \"Bearer\"\n}\n```\n\nNow you can use this access token to access the private endpoint:\n\n```bash\ncurl -X 'GET' \\\n--url '\u003chttp://127.0.0.1:8000/api/private\u003e' \\\n--header 'Authorization: Bearer \u003cYOUR_BEARER_TOKEN\u003e'\n```\n\nIf the request succeeds, the server will send back the payload of the access token:\n\n```json\n{\n \"iss\": \"https://\u003cYOUR_DOMAIN\u003e/\",\n \"sub\": \"iojadoijawdioWDasdijasoid@clients\",\n \"aud\": \"http://\u003cYOUR_AUDIENCE\u003e\",\n \"iat\": 1691399881,\n \"exp\": 1691486281,\n \"azp\": \"ADKASDawdopjaodjwopdAWDdsd\",\n \"gty\": \"client-credentials\"\n}\n```\n\nKeep in mind that if the validation fails, you should see the details of what went wrong.\n\nAnd that’s it — you have finished protecting the private endpoint and testing its protection.\n\n## Recap\n\nYou learned quite a few things in this blog post. To start, you learned the basics of `FastAPI` by implementing two endpoints — one public, one private. You saw how simple it is to make requests to both of these endpoints. You created a verification class and saw how PyJWT helps you validate an Auth0 access token, and you learned what JWKS is.\n\nYou went through the process of creating your API in the Auth0 dashboard. You also learned how to secure one of your endpoints by leveraging the dependency injection system FastAPI provides to help you implement integrations. And you did all of this very quickly.\n\nIn short, you’ve learned how easy it is to get up and running with `FastAPI`, as well as how to use Auth0 for protecting your endpoints.\n\n[In this GitHub repo](https://github.com/auth0-blog/auth0-python-fastapi-sample), you’ll find the full code for the sample application you built today. If you have any questions, ask them in the community forum thread for this blog post.\n\nThanks for reading!","readTime":14,"formattedDate":"Oct 27, 2023"},{"path":"get-started-with-flutter-authentication","title":"Get Started with Flutter Authentication","heroImage":{"url":"https://images.ctfassets.net/23aumh6u8s0i/4TsG2mTRrLFhlQ9G1m19sC/4c9f98d56165a0bdd71cbe7b9c2e2484/flutter","size":{"width":588,"height":528}},"category":["Developers","Tutorial","Flutter"],"authors":[{"metadata":{"tags":[],"concepts":[]},"sys":{"space":{"sys":{"type":"Link","linkType":"Space","id":"23aumh6u8s0i"}},"id":"7qC8LJD80VSx1qYcSdQ1Zh","type":"Entry","createdAt":"2021-08-23T12:59:46.069Z","updatedAt":"2025-01-08T14:00:38.100Z","environment":{"sys":{"id":"master","type":"Link","linkType":"Environment"}},"publishedVersion":42,"revision":6,"contentType":{"sys":{"type":"Link","linkType":"ContentType","id":"author"}},"locale":"en-US"},"fields":{"path":"juan-cruz-martinez","name":"Juan Cruz Martinez","avatar":{"metadata":{"tags":[{"sys":{"type":"Link","linkType":"Tag","id":"user"}}],"concepts":[]},"sys":{"space":{"sys":{"type":"Link","linkType":"Space","id":"23aumh6u8s0i"}},"id":"5b3YvfAb53h2I5U6uanww4","type":"Asset","createdAt":"2022-07-07T09:23:40.589Z","updatedAt":"2022-07-07T09:23:56.422Z","environment":{"sys":{"id":"master","type":"Link","linkType":"Environment"}},"publishedVersion":10,"revision":5,"locale":"en-US"},"fields":{"title":"jcm","description":"Juan Cruz Martinez","file":{"url":"//images.ctfassets.net/23aumh6u8s0i/5b3YvfAb53h2I5U6uanww4/f1dfa0e19f15f5df8eacd53f78a813f6/jcm.jpeg","details":{"size":29371,"image":{"width":400,"height":400}},"fileName":"jcm.jpeg","contentType":"image/jpeg"}}},"lastUpdatedBy":"Juan Cruz Martinez","email":"juan.martinez@okta.com","twitter":"https://twitter.com/bajcmartinez","github":"https://github.com/bajcmartinez","linkedin":"https://www.linkedin.com/in/bajcmartinez/","isPopular":true,"personalWebsite":"https://jcmartinez.dev/","type":"Auth0 Employee","jobTitle":"Staff Developer Advocate","description":"I stream, blog, and make youtube videos about tech stuff. I love coding, I love AI, and I love building stuff!"}},{"metadata":{"tags":[],"concepts":[]},"sys":{"space":{"sys":{"type":"Link","linkType":"Space","id":"23aumh6u8s0i"}},"id":"6w9v3nlChatCrVp8xQEVLZ","type":"Entry","createdAt":"2021-03-22T08:17:41.449Z","updatedAt":"2021-10-28T19:06:46.697Z","environment":{"sys":{"id":"master","type":"Link","linkType":"Environment"}},"publishedVersion":23,"revision":3,"contentType":{"sys":{"type":"Link","linkType":"ContentType","id":"author"}},"locale":"en-US"},"fields":{"path":"amin-abbaspour","name":"Amin Abbaspour","avatar":{"metadata":{"tags":[],"concepts":[]},"sys":{"space":{"sys":{"type":"Link","linkType":"Space","id":"23aumh6u8s0i"}},"id":"2qUp6UKxRpsowc3pk2oZwZ","type":"Asset","createdAt":"2021-03-22T08:26:28.221Z","updatedAt":"2021-03-22T08:26:28.221Z","environment":{"sys":{"id":"master","type":"Link","linkType":"Environment"}},"publishedVersion":2,"revision":1,"locale":"en-US"},"fields":{"title":"amin-abbaspour","description":"amin-abbaspour avatar","file":{"url":"//images.ctfassets.net/23aumh6u8s0i/2qUp6UKxRpsowc3pk2oZwZ/f40c9f27c3ffcadbba6c434785300ae9/amin-abbaspour","details":{"size":14493,"image":{"width":150,"height":150}},"fileName":"amin-abbaspour","contentType":"image/png"}}},"lastUpdatedBy":"amin.abbaspour@auth0.com","email":"amin@auth0.com","twitter":"https://twitter.com/aminize","github":"https://github.com/abbaspour/","linkedin":"https://www.linkedin.com/in/abbaspour","isPopular":null,"personalWebsite":null,"type":"Auth0 Employee","jobTitle":"Lead Solutions Architect","description":"G'day. I look after Professional Services in APAC. I'm passionate about helping customers build and secure their applications and get the best value out of their investment with Auth0. Besides work, I love spending time with my kids, Ryan and Adeline, as well as reading, weightlifting and watching NRL (National Rugby League)."}}],"redirectTo":null,"isHiddenFromBlogPostGrid":null,"lang":"en","tags":["flutter","authentication","authorization","openid-connect","oauth2","oidc","identity","native-apps","ios","auth0","oss"],"dateCreated":"2020-07-09T10:30","dateLastUpdated":"2023-01-30","postContent":"[Flutter](https://flutter.dev/) is Google's cross-platform UI toolkit created to help developers build expressive and beautiful mobile applications. In this article, you will learn how to build and secure a Flutter application with Auth0 using the open-source [Auth0 Flutter SDK](https://pub.dev/documentation/auth0_flutter/latest/) library. You can check out the code developed throughout the article in [this GitHub repository](https://github.com/auth0-blog/flutter-authentication).\n\n## Prerequisites\n\nBefore getting started with this article, you need a working knowledge of Flutter. If you need help getting started, you can follow the [codelabs on the Flutter website](https://flutter.dev/docs/codelabs).\n\nYou also need to have the following installations on your machine:\n\n* [Flutter SDK](https://flutter.dev/docs/get-started/install): We tested this tutorial with SDK version 1.17.\n* A Development Environment, one of:\n * [Android Studio](https://developer.android.com/studio), or \n * [IntelliJ IDEA](https://www.jetbrains.com/idea/download/), or\n * [Visual Studio Code](https://code.visualstudio.com/download).\n \nThese IDEs integrate well with Flutter and make your development effective through the provision of tools to edit and refactor your Flutter application code. You will need an installation of the Dart and Flutter plugins, regardless of the IDE you decide to use.\n\n## OAuth 2.0 Flow and Mobile Applications\n \n[OAuth 2.0](https://auth0.com/docs/protocols/oauth2) is an industry-standard protocol for authorization. It allows users to give third-party applications access to their resources. You can see a typical example of OAuth 2.0 in action when a user tries to sign up for a third-party app using Google. OAuth 2.0 allows users to give the third-party application access to resources, such as using their profile data on a social network platform, without needing to input their credentials on said application.\n\n[OpenID Connect (OIDC)](https://auth0.com/docs/protocols/oidc) is an authentication protocol on top of OAuth 2.0. It expands the successful delegation model of OAuth 2.0 in many ways, like the ability to sign in, a JWT structured [ID token](https://auth0.com/docs/tokens/concepts/id-tokens), and [discovery](https://auth0.com/docs/protocols/oidc/openid-connect-discovery). \n\nOAuth 2.0 is not just for web applications. It provides [different flows](https://auth0.com/docs/api-auth/which-oauth-flow-to-use) to address authentication requirements for various types of applications. For mobile applications, OAuth 2.0 provides the [Authorization Code Grant flow with PKCE](https://auth0.com/docs/api-auth/tutorials/authorization-code-grant-pkce), which is the recommended flow that you'll use throughout this tutorial.\n\nA significant benefit of using standards like OAuth 2.0 and OIDC is that you can decouple your application from a particular vendor. You may have different options of open-source software libraries that can help you integrate your application with these two protocols \u0026mdash; you don't have to start from scratch.\n \nFor your Flutter application using Auth0, you can delegate that integration job to [Auth0 Flutter SDK](https://pub.dev/documentation/auth0_flutter/latest/), the official Auth0 library for Flutter applications.\n\n## What You'll Build\n\nThroughout this article, you'll build an application that allows users to log in or sign up using a social identity provider, such as Google, or a set of credentials, such as a username and password. You won't have to build any forms, though! The application will leverage a login page provided by Auth0, the [Universal Login page](https://auth0.com/docs/universal-login). Your application will also have a profile screen where you can display detailed information about the logged-in user and a logout button.\n \n\u003cinclude src=\"SignupCTA\" text=\"Try out the most powerful authentication platform for free.\" linkText=\"Get started →\" /\u003e\n\nTake a peek of what you'll build:\n\n\u003cAmpContent\u003e\n\n \n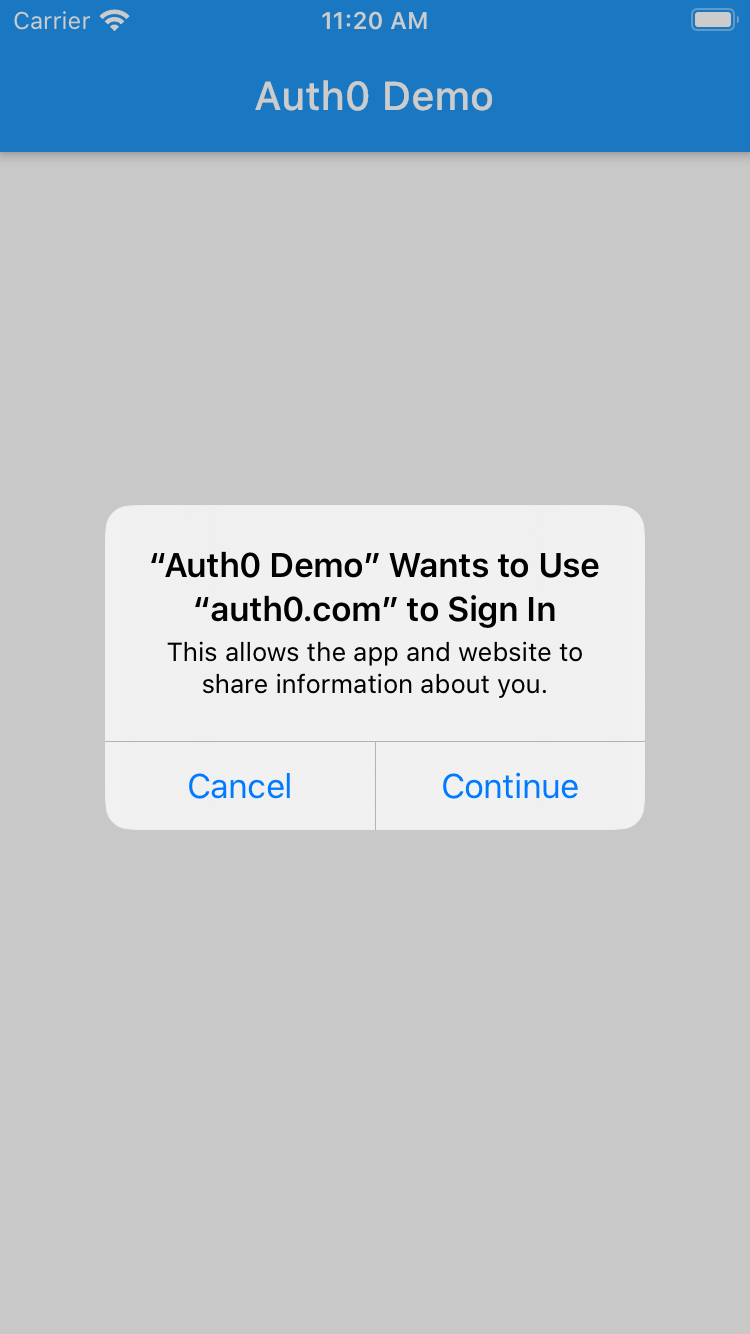\n\n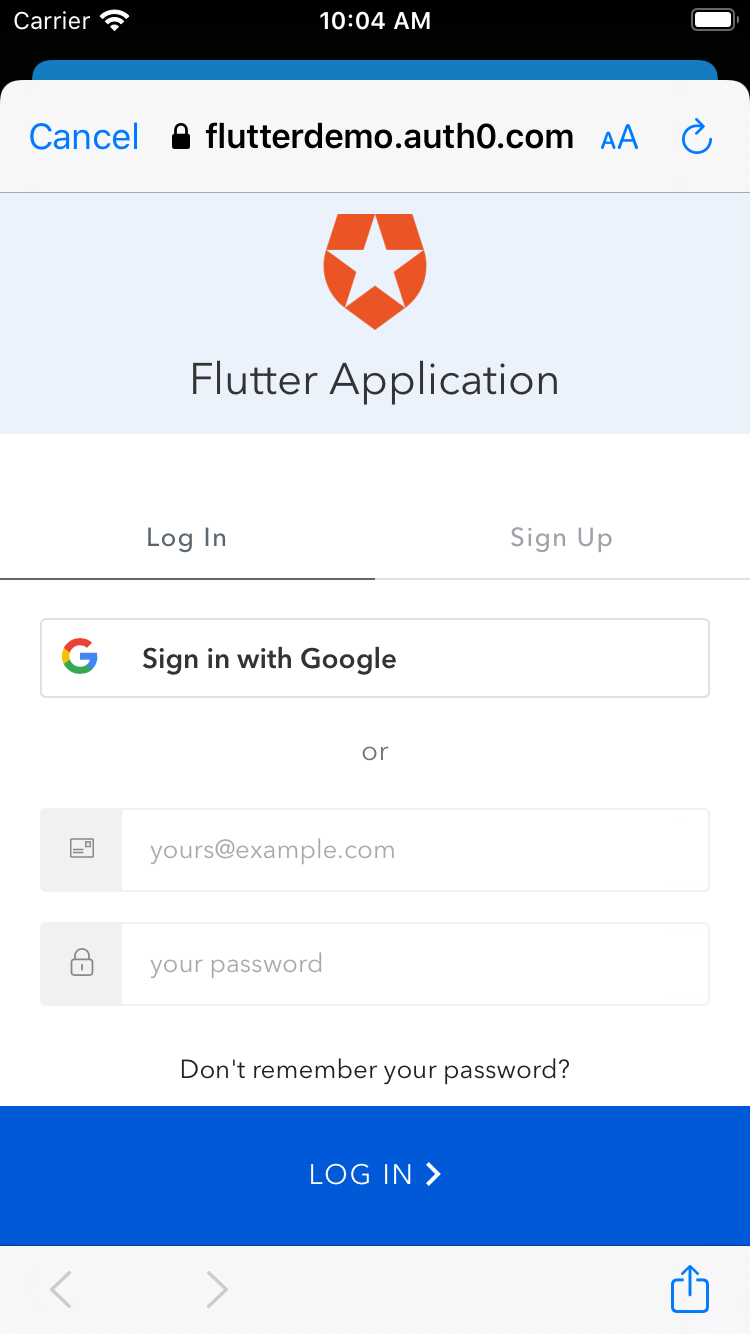\n \n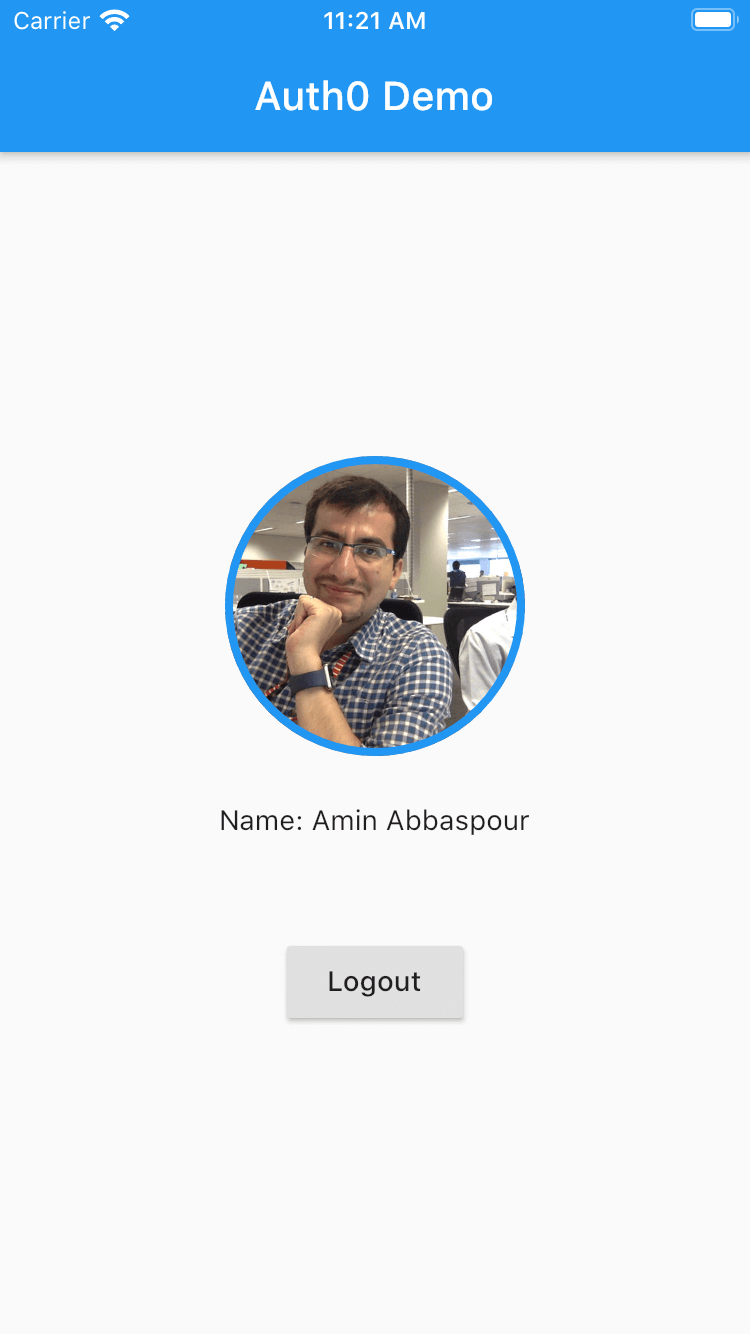\n\n\u003c/AmpContent\u003e\n\n\u003cNonAmpContent\u003e\n\n|  |  |\n| --- | --- | \n|  |  |\n\n\u003c/NonAmpContent\u003e\n\n\u003cbr /\u003e\n\nIf you encounter any issues, the complete source code of the sample application is available on [this GitHub repository](https://github.com/auth0-blog/flutter-authentication).\n\n## Scaffold a Flutter Project\n\nTo facilitate the process of creating a new Flutter project, you will use the Flutter CLI tool. To do this, open your terminal and navigate to your projects directory to run the following command:\n\n```bash \nflutter create --org com.auth0 flutterdemo\n```\n\n\u003e The `com.auth0` parameter sets the hierarchy of your Flutter app, which is significant when you are implementing user authentication using a callback URL. You'll find more details on this concept as you follow the article.\n\nThe CLI tool generates a template project within a couple of seconds to get you started, which you can open in your preferred IDE.\n\nOpen the `lib/main.dart` file and replace its entire content with the following code template:\n\n```dart \n/// -----------------------------------\n/// External Packages \n/// -----------------------------------\n\nimport 'package:flutter/material.dart';\n\n/// -----------------------------------\n/// Profile Widget \n/// -----------------------------------\n\n/// -----------------------------------\n/// Login Widget \n/// -----------------------------------\n\n/// -----------------------------------\n/// App \n/// -----------------------------------\n\nvoid main() =\u003e runApp(MyApp());\n\nclass MyApp extends StatefulWidget {\n @override\n _MyAppState createState() =\u003e _MyAppState();\n}\n\n/// -----------------------------------\n/// App State \n/// -----------------------------------\n\nclass _MyAppState extends State\u003cMyApp\u003e {\n bool isBusy = false;\n late String errorMessage;\n\n @override\n Widget build(BuildContext context) {\n return MaterialApp(\n title: 'Auth0 Demo',\n home: Scaffold(\n appBar: AppBar(\n title: const Text('Auth0 Demo'),\n ),\n body: Center(\n child: const Text('Implement User Authentication'),\n ),\n ),\n );\n }\n}\n```\n\nThis template is the skeleton of your app. You'll add code to each section as you follow the article.\n\n## Install Dependencies\n\nThis Flutter project requires only one dependency, the [Auth0 Flutter SDK](https://pub.dev/documentation/auth0_flutter/latest/) library.\n\nTo install it, run the following command:\n\n```bash \nflutter pub add auth0_flutter\n```\n\n## Configure the SDK\n\n`auth0-flutter` provides access to the methods required to perform user authentication, following the standards that Auth0 also happens to implement. To build a communication bridge between your Flutter app and Auth0, you need to set up a callback URL to receive the authentication result in your application after a user logs in with Auth0.\n\n\u003e A callback URL is a mechanism by which an authorization server communicates back to your application. \n\nFor web applications, the callback URL is a valid HTTP(s) URL. More or less, the same applies to native applications. The subtle difference is that in native applications, callbacks are pseudo-URLs that you compose using an application schema and URI that's configured per application.\n\n### Configure Android\n\nThe Flutter Auth0 SDK will set up an `intent-filter` which captures the authentication callback URL. To set the filter properly, the SDK requires manifest placeholders for the following values:\n\n* `auth0Domain`: The [domain of your Auth0 tenant](https://auth0.com/docs/get-started/applications/application-settings#basic-information). You can find this in the Auth0 dashboard under your application's *Settings* tab in the *Domain* field.\n* `auth0Scheme`: The scheme to use; it can be either a custom scheme (e.g., `flutterdemo`) or HTTPS if you want to use [Android App Links](https://auth0.com/docs/get-started/applications/enable-android-app-links-support).\n\nTo configure the `intent-filter`, first, you need to add the Auth0 domain and the application scheme to our Android application. Start by opening the file `android/app/build.gradle` and add the following manifest placeholders inside `android \u003e defaultConfig`.\n\n```\n// android/app/build.gradle\n\nandroid {\n // ...\n\n defaultConfig {\n // ...\n manifestPlaceholders += [auth0Domain: \"\u003cYOUR_AUTH0_DOMAIN\u003e\", auth0Scheme: \"flutterdemo\"] // 👈 New code\n }\n\n // ...\n}\n```\n\nFor our example, we'll use `flutterdemo` as the scheme, and you'll have to replace the `\u003cYOUR_AUTH0_DOMAIN\u003e` value for your actual Auth0 domain.\n\n### Configure iOS\n\nSimilar to Android, for iOS, we need to specify the callback scheme by adding the following entry to the `\u003cdict\u003e` element present in the `ios/Runner/Info.plist` file:\n\n```xml \n\u003c?xml version=\"1.0\" encoding=\"UTF-8\"?\u003e\n\u003c!DOCTYPE plist PUBLIC \"-//Apple//DTD PLIST 1.0//EN\" \"http://www.apple.com/DTDs/PropertyList-1.0.dtd\"\u003e\n\u003cplist version=\"1.0\"\u003e\n\u003cdict\u003e\n ...\n \u003c!-- 👇 New code --\u003e\n \u003ckey\u003eCFBundleURLTypes\u003c/key\u003e\n \u003carray\u003e\n \u003cdict\u003e\n \u003ckey\u003eCFBundleTypeRole\u003c/key\u003e\n \u003cstring\u003eEditor\u003c/string\u003e\n \u003ckey\u003eCFBundleURLName\u003c/key\u003e\n \u003cstring\u003eauth0\u003c/string\u003e\n \u003ckey\u003eCFBundleURLSchemes\u003c/key\u003e\n \u003carray\u003e\n \u003cstring\u003e$(PRODUCT_BUNDLE_IDENTIFIER)\u003c/string\u003e\n \u003c/array\u003e\n \u003c/dict\u003e\n \u003c/array\u003e\n \u003c!-- 👆 New code --\u003e\n ...\n\u003c/dict\u003e\n\u003c/plist\u003e\n```\n\n\u003e The minimum target platform supported by the `Auth0 Flutter SDK` is `iOS 12.0`, so make sure you have that set in your iOS project.\n\n## Run the Application\n\nLaunch either the [iOS simulator](https://flutter.dev/docs/get-started/install/macos#set-up-the-ios-simulator) or [Android emulators](https://flutter.dev/docs/get-started/install/macos#set-up-the-android-emulator), then run the application on all available devices like so:\n \n```bash \nflutter run -d all\n```\n\n\u003cinclude src=\"tutorial/FeedbackButton\" communityTopic=\"get-started-with-flutter-authentication/45986\"/\u003e\n\n## Create the User Interface\n\nLocate the `Profile Widget` section in the `lib/main.dart` file and create the following widget:\n\n```dart \n/// -----------------------------------\n/// Profile Widget\n/// -----------------------------------\n\n// 👇 New code\nclass Profile extends StatelessWidget {\n final Future\u003cvoid\u003e Function() logoutAction;\n final UserProfile? user;\n\n const Profile(this.logoutAction, this.user, {final Key? key}) : super(key: key);\n\n @override\n Widget build(BuildContext context) {\n return Column(\n mainAxisAlignment: MainAxisAlignment.center,\n children: \u003cWidget\u003e[\n Container(\n width: 150,\n height: 150,\n decoration: BoxDecoration(\n border: Border.all(color: Colors.blue, width: 4),\n shape: BoxShape.circle,\n image: DecorationImage(\n fit: BoxFit.fill,\n image: NetworkImage(user?.pictureUrl.toString() ?? ''),\n ),\n ),\n ),\n const SizedBox(height: 24),\n Text('Name: ${user?.name}'),\n const SizedBox(height: 48),\n ElevatedButton(\n onPressed: () async {\n await logoutAction();\n },\n child: const Text('Logout'),\n ),\n ],\n );\n }\n}\n// 👆 New code\n```\n\nThis widget defines a view that displays user profile information once the user has logged in. It also displays a logout button.\n\nLocate the `Login Widget` section and create the following widget:\n\n```dart \n/// -----------------------------------\n/// Login Widget\n/// -----------------------------------\n\n// 👇 New code\nclass Login extends StatelessWidget {\n final Future\u003cvoid\u003e Function() loginAction;\n final String loginError;\n\n const Login(this.loginAction, this.loginError, {final Key? key}) : super(key: key);\n\n @override\n Widget build(BuildContext context) {\n return Column(\n mainAxisAlignment: MainAxisAlignment.center,\n children: \u003cWidget\u003e[\n ElevatedButton(\n onPressed: () async {\n await loginAction();\n },\n child: const Text('Login'),\n ),\n Text(loginError ?? ''),\n ],\n );\n }\n}\n// 👆 New code\n```\n\nThis widget defines a view that your app shows to users who have not been authenticated yet by Auth0. It displays a login button so that they can start the authentication process.\n\n## Set Up Auth0\n\nAuth0 is an Identity-as-a-Service (IDaaS) platform that provides developers with features such as [Social](https://auth0.com/learn/social-login/) and [Passwordless Login](https://auth0.com/passwordless), among others, to ease online identity management.\n\nTo integrate Auth0 into your Flutter app, you need an Auth0 account. If you have an existing account, you can use it. If you don't, \u003ca href=\"https://a0.to/blog_signup\" data-amp-replace=\"CLIENT_ID\" data-amp-addparams=\"anonId=CLIENT_ID(cid-scope-cookie-fallback-name)\"\u003eclick here to create a FREE account\u003c/a\u003e.\n\nAfter creating an Auth0 account, follow the steps below to set up an application:\n\n* Go to the [Applications](https://manage.auth0.com/#/applications) section of your dashboard.\n* Click on the \"Create Application\" button.\n* Enter a name for your application (e.g., \"Flutter Application\").\n* Finally, select **Native** as the application type and click the Create button.\n\n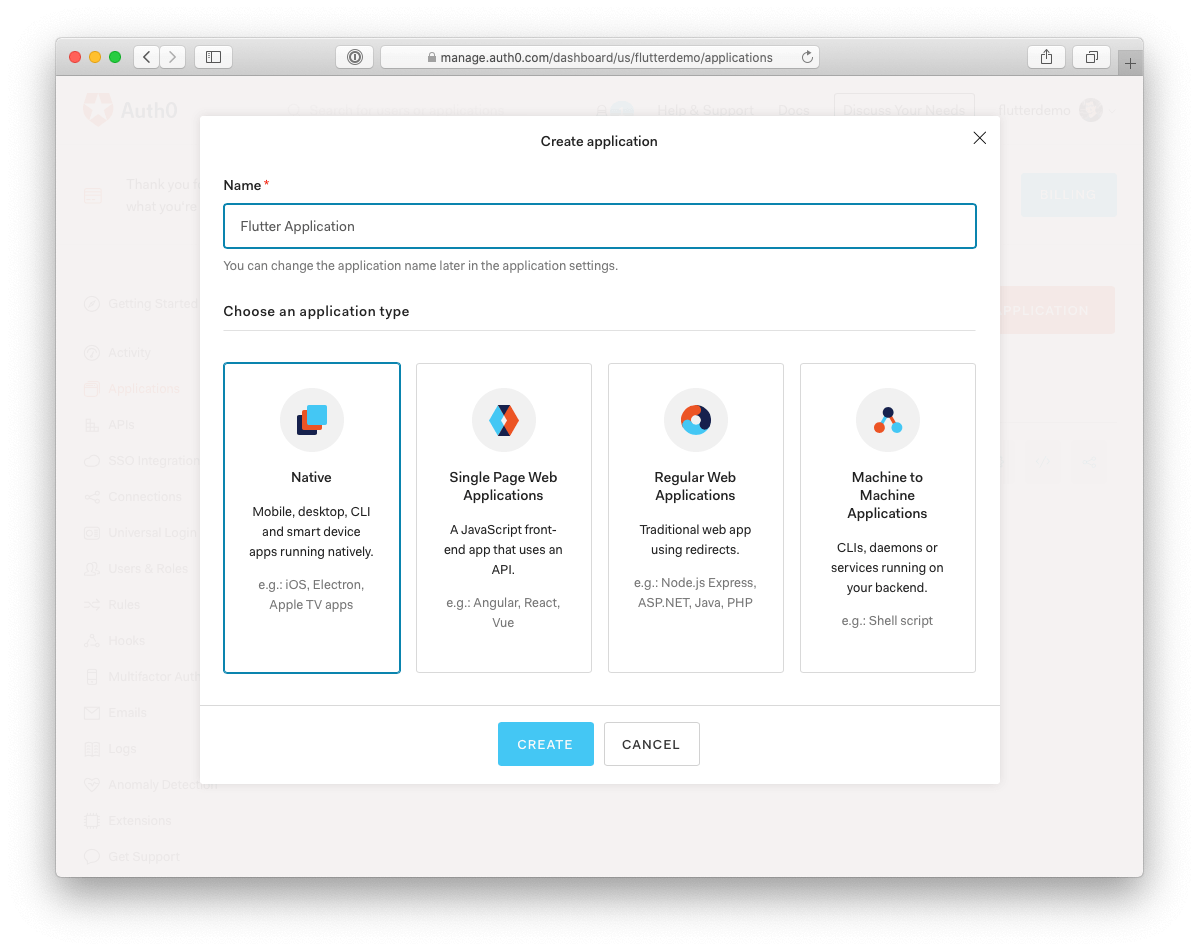\n\nYour application should have at least one enabled Connection. Click on the \"Connections\" tab on your application page and switch on any database or social identity provider (e.g., Google).\n\n\n\nFinally, we need to set the allow callback and logout URLs. For our example application, we will be using the following values:\n\n* Android: `SCHEME://YOUR_DOMAIN/android/YOUR_PACKAGE_NAME/callback`\n* iOS: `YOUR_BUNDLE_ID://YOUR_DOMAIN/ios/YOUR_BUNDLE_ID/callback`\n\nIn our case:\n\n * The Android scheme is `flutterdemo`, and the package name is `com.auth0.flutterdemo`\n * The iOS bundle ID is `com.auth0.flutterdemo`.\n\nTo set them up, navigate to the \"Settings\" tab on your application page and set your *Allowed Callback URLs* and *Allowed Logout URLs* for Android and iOS in the **Application URIs** section. Since you need to add both values for iOS and Android, separate each with a `,`.\n\nHere is how it should look in your Application settings page:\n\n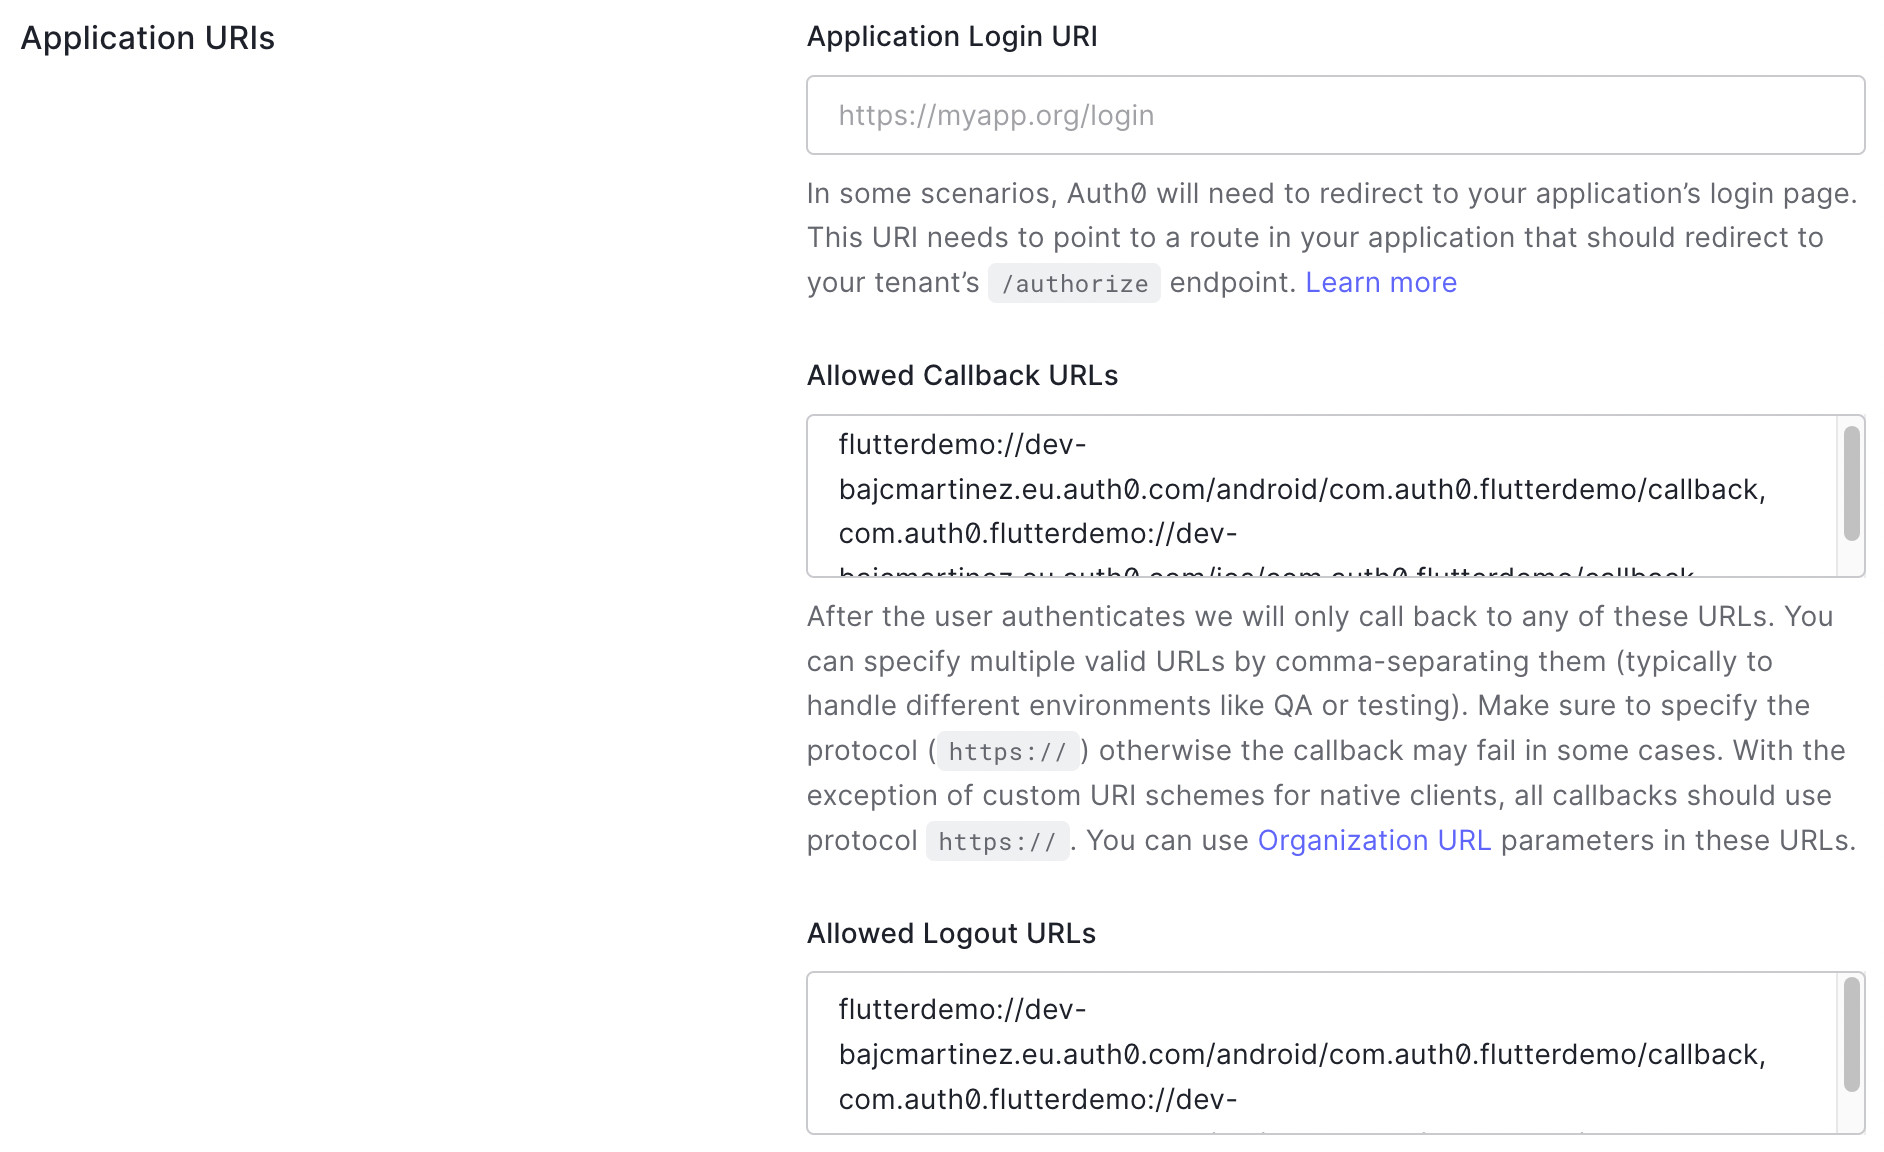\n\nOnce you set the callback and logout URL value, scroll to the bottom of the page and click on the \"Save Changes\" button. You should receive a confirmation message stating that your changes have been saved.\n\n## Integrate Auth0 with Flutter\n\nNow that you set up Auth0, you can write the code for the login and logout actions and connect all the widgets and functions to the main application widget so that at the end of this section, you'll have a running flutter application.\n\n### Add user login with `loginAction`\n\nNext, we'll create a function `loginAction` that will trigger the [Auth0 universal login screen](https://auth0.com/docs/authenticate/login/auth0-universal-login) for the user to authenticate in your app.\n\nImplement a `loginAction()` inside the `AppState` class method as follows:\n\n```dart \n/// -----------------------------------\n/// External Packages \n/// -----------------------------------\n\nimport 'package:flutter/material.dart';\n\nimport 'package:auth0_flutter/auth0_flutter.dart'; // 👈 New code\n\n...\n\n// 👇 New code\nFuture\u003cvoid\u003e loginAction() async {\n setState(() {\n isBusy = true;\n errorMessage = '';\n });\n\n try {\n final Credentials credentials = await auth0.webAuthentication(scheme: appScheme).login();\n\n setState(() {\n isBusy = false;\n _credentials = credentials;\n });\n } on Exception catch (e, s) {\n debugPrint('login error: $e - stack: $s');\n\n setState(() {\n isBusy = false;\n errorMessage = e.toString();\n });\n }\n}\n// 👆 New code\n```\n\nThe `loginAction` method is pretty straightforward as it makes use of the Auth0 SDK to initiate the login flow. In addition, you set up some flow control variables to show indicators to the user when things are loading or when errors occur (for example, if the user cancels the authentication flow).\n\n\u003e In a future article, we'll show you how to configure Auth0 to call third-party APIs from Flutter applications.\n\nIn this section of code, we introduce a new variable, `appScheme`, which wasn't mentioned before. So before we continue, let's declare that globally in the `main.dart` file.\n\nIt is important that the value assigned to this variable reflects the same scheme we defined when we configured the Android platform.\n\nAt the beginning of the `main.dart` file, add the following line of code:\n\n```dart\n/// -----------------------------------\n/// External Packages \n/// -----------------------------------\n\nimport 'package:flutter/material.dart';\n\nimport 'package:auth0_flutter/auth0_flutter.dart';\n\nconst appScheme = 'flutterdemo'; // 👈 New code\n```\n\n### Add user logout with `logoutAction`\n\nLogout is simply implemented as follows:\n\n```dart \n\n// 👇 New code\nFuture\u003cvoid\u003e logoutAction() async {\n await auth0.webAuthentication(scheme: appScheme).logout();\n\n setState(() {\n _credentials = null;\n });\n}\n// 👆 New code\n```\n\nThe `logoutAction()` method first removes the session from Auth0, and then it removes the `_credentials` from the state.\n\n\u003e It is important to note that the `logout()` method from the Auth0 SDK will remove the session from the authorization server (AS), so the next time to try to login, you'll be prompted to enter your credentials once more.\n\n### Render the user interface conditionally in `build`\n\nBefore we can start rendering our final UI, we need to declare a few more state properties and initialize them.\n\nFor that, extend your `_MyAppState` class as follows:\n\n```dart\nclass _MyAppState extends State\u003cMyApp\u003e {\n // 👇 New code\n Credentials? _credentials;\n late Auth0 auth0;\n // 👆 New code\n \n ...\n \n // 👇 New code\n void initState() {\n super.initState();\n\n auth0 = Auth0('{domain}', '{clientId}');\n errorMessage = '';\n }\n // 👆 New code\n ...\n}\n```\n\nOnce again, in the code snippet above, you'll have to replace the placeholders for the Auth0 domain and client ID, which can be obtained from the [Auth0 dashboard](https://manage.auth0.com/#/applications).\n\n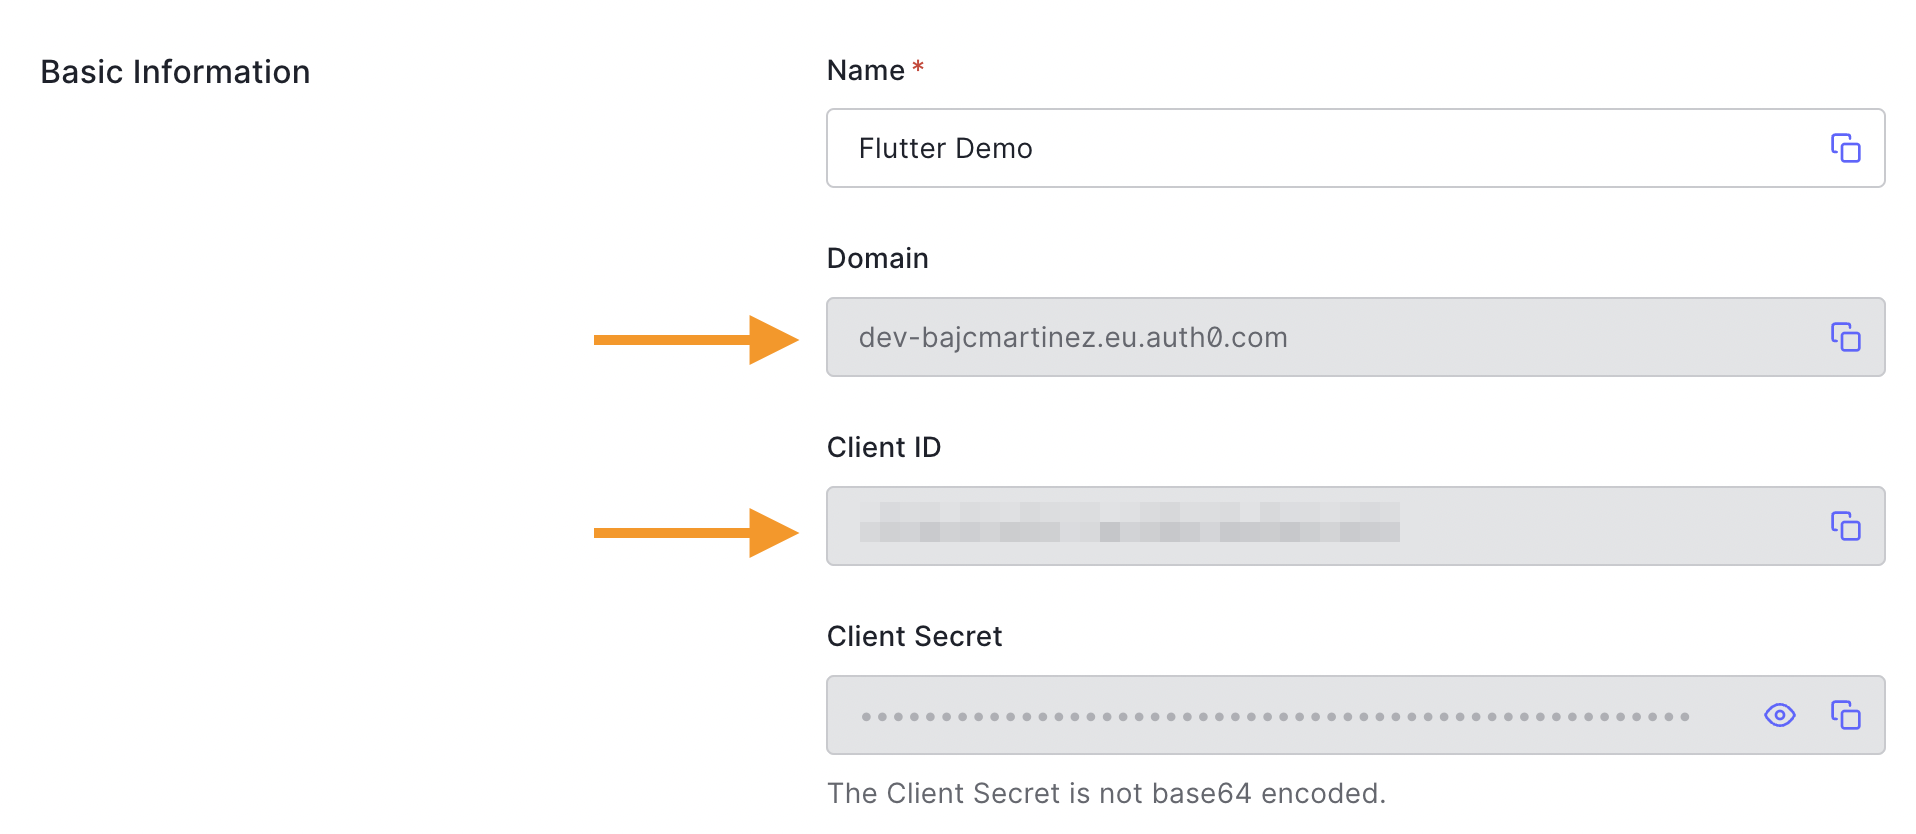\n\nFinally, we can update the build method to display either a processing indicator if things are loading or the Profile/Login widget accordingly.\n\n```dart \n @override\n Widget build(BuildContext context) {\n return MaterialApp(\n title: 'Auth0 Demo',\n home: Scaffold(\n appBar: AppBar(\n title: const Text('Auth0 Demo'),\n ),\n body: Center(\n child: isBusy\n ? const CircularProgressIndicator()\n : _credentials != null\n ? Profile(logoutAction, _credentials?.user)\n : Login(loginAction, errorMessage),\n ), // 👈 Updated code\n ),\n );\n }\n```\n\n\u003cinclude src=\"tutorial/FeedbackButton\" communityTopic=\"get-started-with-flutter-authentication/45986\"/\u003e\n\n## Test the Final Application\n\nWell done on getting to the final stage. If you have successfully followed the steps so far, you should see a login screen similar to this one in your emulator:\n\n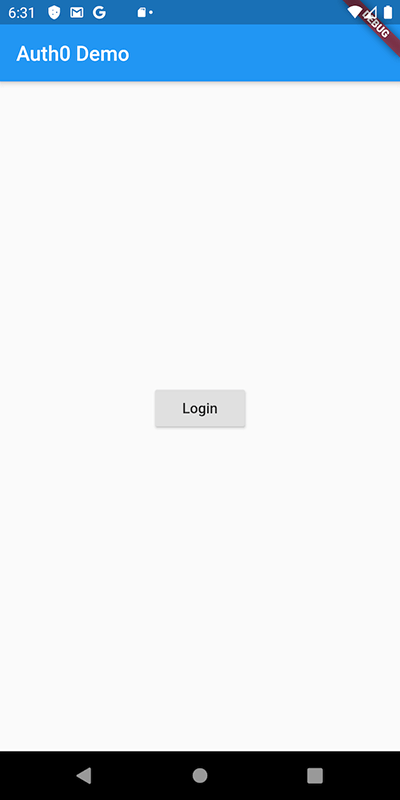\n\nGo ahead and tap the \"Login\" button. Note that in iOS, a consent prompt comes up to notify you that the application intends to use the system browser SSO to process the login:\n\n\n\n\u003e The iOS prompt is an expected part of the [`ASWebAuthenticationSession`](https://developer.apple.com/documentation/authenticationservices/aswebauthenticationsession) implementation. \n \nThat should take you to the Auth0 Universal Login page in the system browser:\n\n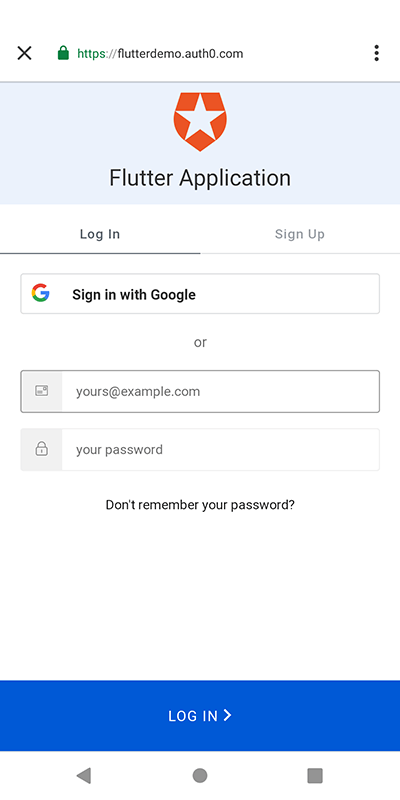\n\nOn this screen, either enter your credentials or click \"Sign in with Google\". Either way, once you successfully log in, the profile screen renders:\n\n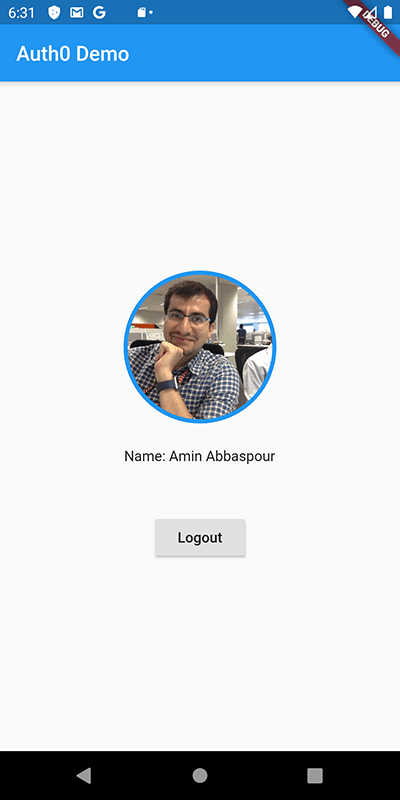\n\n\u003e You can create new users in your tenant directly by using the [\"Users\" section of the Auth0 Dashboard](https://manage.auth0.com/#/users)\n\nTapping the \"Logout\" button should take you back to the initial login screen.\n\nCongratulations. You did it! \n\n## Conclusion and Recommendations\n\nIn this post, you learned how to secure a Flutter application with Auth0 using readily available OSS libraries. It didn't take you more than a couple of lines to connect and secure your application.\n\nThe article is intentionally simple to cover the basic flow. In a future article, we'll cover how to secure multi-page apps as well as define and call back-end APIs from your Flutter application.\n\n\u003cinclude src=\"tutorial/FeedbackButton\" communityTopic=\"get-started-with-flutter-authentication/45986\"/\u003e","readTime":14,"formattedDate":"Jan 30, 2023"},{"path":"ultimate-guide-nextjs-authentication-auth0","title":"The Ultimate Guide to Next.js Authentication with Auth0","heroImage":{"url":"https://images.ctfassets.net/23aumh6u8s0i/3jY4eCzPqbJ8bP7RX8SnTe/d6252025eff38698a5ed4ffdbd02f580/nextjs_hero","size":{"width":1176,"height":1056}},"category":["Developers","Deep Dive","Next.js"],"authors":[{"metadata":{"tags":[],"concepts":[]},"sys":{"space":{"sys":{"type":"Link","linkType":"Space","id":"23aumh6u8s0i"}},"id":"6V22yBqmuKKtjWGuzj2OWP","type":"Entry","createdAt":"2021-03-22T08:21:21.754Z","updatedAt":"2021-03-22T08:40:54.035Z","environment":{"sys":{"id":"master","type":"Link","linkType":"Environment"}},"publishedVersion":3,"revision":2,"contentType":{"sys":{"type":"Link","linkType":"ContentType","id":"author"}},"locale":"en-US"},"fields":{"path":"sandrino-di-mattia","name":"Sandrino Di Mattia","avatar":{"metadata":{"tags":[],"concepts":[]},"sys":{"space":{"sys":{"type":"Link","linkType":"Space","id":"23aumh6u8s0i"}},"id":"1NwxU9oEurXqJGTxi5NpLm","type":"Asset","createdAt":"2021-03-22T08:40:53.038Z","updatedAt":"2021-03-22T08:40:53.038Z","environment":{"sys":{"id":"master","type":"Link","linkType":"Environment"}},"publishedVersion":2,"revision":1,"locale":"en-US"},"fields":{"title":"sandrino-di-mattia","description":"sandrino-di-mattia avatar","file":{"url":"//images.ctfassets.net/23aumh6u8s0i/1NwxU9oEurXqJGTxi5NpLm/32221a26d939563f377086aaa81adcfb/sandrino-di-mattia","details":{"size":72506,"image":{"width":200,"height":200}},"fileName":"sandrino-di-mattia","contentType":"image/png"}}},"lastUpdatedBy":"Unknown during the migration","email":"sandrino@auth0.com","twitter":"https://twitter.com/sandrinodm","github":"https://github.com/sandrinodimattia","linkedin":"https://be.linkedin.com/in/sandrino","isPopular":null,"personalWebsite":null,"type":"Auth0 Employee","jobTitle":"Principal Architect","description":null}},{"metadata":{"tags":[],"concepts":[]},"sys":{"space":{"sys":{"type":"Link","linkType":"Space","id":"23aumh6u8s0i"}},"id":"7qC8LJD80VSx1qYcSdQ1Zh","type":"Entry","createdAt":"2021-08-23T12:59:46.069Z","updatedAt":"2025-01-08T14:00:38.100Z","environment":{"sys":{"id":"master","type":"Link","linkType":"Environment"}},"publishedVersion":42,"revision":6,"contentType":{"sys":{"type":"Link","linkType":"ContentType","id":"author"}},"locale":"en-US"},"fields":{"path":"juan-cruz-martinez","name":"Juan Cruz Martinez","avatar":{"metadata":{"tags":[{"sys":{"type":"Link","linkType":"Tag","id":"user"}}],"concepts":[]},"sys":{"space":{"sys":{"type":"Link","linkType":"Space","id":"23aumh6u8s0i"}},"id":"5b3YvfAb53h2I5U6uanww4","type":"Asset","createdAt":"2022-07-07T09:23:40.589Z","updatedAt":"2022-07-07T09:23:56.422Z","environment":{"sys":{"id":"master","type":"Link","linkType":"Environment"}},"publishedVersion":10,"revision":5,"locale":"en-US"},"fields":{"title":"jcm","description":"Juan Cruz Martinez","file":{"url":"//images.ctfassets.net/23aumh6u8s0i/5b3YvfAb53h2I5U6uanww4/f1dfa0e19f15f5df8eacd53f78a813f6/jcm.jpeg","details":{"size":29371,"image":{"width":400,"height":400}},"fileName":"jcm.jpeg","contentType":"image/jpeg"}}},"lastUpdatedBy":"Juan Cruz Martinez","email":"juan.martinez@okta.com","twitter":"https://twitter.com/bajcmartinez","github":"https://github.com/bajcmartinez","linkedin":"https://www.linkedin.com/in/bajcmartinez/","isPopular":true,"personalWebsite":"https://jcmartinez.dev/","type":"Auth0 Employee","jobTitle":"Staff Developer Advocate","description":"I stream, blog, and make youtube videos about tech stuff. I love coding, I love AI, and I love building stuff!"}}],"redirectTo":null,"isHiddenFromBlogPostGrid":null,"lang":"en","tags":["next.js","react","auth0","authentication","security","javascript","ssr","server-side-rendering","sdk"],"dateCreated":"2019-10-10T08:00","dateLastUpdated":"2023-03-09","postContent":"[Next.js](https://nextjs.org) is a minimalist framework for building single-page JavaScript applications in a simple yet customizable way. The framework focuses on performance and out-of-the-box support for Server-Side Rendering (SSR). The [Next.js showcase](https://nextjs.org/showcase) confirms the success of the framework, which companies big and small use to build their applications, including Netflix, Scale.ai, Marvel, Jet, and even [Auth0](https://auth0.com/developers/).\n\n\u003e If you are new to Next.js and want to learn how to use this framework to build full-stack Jamstack applications, check out the video playlist below by [James Quick](https://twitter.com/jamesqquick):\n\n\u003cAmpContent\u003e\n\u003camp-youtube\n data-videoid=\"1rgeO_EbSGg\"\n layout=\"responsive\"\n width=\"480\" height=\"270\"\u003e\n\u003c/amp-youtube\u003e\n\n\u003c/AmpContent\u003e\n\n\u003cNonAmpContent\u003e\n\n\u003ciframe width=\"560\" height=\"315\" src=\"https://www.youtube.com/embed/videoseries?list=PLZ14qQz3cfJJOcbbVi_nVEPqC2334LLMz\" frameborder=\"0\" allow=\"accelerometer; autoplay; clipboard-write; encrypted-media; gyroscope; picture-in-picture\" allowfullscreen\u003e\u003c/iframe\u003e\n\n\u003c/NonAmpContent\u003e\n\n## New Tools, New Challenges\n\nProviding a solution to support authentication in Next.js was [one of the most requested features](https://github.com/vercel/next.js/issues?q=is%3Aissue+sort%3Acomments-desc+is%3Aclosed) in the platform. But why is that? \n\nCan't we use any of the tools that we've been using for so long in React and Node.js, such as [`passport`](https://github.com/auth0/passport-auth0) or [`auth0.js`](https://github.com/auth0/auth0.js)? Or new ones such as the [Auth0 React SDK](https://auth0.com/blog/complete-guide-to-react-user-authentication/) or [Express OpenID Connect](https://github.com/auth0/express-openid-connect)?\n\nNext.js blurs the line between frontend and backend, making the existing ecosystem suboptimal if you want to use Next.js to its full potential.\n\nOne example is [Passport](http://www.passportjs.org/), which depends on the availability of Express. And while you could technically use Express in your Next.js application, it will make all performance improvements fade away. If you want to optimize for fast cold starts and improve the reliability and scalability of your application, you need to shift to the [serverless deployment model](https://nextjs.org/docs#serverless-deployment).\n\nThere are different ways to build and deploy Next.js applications. In this blog post, we'll explore those Next.js use cases, explain their architecture, and define the strategy you can use to implement authentication for each one.\n\n## What Does Authentication Mean For Next.js?\n\nWhen you're building a Next.js application, you may need authentication in the following cases:\n\n- When accessing a page: \"My Invoices\"\n\n- When accessing a Next.js API route: `/api/my/invoices`\n\n- When your application calls an API hosted outside of your Next.js application on behalf of the user: from `www.mycompany.com` to `billing.mycompany.com/api`\n\nNow that we understand where and when our application might require authentication let's explore the authentication strategies you can implement for different Next.js deployment models.\n\n## Next.js Static Site Approach\n\nNext.js allows you to generate [a standalone static application](https://nextjs.org/docs/advanced-features/static-html-export) without needing a Node.js server. You can run the `next build \u0026\u0026 next export` command to generate HTML files for each page that supports it. You can use this generated output to deploy your site to any static hosting service, such as [Vercel](https://vercel.com/), [Amazon S3](https://aws.amazon.com/s3/), or [Netlify](https://www.netlify.com).\n\n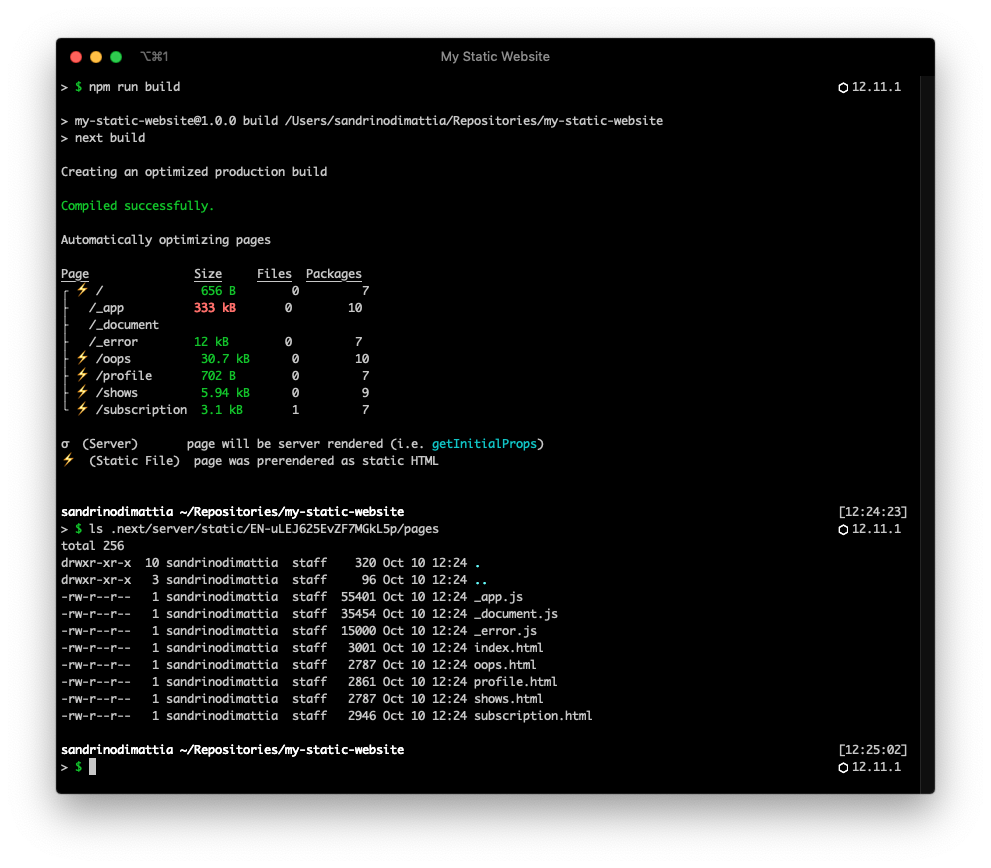\n\nYou can use this technique to generate complete websites as static sites, like a company public front page, or when creating an \"admin dashboard\". The generated HTML could be the shell of your application \u0026mdash; think of this shell as your application's header and footer. The [Vercel dashboard](https://vercel.com/dashboard) is one of the best examples out there of how this could look:\n\n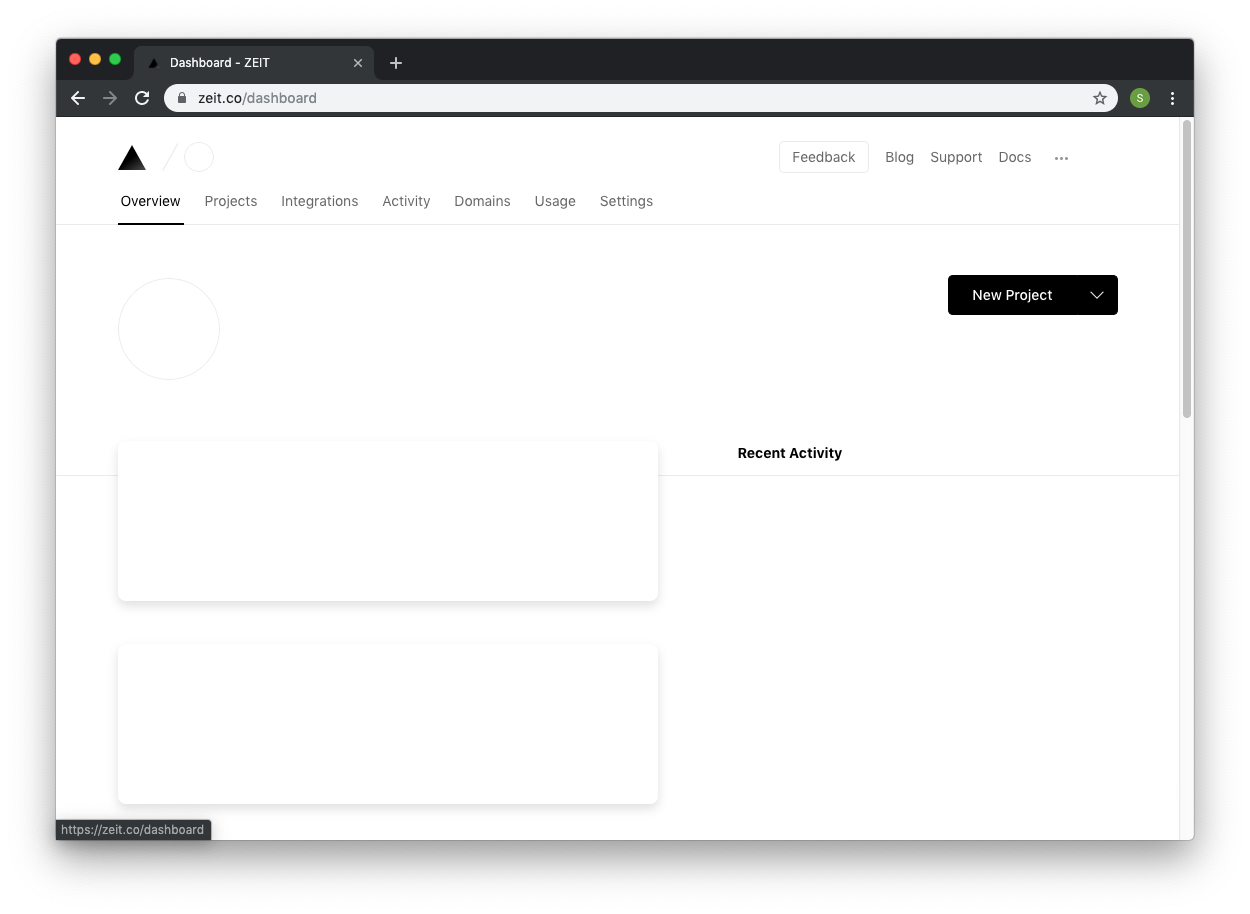\n\nOnce the \"shell\" has been served, the client side will call the necessary APIs (carrying the user information), fetch user-specific content, and update the page:\n\n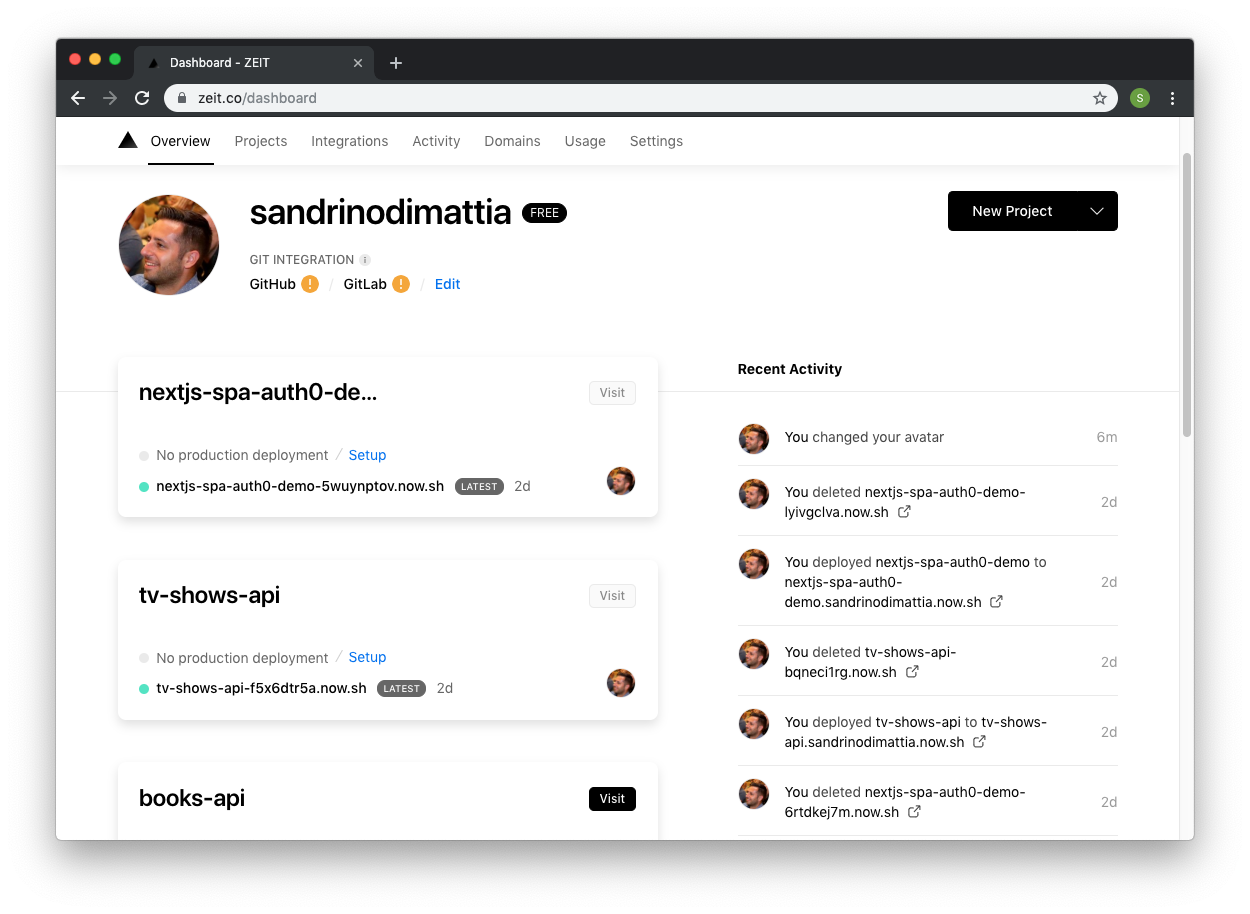\n\nThis model has several advantages when it comes to hosting. Static hosting sites (like [Vercel](https://vercel.com/home), [Amazon S3](https://aws.amazon.com/s3/), [Azure Blob Storage](https://azure.microsoft.com/en-us/services/storage/blobs/), [Netlify](https://www.netlify.com), and others) are battle-tested, inexpensive, but more importantly, they are extremely fast and play well with CDNs.\n\n\n\nOne thing that will be different is how we handle authentication. The model where a server is available can handle the interaction with Auth0 and create a session, but in this model, we don't have a backend. All the work happens on the frontend:\n \n 1. Your static site redirects your users to Auth0 to log in.\n 2. When your users successfully log in, Auth0 redirects them to your static site. \n 3. Your static site performs a code exchange with Auth0 to retrieve the user's `id_token` and `access_token`, which it stores in memory.\n\n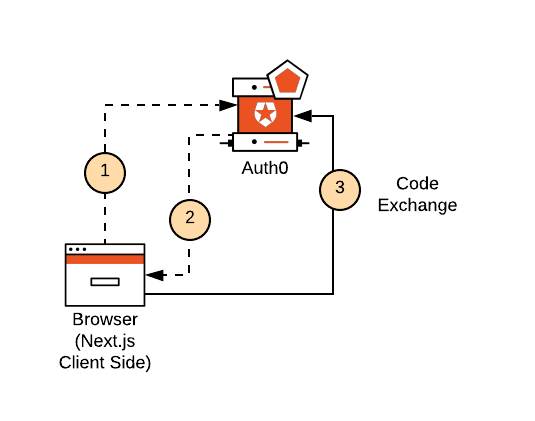\n\nIf your use case requires dynamic content or user-specific content, you will also need to deploy something else, like an API. This API won't run as part of your static hosting site. You'll use a platform like AWS Lambda, Heroku, or Now to deploy it. Your static site (the client-side) will use the `access_token` to make secure calls to that API directly, fetch the dynamic content, and enrich the static page served by the hosting platform.\n\n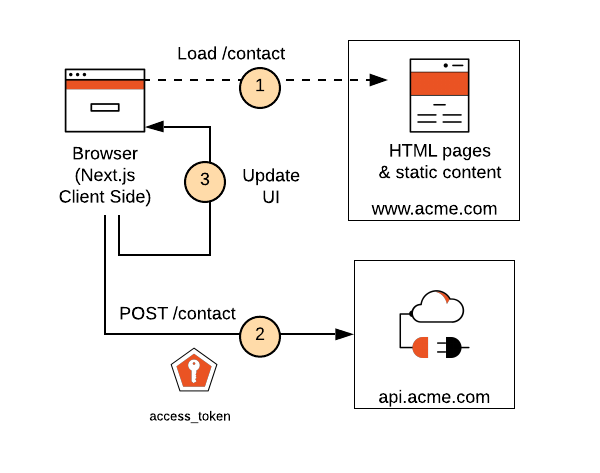\n\nThis architecture is similar to how you can build any single-page application, where the application doesn't have an actual \"backend\" but instead calls one or more APIs. You'll find a variety of examples in the community of how to sign in to this type of application:\n\n- [`auth0-react`](https://github.com/auth0/auth0-react) (using [`auth0-spa-js`](https://github.com/auth0/auth0-spa-js))\n- [`useAuth`](https://github.com/Swizec/useAuth) (using [`auth0.js`](https://github.com/auth0/auth0.js)) \n\n\u003cinclude src=\"SignupCTA\" text=\"Try out the most powerful authentication platform for free.\" linkText=\"Get started →\" /\u003e\n\nWith `auth0-react`, for example, it's as easy as configuring your application like so:\n\n``` javascript \n// pages/_app.jsx\nimport { Auth0Provider } from '@auth0/auth0-react';\n\nexport default class Root extends App {\n render () {\n const { Component, pageProps } = this.props;\n return (\n \u003cAuth0Provider\n domain=\"YOUR_DOMAIN\"\n clientId=\"YOUR_CLIENT_ID\"\n authorizationParams={{\n redirect_uri: window.location.origin\n }}\n \u003e\n \u003cComponent {...pageProps} /\u003e\n \u003c/Auth0Provider\u003e\n );\n }\n}\n```\n\nYou can then use [React Hooks](https://reactjs.org/docs/hooks-intro.html) to retrieve the user profile information and request an access token to make secure calls to your APIs. Your Next.js static site sends the `access_token` in the authorization headers of your API calls, which the following example does through the [useSWR](https://github.com/vercel/swr) hook:\n\n``` javascript \nimport { useAuth0 } from '@auth0/auth0-react';\nimport useSWR from 'swr';\n\nexport default function MyShows() {\n const {\n user,\n isAuthenticated,\n isLoading,\n getAccessTokenSilently,\n } = useAuth0();\n\n const { data, error } = useSWR(\n isLoading || !isAuthenticated ? null : '/api/my/shows',\n async (url) =\u003e {\n const accessToken = await getAccessTokenSilently({\n authorizationParams: {\n audience: 'https://api/tv-shows',\n scope: 'read:shows',\n },\n });\n const res = await fetch(url, {\n headers: {\n authorization: `Bearer ${accessToken}`,\n },\n });\n return res.json();\n }\n );\n\n if (isLoading) {\n return \u003cdiv\u003eLoading your user information...\u003c/div\u003e;\n }\n\n if (!isAuthenticated) {\n return \u003cdiv\u003eYou must first sign in to access your subscriptions.\u003c/div\u003e;\n }\n\n if (error) {\n return \u003cdiv\u003eThere was an error loading your subscriptions.\u003c/div\u003e;\n }\n\n if (!data) {\n return (\n \u003cdiv\u003e\n \u003ch1\u003eSubscriptions for {user.email}\u003c/h1\u003e\n \u003cdiv\u003eLoading your subscriptions ...\u003c/div\u003e\n \u003c/div\u003e\n );\n }\n return (\n \u003cdiv\u003e\n \u003ch1\u003eSubscriptions for {user.email}\u003c/h1\u003e\n \u003cdiv\u003eYou have subscribed to a total of {data.length} shows...\u003c/div\u003e\n \u003c/div\u003e\n );\n}\n```\n\n\u003e Visit the [Next.js Practical Introduction](https://auth0.com/blog/next-js-practical-introduction-for-react-developers-part-1/) to learn how to use the Next.js framework to build React applications.\n\n### What exactly happens behind the curtains here?\n\nWhen using `auth0-spa-js` the user will sign in using the [Authorization Code Grant with PKCE](https://auth0.com/docs/flows/concepts/auth-code-pkce). At a high level, your Next.js application redirects the user to Auth0 to log in. Auth0 will handle all the required authentication and authorization logic (sign-up, sign-in, MFA, consent, and so on). After users complete the authentication process with Auth0, Auth0 redirects them to your application with an **Authorization Code** in the query string.\n\nThe client side will exchange that code for an `id_token` and optionally an `access_token` **(1,2)**. You can use the `access_token` to call your API. When the `access_token` expires, the same flow will happen again under the covers, using an `\u003ciframe\u003e`. This \"silent authentication\" approach will keep working as long as the user is logged in \u0026mdash; as long as the user has a session in Auth0. When the user's session in Auth0 expires or a sign-out takes place, this call will fail, and the user will be required to log in again.\n\n\n\n## Next.js Serverless Deployment Model\n\nWhere Next.js shines is in the [serverless deployment model](https://nextjs.org/docs#serverless-deployment), where you deploy all pages and API routes as separate serverless functions implemented using Vercel or AWS Lambda, for example.\n\nIn this model, you don't have a full-blown web framework running (like Express.js), but instead, the runtime will execute functions by passing them a request and a response object (`(req, res) =\u003e { }`). This is why we can't use traditional web frameworks (like [Express.js](https://expressjs.com/)) or any of the building blocks they offer for authenticating users in this model (like [Passport.js](http://www.passportjs.org/)) and creating sessions (`express-sessions`).\n\nThe following diagram illustrates how this model works: Next.js pages and API routes run as separate serverless functions. When the browser tries to access the **TV Shows** page **(1)**, a function will take care of rendering and serving the page, effectively performing server-side rendering. This function will also call any APIs the page needs to fetch the necessary data **(2)**.\n\n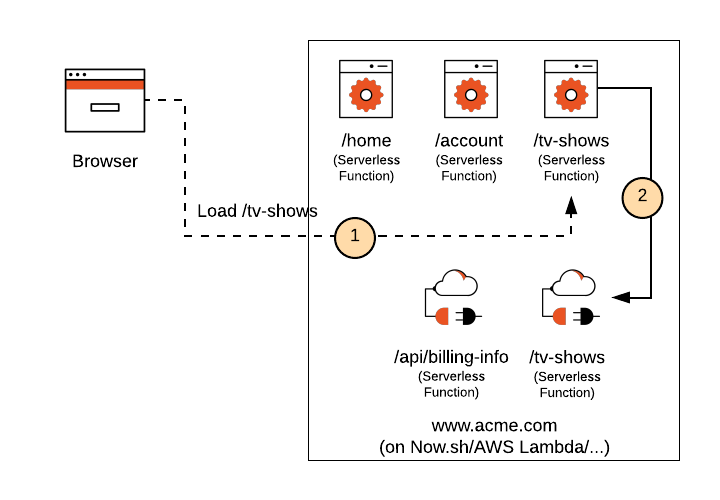\n\nIf the entire site has already been loaded, the rendering happens on the client whenever you visit another page. At that point, the client application makes all subsequent API calls directly. As you can see, this is where the line between the frontend and backend layers starts to become blurry.\n\n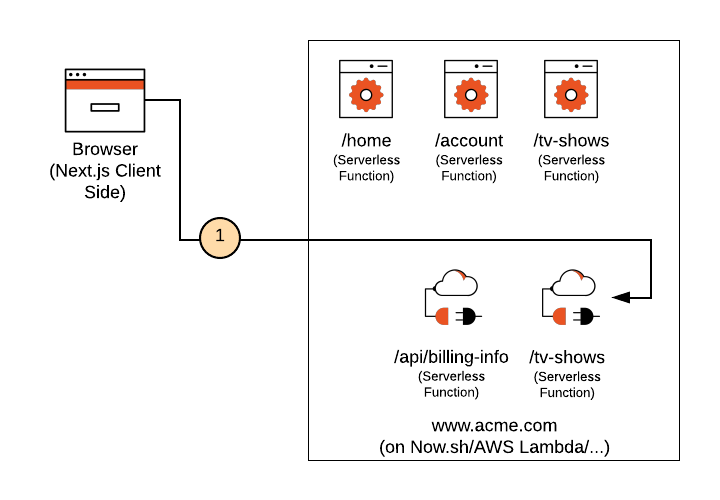\n\nBefore we go into any specifics, it's important to call out that there are two specific flavors of the serverless model when it comes to authentication, depending on where you need the user to be available.\n\n### Serverless with the user on the frontend\n\nThe diagram below shows one flavor, which is very similar to the **Static Site**. You will execute these calls in a serverless function whenever you need to render a page on the server side or call an API route. In this model, authentication takes place on the client side:\n\n 1. The client application redirects the user to Auth0.\n 2. When users log in successfully, Auth0 redirects them to the client application.\n 3. The client application completes the code exchange with Auth0 and retrieves the user's `id_token` and `access_token`, which it stores in memory. \n\n\n\nAny page rendered by the serverless function can only return content that all users can access without needing any form of authentication. When your client application loads the page, it can execute some logic to fetch user-specific content by calling API routes or calling other APIs.\n\n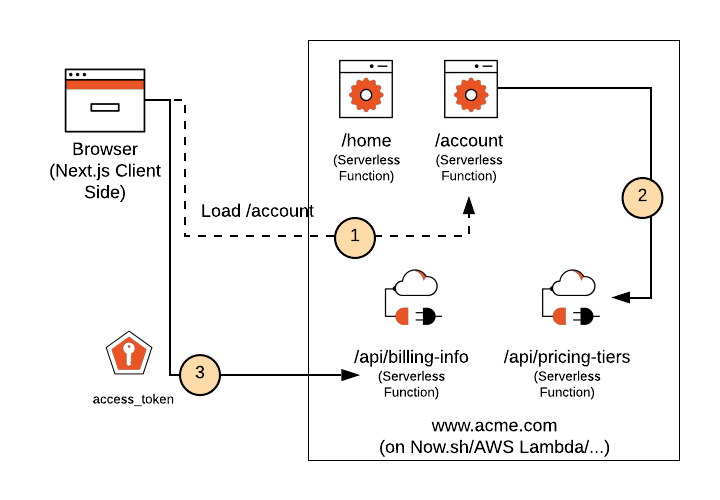\n\nIn the diagram above, you can see an example of how this could work:\n\n1. A serverless function (SSR) can render the `/account` page.\n2. In turn, this serverless function also calls the `/api/pricing-tiers` API route, which simply returns the different subscription types available in the application (for example, Free, Developer, Enterprise). This is public information, so authentication is not required to access the pricing data.\n3. When the client side is ready, it can now call the `/api/billing-info` API route and provide the user's access token. The client side can then render content that is specific to the user. Accessing user billing information requires authentication.\n\nOnly the client-side and the API routes are aware of the user, while the server-side rendering of pages could only render public content, which is perfectly fine for SEO purposes.\n\n### Serverless with the user on the backend\n\nThe second flavor in this model involves a serverless function that needs the user when rendering the page. When that happens, you can't just rely on client-side authentication.\n\n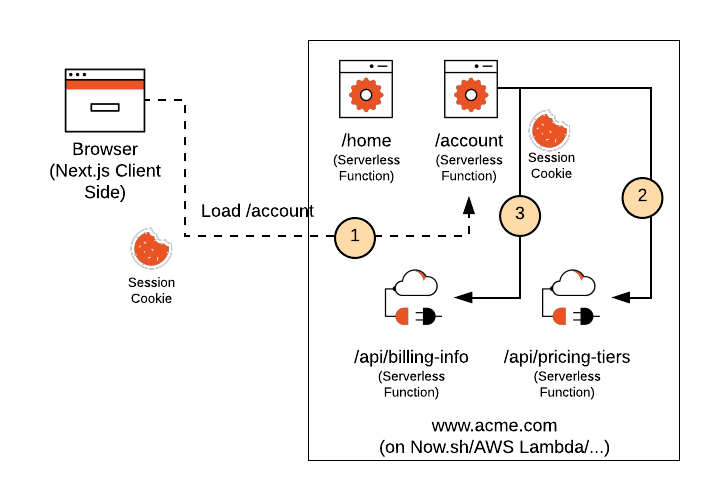\n\nThis diagram is similar to the one from the frontend model, except for a few subtle but important differences:\n\n1. A serverless function (SSR) can render the `/account` page, but the browser sends a session cookie to it.\n3. This serverless function can call `/api/billing-info` by forwarding the session cookie. The serverless function can now render user content.\n3. This serverless function can also call the `/api/pricing-tiers` API route (nothing changes here from the frontend model).\n\nIn this example, the server side can render the user's account page completely.\n\nYou'll also need to consider the case where the site is already fully loaded, and the user navigates to the account page. In that case, the client side can call the endpoints directly, and the cookie will automatically be provided to the API route:\n\n1. The client application can call an API route that requires authentication (because the browser will automatically provide the session cookie).\n2. The client application can also call API routes that don't require authentication.\n\n\n\nTo accommodate this use case, we've published [`@auth0/nextjs-auth0`](https://github.com/auth0/nextjs-auth0), which takes care of authentication in the serverless deployment model using the [Authorization Code Grant](https://auth0.com/docs/flows/concepts/auth-code). This package also creates a session for the authenticated user using an [`HttpOnly` cookie](https://www.owasp.org/index.php/HttpOnly), which mitigates the [most common XSS attack](https://auth0.com/docs/security/common-threats).\n\nTo use the library, you'll start by defining some environment variables in a `.env.local` file in the root of your application:\n\n``` shell \n# A long secret value used to encrypt the session cookie\nAUTH0_SECRET=some-very-very-very-very-very-very-very-long-secret\n# The base url of your application\nAUTH0_BASE_URL=http://localhost:3000\n# The url of your Auth0 tenant domain\nAUTH0_ISSUER_BASE_URL=https://YOUR_AUTH0_DOMAIN.auth0.com\n# Your Auth0 application's Client ID\nAUTH0_CLIENT_ID=YOUR_AUTH0_CLIENT_ID\n# Your Auth0 application's Client Secret\nAUTH0_CLIENT_SECRET=YOUR_AUTH0_CLIENT_SECRET\n```\n\n\u003e Read the [\"Environment Variables\" document](https://nextjs.org/docs/basic-features/environment-variables) for more details about loading environmental variables in Next.js.\n\nYou can execute the following command to generate a suitable string for the session secret easily:\n\n``` bash \nnode -e \"console.log(crypto.randomBytes(32).toString('hex'))\"\n```\n\nThen, create a [Dynamic API Route](https://nextjs.org/docs/api-routes/dynamic-api-routes) handler at `/pages/api/auth/[...auth0].js`.\n\n``` javascript \nimport { handleAuth } from '@auth0/nextjs-auth0';\n\nexport default handleAuth();\n```\n\nThis will create the following urls: `/api/auth/login`, `/api/auth/callback`, `/api/auth/logout`, and `/api/auth/me`.\n\nAnd that's it! You've now setup the server side of your application.\n\nTo setup, the client side, wrap your `pages/_app.js` component in the `UserProvider` component.\n\n``` javascript \n// pages/_app.js\nimport React from 'react';\nimport { UserProvider } from '@auth0/nextjs-auth0/client';\n\nexport default function App({ Component, pageProps }) {\n return (\n \u003cUserProvider\u003e\n \u003cComponent {...pageProps} /\u003e\n \u003c/UserProvider\u003e\n );\n}\n```\n\nNow you can log in, log out, and access the user on the client.\n\n``` javascript \n// pages/index.js\nimport { useUser } from '@auth0/nextjs-auth0/client';\n\nexport default () =\u003e {\n const { user, error, isLoading } = useUser();\n\n if (isLoading) return \u003cdiv\u003eLoading...\u003c/div\u003e;\n if (error) return \u003cdiv\u003e{error.message}\u003c/div\u003e;\n\n if (user) {\n return (\n \u003cdiv\u003e\n Welcome {user.name}! \u003ca href=\"/api/auth/logout\"\u003eLogout\u003c/a\u003e\n \u003c/div\u003e\n );\n }\n\n return \u003ca href=\"/api/auth/login\"\u003eLogin\u003c/a\u003e;\n};\n```\n\nNote that authentication takes place on the server in this model, meaning that the client isn't aware that the user is logged in. The `useUser` hook makes it aware by accessing that information in the initial state or through the `/api/auth/profile` endpoint, but it won't expose any `id_token` or `access_token` to the client. That information remains on the server side.\n\n### What exactly happens behind the curtains here?\n\nWhen using `nextjs-auth0`, the user logs in using the [Authorization Code Grant](https://auth0.com/docs/flows/concepts/auth-code). At a high level, the client application redirects the user to Auth0 **(1,2)**, who handles all the required authentication and authorization logic (sign-up, sign-in, MFA, consent, and so on). Once users log in, Auth0 redirects them to your application with an **Authorization Code** in the query string **(3)**.\n\n\n\nThe server side (or better, the serverless function) then exchanges **(4)** that code for an `id_token` and optionally an `access_token` and `refresh_token`. After the library validates the `id_token`, it creates a session and stores it in an encrypted cookie **(5)**. Each time you render a page on the server side or you call an API route, you send the session cookie to the serverless functions, which can then access the session and any relevant user information.\n\n### Calling an external API\n\nThe pages and API routes can all access the user's session, but that is not the case for external APIs, typically hosted on other (sub-)domains. When consuming those APIs, you'll need to provide them with an `access_token` to authorize the user to access their protected resources.\n\nWhen you need to call an external API on behalf of the user, you must proxy that call through a Next.js API route. These routes will have access to the user's session, and depending on how the user logged in, that session might contain the user's information. Optionally, the session may also have the following:\n\n - `id_token`\n - `access_token`\n - `refresh_token`\n\n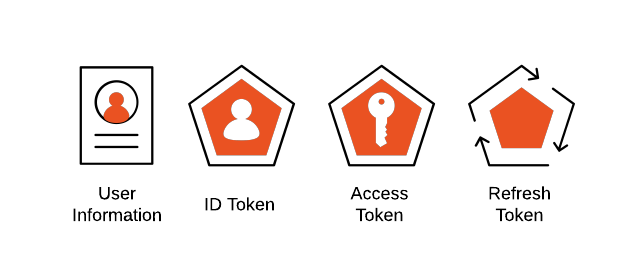\n\nWhen the Next.js API route needs to call an external API on behalf of the user, it can extract the `access_token` from the session and add it to the `Authorization` header of the HTTP call.\n\n\n\nThe following example illustrates how you would create an API route that extracts the `access_token` from the session and then uses it to call a downstream API.\n\n``` js \nimport { getAccessToken, withApiAuthRequired } from '@auth0/nextjs-auth0';\n\nexport default withApiAuthRequired(async function products(req, res) {\n try {\n const { accessToken } = await getAccessToken(req, res);\n const client = new BillingApiClient(accessToken);\n return client.getBillingInfo();\n } catch(error) {\n console.error(error)\n res.status(error.status || 500).end(error.message)\n }\n});\n```\n\nThe biggest difference with the frontend model is that the server will be aware of the user authentication status when rendering pages. As such, the server side won't be limited to loading public data. The server side could also load data specific to the user and render that information.\n\nYou can find a full Auth0 example in the official [Next.js repository](https://github.com/vercel/next.js/tree/canary/examples/auth0).\n\n## The Custom Server Approach\n\nA very common (but legacy) deployment model you'll see with Next.js is where you use a custom server to host the Next.js application. You can implement a [custom server in Next.js](https://nextjs.org/docs#custom-server-and-routing) using something like Express.js. It works like this:\n\n- The custom server accepts the request.\n- The custom server calls the `app.getRequestHandler()` method to get a Next.js request handler.\n- The custom server forwards the request to the Next.js request handler.\n\nWith this approach, the custom server can act as a proxy and process the request before Next.js handles it:\n\n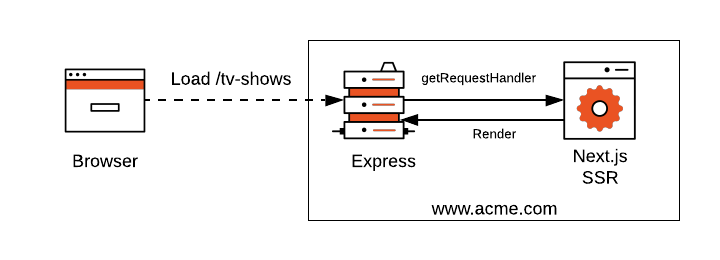\n\nMiddlewares, which run before the Next.js server-side rendering, provide building blocks to your application like:\n\n- Authentication\n- Sessions\n- Enforcing authentication and authorization\n- Rate limiting\n\nAll the building blocks and tools that you can use today with Express.js are available to you in this custom server model. Here's the most basic example of how you would host your Next.js application with Express.js:\n\n``` js \nconst next = require('next');\nconst express = require('express');\n...\n\nconst app = next({ dev });\nconst handle = app.getRequestHandler();\n\napp.prepare()\n .then(() =\u003e {\n const server = express();\n ...\n passport.use(auth0);\n ...\n server.use(passport.initialize());\n server.use(passport.session());\n server.use(myApiRoutes);\n ...\n server.get('*', (req, res) =\u003e {\n return handle(req, res);\n });\n\n server.listen(3000, (err) =\u003e {\n if (err) {\n throw err;\n }\n\n console.log('Listening on http://localhost:3000')\n });\n })\n .catch((ex) =\u003e {\n console.error(ex.stack);\n process.exit(1);\n });\n```\n\nWhen it comes to authenticating users in the custom server model, you can use [Passport.js](http://www.passportjs.org/) (which is by far the most popular framework for authentication in Node.js) in combination with [`passport-auth0`](https://github.com/auth0/passport-auth0). When the user logs in, Passport.js creates a session using [`express-session`](https://www.npmjs.com/package/express-session) and persists it in the browser using an `HttpOnly` cookie.\n\n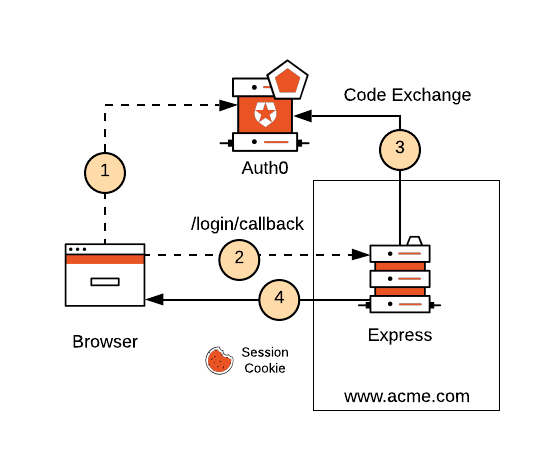\n\nOnce the user has a session, they can access pages or call API endpoints that require authentication using Next.js API routes or traditional Express endpoints. The client application sends the session cookie along with each request, which makes the user information available on the server-side automatically.\n\n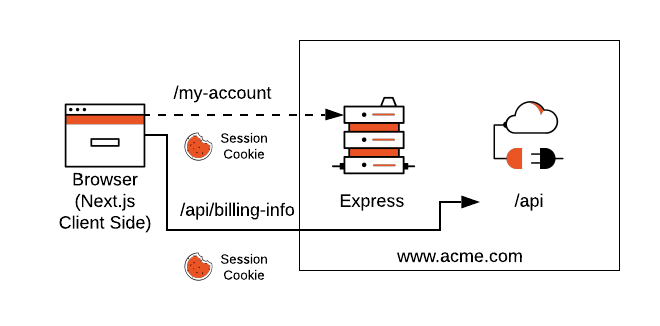\n\nIn this model, you basically [use Node.js and Express to build a regular web application](https://auth0.com/blog/create-a-simple-and-secure-node-express-app/). Authentication, database access, and other features are already a solved problem.\n\n\u003e Visit the [Next.js Authentication Tutorial](https://auth0.com/blog/next-js-authentication-tutorial/) for a complete example of how to create a Next.js application using the custom server model.\n\n### A legacy model?\n\nThe [Next.js docs](https://nextjs.org/docs) no longer list this model because it's the least optimal from a cost and performance point of view:\n\n- You miss out on the advantages of [the serverless deployment model](https://nextjs.org/docs#serverless-deployment), such as distributed points of failure, infinite scalability, and low cost.\n- You can't generate static sites, which could be something you want if you're running a public-facing website. Static sites are fast and inexpensive to host.\n\n## Conclusion\n \nAnd with that, we've covered the different deployment models which exist today for the Next.js framework, and we've explained the best way to authenticate in those models and the reasoning behind it.\n\nIf this tutorial has helped you better decide what to use for your deployment model, let us know in the comments below!\n\n\u003cinclude src=\"asides/AboutAuth0\" /\u003e\n","readTime":17,"formattedDate":"Mar 9, 2023"},{"path":"securing-electron-applications-with-openid-connect-and-oauth-2","title":"Securing Electron Applications with OpenID Connect and OAuth 2.0","heroImage":{"url":"https://images.ctfassets.net/23aumh6u8s0i/13Q1HQyn1oJuJwrn2JBZfC/2ed8c6e9a1f5bc376aabf156629c5e82/electronjs","size":{"width":613,"height":550}},"category":["Developers","Tutorial","Electron"],"authors":[{"metadata":{"tags":[],"concepts":[]},"sys":{"space":{"sys":{"type":"Link","linkType":"Space","id":"23aumh6u8s0i"}},"id":"7qC8LJD80VSx1qYcSdQ1Zh","type":"Entry","createdAt":"2021-08-23T12:59:46.069Z","updatedAt":"2025-01-08T14:00:38.100Z","environment":{"sys":{"id":"master","type":"Link","linkType":"Environment"}},"publishedVersion":42,"revision":6,"contentType":{"sys":{"type":"Link","linkType":"ContentType","id":"author"}},"locale":"en-US"},"fields":{"path":"juan-cruz-martinez","name":"Juan Cruz Martinez","avatar":{"metadata":{"tags":[{"sys":{"type":"Link","linkType":"Tag","id":"user"}}],"concepts":[]},"sys":{"space":{"sys":{"type":"Link","linkType":"Space","id":"23aumh6u8s0i"}},"id":"5b3YvfAb53h2I5U6uanww4","type":"Asset","createdAt":"2022-07-07T09:23:40.589Z","updatedAt":"2022-07-07T09:23:56.422Z","environment":{"sys":{"id":"master","type":"Link","linkType":"Environment"}},"publishedVersion":10,"revision":5,"locale":"en-US"},"fields":{"title":"jcm","description":"Juan Cruz Martinez","file":{"url":"//images.ctfassets.net/23aumh6u8s0i/5b3YvfAb53h2I5U6uanww4/f1dfa0e19f15f5df8eacd53f78a813f6/jcm.jpeg","details":{"size":29371,"image":{"width":400,"height":400}},"fileName":"jcm.jpeg","contentType":"image/jpeg"}}},"lastUpdatedBy":"Juan Cruz Martinez","email":"juan.martinez@okta.com","twitter":"https://twitter.com/bajcmartinez","github":"https://github.com/bajcmartinez","linkedin":"https://www.linkedin.com/in/bajcmartinez/","isPopular":true,"personalWebsite":"https://jcmartinez.dev/","type":"Auth0 Employee","jobTitle":"Staff Developer Advocate","description":"I stream, blog, and make youtube videos about tech stuff. I love coding, I love AI, and I love building stuff!"}},{"metadata":{"tags":[],"concepts":[]},"sys":{"space":{"sys":{"type":"Link","linkType":"Space","id":"23aumh6u8s0i"}},"id":"53ermIQhgEs7w3sBNLtdrl","type":"Entry","createdAt":"2021-03-22T08:18:12.111Z","updatedAt":"2023-01-25T20:37:03.769Z","environment":{"sys":{"id":"master","type":"Link","linkType":"Environment"}},"publishedVersion":9,"revision":4,"contentType":{"sys":{"type":"Link","linkType":"ContentType","id":"author"}},"locale":"en-US"},"fields":{"path":"bruno-krebs","name":"Bruno Krebs","avatar":{"metadata":{"tags":[],"concepts":[]},"sys":{"space":{"sys":{"type":"Link","linkType":"Space","id":"23aumh6u8s0i"}},"id":"H7mkLrAoB5N10mbKVUc4o","type":"Asset","createdAt":"2021-03-22T08:29:02.968Z","updatedAt":"2021-03-22T08:29:02.968Z","environment":{"sys":{"id":"master","type":"Link","linkType":"Environment"}},"publishedVersion":2,"revision":1,"locale":"en-US"},"fields":{"title":"bruno-krebs","description":"bruno-krebs avatar","file":{"url":"//images.ctfassets.net/23aumh6u8s0i/H7mkLrAoB5N10mbKVUc4o/641e80c0533fb487547e9da7fe7a18fc/bruno-krebs","details":{"size":23890,"image":{"width":160,"height":160}},"fileName":"bruno-krebs","contentType":"image/jpeg"}}},"lastUpdatedBy":"robertino.calcaterra@auth0.com","email":"bruno.krebs@auth0.com","twitter":"https://twitter.com/brunoskrebs","github":"http://github.com/brunokrebs/","linkedin":"https://www.linkedin.com/in/brunokrebs","isPopular":false,"personalWebsite":null,"type":"Former Auth0 Employee","jobTitle":"R\u0026D Content Architect","description":"I am passionate about developing highly scalable, resilient applications. I love everything from the database, to microservices (Kubernetes, Docker, etc), to the frontend. I find amazing to think about how all pieces work together to provide a fast and pleasurable experience to end users, mainly because they have no clue how complex that \"simple\" app is."}}],"redirectTo":null,"isHiddenFromBlogPostGrid":null,"lang":"en","tags":["electron","security","openid","openid-connect","oauth","oauth-2.0","authentication","authorization"],"dateCreated":"2018-10-09T08:30","dateLastUpdated":"2022-07-29","postContent":"The goal of this tutorial is to show you how to secure an Electron application with [OpenID Connect](https://auth0.com/docs/protocols/oidc) and [OAuth 2.0](https://auth0.com/docs/protocols/oauth2). You will learn how to authenticate users and make API requests to protected endpoints from your Electron app. For this purpose, you'll use a Node.js Express API with a single endpoint to test the validity of your user authentication and authorization system.\n\nYou don't need to be an OpenID Connect and OAuth expert to follow this tutorial along because the instructions will guide you through the whole process. In fact, securing your application is easier when you use an [Identity-as-a-Service (IDaaS)](https://auth0.com/blog/what-is-idaas/) platform that adheres to those standards, such as [Auth0](https://auth0.com/blog/we-are-now-open-id-certified/).\n\nHowever, if you want to learn in-depth about **OpenID Connect**, check out the free ebook!\n\n\u003cinclude src=\"ebook-ads/OidcHandbook\" /\u003e\n\n## Register an Electron Application with Auth0\n\nTo use Auth0 with Electron, you need to register your Electron application with Auth0 and set up a communication bridge between them. If you don't have an Auth0 account yet, you can \u003ca href=\"https://a0.to/blog_signup\" data-amp-replace=\"CLIENT_ID\" data-amp-addparams=\"anonId=CLIENT_ID(cid-scope-cookie-fallback-name)\"\u003esign up for a free one right now\u003c/a\u003e.\n\nTo start, open the [Applications section](https://manage.auth0.com/#/applications) of the Auth0 Dashboard and click on _**Create Application**_.\n\nOn the dialog shown:\n\n- Provide a name for your application, such as \"Auth0 Electron Demo\".\n- Choose _**Native**_ as the application type.\n- Click on the _**Create**_ button.\n\nOnce done, the Auth0 application page loads up. From there, click on the _**Settings**_ tab to configure Auth0 to communicate with your Electron application.\n\nSearch for the _**Allowed Callback URLs**_ field and put the following URL as its value:\n\n```bash\nhttp://localhost/callback\n```\n\nYou are probably wondering what this URL is and why you need it. When using Auth0 for user authentication, you don't need to build login or sign-up forms. When your users click a login button in your user interface, your Electron app will redirect them to the [Auth0 Universal Login page](https://auth0.com/universal-login), where Auth0 will carry out the authentication process.\n\nOnce done, Auth0 will invoke your allowed callback URL to take your users back to your application and inform it about the outcome: was authentication successful or not? **For security reasons, Auth0 will only call URLs registered in the _Allowed Callback URLs_ field**. Despite the URL structure, you don't need to have an actual server listening to it; you just need to have your Electron application listening to it, as you will learn later on.\n\nThat's all the configuration you need to register your Electron application. Click the **_Save Changes_** button at the bottom of the \"Settings\" page to complete the process. Leave this page open as you will need to copy a few values from it soon to integrate Auth0 into your app.\n\n## Start an Electron Project\n\nNow that you have configured Auth0, you can focus on learning how to secure an Electron application. You will build a simple Electron app that uses an Authorization Server (Auth0) to authenticate users and authorize the app to access protected data from a [Resource Server](https://tools.ietf.org/html/rfc6749#section-1.1) (an external API).\n\nSo, open a new terminal window and execute the following commands to create a directory to host the Electron app and initialize an npm project within it:\n\n```bash\n# create a directory for your Electron app\nmkdir electron-openid-oauth\n\n# move into it\ncd electron-openid-oauth\n\n# init npm with default properties\nnpm init -y\n```\n\nAfter that, open the `package.json` file and replace its content with the following:\n\n```json\n{\n \"name\": \"electron-openid-oauth-2\",\n \"version\": \"1.0.0\",\n \"description\": \"\",\n \"main\": \"main.js\",\n \"scripts\": {\n \"start\": \"electron ./\"\n },\n \"keywords\": [],\n \"author\": \"\",\n \"license\": \"ISC\"\n}\n```\n\n## Install Dependencies\n\nYour app will have only three dependencies:\n\n- [`axios`](https://www.npmjs.com/package/axios): a promise-based HTTP client for the browser and Node.js.\n- [`electron`](https://www.npmjs.com/package/electron): the Electron framework itself so you can run your application.\n- [`jwt-decode`](https://www.npmjs.com/package/jwt-decode): a library that enables your application to decode a [JSON Web Token (JWT)](https://jwt.io/).\n\nTo install these dependencies, issue the following commands:\n\n```bash\n# you need electron as a dev dependency\nnpm i -D electron\n\n# and the other two as normal dependencies\nnpm i axios jwt-decode\n```\n\nYou will use these libraries in the next sections to build your Electron app.\n\n\u003e Note that Electron is installed as a development dependency. This is [the preferred method to install Electron](https://www.electronjs.org/docs/latest/tutorial/quick-start#scaffold-the-project) as you don't need the package as a dependency, but only for development and building of the application.\n\n## Manage Different Environments in Electron\n\nIn this tutorial, you won't make your application run in other environments. However, it is always a good idea to avoid hard-coding configuration variables so you don't end up pushing them to your version control system, which can expose some credentials or make the lives of contributors harder.\n\nSo, to define your environment variables, create a file called `env-variables.json` under the root project directory and add the following object to it:\n\n```json\n{\n \"auth0Domain\": \"\u003cYOUR_AUTH0_DOMAIN\u003e\",\n \"clientId\": \"\u003cYOUR_AUTH0_CLIENT_ID\u003e\",\n \"apiIdentifier\": \"\u003cAPI_IDENTIFIER\u003e\"\n}\n```\n\n`auth0Domain` and `clientId` correspond to the Domain and Client ID values present in the \"Settings\" of the Auth0 Application that you created to register your Electron app.\n\nYou will also use `apiIdentifier` to access data from an API protected by Auth0. You will define this variable later on.\n\nRemember to exclude this file from your versioning system. For example, if you are using Git, add the name `env-variables.json` into `.gitignore`.\n\n## Persist Data in Electron\n\nAs the outcome of successful user authentication, Auth0 can send three types of tokens to your Electron app: an [access token](https://auth0.com/docs/tokens/concepts/access-tokens), an [ID token](https://auth0.com/docs/tokens/concepts/id-tokens), and a [refresh token](https://auth0.com/docs/tokens/concepts/refresh-tokens). Then, when your users close your app and reopen it (or when the access token or the ID token expires), your app can use the refresh token to get new versions of the other two without asking your users to log in again.\n\nAs such, you need to provide your Electron app a way to securely store or persist the refresh tokens on disk; otherwise, your app won't have access to them when your users close and reopen it. To store data in Electron, you can use the [`keytar`](https://www.npmjs.com/package/keytar) Node.js module. As described by the official documentation, `keytar` is:\n\n\u003e \"A native Node module to get, add, replace, and delete passwords in system's Keychain. On macOS, the passwords are managed by the Keychain, on Linux, they are managed by the Secret Service API/libsecret, and on Windows, they are managed by Credential Vault.\" \u0026mdash; [https://github.com/atom/node-keytar](https://github.com/atom/node-keytar)\n\nTo install `keytar`, issue the following command on the terminal:\n\n```bash\nnpm i keytar\n```\n\nYou will see soon how it will be used.\n\n\u003cinclude src=\"TweetQuote\" quoteText=\"Learn how to secure your @electronjs applications with @openid Connect and OAuth 2.0\"/\u003e\n\n## Authenticate Users in Electron\n\nYour next step is to create a service that will be responsible for the authentication process. Mainly, this authentication service will provide the following functions:\n\n1. `getAuthenticationURL`: returns the complete URL of the Authorization Server that users have to visit to authenticate.\n2. `refreshTokens`: verifies if there is a Refresh Token available to the current user and, if so, exchange it for a new access token.\n3. `loadTokens`: parses the URL called back after the authentication process completes to get the `code` query parameter that you can use to fetch different tokens (an access token, the refresh token, and an ID token).\n\nSo, create a directory called `services` under the root project directory and populate it with a file called `auth-service.js` that has the following code:\n\n```javascript\n// services/auth-service.js\n\nconst jwtDecode = require('jwt-decode');\nconst axios = require('axios');\nconst url = require('url');\nconst envVariables = require('../env-variables');\nconst keytar = require('keytar');\nconst os = require('os');\n\nconst {apiIdentifier, auth0Domain, clientId} = envVariables;\n\nconst redirectUri = 'http://localhost/callback';\n\nconst keytarService = 'electron-openid-oauth';\nconst keytarAccount = os.userInfo().username;\n\nlet accessToken = null;\nlet profile = null;\nlet refreshToken = null;\n\nfunction getAccessToken() {\n return accessToken;\n}\n\nfunction getProfile() {\n return profile;\n}\n\nfunction getAuthenticationURL() {\n return (\n \"https://\" +\n auth0Domain +\n \"/authorize?\" +\n \"scope=openid profile offline_access\u0026\" +\n \"response_type=code\u0026\" +\n \"client_id=\" +\n clientId +\n \"\u0026\" +\n \"redirect_uri=\" +\n redirectUri\n );\n}\n\nasync function refreshTokens() {\n const refreshToken = await keytar.getPassword(keytarService, keytarAccount);\n\n if (refreshToken) {\n const refreshOptions = {\n method: 'POST',\n url: `https://${auth0Domain}/oauth/token`,\n headers: {'content-type': 'application/json'},\n data: {\n grant_type: 'refresh_token',\n client_id: clientId,\n refresh_token: refreshToken,\n }\n };\n\n try {\n const response = await axios(refreshOptions);\n\n accessToken = response.data.access_token;\n profile = jwtDecode(response.data.id_token);\n } catch (error) {\n await logout();\n\n throw error;\n }\n } else {\n throw new Error(\"No available refresh token.\");\n }\n}\n\nasync function loadTokens(callbackURL) {\n const urlParts = url.parse(callbackURL, true);\n const query = urlParts.query;\n\n const exchangeOptions = {\n 'grant_type': 'authorization_code',\n 'client_id': clientId,\n 'code': query.code,\n 'redirect_uri': redirectUri,\n };\n\n const options = {\n method: 'POST',\n url: `https://${auth0Domain}/oauth/token`,\n headers: {\n 'content-type': 'application/json'\n },\n data: JSON.stringify(exchangeOptions),\n };\n\n try {\n const response = await axios(options);\n\n accessToken = response.data.access_token;\n profile = jwtDecode(response.data.id_token);\n refreshToken = response.data.refresh_token;\n\n if (refreshToken) {\n await keytar.setPassword(keytarService, keytarAccount, refreshToken);\n }\n } catch (error) {\n await logout();\n\n throw error;\n }\n}\n\nasync function logout() {\n await keytar.deletePassword(keytarService, keytarAccount);\n accessToken = null;\n profile = null;\n refreshToken = null;\n}\n\nfunction getLogOutUrl() {\n return `https://${auth0Domain}/v2/logout`;\n}\n\nmodule.exports = {\n getAccessToken,\n getAuthenticationURL,\n getLogOutUrl,\n getProfile,\n loadTokens,\n logout,\n refreshTokens,\n};\n```\n\nAt the beginning of this file, you find the definition of the following constants:\n\n- The authentication service uses `apiIdentifier`, `auth0Domain`, and `clientId` to interact with the Auth0 Authorization Server.\n- `redirectUri` defines what URL Auth0 will call after finishing the authentication process.\n- `keytarService` and `keytarAccount` define what `keytar` uses to persist the refresh token on the disk or to retrieve it.\n\nAmong the functions mentioned earlier, you have these other functions in this service:\n\n- `getAccessToken()` returns the current `accessToken`.\n- `getLogOutUrl()` returns the URL of the `/v2/logout` endpoint from your Auth0 tenant, which you can use [to clear user sessions](https://auth0.com/docs/logout) in the Auth0 layer.\n- `getProfile()` returns an object with the user profile, which this service extracts from the ID Token sent by Auth0.\n- `logout()` clears the local session by removing the refresh token from the disk and nullifying the `accessToken`, `profile`, and `refreshToken` variables.\n\nNow, as your users will need an interface to log in or sign up to your application, you need to create an instance of `BrowserWindow` in the Electron main process. This window will render the Auth0 Universal Login page for your users.\n\n\u003e Remember that Electron has two types of processes: the main process and the renderer process. The main process is unique to each application and is the only process that can call the native Electron API. The renderer process is responsible for running each web page in the application.\n\u003e\n\u003e Check out [the official documentation for more information](https://www.electronjs.org/docs/latest/tutorial/process-model).\n\nTo manage this window, create a new directory called `main` under the root project directory, and add a file called `auth-process.js` to it with the following code:\n\n```javascript\n// main/auth-process.js\n\nconst { BrowserWindow } = require('electron');\nconst authService = require('../services/auth-service');\nconst createAppWindow = require('../main/app-process');\n\nlet win = null;\n\nfunction createAuthWindow() {\n destroyAuthWin();\n\n win = new BrowserWindow({\n width: 1000,\n height: 600,\n webPreferences: {\n nodeIntegration: false,\n enableRemoteModule: false\n }\n });\n\n win.loadURL(authService.getAuthenticationURL());\n\n const {session: {webRequest}} = win.webContents;\n\n const filter = {\n urls: [\n 'http://localhost/callback*'\n ]\n };\n\n webRequest.onBeforeRequest(filter, async ({url}) =\u003e {\n await authService.loadTokens(url);\n createAppWindow();\n return destroyAuthWin();\n });\n\n win.on('authenticated', () =\u003e {\n destroyAuthWin();\n });\n\n win.on('closed', () =\u003e {\n win = null;\n });\n}\n\nfunction destroyAuthWin() {\n if (!win) return;\n win.close();\n win = null;\n}\n\nfunction createLogoutWindow() {\n const logoutWindow = new BrowserWindow({\n show: false,\n });\n\n logoutWindow.loadURL(authService.getLogOutUrl());\n\n logoutWindow.on('ready-to-show', async () =\u003e {\n await authService.logout();\n logoutWindow.close();\n });\n}\n\nmodule.exports = {\n createAuthWindow,\n createLogoutWindow,\n};\n```\n\nThe functionality that this module exposes is quite simple. First, it defines and exposes a function called `createAuthWindow` to create an instance of `BrowserWindow` that loads the login page using the authorization server URL. Second, it defines a function called `destroyAuthWin` that your app can use to close the authentication window instance when it's no longer needed.\n\nYou pass the `BrowserWindow` constructor a few parameters to define the size and level of integration of the window. The `webPreferences` key specifies that the process associated with the window doesn't require access to local resources (`nodeIntegration: false`), nor does it need to communicate with the Main process (`enableRemoteModule: false`). These two settings reduce your risk of loading remote content that could create security issues in your Electron application.\n\n\u003e Go over the [Electron Checklist: Security Recommendations](https://www.electronjs.org/docs/tutorial/security#checklist-security-recommendations) for a deep dive into how to improve the security of your applications.\n\nFinally, it is important to notice that Auth0 will call the `http://localhost/callback` URL right after it authenticates your users. As such, you are defining a listener using the `onBeforeRequest()` function that Electron will trigger when Auth0 calls the callback URL. The goal of this listener is to load users' tokens (`authService.loadTokens(url)`) to then create the main window of your app (`createAppWindow()`) and destroy the current one (`destroyAuthWin()`).\n\n## Create the Electron App Main Process\n\nYou now need to create a module that renders the base window of your Electron application. This module will handle the Electron renderer process, which is responsible for showing a web page with your app.\n\nTo start, create a file called `app-process.js` under the `main` directory and add the following code to it:\n\n```javascript\n// main/app-process.js\n\nconst { BrowserWindow } = require(\"electron\");\nconst path = require(\"path\");\n\nfunction createAppWindow() {\n let win = new BrowserWindow({\n width: 1000,\n height: 600,\n webPreferences: {\n preload: path.join(__dirname, \"preload.js\"),\n }\n });\n\n win.loadFile('./renderers/home.html');\n\n win.on('closed', () =\u003e {\n win = null;\n });\n}\n\nmodule.exports = createAppWindow;\n```\n\nAs you can see, this module loads an HTML template, `./renderers/home.html`, that you'll create soon. The app window is what your authenticated users will see when Auth0 brings them back to your application.\n\nNew projects with Electron will enable [Context Isolation](https://www.electronjs.org/docs/latest/tutorial/context-isolation) by default. With this feature enabled, you ensure a clear separation between the renderer and the main process.\n\nAny logic triggered by the renderer process that requires interacting with the main process will make use of the [contextBridge](https://www.electronjs.org/docs/latest/api/context-bridge) API and the `preload` script.\n\nFor this particular application you will define three cross-process functions, and in order to do that, create a new file `preload.js` with the following content:\n\n```javascript\n// main/preload.js\n\nconst { contextBridge, ipcRenderer } = require(\"electron\");\n\n// API Definition\nconst electronAPI = {\n getProfile: () =\u003e ipcRenderer.invoke('auth:get-profile'),\n logOut: () =\u003e ipcRenderer.send('auth:log-out'),\n getPrivateData: () =\u003e ipcRenderer.invoke('api:get-private-data'),\n};\n\n// Register the API with the contextBridge\nprocess.once(\"loaded\", () =\u003e {\n contextBridge.exposeInMainWorld('electronAPI', electronAPI);\n});\n```\n\nThere are two parts to our `preload` script: in the first, you defined an API, `electronAPI`, that allows getting information about the user, logging out, and calling the private API endpoint.\n\nThe code is simple and makes use of [IPC](https://www.electronjs.org/docs/latest/tutorial/ipc) (inter-process communication) to trigger events that will be captured and executed by our main process.\n\nOur example makes use of two types of communications:\n\n- `ipcRenderer.invoke`: sends a message to the channel and expects a promise which is then returned to the original `invoke` call (_two-way communication_).\n- `ipcRenderer.send`: submits a message to the channel, and it is unaware of whether the execution completes and its result (_one-way communication_).\n\nThe second part registers the API to the `context bridge`, which is available in the renderer process as `window.electronAPI`.\n\nYou'll see these three integrations in action after you create a JavaScript module, `home.js`, to support the rendering of the `home.html` template and connect the user events to their corresponding actions.\n\nBefore you complete the main process by creating the main window and events management, it is necessary to create a new module to handle all the APIs calls, in this case, the call to the `private` endpoint.\n\nCreate an `api-service.js` file in the `services` folder with the following content:\n\n```javascript\n// services/api-service.js\n\nconst axios = require('axios');\nconst authService = require('./auth-service');\n\nasync function getPrivateData() {\n const result = await axios.get('http://localhost:3000/private', {\n headers: {\n 'Authorization': `Bearer ${authService.getAccessToken()}`,\n },\n });\n return result.data;\n}\n\nmodule.exports = {\n getPrivateData,\n}\n```\n\nFor now, the API service is quite simple, containing only one method which triggers an HTTP call to the API and passes the `Bearer` token in the headers to perform the authentication.\n\nLastly, you need a module that orchestrates the communication between the main and the renderer processes. To define this module, create a file called `main.js` under the root project directory and add the following code to it:\n\n```javascript\n// main.js\n\nconst { app, ipcMain, BrowserWindow } = require('electron');\n\nconst { createAuthWindow, createLogoutWindow } = require('./main/auth-process');\nconst createAppWindow = require('./main/app-process');\nconst authService = require('./services/auth-service');\nconst apiService = require('./services/api-service');\n\nasync function showWindow() {\n try {\n await authService.refreshTokens();\n createAppWindow();\n } catch (err) {\n createAuthWindow();\n }\n}\n\n// This method will be called when Electron has finished\n// initialization and is ready to create browser windows.\n// Some APIs can only be used after this event occurs.\napp.on('ready', () =\u003e {\n // Handle IPC messages from the renderer process.\n ipcMain.handle('auth:get-profile', authService.getProfile);\n ipcMain.handle('api:get-private-data', apiService.getPrivateData);\n ipcMain.on('auth:log-out', () =\u003e {\n BrowserWindow.getAllWindows().forEach(window =\u003e window.close());\n createLogoutWindow();\n });\n\n showWindow();\n});\n\n// Quit when all windows are closed.\napp.on('window-all-closed', () =\u003e {\n app.quit();\n});\n```\n\nThere are three key tasks that this module performs:\n\n1. It defines a `showWindow()` function to get new tokens from the authentication server using a refresh token, if present. Upon success, the function loads the Electron app (`createAppWindow`). Otherwise, it loads the login page (`createAuthWindow`).\n\n2. You define an event handler for the `ready` event that Electron emits after finishing its initialization process. When the event takes place, you execute the `showWindow()` function to display the proper window depending on the user's authentication status.\n\n3. It captures and handles the different channel events, in our case, related to the three API functions defined in `electronAPI`.\n\nThat's all the code you need to carry out Electron's main and renderer process.\n\n## Create the Electron App Renderer Process\n\nTo complete your Electron application, you need to define the home page for your app.\n\nFirst, create a directory called `renderers` under the root project directory and create a `home.html` file inside it with the following code:\n\n```html\n\u003c!-- renderers/home.html --\u003e\n\u003c!DOCTYPE html\u003e\n\u003chtml lang=\"en\"\u003e\n \u003chead\u003e\n \u003cmeta charset=\"UTF-8\" /\u003e\n \u003cmeta name=\"viewport\" content=\"width=device-width, initial-scale=1.0\" /\u003e\n \u003cmeta http-equiv=\"X-UA-Compatible\" content=\"ie=edge\" /\u003e\n \u003cmeta http-equiv=\"Content-Security-Policy\" content=\"script-src 'self'\" /\u003e\n \u003ctitle\u003eElectron App\u003c/title\u003e\n \u003clink\n rel=\"stylesheet\"\n href=\"https://stackpath.bootstrapcdn.com/bootstrap/4.1.3/css/bootstrap.min.css\"\n integrity=\"sha384-MCw98/SFnGE8fJT3GXwEOngsV7Zt27NXFoaoApmYm81iuXoPkFOJwJ8ERdknLPMO\"\n crossorigin=\"anonymous\"\n /\u003e\n \u003clink rel=\"stylesheet\" href=\"home.css\" /\u003e\n \u003c/head\u003e\n\n \u003cbody\u003e\n \u003cnav class=\"navbar fixed-top navbar-expand-lg navbar-dark bg-dark\"\u003e\n \u003cdiv class=\"profile\"\u003e\n \u003cdiv\u003e\u003ca class=\"navbar-brand\" href=\"#\"\u003eElectron App\u003c/a\u003e\u003c/div\u003e\n \u003cimg id=\"picture\" /\u003e\n \u003cspan id=\"name\"\u003e\u003c/span\u003e\n \u003cbutton id=\"logout\" class=\"btn\"\u003eLogout\u003c/button\u003e\n \u003c/div\u003e\n \u003c/nav\u003e\n \u003cdiv class=\"container-fluid\"\u003e\n \u003cdiv class=\"row\"\u003e\n \u003cdiv class=\"col-sm\"\u003e\n \u003ch1\u003eElectron App\u003c/h1\u003e\n \u003cp\u003e\n This Electron application is secured with OpenID Connect and OAuth\n 2.0.\n \u003c/p\u003e\n \u003c/div\u003e\n \u003c/div\u003e\n \u003cdiv class=\"row\"\u003e\n \u003cdiv class=\"col-sm\"\u003e\n \u003cdiv id=\"success\" class=\"alert alert-success\"\u003e\u003c/div\u003e\n \u003cdiv id=\"message\" class=\"jumbotron\"\u003e\u003c/div\u003e\n \u003cbutton id=\"secured-request\" class=\"btn btn-primary\"\u003e\n Get Private Message\n \u003c/button\u003e\n \u003c/div\u003e\n \u003c/div\u003e\n \u003c/div\u003e\n \u003c/body\u003e\n\n \u003cscript src=\"home.js\"\u003e\u003c/script\u003e\n\u003c/html\u003e\n```\n\nThis web page defines a simple user interface that you style using [Bootstrap](https://getbootstrap.com/). The UI includes:\n\n- A navigation bar (the `nav.navbar` element) that shows the name and profile picture of the user along with a logout button.\n\n- A page title (`h1`) that displays _Electron App_.\n\n- A paragraph that mentions that this app is secured with OpenID Connect and OAuth 2.0.\n\n- A block styled with the `alert-success` class that shows up if the user is successfully authenticated.\n\n- A block styled with the `jumbotron` class that shows data fetched from an external API and a button styled with the `btn-primary` class to trigger that API call.\n\n- A `script` tag that loads a `home.js` file to add interactivity to the page.\n\nCreate the `home.js` file inside the `renderers` directory and add the following code to it:\n\n```javascript\n// renderers/home.js\n\naddEventListener('load',async () =\u003e{\n const profile = await window.electronAPI.getProfile();\n document.getElementById('picture').src = profile.picture;\n document.getElementById('name').innerText = profile.name;\n document.getElementById('success').innerText = 'You successfully used OpenID Connect and OAuth 2.0 to authenticate.';\n});\n\ndocument.getElementById('logout').onclick = () =\u003e {\n window.electronAPI.logOut();\n};\n\ndocument.getElementById('secured-request').onclick = async () =\u003e {\n try {\n const response = await window.electronAPI.getPrivateData();\n const messageJumbotron = document.getElementById('message');\n messageJumbotron.innerText = response;\n messageJumbotron.style.display = 'block';\n } catch(error) {\n console.error('Error connecting to te API: ' + error);\n }\n};\n```\n\nThis JavaScript module is responsible for loading the logged-in user profile when the page loads, as well as registering handlers for the `onclick` events of the `logout` and `secured-request` buttons.\n\nWhile working on the renderer process you have direct access to the `electronAPI` defined earlier. It is exposed under the `window` object.\n\nSo to retrieve the user information simply do:\n\n```javascript\nwindow.electronAPI.getProfile()\n```\n\nSimilarly, for logging out:\n\n```javascript\nwindow.electronAPI.logOut()\n```\n\nand finally, to call our private endpoint (http://localhost:3000/private):\n\n```javascript\nwindow.electronAPI.getPrivateData()\n```\n\nIn a nutshell, the API is protected using Auth0, and access to its `/private` endpoint requires an access token. As such, the request you are making with `axios` **must** contain the access token retrieved in the authentication process. Otherwise, you will get an [HTTP 401 Unauthorized response](https://developer.mozilla.org/en-US/docs/Web/HTTP/Status/401).\n\nBut how exactly does it all happens? Take a look at the following diagram:\n\n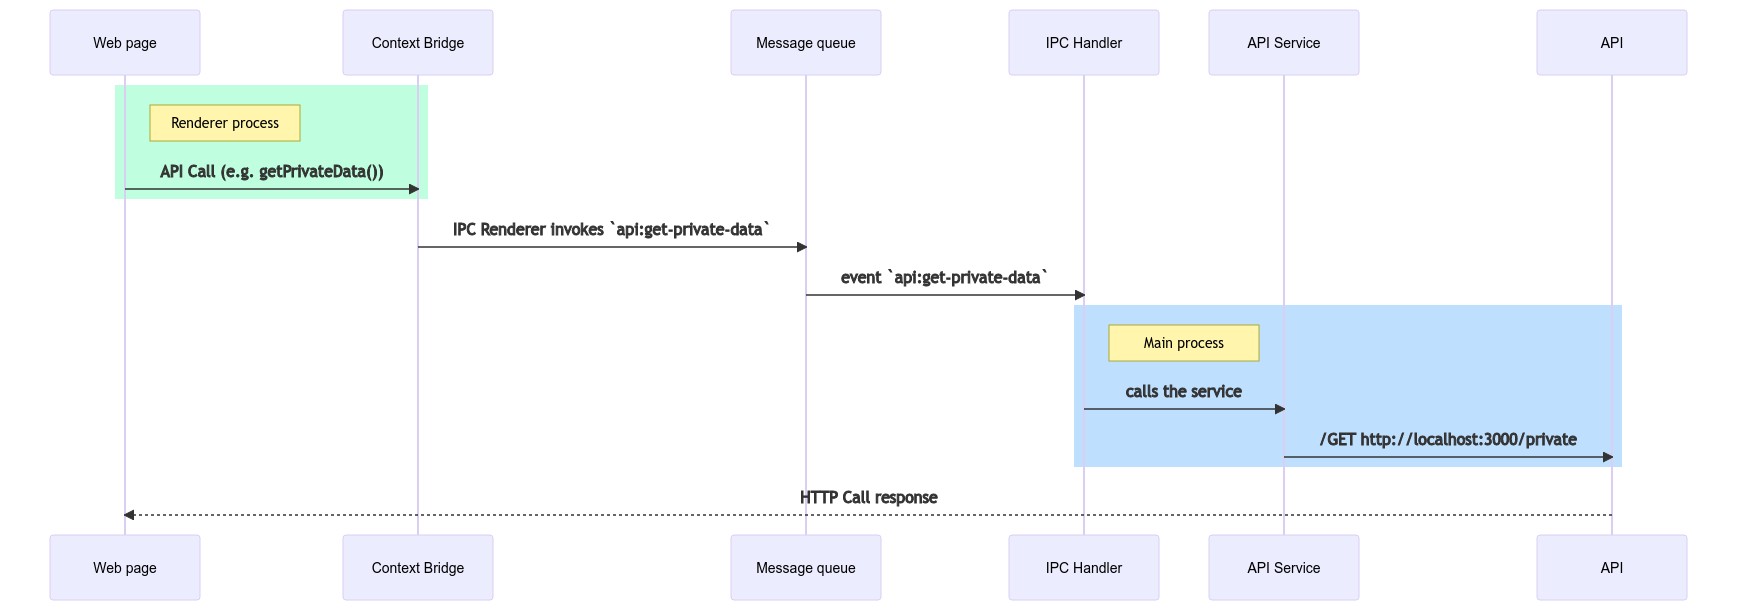\n\nWhen the user presses the \"Get Private Message\" button the renderer process uses the exposed `electronAPI` to fire a two-way IPC call `api:get-private-data`.\n\nThe main process on the other side is listening to IPC events, and when it detects an event for the channel `api:get-private-data` it will make the API call and awaits its response.\n\nIn a one-way communication that would be the end of it. Since we established a two-way communication, the response from the API is queued back to the renderer process and captured automatically by the event bridge. Then it is returned to the app where the result is visually presented to the user.\n\n\u003e **Note:** You can always use the comments area down below to ask questions when something is not clear.\n\nBefore moving on to set up the demo API, create a `home.css` file under the `renderers` directory to style the home window. Add the following CSS code to it:\n\n```css\n/* renderers/home.css */\n\nbody {\n padding-top: 70px;\n padding-bottom: 30px;\n}\n\ndiv.profile {\n display: grid;\n grid-template-columns: 1fr auto auto auto;\n align-items: start;\n width: 100%;\n}\n\ndiv.profile span {\n display: inline-block;\n align-self: center;\n color: #ccc;\n margin-left: 10px;\n margin-right: 25px;\n}\n\ndiv.profile img {\n width: 30px;\n border-radius: 50%;\n align-self: center;\n}\n\ndiv#message {\n display: none;\n}\n```\n\nDone! You can now run your Electron application to test its enterprise-grade user authentication. Execute the following command:\n\n```bash\nnpm start\n```\n\nIf you run into an error saying `\"Error: Module did not self-register\"`, you will have to [install `electron-rebuild`](https://github.com/electron/electron-rebuild) to rebuild native Node.js modules against the version of Node.js that your Electron project is using.\n\nIf that's the case, start by installing the package:\n\n```bash\nnpm install --save-dev electron-rebuild\n```\n\nOnce the package is installed, run it like so:\n\n```bash\n$(npm bin)/electron-rebuild\n```\n\nIf you are using Windows, you need to run `electron-rebuild` like this:\n\n```bash\n.\\node_modules\\.bin\\electron-rebuild.cmd\n```\n\nFrom now on, whenever you install a new npm package, you need to re-run `electron-rebuild`.\n\nAs this is the first time you are running your application, you will see the Auth0 Universal Login page:\n\n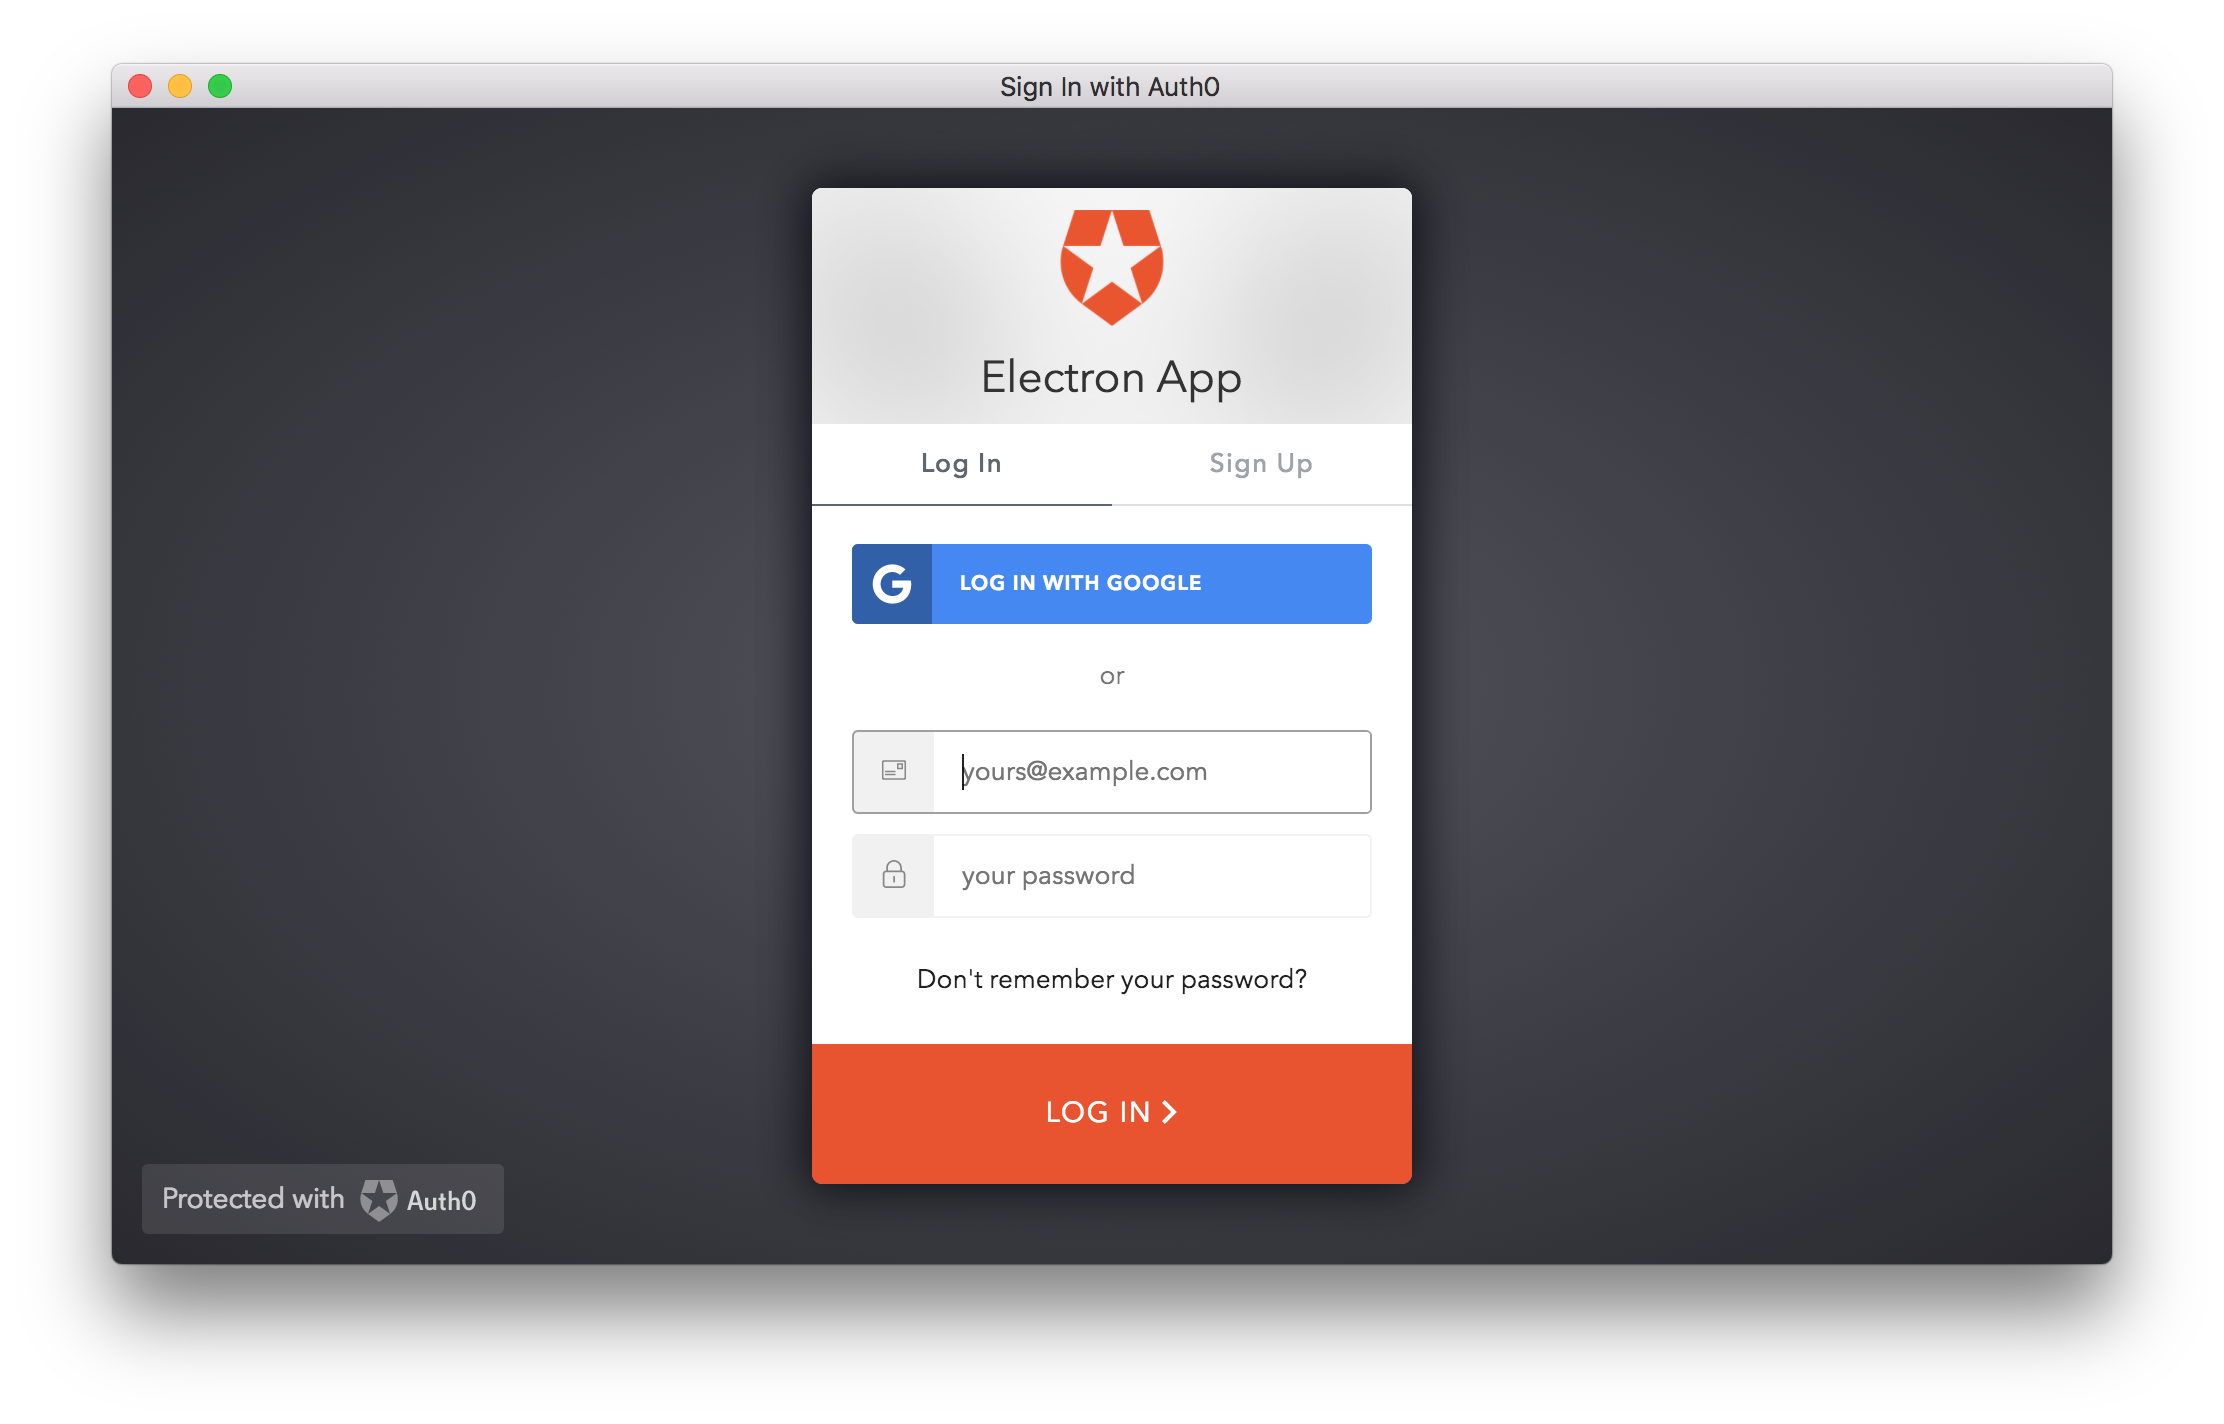\n\nSo, authenticate by using the method of your choice and authorize the app to access your profile data in the [Consent dialog](https://auth0.com/docs/api-auth/user-consent) that will pop up immediately afterward. The Consent dialog will appear only the first time you access your app.\n\nAfter authenticating, your Electron application shows you the home window, as seen below:\n\n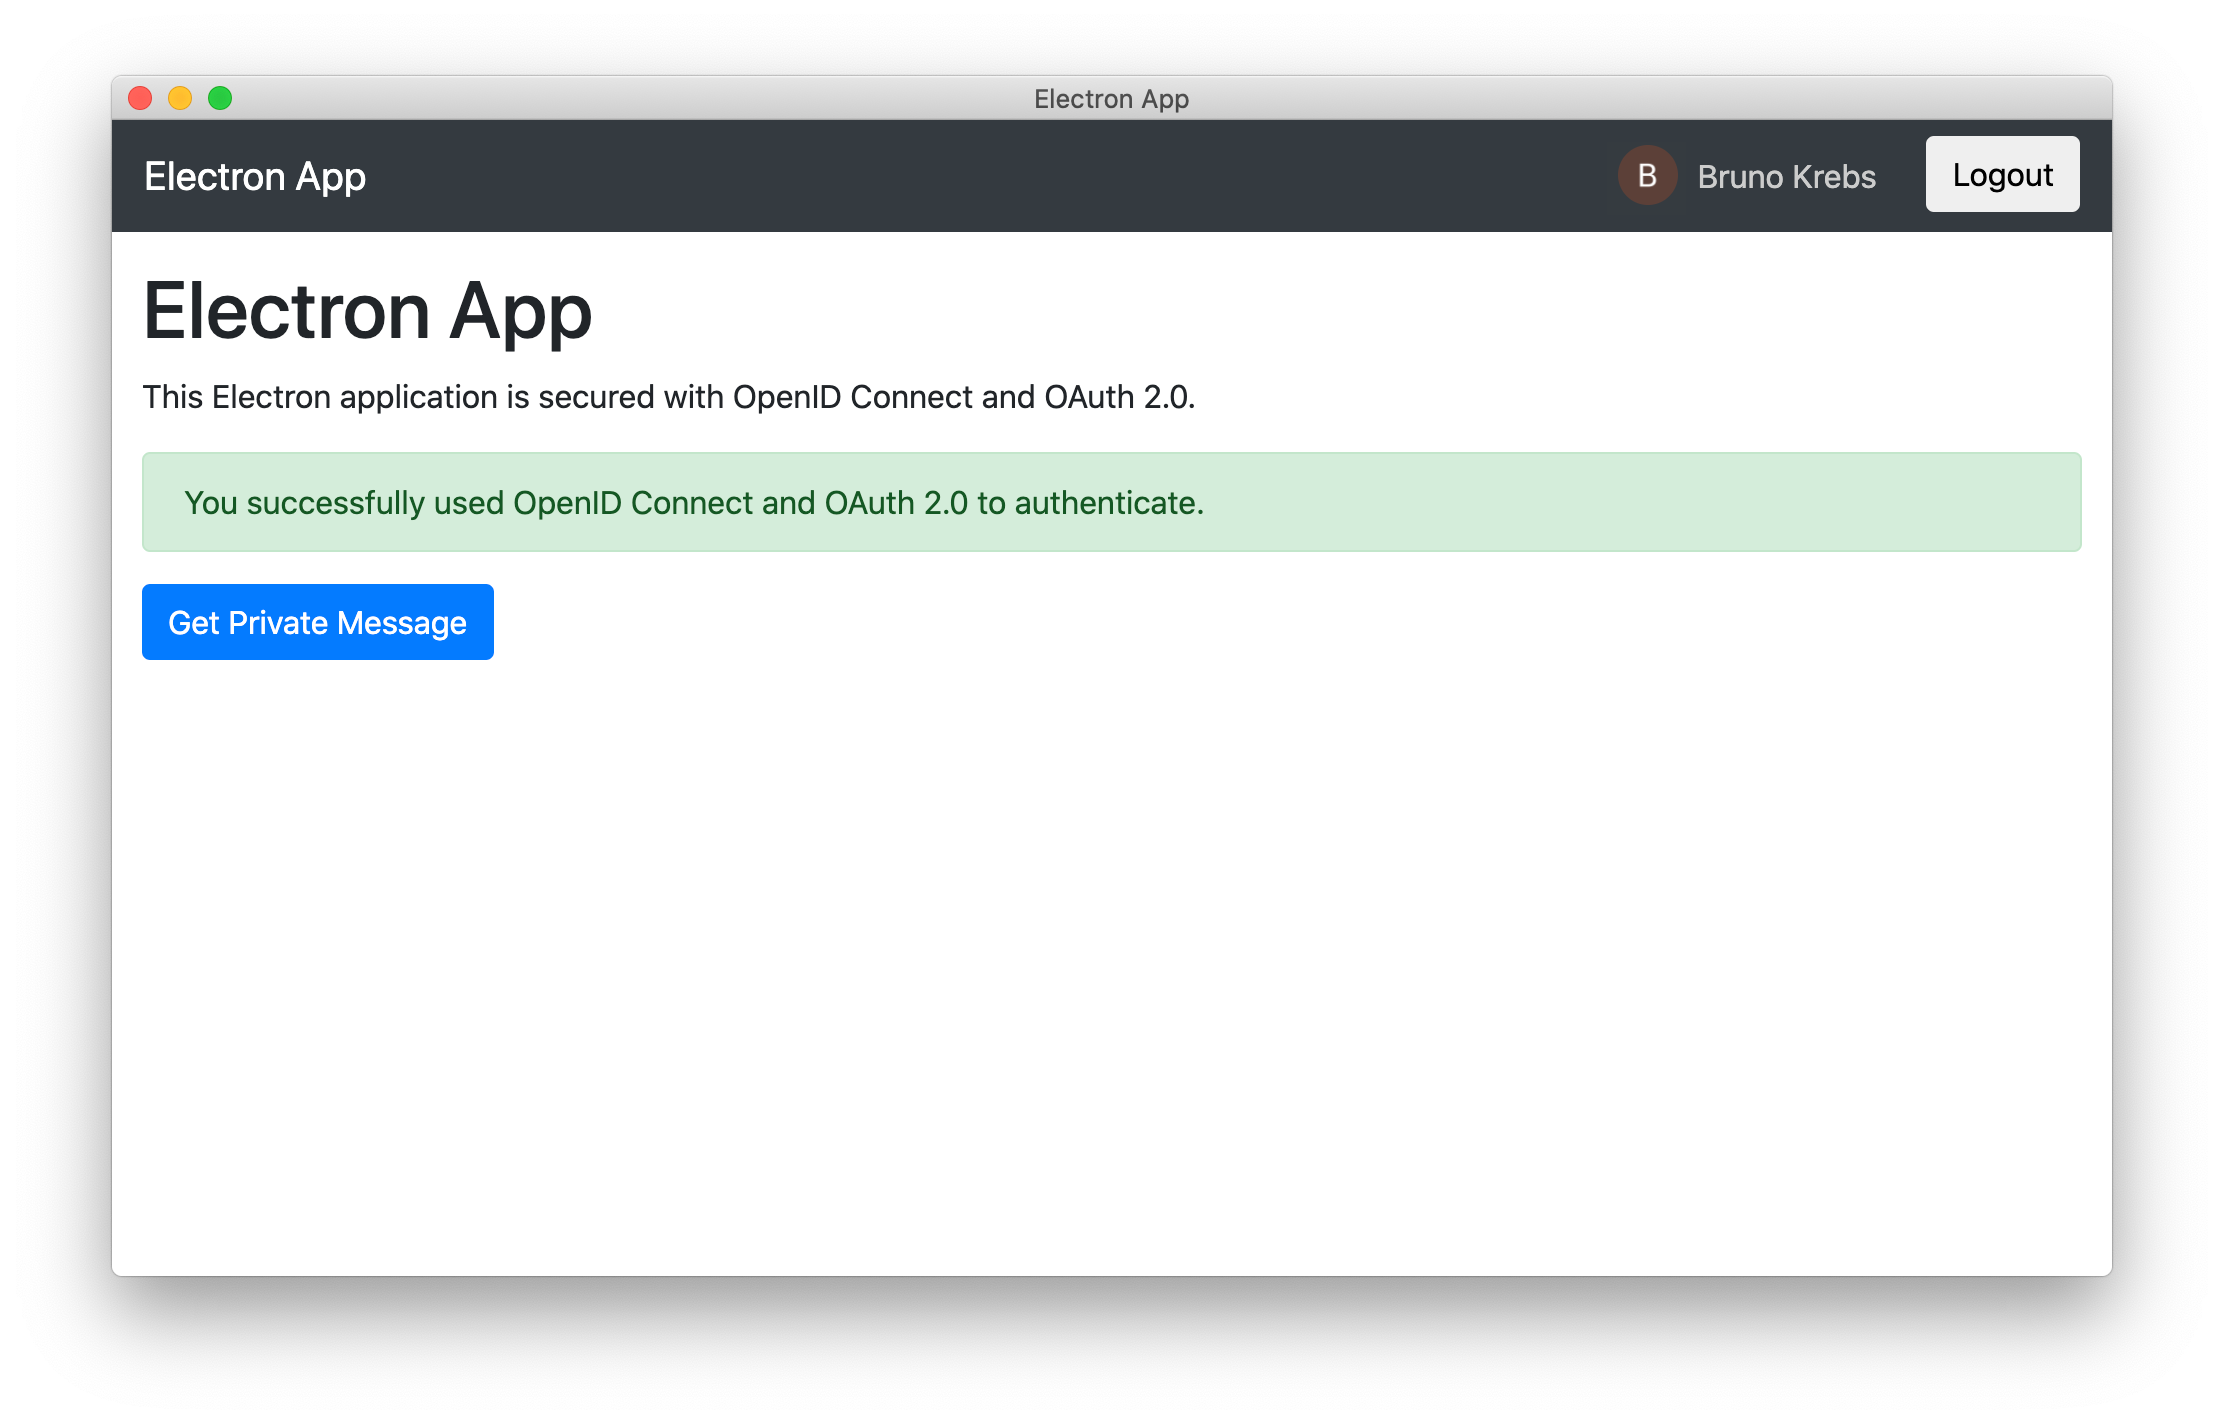\n\nIn this window, you can see a button to fetch a secured message from an external API that still requires some configuration you'll set up in the next section.\n\n\u003cinclude src=\"TweetQuote\" quoteText=\"I just built an @electronjs application that is secured with @openid Connect and OAuth 2.0\"/\u003e\n\n## Call a Secure API within Electron\n\nIn this section, you will quickly set up a backend API that will play the Resource Server role for your Electron application.\n\nStart by cloning the demo API repository anywhere in your system:\n\n```bash\ngit clone -b backend --single-branch https://github.com/auth0-blog/electron-openid-oauth electron-backend\n```\n\nMake the cloned project your current active directory:\n\n```bash\ncd electron-backend\n```\n\nNext, install the project dependencies:\n\n```bash\nnpm install\n```\n\nThis Express API is simple and only has these dependencies:\n\n- [`express`](https://expressjs.com/): the most popular web application framework for Node.js.\n\n- [`express-jwt`](https://github.com/auth0/express-jwt): a module to validate JWTs (access tokens, in this case) that sets the `req.user` property with some attributes related to the current user.\n\n- [`jwks-rsa`](https://github.com/auth0/node-jwks-rsa): a library to retrieve [RSA](https://en.wikipedia.org/wiki/RSA_%28cryptosystem%29) public keys from a [JWKS (JSON Web Key Set)](https://auth0.com/docs/jwks) endpoint to validate access tokens.\n\n\nNext, under the API project directory, rename the `env-variables.json.template` file into `env-variables.json`. Its content looks as follows:\n\n```bash\n{\n \"apiIdentifier\": \"\u003cAPI_IDENTIFIER\u003e\",\n \"auth0Domain\": \"\u003cYOUR_AUTH0_DOMAIN\u003e\"\n}\n```\n\nYou already know the value of `\u003cYOUR_AUTH0_DOMAIN\u003e`: it is the same value of `auth0Domain` present in the `env-variables.json` of your Electron project. To get an API identifier, you need to register this demo API with Auth0.\n\n### Register an API with Auth0\n\nWhat you are doing here will enable you to secure access to your APIs by obtaining an access token for them.\n\nGo to the [APIs section](https://manage.auth0.com/#/apis) of the Auth0 dashboard to register your demo API (the Resource Server).\n\nOnce there, click on _**Create API**_ to open a dialog with three fields. Fill it out as follows:\n\n- **Name**: Enter a name to represent your API in your Auth0 tenant. For example: \"My Resource Server\".\n\n- **Identifier**: Enter a logical identifier for your API. For example: `https://my-resource-server`.\n\n- **Signing Algorithm**: For this field, you can leave the default option (RS256).\n\n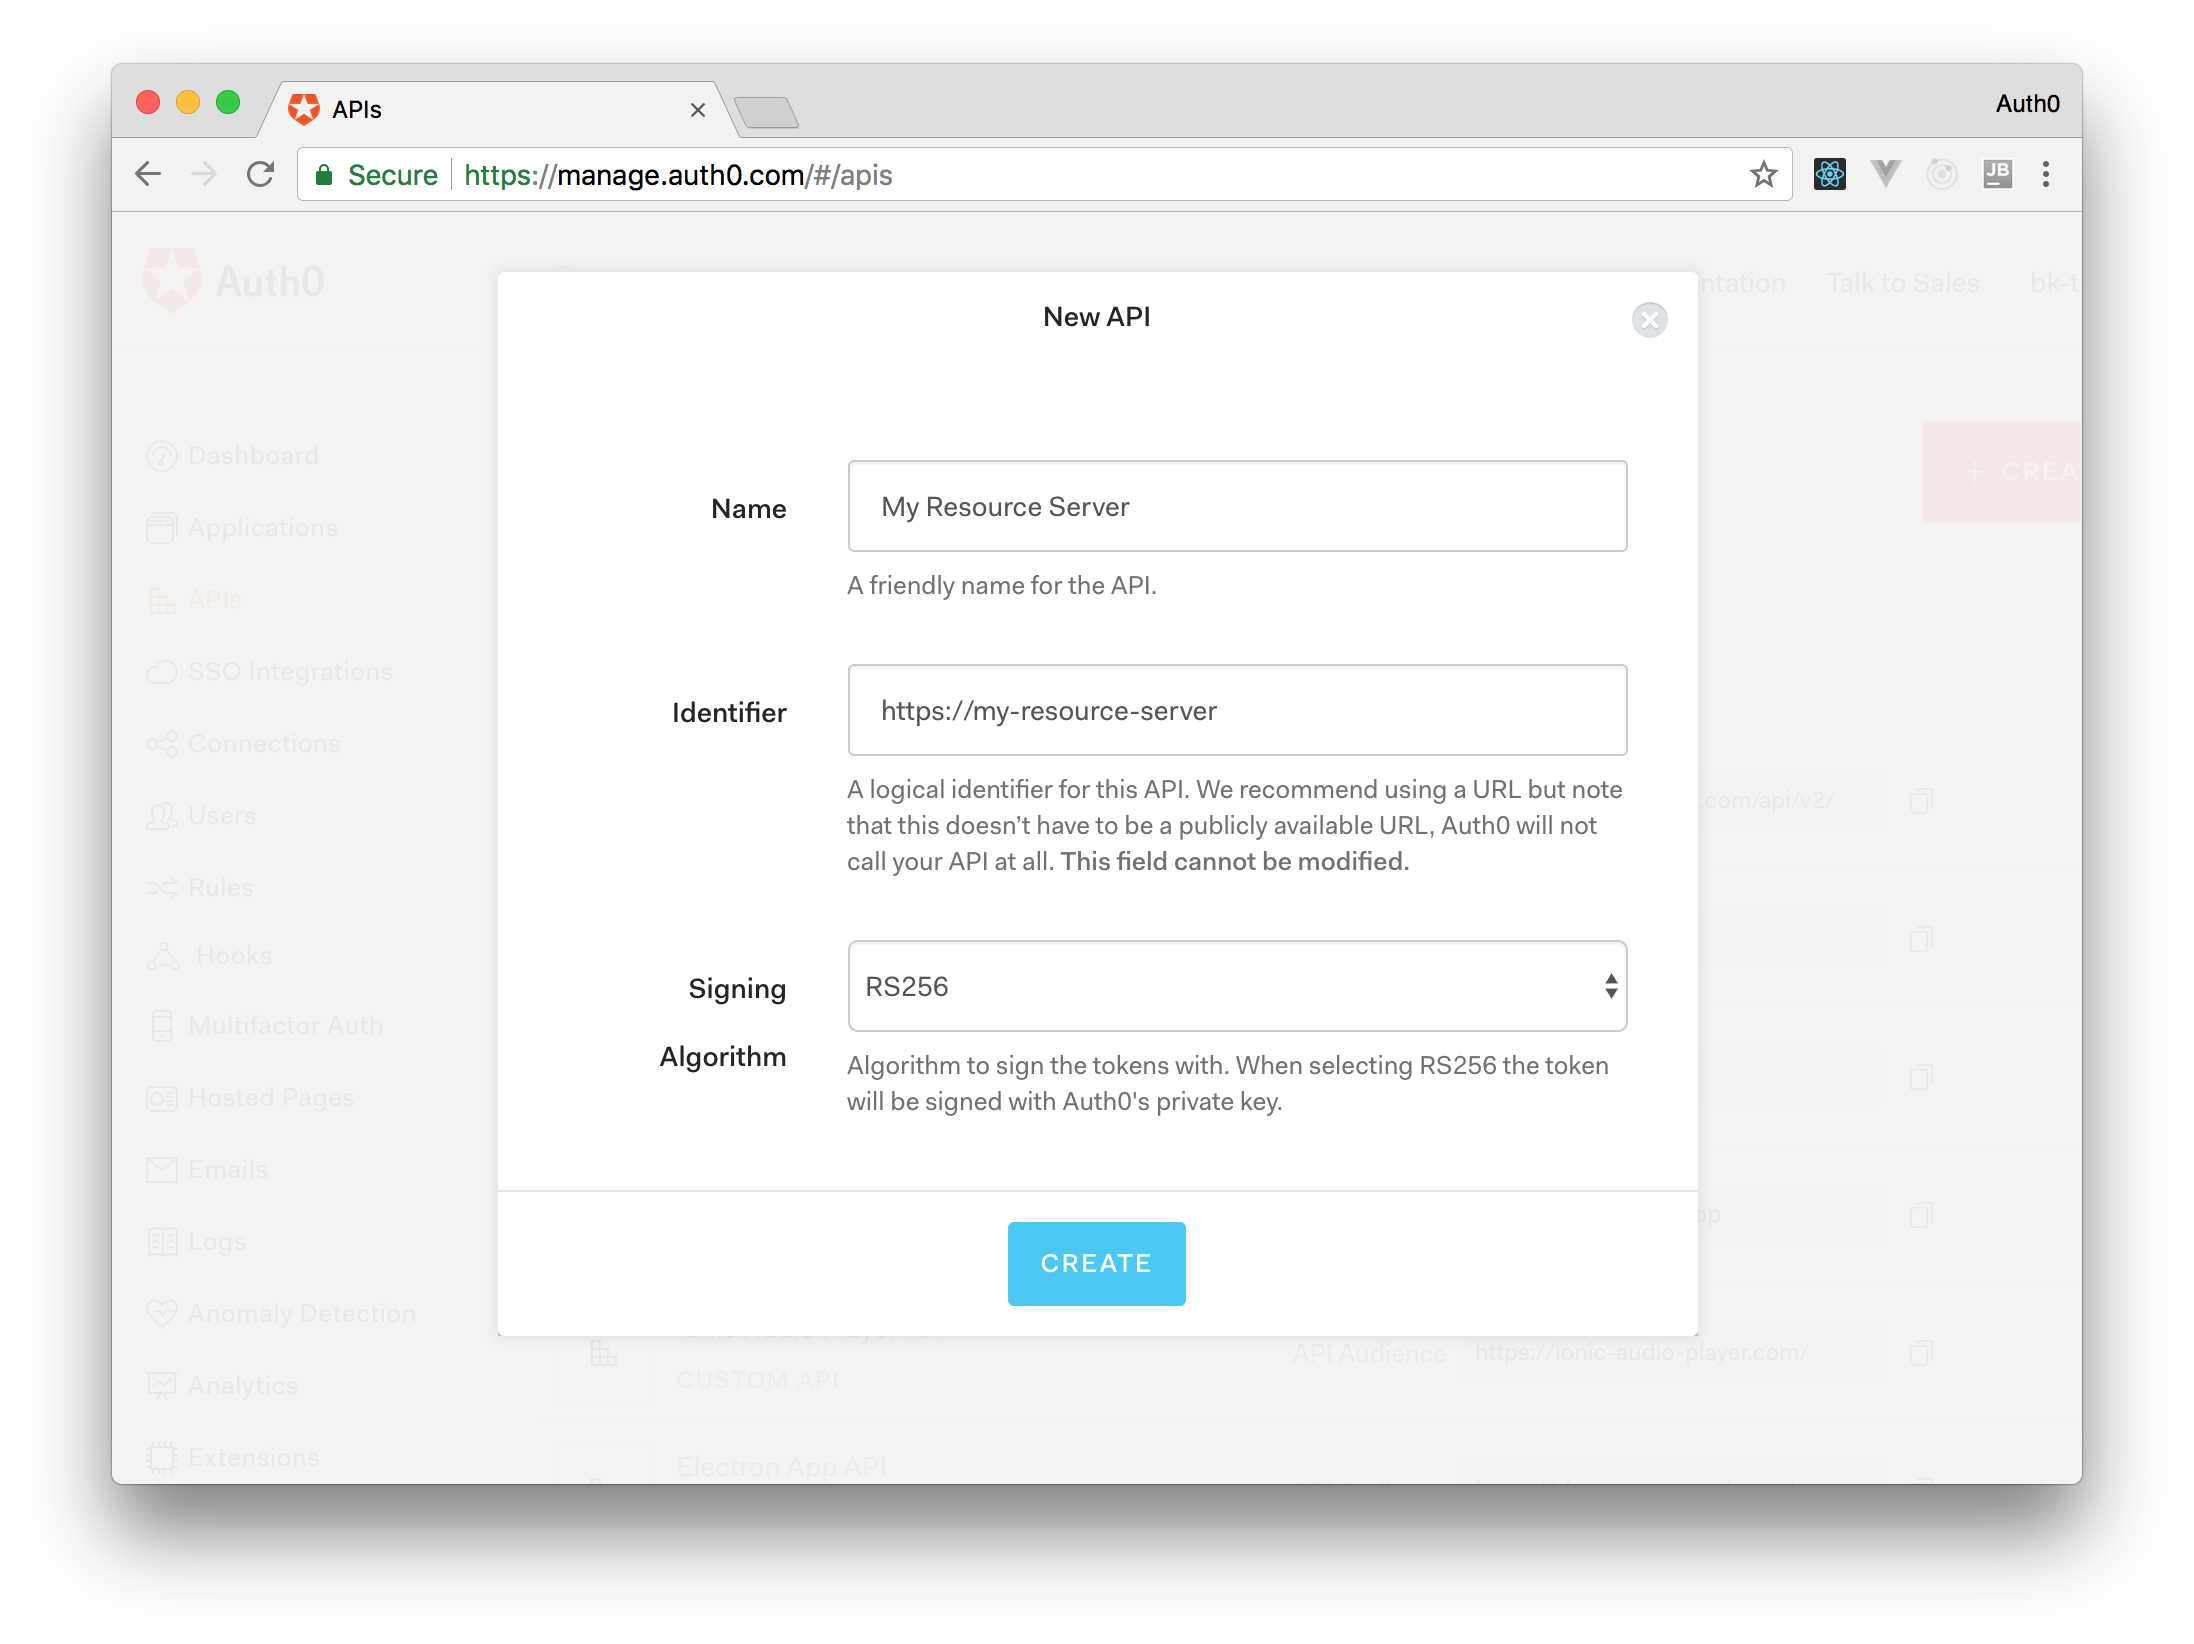\n\nOnce the form is filled out, click on _**Create**_ to complete the process. Auth0 will redirect you to the _**Quick Start**_ section of your new API.\n\nFrom there, click on the _**Settings**_ tab and switch on the _**Allow Offline Access**_ option, which configures Auth0 to allow applications to request refresh tokens for this API.\n\nNow, click on the ***Save*** button to confirm the data just inserted.\n\nRecall that a refresh token is a special kind of token that contains the information required to obtain a new access token or ID token. Using refresh tokens in your Electron app lets it automatically sign in users when they close and open your application again \u0026mdash; as long as they don't log out.\n\nThe **Identifier** value from the _**Settings**_ of the API is the value that you need to use for audience. Head back to the `env-variables.json` file in your API project and paste it as the value of `apiIdentifier`.\n\nYou now also need to set up this audience value in your Electron project. But first, run the API server as follows:\n\n```bash\nnpm start\n```\n\n### Configure Electron to make secure API calls\n\nHead to your Electron project, open `env-variables.json`, and add an `apiIdentifier` property to the existing object. The value of `apiIdentifier` is the same value you used for `apiIdentifier` in the Express project. Your final file should look like this:\n\n```json\n{\n \"auth0Domain\": \"your-auth0-tenant-name.auth0.com\",\n \"clientId\": \"your-electron-app-client-id-from-auth0\",\n \"apiIdentifier\": \"https://my-resource-server\"\n}\n```\n\nNow, you need to pass an `audience` query parameter in the authentication URL that you have defined in the authentication service.\n\nOpen `services/auth-service.js`, locate the `getAuthenticationURL()` function, and replace it with the following:\n\n```javascript\nfunction getAuthenticationURL() {\n return 'https://' + auth0Domain + '/authorize?' +\n 'audience=' + apiIdentifier + '\u0026' +\n 'scope=openid profile offline_access\u0026' +\n 'response_type=code\u0026' +\n 'client_id=' + clientId + '\u0026' +\n 'redirect_uri=' + redirectUri;\n}\n```\n\nThat's it for updating the service.\n\nIf your Electron application is running, click the log out button. If not, run it, and, if you are not asked to log in, click the log out button. You need to log in again for the authentication server to send back to your Electron app an access token that accounts for the `audience` parameter. If you were to use the existing access token, the API would deem it invalid as it will lack an [`aud` claim](https://tools.ietf.org/html/rfc7519#section-4.1.3).\n\nAfter you run your Electron app and log in again, click the \"Get Private Message\" button. If the request is successful, a message should display within a gray box as follows:\n\n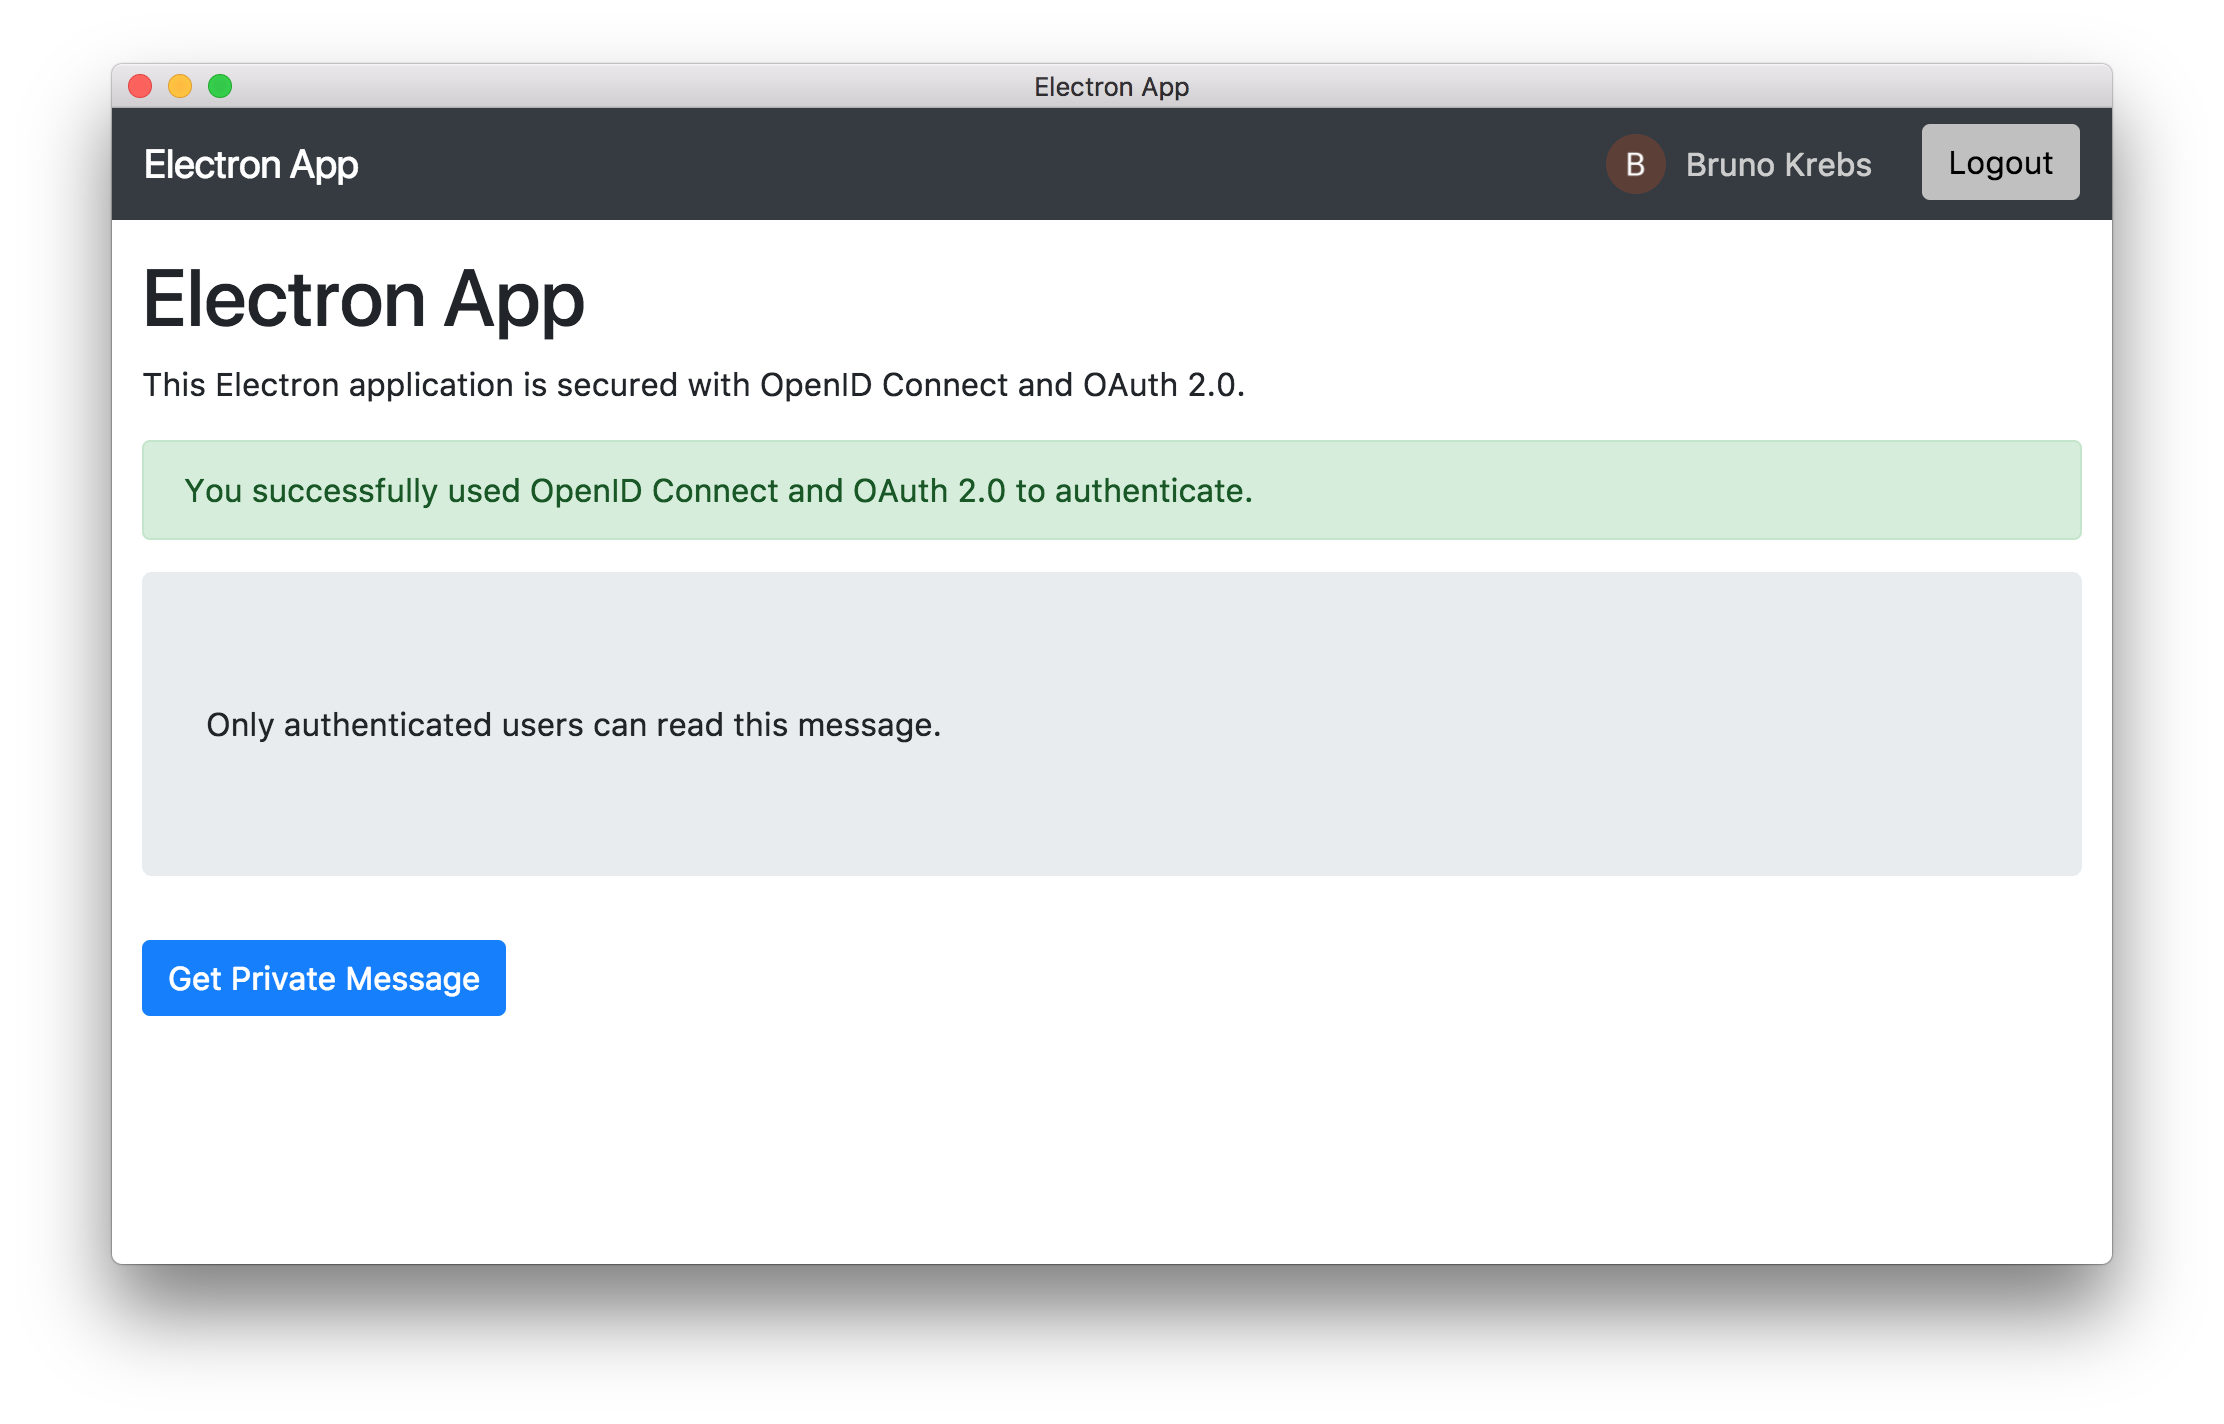\n\n## Conclusion\n\nIn this tutorial, you learned how to secure an Electron app using Auth0 to enable user authentication and access to protected resources from a secured API. You also saw in action the different processes that power the Electron framework: the main and the renderer processes.\n\nYou also got a glimpse of what setting up a Node.js Express API looks like with Auth0. If you want to learn in more detail how to develop secured RESTful APIs with Node.js, Express, and Auth0, check out the [Node.js and Express Tutorial: Building and Securing RESTful APIs](https://auth0.com/blog/node-js-and-express-tutorial-building-and-securing-restful-apis/) blog post.\n\nYou can download [the full code of the Electron application and the API from this GitHub repository](https://github.com/auth0-blog/electron-openid-oauth).","readTime":24,"formattedDate":"Jul 29, 2022"},{"path":"developing-restful-apis-with-python-and-flask","title":"Developing RESTful APIs with Python and Flask","heroImage":{"url":"https://images.ctfassets.net/23aumh6u8s0i/6uBzrqHNLlSAoER6HtgDN0/accd8f871b1de37f472b94da4346afa2/python-hero","size":{"width":1176,"height":1056}},"category":["Developers","Tutorial","Python"],"authors":[{"metadata":{"tags":[],"concepts":[]},"sys":{"space":{"sys":{"type":"Link","linkType":"Space","id":"23aumh6u8s0i"}},"id":"53ermIQhgEs7w3sBNLtdrl","type":"Entry","createdAt":"2021-03-22T08:18:12.111Z","updatedAt":"2023-01-25T20:37:03.769Z","environment":{"sys":{"id":"master","type":"Link","linkType":"Environment"}},"publishedVersion":9,"revision":4,"contentType":{"sys":{"type":"Link","linkType":"ContentType","id":"author"}},"locale":"en-US"},"fields":{"path":"bruno-krebs","name":"Bruno Krebs","avatar":{"metadata":{"tags":[],"concepts":[]},"sys":{"space":{"sys":{"type":"Link","linkType":"Space","id":"23aumh6u8s0i"}},"id":"H7mkLrAoB5N10mbKVUc4o","type":"Asset","createdAt":"2021-03-22T08:29:02.968Z","updatedAt":"2021-03-22T08:29:02.968Z","environment":{"sys":{"id":"master","type":"Link","linkType":"Environment"}},"publishedVersion":2,"revision":1,"locale":"en-US"},"fields":{"title":"bruno-krebs","description":"bruno-krebs avatar","file":{"url":"//images.ctfassets.net/23aumh6u8s0i/H7mkLrAoB5N10mbKVUc4o/641e80c0533fb487547e9da7fe7a18fc/bruno-krebs","details":{"size":23890,"image":{"width":160,"height":160}},"fileName":"bruno-krebs","contentType":"image/jpeg"}}},"lastUpdatedBy":"robertino.calcaterra@auth0.com","email":"bruno.krebs@auth0.com","twitter":"https://twitter.com/brunoskrebs","github":"http://github.com/brunokrebs/","linkedin":"https://www.linkedin.com/in/brunokrebs","isPopular":false,"personalWebsite":null,"type":"Former Auth0 Employee","jobTitle":"R\u0026D Content Architect","description":"I am passionate about developing highly scalable, resilient applications. I love everything from the database, to microservices (Kubernetes, Docker, etc), to the frontend. I find amazing to think about how all pieces work together to provide a fast and pleasurable experience to end users, mainly because they have no clue how complex that \"simple\" app is."}},{"metadata":{"tags":[],"concepts":[]},"sys":{"space":{"sys":{"type":"Link","linkType":"Space","id":"23aumh6u8s0i"}},"id":"7qC8LJD80VSx1qYcSdQ1Zh","type":"Entry","createdAt":"2021-08-23T12:59:46.069Z","updatedAt":"2025-01-08T14:00:38.100Z","environment":{"sys":{"id":"master","type":"Link","linkType":"Environment"}},"publishedVersion":42,"revision":6,"contentType":{"sys":{"type":"Link","linkType":"ContentType","id":"author"}},"locale":"en-US"},"fields":{"path":"juan-cruz-martinez","name":"Juan Cruz Martinez","avatar":{"metadata":{"tags":[{"sys":{"type":"Link","linkType":"Tag","id":"user"}}],"concepts":[]},"sys":{"space":{"sys":{"type":"Link","linkType":"Space","id":"23aumh6u8s0i"}},"id":"5b3YvfAb53h2I5U6uanww4","type":"Asset","createdAt":"2022-07-07T09:23:40.589Z","updatedAt":"2022-07-07T09:23:56.422Z","environment":{"sys":{"id":"master","type":"Link","linkType":"Environment"}},"publishedVersion":10,"revision":5,"locale":"en-US"},"fields":{"title":"jcm","description":"Juan Cruz Martinez","file":{"url":"//images.ctfassets.net/23aumh6u8s0i/5b3YvfAb53h2I5U6uanww4/f1dfa0e19f15f5df8eacd53f78a813f6/jcm.jpeg","details":{"size":29371,"image":{"width":400,"height":400}},"fileName":"jcm.jpeg","contentType":"image/jpeg"}}},"lastUpdatedBy":"Juan Cruz Martinez","email":"juan.martinez@okta.com","twitter":"https://twitter.com/bajcmartinez","github":"https://github.com/bajcmartinez","linkedin":"https://www.linkedin.com/in/bajcmartinez/","isPopular":true,"personalWebsite":"https://jcmartinez.dev/","type":"Auth0 Employee","jobTitle":"Staff Developer Advocate","description":"I stream, blog, and make youtube videos about tech stuff. I love coding, I love AI, and I love building stuff!"}}],"redirectTo":null,"isHiddenFromBlogPostGrid":null,"lang":"en","tags":["python","flask","restful"],"dateCreated":"2017-09-28T15:29","dateLastUpdated":"2025-01-07","postContent":"**TL;DR:** Throughout this article, we will use Flask and Python to develop a RESTful API. We will create an endpoint that returns static data (dictionaries). Afterward, we will create a class with two specializations and a few endpoints to insert and retrieve instances of these classes. Finally, we will look at how to run the API on a Docker container. [The final code developed throughout this article is available in this GitHub repository](https://github.com/auth0-blog/flask-restful-apis). I hope you enjoy it!\n\n\u003cinclude src=\"TweetQuote\" quoteText=\"Flask allows Python developers to create lightweight RESTful APIs.\"/\u003e\n\n## Summary\n\nThis article is divided into the following sections:\n\n1. \u003ca href=\"#why-python\" target=\"_self\"\u003eWhy Python?\u003c/a\u003e\n2. \u003ca href=\"#why-flask\" target=\"_self\"\u003eWhy Flask?\u003c/a\u003e\n3. \u003ca href=\"#bootstrapping-flask\" target=\"_self\"\u003eBootstrapping a Flask Application\u003c/a\u003e\n4. \u003ca href=\"#restful-flask\" target=\"_self\"\u003eCreating a RESTful Endpoint with Flask\u003c/a\u003e\n5. \u003ca href=\"#python-classes\" target=\"_self\"\u003eMapping Models with Python Classes\u003c/a\u003e\n6. \u003ca href=\"#marshmallow-serilization\" target=\"_self\"\u003eSerializing and Deserializing Objects with Marshmallow\u003c/a\u003e\n7. \u003ca href=\"#flask-on-docker\" target=\"_self\"\u003eDockerizing Flask Applications\u003c/a\u003e\n8. \u003ca href=\"#securing-python-apis\" target=\"_self\"\u003eSecuring Python APIs with Auth0\u003c/a\u003e\n9. \u003ca href=\"#next-steps\" target=\"_self\"\u003eNext Steps\u003c/a\u003e\n\n## \u003cspan id=\"why-python\"\u003e\u003c/span\u003e Why Python?\n\nNowadays, choosing Python to develop applications is becoming a very popular choice. [As StackOverflow recently analyzed](https://survey.stackoverflow.co/2022/#technology-most-popular-technologies), Python is one of the fastest-growing programming languages, having surpassed even Java in the number of questions asked on the platform. On GitHub, the language also shows signs of mass adoption, occupying the second position among the [top programming languages in 2021](https://octoverse.github.com/).\n\n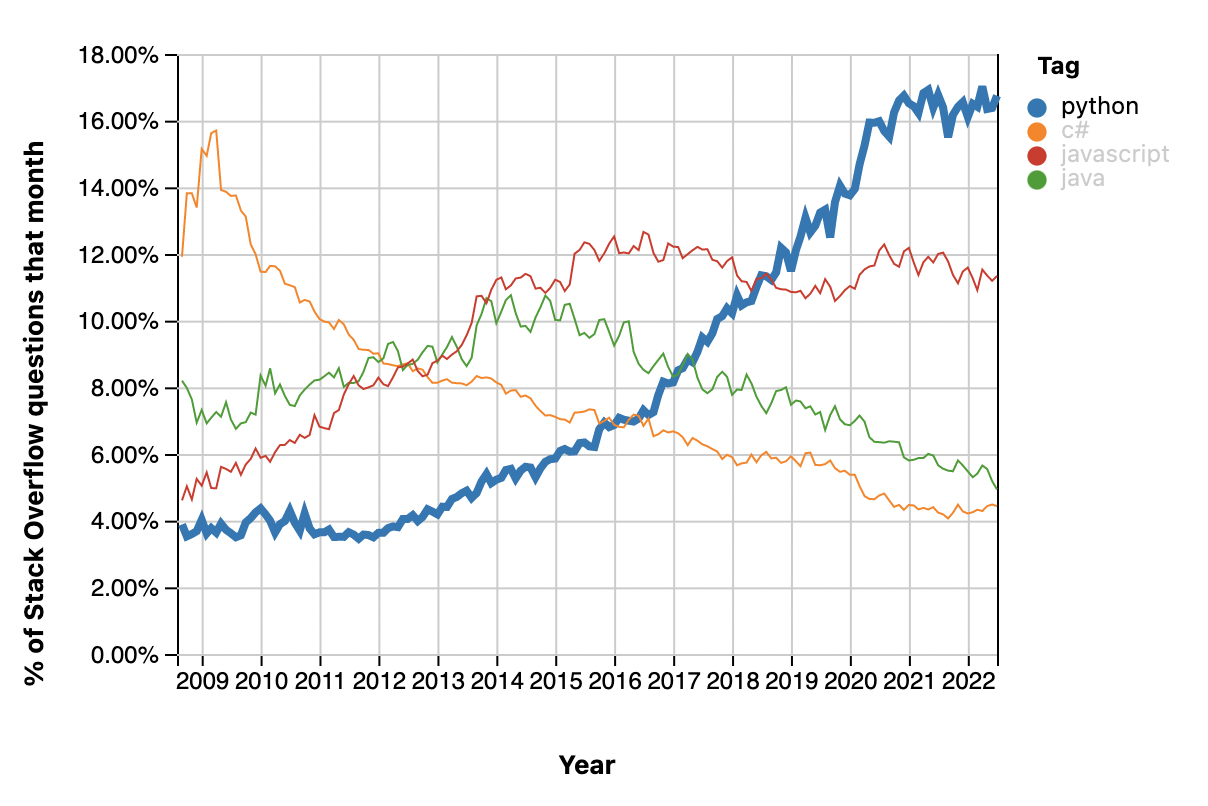\n\nThe huge community forming around Python is improving every aspect of the language. More and more open source libraries are being released to address many different subjects, like [Artificial Intelligence](https://github.com/aimacode/aima-python), [Machine Learning](https://github.com/rasbt/python-machine-learning-book), and [web development](https://github.com/pallets/flask). Besides the tremendous support provided by the overall community, the [Python Software Foundation also provides excellent documentation](https://docs.python.org/3/), where new adopters can learn its essence fast.\n\n## \u003cspan id=\"why-flask\"\u003e\u003c/span\u003e Why Flask?\n\nWhen it comes to web development on Python, there are three predominant frameworks: [Django](https://github.com/django/django), [Flask](https://github.com/pallets/flask), and a relatively new player [FastAPI](https://fastapi.tiangolo.com/). Django is older, more mature, and a little bit more popular. On GitHub, this framework has around 66k stars, 2.2k contributors, ~350 releases, and more than 25k forks.\n\nFastAPI is growing at high speed, with 48k stars on Github, 370 contributors, and more than 3.9k forks. This elegant framework built for high-performance and fast-to-code APIs is not one to miss.\n\nFlask, although less popular, is not far behind. On GitHub, Flask has almost 60k stars, ~650 contributors, ~23 releases, and nearly 15k forks.\n\nEven though Django is older and has a slightly more extensive community, Flask has its strengths. From the ground up, Flask was built with scalability and simplicity. Flask applications are known for being lightweight, mainly compared to their Django counterparts. Flask developers call it a microframework, where micro ([as explained here](http://flask.pocoo.org/docs/0.12/foreword/#what-does-micro-mean)) means that the goal is to keep the core simple but extensible. Flask won't make many decisions for us, such as what database to use or what template engine to choose. Lastly, Flask has [extensive documentation](http://flask.pocoo.org/docs/0.12/) that addresses everything developers need to start.\nFastAPI follows a similar \"micro\" approach to Flask, though it provides more tools like automatic Swagger UI and is an excellent choice for APIs. However, as it is a newer framework, many more resources and libraries are compatible with frameworks like Django and Flask but not with FastAPI.\n\nBeing lightweight, easy to adopt, well-documented, and popular, Flask is a good option for developing RESTful APIs.\n\n## \u003cspan id=\"bootstrapping-flask\"\u003e\u003c/span\u003e Bootstrapping a Flask Application\n\nFirst and foremost, we will need to install some dependencies on our development machine. We will need to install [Python 3](https://docs.python.org/3/), [Pip (Python Package Index)](https://pypi.python.org/pypi/pip), and [Flask](http://flask.pocoo.org/).\n\n### Installing Python 3\n\nIf we are using some recent version of a popular Linux distribution (like Ubuntu) or macOS, we might already have Python 3 installed on our computer. If we are running Windows, [we will probably need to install Python 3](https://www.python.org/downloads/windows/), as this operating system does not ship with any version.\n\nAfter installing Python 3 on our machine, we can check that we have everything set up as expected by running the following command:\n\n```bash\npython --version\n# Python 3.8.9\n```\n\nNote that the command above might produce a different output when we have a different Python version. What is important is that you are running at least `Python 3.7` or newer. If we get \"Python 2\" instead, we can try issuing `python3 --version`. If this command produces the correct output, we must replace all commands throughout the article to use `python3` instead of just `python`.\n\n### Installing Pip\n\nPip is the recommended tool for installing Python packages. While the [official installation page](https://pip.pypa.io/en/stable/installing/) states that `pip` comes installed if we're using Python 2 \u003e= `2.7.9` or Python 3 \u003e= `3.4`, installing Python through `apt` on Ubuntu doesn't install `pip`. Therefore, let's check if we need to install `pip` separately or already have it.\n\n```bash\n# we might need to change pip by pip3\npip --version\n# pip 9.0.1 ... (python 3.X)\n```\n\nIf the command above produces an output similar to `pip 9.0.1 ... (python 3.X)`, then we are good to go. If we get `pip 9.0.1 ... (python 2.X)`, we can try replacing `pip` with `pip3`. If we cannot find Pip for Python 3 on our machine, we can follow the instructions [here to install Pip](https://pip.pypa.io/en/stable/installing/).\n\n### Installing Flask\n\nWe already know what Flask is and its capabilities. Therefore, let's focus on installing it on our machine and testing to see if we can get a basic Flask application running. The first step is to use `pip` to install Flask:\n\n```bash\n# we might need to replace pip with pip3\npip install Flask\n```\n\nAfter installing the package, we will create a file called `hello.py` and add five lines of code to it. As we will use this file to check if Flask was correctly installed, we don't need to nest it in a new directory.\n\n```python\n# hello.py\n\nfrom flask import Flask\n\napp = Flask(__name__)\n\n@app.route(\"/\")\ndef hello_world():\n return \"Hello, World!\"\n```\n\nThese 5 lines of code are everything we need to handle HTTP requests and return a \"Hello, World!\" message. To run it, we execute the following command:\n\n```bash\nflask --app hello run\n\n * Serving Flask app 'hello'\n * Debug mode: off\nWARNING: This is a development server. Do not use it in a production deployment. Use a production WSGI server instead.\n * Running on http://127.0.0.1:5000\nPress CTRL+C to quit\n```\n\n\u003e On Ubuntu, we might need to edit the `$PATH` variable to be able to run flask directly. To do that, let's `touch ~/.bash_aliases` and then `echo \"export PATH=$PATH:~/.local/bin\" \u003e\u003e ~/.bash_aliases`.\n\nAfter executing these commands, we can reach our application by opening a browser and navigating to `http://127.0.0.1:5000/` or by issuing `curl http://127.0.0.1:5000/`.\n\n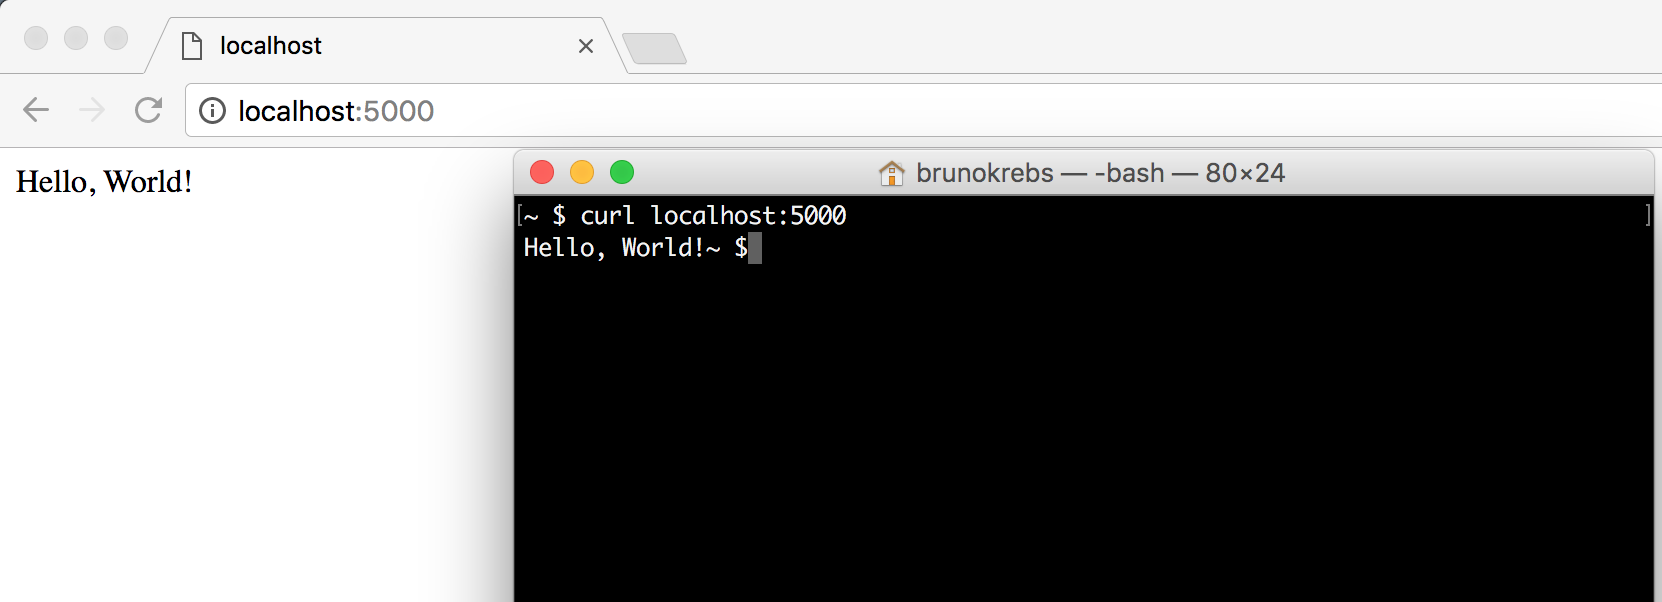\n\n### Virtual environments (virtualenv)\n\nAlthough PyPA—the [Python Packaging Authority group](https://www.pypa.io/en/latest/)—recommends `pip` as the tool for installing Python packages, we will need to use another package to manage our project's dependencies. It's true that `pip` supports [package management through the `requirements.txt` file](https://pip.pypa.io/en/stable/user_guide/#requirements-files), but the tool lacks some features required on serious projects running on different production and development machines. Among its issues, the ones that cause the most problems are:\n\n- `pip` installs packages globally, making it hard to manage multiple versions of the same package on the same machine.\n- `requirements.txt` need all dependencies and sub-dependencies listed explicitly, a manual process that is tedious and error-prone.\n\nTo solve these issues, we are going to use Pipenv. [Pipenv is a dependency manager](https://github.com/kennethreitz/pipenv) that isolates projects in private environments, allowing packages to be installed per project. If you're familiar with NPM or Ruby's bundler, it's similar in spirit to those tools.\n\n```bash\npip install pipenv\n```\n\nNow, to start creating a serious Flask application, let's create a new directory that will hold our source code. In this article, we will create *Cashman*, a small RESTful API that allows users to manage incomes and expenses. Therefore, we will create a directory called `cashman-flask-project`. After that, we will use `pipenv` to start our project and manage our dependencies.\n\n```bash\n# create our project directory and move to it\nmkdir cashman-flask-project \u0026\u0026 cd cashman-flask-project\n\n# use pipenv to create a Python 3 (--three) virtualenv for our project\npipenv --three\n\n# install flask a dependency on our project\npipenv install flask\n```\n\nThe second command creates our virtual environment, where all our dependencies get installed, and the third will add Flask as our first dependency. If we check our project's directory, we will see two new files:\n\n1. `Pipfile` contains details about our project, such as the Python version and the packages needed.\n2. `Pipenv.lock` contains precisely what version of each package our project depends on and its transitive dependencies.\n\n### Python packages\n\nLike other mainstream programming languages, [Python also has the concept of packages](https://docs.python.org/3/tutorial/modules.html#packages) to enable developers to organize source code according to subjects/functionalities. Similar to Java packages and C# namespaces, packages in Python are files organized in directories that other Python scripts can import. To create a package in a Python application, we need to create a folder and add an empty file called `__init__.py`.\n\nLet's create our first package in our application, the main package, with all our RESTful endpoints. Inside the application's directory, let's create another one with the same name, `cashman`. The root `cashman-flask-project` directory created before will hold metadata about our project, like what dependencies it has, while this new one will be our package with our Python scripts.\n\n```bash\n# create source code's root\nmkdir cashman \u0026\u0026 cd cashman\n\n# create an empty __init__.py file\ntouch __init__.py\n```\n\nInside the main package, let's create a script called `index.py`. In this script, we will define the first endpoint of our application.\n\n```python\nfrom flask import Flask\napp = Flask(__name__)\n\n\n@app.route(\"/\")\ndef hello_world():\n return \"Hello, World!\"\n```\n\nAs in the previous example, our application returns a \"Hello, world!\" message. We will start improving it in a second, but first, let's create an executable file called `bootstrap.sh` in the root directory of our application.\n\n```bash\n# move to the root directory\ncd ..\n\n# create the file\ntouch bootstrap.sh\n\n# make it executable\nchmod +x bootstrap.sh\n```\n\nThe goal of this file is to facilitate the start-up of our application. Its source code will be the following:\n\n```sh\n#!/bin/sh\nexport FLASK_APP=./cashman/index.py\npipenv run flask --debug run -h 0.0.0.0\n```\n\nThe first command defines the main script to be executed by Flask. The second command runs our Flask application in the context of the virtual environment listening to all interfaces on the computer (`-h 0.0.0.0`).\n\n\u003e Note: we are setting flask to run in debug mode to enhance our development experience and activate the hot reload feature, so we don't have to restart the server each time we change the code. If you run Flask in production, we recommend updating these settings for production.\n\nTo check that this script is working correctly, we run `./bootstrap.sh` to get similar results as when executing the \"Hello, world!\" application.\n\n```bash\n * Serving Flask app './cashman/index.py'\n * Debug mode: on\nWARNING: This is a development server. Do not use it in a production deployment. Use a production WSGI server instead.\n * Running on all addresses (0.0.0.0)\n * Running on http://127.0.0.1:5000\n * Running on http://192.168.1.207:5000\nPress CTRL+C to quit\n```\n\n## \u003cspan id=\"restful-flask\"\u003e\u003c/span\u003e Creating a RESTful Endpoint with Flask\n\nNow that our application is structured, we can start coding some relevant endpoints. As mentioned before, the goal of our application is to help users to manage incomes and expenses. We will begin by defining two endpoints to handle incomes. Let's replace the contents of the `./cashman/index.py` file with the following:\n\n```python\nfrom flask import Flask, jsonify, request\n\napp = Flask(__name__)\n\nincomes = [\n { 'description': 'salary', 'amount': 5000 }\n]\n\n\n@app.route('/incomes')\ndef get_incomes():\n return jsonify(incomes)\n\n\n@app.route('/incomes', methods=['POST'])\ndef add_income():\n incomes.append(request.get_json())\n return '', 204\n```\n\nSince improving our application, we have removed the endpoint that returned \"Hello, world!\" to users. In its place, we defined an endpoint to handle HTTP `GET` requests to return incomes and another endpoint to handle HTTP `POST` requests to add new ones. These endpoints are annotated with `@app.route` to define routes listening to requests on the `/incomes` endpoint. [Flask provides great documentation on what exactly this does](http://flask.pocoo.org/docs/0.12/api/#flask.Flask.route).\n\nTo facilitate the process, we currently manipulate incomes as [dictionaries](https://docs.python.org/3/tutorial/datastructures.html#dictionaries). However, we will soon create classes to represent incomes and expenses.\n\nTo interact with both endpoints that we have created, we can start our application and issue some HTTP requests:\n\n```bash\n# start the cashman application\n./bootstrap.sh \u0026\n\n# get incomes\ncurl http://localhost:5000/incomes\n\n# add new income\ncurl -X POST -H \"Content-Type: application/json\" -d '{\n \"description\": \"lottery\",\n \"amount\": 1000.0\n}' http://localhost:5000/incomes\n\n# check if lottery was added\ncurl localhost:5000/incomes\n```\n\n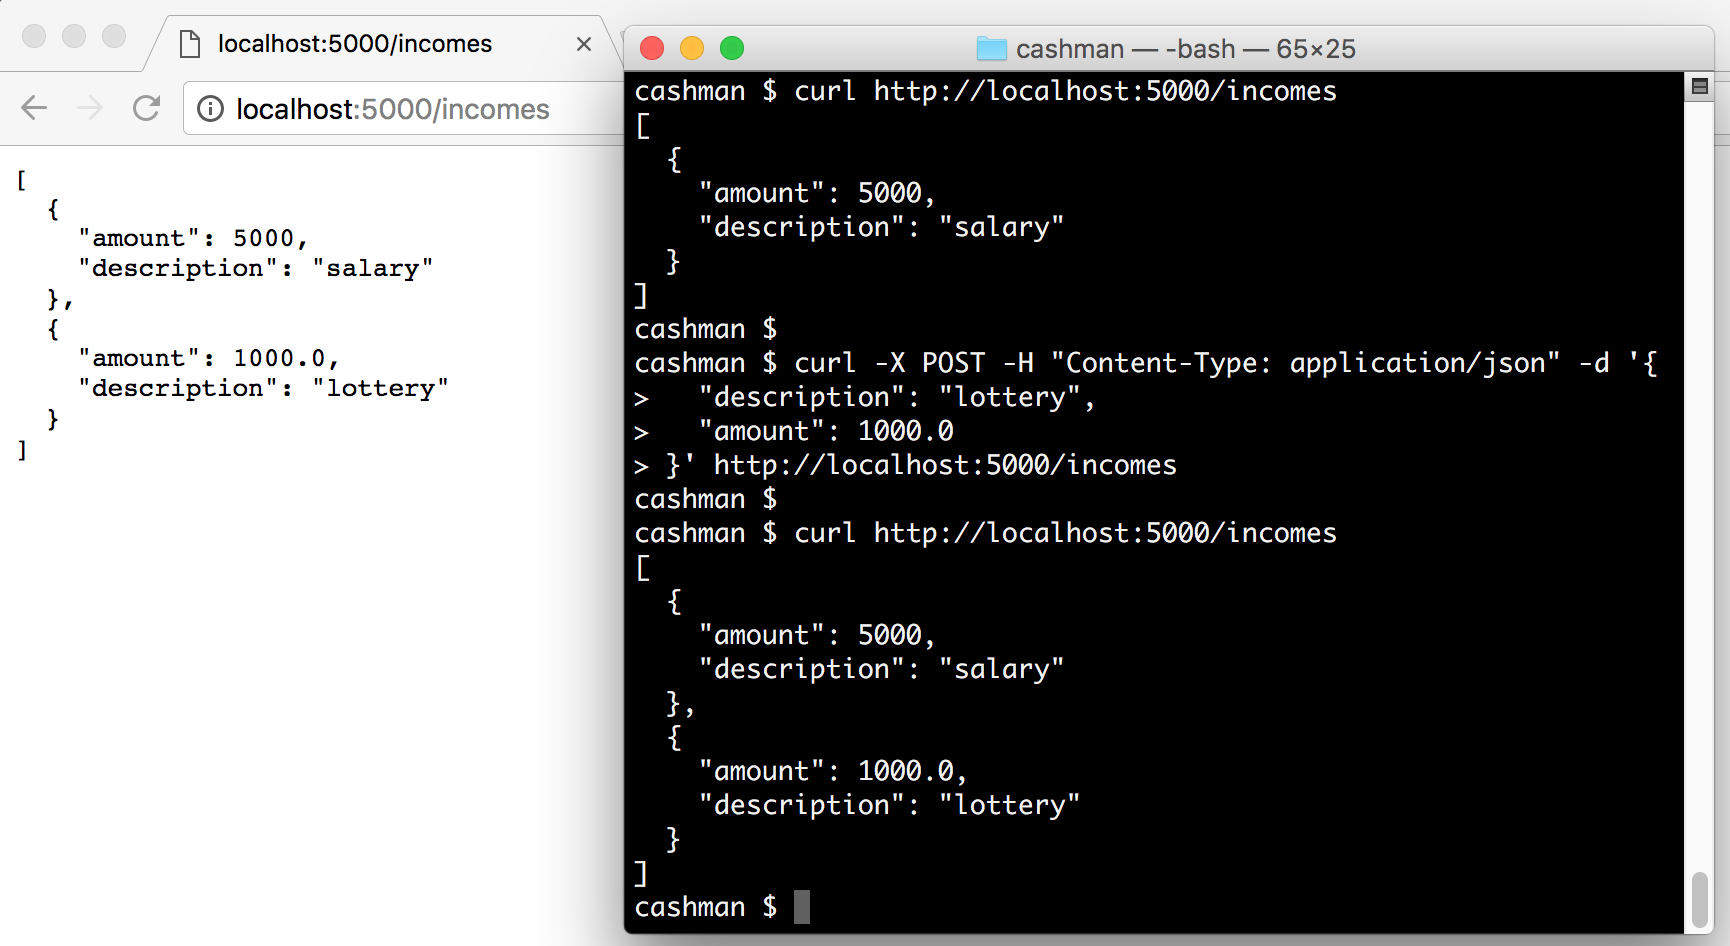\n\n## \u003cspan id=\"python-classes\"\u003e\u003c/span\u003e Mapping Models with Python Classes\n\nUsing dictionaries in a simple use case like the one above is enough. However, for more complex applications that deal with different entities and have multiple business rules and validations, we might need to encapsulate our data into [Python classes](https://docs.python.org/3/tutorial/classes.html).\n\nWe will refactor our application to learn the process of mapping entities (like incomes) as classes. The first thing that we will do is create a subpackage to hold all our entities. Let's create a `model` directory inside the `cashman` package and add an empty file called `__init__.py` on it.\n\n```bash\n# create model directory inside the cashman package\nmkdir -p cashman/model\n\n# initialize it as a package\ntouch cashman/model/__init__.py\n```\n\n### Mapping a Python Superclass\n\nWe will create three classes in this new directory: `Transaction`, `Income`, and `Expense`. The first class will be the base for the two others, and we will call it `Transaction`. Let's create a file called `transaction.py` in the `model` directory with the following code:\n\n```python\nimport datetime as dt\n\nfrom marshmallow import Schema, fields\n\n\nclass Transaction(object):\n def __init__(self, description, amount, type):\n self.description = description\n self.amount = amount\n self.created_at = dt.datetime.now()\n self.type = type\n\n def __repr__(self):\n return '\u003cTransaction(name={self.description!r})\u003e'.format(self=self)\n\n\nclass TransactionSchema(Schema):\n description = fields.Str()\n amount = fields.Number()\n created_at = fields.Date()\n type = fields.Str()\n```\n\nBesides the `Transaction` class, we also defined a `TransactionSchema`. We will use the latter to deserialize and serialize instances of `Transaction` from and to JSON objects. This class inherits from another superclass called `Schema` that belongs on a package not yet installed.\n\n```bash\n# installing marshmallow as a project dependency\npipenv install marshmallow\n```\n\n[Marshmallow is a popular Python package](https://marshmallow.readthedocs.io/en/latest/) for converting complex datatypes, such as objects, to and from built-in Python datatypes. We can use this package to validate, serialize, and deserialize data. We won't dive into validation in this article, as it will be the subject of another one. Though, as mentioned, we will use `marshmallow` to serialize and deserialize entities through our endpoints.\n\n### Mapping Income and Expense as Python Classes\n\nTo keep things more organized and meaningful, we won't expose the `Transaction` class on our endpoints. We will create two specializations to handle the requests: `Income` and `Expense`. Let's make a module called `income.py` inside the `model` package with the following code:\n\n```python\nfrom marshmallow import post_load\n\nfrom .transaction import Transaction, TransactionSchema\nfrom .transaction_type import TransactionType\n\n\nclass Income(Transaction):\n def __init__(self, description, amount):\n super(Income, self).__init__(description, amount, TransactionType.INCOME)\n\n def __repr__(self):\n return '\u003cIncome(name={self.description!r})\u003e'.format(self=self)\n\n\nclass IncomeSchema(TransactionSchema):\n @post_load\n def make_income(self, data, **kwargs):\n return Income(**data)\n```\n\nThe only value that this class adds for our application is that it hardcodes the type of transaction. This type is a [Python enumerator](https://docs.python.org/3/library/enum.html), which we still have to create, that will help us filter transactions in the future. Let's create another file, called `transaction_type.py`, inside `model` to represent this enumerator:\n\n```python\nfrom enum import Enum\n\n\nclass TransactionType(Enum):\n INCOME = \"INCOME\"\n EXPENSE = \"EXPENSE\"\n```\n\nThe code of the enumerator is quite simple. It just defines a class called `TransactionType` that inherits from `Enum` and that defines two types: `INCOME` and `EXPENSE`.\n\nLastly, let's create the class that represents expenses. To do that, let's add a new file called `expense.py` inside `model` with the following code:\n\n```python\nfrom marshmallow import post_load\n\nfrom .transaction import Transaction, TransactionSchema\nfrom .transaction_type import TransactionType\n\n\nclass Expense(Transaction):\n def __init__(self, description, amount):\n super(Expense, self).__init__(description, -abs(amount), TransactionType.EXPENSE)\n\n def __repr__(self):\n return '\u003cExpense(name={self.description!r})\u003e'.format(self=self)\n\n\nclass ExpenseSchema(TransactionSchema):\n @post_load\n def make_expense(self, data, **kwargs):\n return Expense(**data)\n```\n\nSimilar to `Income`, this class hardcodes the type of the transaction, but now it passes `EXPENSE` to the superclass. The difference is that it transforms the given `amount` to be negative. Therefore, no matter if the user sends a positive or a negative value, we will always store it as negative to facilitate calculations.\n\n## \u003cspan id=\"marshmallow-serilization\"\u003e\u003c/span\u003e Serializing and Deserializing Objects with Marshmallow\n\nWith the `Transaction` superclass and its specializations adequately implemented, we can now enhance our endpoints to deal with these classes. Let's replace `./cashman/index.py` contents to:\n\n```bash\nfrom flask import Flask, jsonify, request\n\nfrom cashman.model.expense import Expense, ExpenseSchema\nfrom cashman.model.income import Income, IncomeSchema\nfrom cashman.model.transaction_type import TransactionType\n\napp = Flask(__name__)\n\ntransactions = [\n Income('Salary', 5000),\n Income('Dividends', 200),\n Expense('pizza', 50),\n Expense('Rock Concert', 100)\n]\n\n\n@app.route('/incomes')\ndef get_incomes():\n schema = IncomeSchema(many=True)\n incomes = schema.dump(\n filter(lambda t: t.type == TransactionType.INCOME, transactions)\n )\n return jsonify(incomes)\n\n\n@app.route('/incomes', methods=['POST'])\ndef add_income():\n income = IncomeSchema().load(request.get_json())\n transactions.append(income)\n return \"\", 204\n\n\n@app.route('/expenses')\ndef get_expenses():\n schema = ExpenseSchema(many=True)\n expenses = schema.dump(\n filter(lambda t: t.type == TransactionType.EXPENSE, transactions)\n )\n return jsonify(expenses)\n\n\n@app.route('/expenses', methods=['POST'])\ndef add_expense():\n expense = ExpenseSchema().load(request.get_json())\n transactions.append(expense)\n return \"\", 204\n\n\nif __name__ == \"__main__\":\n app.run()\n```\n\nThe new version that we just implemented starts by redefining the `incomes` variable into a list of `Expenses` and `Incomes`, now called `transactions`. Besides that, we have also changed the implementation of both methods that deal with incomes. For the endpoint used to retrieve incomes, we defined an instance of `IncomeSchema` to produce a JSON representation of incomes. We also used [`filter`](https://docs.python.org/3/library/functions.html#filter) to extract incomes only from the `transactions` list. In the end we send the array of JSON incomes back to users.\n\nThe endpoint responsible for accepting new incomes was also refactored. The change on this endpoint was the addition of `IncomeSchema` to load an instance of `Income` based on the JSON data sent by the user. As the `transactions` list deals with instances of `Transaction` and its subclasses, we just added the new `Income` in that list.\n\nThe other two endpoints responsible for dealing with expenses, `get_expenses` and `add_expense`, are almost copies of their `income` counterparts. The differences are:\n\n- instead of dealing with instances of `Income`, we deal with instances of `Expense` to accept new expenses,\n- and instead of filtering by `TransactionType.INCOME`, we filter by `TransactionType.EXPENSE` to send expenses back to the user.\n\nThis finishes the implementation of our API. If we run our Flask application now, we will be able to interact with the endpoints, as shown here:\n\n```bash\n# start the application\n./bootstrap.sh\n\n# get expenses\ncurl http://localhost:5000/expenses\n\n# add a new expense\ncurl -X POST -H \"Content-Type: application/json\" -d '{\n \"amount\": 20,\n \"description\": \"lottery ticket\"\n}' http://localhost:5000/expenses\n\n# get incomes\ncurl http://localhost:5000/incomes\n\n# add a new income\ncurl -X POST -H \"Content-Type: application/json\" -d '{\n \"amount\": 300.0,\n \"description\": \"loan payment\"\n}' http://localhost:5000/incomes\n```\n\n## \u003cspan id=\"flask-on-docker\"\u003e\u003c/span\u003e Dockerizing Flask Applications\n\nAs we are planning to eventually release our API in the cloud, we are going to create a `Dockerfile` to describe what is needed to run the application on a Docker container. We need to [install Docker on our development machine](https://docs.docker.com/engine/installation/) to test and run dockerized instances of our project. Defining a Docker recipe (`Dockerfile`) will help us run the API in different environments. That is, in the future, we will also install Docker and run our program on environments like [production](https://en.wikipedia.org/wiki/Deployment_environment#Production) and [staging](https://en.wikipedia.org/wiki/Deployment_environment#Staging).\n\nLet's create the `Dockerfile` in the root directory of our project with the following code:\n\n```bash\n# Using lightweight alpine image\nFROM python:3.8-alpine\n\n# Installing packages\nRUN apk update\nRUN pip install --no-cache-dir pipenv\n\n# Defining working directory and adding source code\nWORKDIR /usr/src/app\nCOPY Pipfile Pipfile.lock bootstrap.sh ./\nCOPY cashman ./cashman\n\n# Install API dependencies\nRUN pipenv install --system --deploy\n\n# Start app\nEXPOSE 5000\nENTRYPOINT [\"/usr/src/app/bootstrap.sh\"]\n```\n\nThe first item in the recipe defines that we will create our Docker container based on the default [Python 3 Docker image](https://hub.docker.com/_/python/). After that, we update APK and install `pipenv`. Having `pipenv`, we define the working directory we will use in the image and copy the code needed to bootstrap and run the application. In the fourth step, we use `pipenv` to install all our Python dependencies. Lastly, we define that our image will communicate through port `5000` and that this image, when executed, needs to run the `bootstrap.sh` script to start Flask.\n\n\u003e Note: For our `Dockerfile`, we use Python version 3.8, however, depending on your system configuration, `pipenv` may have set a different version for Python in the file `Pipfile`. Please make sure that the Python version in both `Dockerfile` and `Pipfile` are aligned, or the docker container won't be able to start the server.\n\nTo create and run a Docker container based on the `Dockerfile` that we created, we can execute the following commands:\n\n```bash\n# build the image\ndocker build -t cashman .\n\n# run a new docker container named cashman\ndocker run --name cashman \\\n -d -p 5000:5000 \\\n cashman\n\n# fetch incomes from the dockerized instance\ncurl http://localhost:5000/incomes/\n```\n\nThe `Dockerfile` is simple but effective, and using it is similarly easy. With these commands and this `Dockerfile`, we can run as many instances of our API as we need with no trouble. It's just a matter of defining another port on the host or even another host.\n\n\u003cinclude src=\"asides/Python\" /\u003e\n\n## \u003cspan id=\"next-steps\"\u003e\u003c/span\u003e Next Steps\n\nIn this article, we learned about the basic components needed to develop a well-structured Flask application. We looked at how to use `pipenv` to manage the dependencies of our API. After that, we installed and used Flask and Marshmallow to create endpoints capable of receiving and sending JSON responses. In the end, we also looked at how to dockerize the API, which will facilitate the release of the application to the cloud.\n\nAlthough well structured, our API is not that useful yet. Among the things that we can improve, we are going to cover the following topics in the following article:\n\n- [Database persistence with SQLAlchemy](https://auth0.com/blog/sqlalchemy-orm-tutorial-for-python-developers/)\n- [Add authorization to a Flask API application](https://auth0.com/docs/quickstart/backend/python/interactive)\n- [How to handle JWTs in Python](https://auth0.com/blog/how-to-handle-jwt-in-python/)\n\nStay tuned!\n","readTime":19,"formattedDate":"Jan 7, 2025"}],"tags":["authentication","identity","authorization","javascript","auth0","api","universal-login","saas","release","announcement","python","security","fga","login","passkeys","management","next.js","nextjs","customer-identity","demos","actions","cli","react","sdk","ios","flutter","flask","openid-connect","rag","ai","langchain","rebac","abac","rbac","mfa","fido","passwordless","passwords","m2m","scopes","templates","js","scripts","cloud","pulumi","infrastructure","typescript","mobile","android","native","rest","fastapi","oauth2","oidc","native-apps","oss","ssr","server-side-rendering","electron","openid","oauth","oauth-2.0","restful"]},"__N_SSG":true},"page":"/blog/authors/[author]","query":{"author":"juan-cruz-martinez"},"buildId":"L-8E-oNj-NJipGRZqMH3N","assetPrefix":"/blog","isFallback":false,"gsp":true,"customServer":true,"scriptLoader":[]}</script></body></html>